Lexicalについてや開発していることをつらつらと書く
はじめに
現在独自のエディタを作ろうとしているのですが、そのライブラリとしてLexicalを使用しています。
これが、初期状態は非常に簡素ですが、実装を進めればすすめるほど色々な機能を搭載できることが分かってきました。
なので、今回は Lexical でできる一部の紹介ができたらと思います。
ただ、結構量が膨大になってしまったのと、その割にはまとまっておらず上から順によんでもそれっぽいエディタを作ることはできません。
なので、読みにくい文章かもしれませんが、それでも目を通していただける方がいれば見ていただけますと幸いです。
なお、記事の中で使用している画像は引用元が記載していない場合、全て Lexical の公式サイトから引用しております。
でははじめます。
Lexical の概要
Lexical とは
Lexical とは Meta 社が提供している Javascript ベースのテキストエディタフレームワークです。
この Lexical は以下の特徴があります。
Lexical はエディタインスタンスに状態を持っており、任意の時間のデータを取り出すことができます。
WCAGに準拠して作られており、全ての人にとって使いやすい機能を提供しています。
Lexical は必要な機能だけ提供しているので、とても軽いです。
実際にドキュメントではコア機能のサイズは 22kb しかないと謳っています。
これは Lexical 自身はコンポーネントや各エディタ機能そのものを多く提供しているのではなく、あくまで上記につながるインターフェースを主に提供しているためです。
なお、機能によっては拡張したモジュールが Lexical から提供されているので、完全に一からエディタ機能を組む必要はありません。
とはいえ、コア機能についてはインターフェースを提供することが主となっており、そのおかげでかなり軽いものになっています。

Javascript ベースなので、Web ブラウザはもちろん対応していますが、iOS 用の Swift にも対応しています。
Android 系はいけるのか分かりませんでした。
Lexical は「Fast」の機能で説明したように、コア機能は必要最低限しか提供していません。
そのため、ライブラリに依存せずかなり自由に自分なりのエディタを構築することができます。
実際ドキュメントの Introduction にも以下のように記載があります。
Lexical allows developers to create unique text editing experiences that scale in size and functionality.
以上のことから、一通り機能がそろったものをサクッと使うのではなく、自由に改造したい場合は Lexical は第一候補になりそうです。
機能の特徴
Lexical は contentEditable な要素と接続します。
以降の画面動作は Lexical 提供の宣言型の API 経由で行われます。
それによって、DOM を直接書き換えることはほぼ必要なくなり、DOM 絡みのエッジケースを心配する必要がないです。
イメージは以下の画像の通りです。
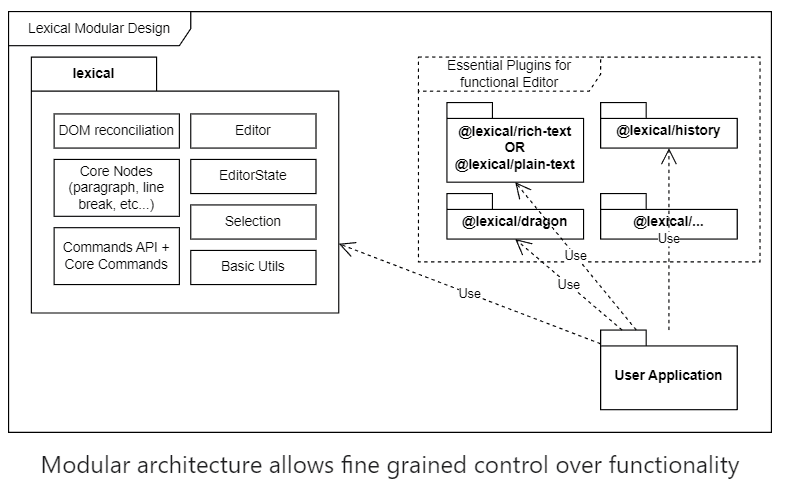
アプリケーションは Lexical が提供する機能は使いますが、この枠を飛び越えアプリケーションが直接 DOM とやり取りする必要は基本ないです。
使っている身としては、Lexical が言っていることに納得感はあります。
ただ、画面のここに出したいといった表示する位置を絶対値で定める時は Lexical の機能メインでやるのは厳しい印象です。
Lexical は contentEditable な要素と紐づいて状態を管理するので、その外の情報が欲しい場合は Lexical 以外の機能を使う必要があります。
とはいえ、外の情報を取得したらその値を Lexical 内の State に保存しておくことはできますし、エディタ機能に関してはほぼ Lexical の処理を使用して構築しています。
なので、ドキュメント記載の通りエディタ機能は Lexical 経由のみで実装するのが最適解だと思います。
先程 Lexical とアプリケーションの関係性を軽くみましたが、もう少し具体的なアプリケーションとの関係を見ていきます。
まずは以下の画面を見てください。
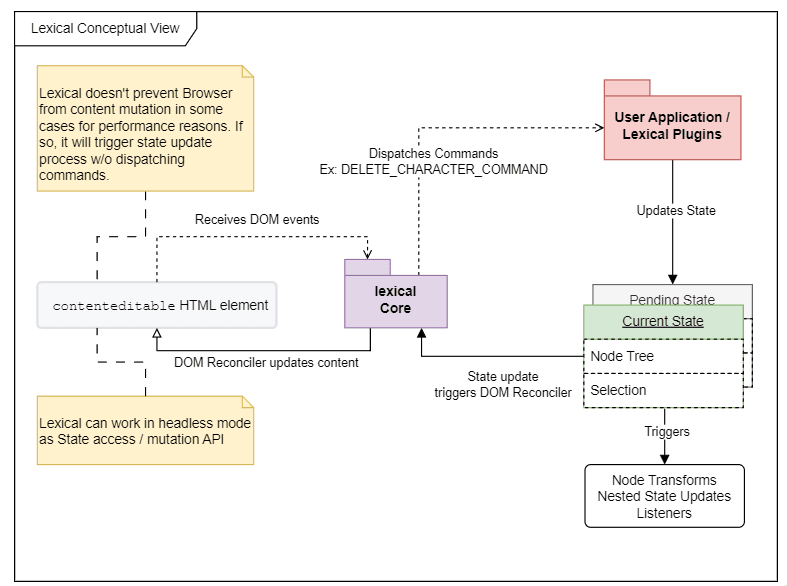
主な流れは以下の通りです。
①contentEditable な DOM でイベントが発火する
②Lexical がそのイベントを受け取る
③ イベントに紐づけ予め登録していた処理を実行する
④Lexical が管理している State を更新する
⑤④ の State が紐づいている DOM Reconciler の内容を更新します。
⑥DOM Reconciler に変更があれば、contentEditable な DOM の内容を更新します。
なお、DOM Reconciler は仮想 DOM と置き換えて上記を読んでもらっても問題ないと思っています。
ただし、ドキュメントで以下のように記載がある通り、完全に同一ではありません。
You can think of this as a kind-of virtual DOM, except Lexical is able to skip doing much of the diffing work, as it knows what was mutated in a given update.
エディタの内容を更新することに特化しており、それに関係ない差分については反映させる処理を行わないとしています。
とはいえ、エディタの内容に関わる差分については変更タイミングで DOM に反映されるので、流れとしては概ね仮想 DOM と認識していも理解を大きく誤ることはなさそうです。(間違えていたらすみません)
Lexical のコンセプト
すべての源:Editor instances
DOM のイベントから Lexical を経由し、最終的に DOM へ反映させる流れを見てきました。
この流れを構築するのに必要なのが、Editor instances です。
Editor instances を生成し、contentEditable な DOM を紐づけることで初めてこれまで説明した流れを設定することができます。
この Editor instances を作成するには Lexical が提供している createEditor API を使用します。
createEditor API を呼び出せる環境であれば React でなくても、Lexical を使用できます。
ただ、@lexical/reactモジュールを使えば、Lexical の使うために必要なインスタンスの作成など行ってくれるので、特別な事情がない限りは React で開発した方が簡単に必要な機能を使えそうです。
Lexical の核:Editor States
Editor instances によって、Lexical の核と言える Editor States を扱うことが可能になります。
Editor States はドキュメントに以下の記載があるように、Lexical において Editor Sates が信頼できる情報源となります。
With Lexical, the source of truth is not the DOM, but rather an underlying state model that Lexical maintains and associates with an editor instance.
なので、Lexical でデータを読み込んだり、書き込んだりすることは Editor States の情報を変更することと等しいです。
この、Editor States は大きく分けて以下の二つの情報をもっています。
①Lexical の Node ツリー
②Lexical の Selection オブジェクト
Node はエディタ内で構築される要素です。
イメージは以下のように各 HTML 要素一つが一つの Node として捉えています。
<div>
  <p>
    <span>Lexical</span>
  </p>
</div>
もちろん搭載できる機能は HTML とは全く違います。
ですが、Lexical でエディタを生成したらトップレベルで定義される RootNode をはじめとし、そこから入れ子構造で Node が組み立てられるのは HTML の構造に似ていると感じます。
Selection オブジェクトは現在選択しているテキストの情報や Node の情報を持っています。
これによって、文字を選択しているときにツールバーを表示させるなど、選択範囲に対する操作を行うことができます。
Editor States が持つ情報について確認しましたが、存在するフェーズについても確認します。
これについてもドキュメントには以下の記載があります。
- During an update they can be thought of as "mutable". See "Updating state" below to mutate an editor state.
- After an update, the editor state is then locked and deemed immutable from there on. This editor state can therefore be thought of as a "snapshot".
Lexical の構文内で更新処理をしている場合は操作可能となり、更新後は現在の状態をイミュータブルに保持しています。
Lexical の世界の中でしか Editor States は書き換えることができないので、Editor States は Lexical において現在の状態を正しく保持しているとみなせます。
ここまでで Editor States が保持する情報ととりうる状態を確認しました。
最後に Editor States の情報を取得したり、更新したりする際の手順を確認します。
ドキュメントにはもちろん様々な方法やオプションがありますが、とりあえず以下の点だけ把握しておけばざっくりと開発ができると思います。(実際はできず、私ができると勘違いしているだけかもしれませんが…。)
① 現在の Editor States を取得する時はgetEditorStateメソッドを呼び出す
② 更新処理をする時はupdateメソッドを呼び出す
③ 更新を検知して処理を実行したい場合はregisterUpdateListenerメソッドを定義する
④Lexical の便利な関数群はupdateメソッドかreadメソッド内でしか実行できない
具体的なコード例は後ほど実装例の時に記載しますが、ここでは便利な関数群についてみていきます。
Lexical では現在の Node を取得するであったり、Selection オブジェクトの情報の取得であったり、新しく Node を作るであったり、Editor States 内部の操作に対してい様々な機能が提供されています。
そして、それらは全て接頭辞として$が付与されています。
例えば以下のコードです。
import { $getRoot, $getSelection } from "lexical";
import { $createParagraphNode } from "lexical";
editor.update(() => {
  // Get the RootNode from the EditorState
  const root = $getRoot();
  // Get the selection from the EditorState
  const selection = $getSelection();
  // Create a new ParagraphNode
  const paragraphNode = $createParagraphNode();
  // Create a new TextNode
  const textNode = $createTextNode("Hello world");
  // Append the text node to the paragraph
  paragraphNode.append(textNode);
  // Finally, append the paragraph to the root
  root.append(paragraphNode);
});
Node を作成したり、Selection を取得していますね。
実際に開発すると、$がついた関数群は Lexical で開発する際に必須です。
これらがないと Lexical での開発は無理だと言っても過言ではないくらい、便利な関数達です。
ですが、これら関数は Lexical の update メソッドか read メソッドの中でしか使用できません。
それ以外では動作しないので、注意が必要です。
Lexical を使って今開発していることをつらつらと書く
ここからは実際に Lexical を使って開発をしていきます。
本当は順序だって記載していきたかったのですが、まとめる気力がわかず各節が微妙に独立している形になっています。
読みにくくて申し訳ございません。
なお、大枠に関しては以下の記事を参考に実装しています。
今回私が実装してくエディタは Next.js の App Router を使用しつつ、この記事を拡張したものになります。
記事内にある$wrapLeafNodesInElementsは現在の Lexical のバージョンでは使用されていません。
そのため、その部分に関して私は$setBlocksTypeを使い実装しています。
$wrapLeafNodesInElements との互換性があるかはわかりませんが、少なくとも同等の動きはします。
また、参考記事では SCSS でスタイルをあてていますが、今後のコードでは Tailwind CSS であったり、CSS Modules であったりを使用しています。
これは特に意図はなく、単純に試したことが混在しているだけで今後のリファクタリング対象になっています。
Markdown 変換のパターンを追加する
現状 Lexical は基本的な Markdown 変換には対応しており、そのまとまりとしてTRANSFORMERSという変数が提供されています。
ですが、場合によっては独自で Markdonw の変換パターンを追加したい場合があると思います。
その時の手順について確認します。
まず変換の種類ですが、ドキュメントを確認すると以下の 3 つがあります。
- Element transformer
- Text format transforme
- Text match transformer
正直厳密な違いは分かっていませんが、Element transformer はブロック単位での変換。
Text format transforme は Node の変換はせず、テキストのフォーマットのみを変換。
Text match transformer はテキストの一部を変換。
といった感じで区別しています。
基本的にはこれらの変換を定義し、それをプラグインへ登録する流れとなります。
ざっくりとして説明をしたので、現在私が実装しているコードを展開します。
import {
TRANSFORMERS,
TextMatchTransformer,
ElementTransformer,
} from "@lexical/markdown";
import { MarkdownShortcutPlugin } from "@lexical/react/LexicalMarkdownShortcutPlugin";
import {
$createImageNode,
$isImageNode,
ImageNode,
} from "./InserImagePlugin/node";
import {
$createCollapsibleContainerNode,
$isCollapsibleContainerNode,
CollapsibleContainerNode,
} from "./CollapsiblePlugin/container-node";
import {
$createCollapsibleContentNode,
$isCollapsibleContentNode,
CollapsibleContentNode,
} from "./CollapsiblePlugin/content-node";
import {
$createCollapsibleTitleNode,
$isCollapsibleTitleNode,
CollapsibleTitleNode,
} from "./CollapsiblePlugin/title-node";
import {
$createParagraphNode,
$createTextNode,
$isParagraphNode,
ElementNode,
LexicalNode,
} from "lexical";
import {
$createLinkPreviewNode,
$isLinkPreviewNode,
LinkPreviewNode,
} from "./LinkPreviewPlugin/node";
import {
$createMessageContentNode,
$isMessageContentNode,
MessageContentNode,
MessageTypes,
} from "./MessagePlugin/content-node";
import { Permutation } from "@/libs/utility-types";
import {
TableNode,
TableCellNode,
TableRowNode,
$isTableNode,
$createTableNode,
$createTableRowNode,
$createTableCellNode,
} from "@lexical/table";
import {
$isFigmaNode,
FigmaNode,
} from "./EmbedExternalSystemPlugin/FigmaPlugin/node";
import {
$isTweetNode,
TweetNode,
} from "./EmbedExternalSystemPlugin/TwitterPlugin/node";
export const IMAGE: TextMatchTransformer = {
dependencies: [ImageNode],
export: (node, exportChildren, exportFormat) => {
if (!$isImageNode(node)) {
return null;
}
return `})`;
},
importRegExp: /!(?:\[([^[]*)\])(?:\(([^(]+)\))/,
regExp: /!(?:\[([^[]*)\])(?:\(([^(]+)\))$/,
replace: (textNode, match) => {
const [, altText, src] = match;
const imageNode = $createImageNode({ src, altText, maxWidth: 800 });
textNode.replace(imageNode);
},
trigger: ")",
type: "text-match",
};
export const COLLAPSIBLE: ElementTransformer = {
dependencies: [
CollapsibleContainerNode,
CollapsibleContentNode,
CollapsibleTitleNode,
],
export: (node, exportChildren: (node: ElementNode) => string) => {
if (!$isCollapsibleContainerNode(node)) {
return null;
}
const titleNode = node.getFirstChild();
const contentNode = node.getLastChild();
if (
!$isCollapsibleTitleNode(titleNode) ||
!$isCollapsibleContentNode(contentNode)
) {
return null;
}
const title = exportChildren(titleNode);
const content = exportChildren(contentNode);
return ":::details " + title + "\n" + content + "\n:::";
},
replace: (parentNode: ElementNode, children: LexicalNode[], match) => {
const [all, title, content] = match;
const messageContainer = $createCollapsibleContainerNode(true);
const messageTitle = $createCollapsibleTitleNode().append(
$createTextNode(all.replace(":::details ", "").trim())
);
const messageContent = $createCollapsibleContentNode().append(
$createParagraphNode()
);
// childrenをParagraphNodeにラップしてmessageContentに追加
children.forEach((child) => {
if ($isParagraphNode(child)) {
messageContent.append(child);
} else {
const paragraphNode = $createParagraphNode();
paragraphNode.append(child);
messageContent.append(paragraphNode);
}
});
messageContainer.append(messageTitle, messageContent);
parentNode.replace(messageContainer);
},
regExp: /^[ \t]*:::details [\s\S]+(\w{1,10})?\s/,
type: "element",
};
export const MESSAGE: ElementTransformer = {
dependencies: [MessageContentNode],
export: (node, exportChildren: (node: ElementNode) => string) => {
if (!$isMessageContentNode(node)) {
return null;
}
return (
":::message " +
node.getMessageType() +
"\n" +
node.getTextContent() +
"\n:::"
);
},
replace: (parentNode: ElementNode, children: LexicalNode[], match) => {
const [all] = match;
const trimMathcText = all.replace(":::message ", "").trim();
const messageTypes: Permutation<MessageTypes> = ["alert", "warning", ""];
const targetMessageType = messageTypes.find(
(type) => type === trimMathcText
);
if (targetMessageType === undefined) {
return null;
}
const messageContent = $createMessageContentNode(targetMessageType);
parentNode.replace(messageContent);
},
regExp: /^[ \t]*:::message (\s|alert|warning)\s/,
type: "element",
};
export const LINK_CARD: ElementTransformer = {
dependencies: [LinkPreviewNode],
export: (node) => {
if (!$isLinkPreviewNode(node)) {
return null;
}
return "@[linkCard](" + node.getUrl() + ")";
},
replace: (node, children, match) => {
const [, url] = match;
const linkPreviewNode = $createLinkPreviewNode({ url });
node.replace(linkPreviewNode);
},
regExp: /@(?:\[linkCard\])(?:\(([^(]+)\))$/,
type: "element",
};
export const TABLE: ElementTransformer = {
dependencies: [TableNode, TableRowNode, TableCellNode],
export: (node) => {
if (!$isTableNode(node)) {
return null;
}
const separate = " | ";
const children = node.getChildren();
const childrenTexts = children.map((child) =>
child
.getTextContent()
.split("\n")
.map((val, index) => (index % 2 === 1 ? " | " : `${val}`))
);
const headerSeparete = [
...Array(childrenTexts[0].filter((i) => i !== separate).length),
]
.map(() => "----")
.join(separate);
const headerText = childrenTexts[0].join("");
const bodyTexts = childrenTexts.slice(1).map((val) => {
return `| ${val.join("")} |`;
});
const bodyText = bodyTexts.join("\n");
return `| ${headerText} |\n| ${headerSeparete} |\n${bodyText}`;
},
replace: (parentNode: ElementNode, children: LexicalNode[], match) => {
const [all] = match;
const createRowNum = Number(all.replace(/.*\|/gi, "").trim());
const tabeleCotent = all.trim().match(/^\|.*\|/gi);
if (!tabeleCotent) {
return;
}
const texts = tabeleCotent[0]
.replace(/^\|/, "")
.replace(/\|$/, "")
.split("|");
const tableNode = $createTableNode();
const tableRowNode = $createTableRowNode();
const tableCellNodes = texts.map((text) =>
$createTableCellNode(0).append(
$createParagraphNode().append($createTextNode(text.trim()))
)
);
tableCellNodes.forEach((cell) => {
tableRowNode.append(cell);
});
tableNode.append(tableRowNode);
for (let i = 1; i < createRowNum; i++) {
const tableRowNodeArterFirstRow = $createTableRowNode();
[...Array(tableCellNodes.length)].forEach((_) => {
tableRowNodeArterFirstRow.append(
$createTableCellNode(0).append($createParagraphNode())
);
});
tableNode.append(tableRowNodeArterFirstRow);
}
return parentNode.replace(tableNode);
},
regExp: /^\|.+\| (\s|[0-9]+)\s/g,
type: "element",
};
export const FIGMA: ElementTransformer = {
dependencies: [FigmaNode],
export: (node) => {
if (!$isFigmaNode(node)) {
return null;
}
return "@[figma](" + node.getTextContent() + ")";
},
// ここから下は一旦使わない
replace: (node, match) => {},
regExp: /figma/,
type: "element",
};
export const TWITTER: ElementTransformer = {
dependencies: [TweetNode],
export: (node) => {
if (!$isTweetNode(node)) {
return null;
}
return "----tweetEmbed----(" + node.getUrl() + ")";
},
// ここから下は一旦使わない
replace: (node, match) => {},
regExp: /twitter/,
type: "element",
};
export const TRANSFORMER_PATTERNS = [
FIGMA,
TWITTER,
IMAGE,
COLLAPSIBLE,
LINK_CARD,
MESSAGE,
TABLE,
...TRANSFORMERS,
];
export const MarkdownPlugin = () => {
return (
<MarkdownShortcutPlugin
transformers={TRANSFORMER_PATTERNS}
></MarkdownShortcutPlugin>
);
};
基本的な実装は以下に集約されます。
変換の設定を定義する
先程紹介した 3 つの Tranformer が Markdown 周りで、主に使うものになります。
export type ElementTransformer = {
  dependencies: 使用する想定のNode;
  export: Markdownとして出力したい時の変換処;
  regExp: 変換処理を走らせたい場合の正規表現;
  replace: regExpに該当するものをLexicalの要素に変換する;
  type: "element";
};
export type TextFormatTransformer = Readonly<{
  format: ReadonlyArray<TextFormatType>;
  tag: string;
  intraword?: boolean;
  type: "text-format";
}>;
export type TextMatchTransformer = Readonly<{
  dependencies: 使用する想定のNode;
  export: Markdownとして出力したい時の変換処;
  importRegExp: Markdonwをインポートする時に変換処理を走らせるための正規表現;
  regExp: 変換処理を走らせたい場合の正規表現;
  replace: regExpに該当するものをLexicalの要素に変換する;
  trigger: 変換処理を走らせる時の入力値;
  type: "text-match";
}>;
使う Lexical の要素を指定し、それらを検知する正規表現を作成します。
そして、正規表現と一致した時に変換する処理を定義し、Markdown に出力する時の処理も書いておきます。
後はMarkdownShortcutPluginの transformers 属性に値を追加するだけです。
実際に処理を実行するには、Node を作成するなど事前準備やお作法は理解しておく必要がありますが、大まかな流れは上記の通りです。
サンプルコードで一番分かりやすいのは LINK_CARD かなと思います。
export const LINK_CARD: ElementTransformer = {
  dependencies: [LinkPreviewNode],
  export: (node) => {
    if (!$isLinkPreviewNode(node)) {
      return null;
    }
    return "@[linkCard](" + node.getUrl() + ")";
  },
  replace: (node, children, match) => {
    const [, url] = match;
    const linkPreviewNode = $createLinkPreviewNode({ url });
    node.replace(linkPreviewNode);
  },
  regExp: /@(?:\[linkCard\])(?:\(([^(]+)\))$/,
  type: "element",
};
ここでは LinkPreviewNode を Markdown で扱うと定義し、export でマークダウンに変換する時の文字列を@[linkCard](LinkPreviewNodeがもつURL)になるようにしています。
replace では正規表現に一致した時、正規表現から抽出した値を使い LinkPreviewNode を作成し、元の Node に対して置き換えを行っています。
後は、変換のキーとなる正規表現を設定し、Element に対する変換処理だと分かるように type へelementを定義しています。
実装してみないと雰囲気は掴みにくいかもしれませんが、雰囲気がつかめたらやることは大体同じなので、意外と独自の Markdown を作成することは難しくないです。
以上が Markdonw に追加機能を搭載するコードの解説でした。
なお、TextMatchTransformer には importRegExp と regExp 属性があります。
importRegExp 属性については、$convertFromMarkdownStringから辿ると使われていることが確認できます。
なので、上記属性はおそらく Markdown をインポートして、Lexical の要素へ変換する時に使用されていそうです。
一方、regExp 属性はrunTextMatchTransformers関数で使用されており、これはエディタで Markdown 入力した時に一致するテキストがあれば、対象の要素に変換する処理をになっています。
なので、regExp 属性はエディタの入力の際に使用する想定ではないかと考えています。
正直なぜ、TextMatchTransformer だけインポート用と入力用で正規表現を設定しないといけないかはハッキリとは分かっていません。
分かる方がいらっしゃれば教えて欲しいです。よろしくお願いします。
最後にこの部分の実装でこんな感じの挙動が達成できることを示すために、デモをおいておきます。

色付き見出しの実装
先程のデモで最後に表示した色付きで先頭にアイコンを付与する Node の実装についてです。
主に実際の変換処理部分を担う Plugin 部分と表示の際に使用する Node 部分の実装をしています。
まずは Plugin 部分についてです。
import "./styles/style.module.css";
import { useLexicalComposerContext } from "@lexical/react/LexicalComposerContext";
import { mergeRegister } from "@lexical/utils";
import {
  $getSelection,
  $isRangeSelection,
  COMMAND_PRIORITY_LOW,
  createCommand,
} from "lexical";
import { useEffect } from "react";
import {
  $createMessageContentNode,
  $isMessageContentNode,
  MessageContentNode,
  MessageTypes,
} from "./content-node";
import { getSelectedNode } from "../../utils/getSelectedNode";
export const INSERT_MESSEAGE_COMMAND = createCommand<MessageTypes>();
export default function MessagePlugin(): null {
  const [editor] = useLexicalComposerContext();
  useEffect(() => {
    if (!editor.hasNodes([MessageContentNode])) {
      throw new Error(
        "MessagePlugin: MessageContentNode not registered on editor"
      );
    }
    return mergeRegister(
      editor.registerCommand(
        INSERT_MESSEAGE_COMMAND,
        (payload) => {
          editor.update(() => {
            const selection = $getSelection();
            if ($isRangeSelection(selection)) {
              const node = getSelectedNode(selection).getParentOrThrow();
              if ($isMessageContentNode(node)) {
                return node.replace($createMessageContentNode(payload));
              }
              selection.insertNodes([$createMessageContentNode(payload)]);
            }
          });
          return true;
        },
        COMMAND_PRIORITY_LOW
      )
    );
  }, [editor]);
  return null;
}
行っているのは、Editor States などの情報を持っているコンテキストに、実行コマンドを登録しています。
参考記事にもありますが、registerCommand で登録した処理は dispatchCommand を呼ぶことで実行できます。
結構融通が利くイベントハンドラー的な認識で私はいます。
registerCommand は第一引数にコマンド初期設定を定義します。
そして、具体的にコマンドの処理を第二引数に記載します。
第二引数の payload はコマンドの初期設定をする際に指定した型が入ってきます。
export const INSERT_MESSEAGE_COMMAND = createCommand<MessageTypes>();
今回でいうと MessageTypes 型が payload で受け取ることができます。
処理の内容については Selection が存在する場所が色付き見出しであるかないかで、処理を分けています。
色付き見出しでない場合は、キャレットが選択している段落に色付き見出しを挿入します。
色付き見出し上にいる場合は、色付き見出しの種類を変更します。
まあ、分岐的には同じものであっても置き換え処理は走るのですが、それは許容しています。
Plugin 部分を見たので、次は Node の定義をみていきます。
import {
  $applyNodeReplacement,
  $createLineBreakNode,
  $createParagraphNode,
  $createTextNode,
  $isTextNode,
  DOMConversionOutput,
  DOMExportOutput,
  EditorConfig,
  ElementNode,
  LexicalNode,
  ParagraphNode,
  RangeSelection,
  SerializedElementNode,
  Spread,
  TextNode,
} from "lexical";
import styles from "./styles/style.module.css";
export type MessageTypes = "" | "alert" | "warning";
type SerializedMessageContentNode = Spread<
  { messageType: MessageTypes },
  SerializedElementNode
>;
export class MessageContentNode extends ElementNode {
  _messageType: MessageTypes;
  static getType(): string {
    return "message-content";
  }
  static clone(node: MessageContentNode): MessageContentNode {
    return new MessageContentNode(node._messageType);
  }
  constructor(messageType?: MessageTypes, key?: string) {
    super(key);
    this._messageType = messageType ?? "";
  }
  createDOM(config: EditorConfig): HTMLElement {
    const dom = document.createElement("aside");
    dom.classList.add(styles.Message__content);
    if (this.getMessageType() === "alert") {
      dom.classList.add(styles.Message__content_alert);
    }
    if (this.getMessageType() === "warning") {
      dom.classList.add(styles.Message__content_warning);
    }
    return dom;
  }
  updateDOM(): boolean {
    return false;
  }
  exportDOM(): DOMExportOutput {
    const element = document.createElement("div");
    element.classList.add(styles.Message__content);
    element.setAttribute("data-lexical-message-content", "true");
    return { element };
  }
  static importJSON(
    serializedNode: SerializedMessageContentNode
  ): MessageContentNode {
    return $createMessageContentNode(serializedNode.messageType);
  }
  exportJSON(): SerializedMessageContentNode {
    return {
      ...super.exportJSON(),
      messageType: this.getMessageType(),
      type: "message-content",
      version: 1,
    };
  }
  getMessageType() {
    return this._messageType;
  }
  // 改行する時の挙動を制御
  insertNewAfter(
    selection: RangeSelection,
    restoreSelection = true
  ): null | ParagraphNode | MessageContentNode {
    const children = this.getChildren();
    const childrenLength = children.length;
    // 後ろ行二つが空に続いている状態で改行をした時の挙動を制御
    // Messageノードを解除して、新規のParagraphノードを挿入している
    if (
      childrenLength >= 2 &&
      children[childrenLength - 1].getTextContent() === "\n" &&
      children[childrenLength - 2].getTextContent() === "\n" &&
      selection.isCollapsed() &&
      selection.anchor.key === this.__key &&
      selection.anchor.offset === childrenLength
    ) {
      children[childrenLength - 1].remove();
      children[childrenLength - 2].remove();
      const newElement = $createParagraphNode();
      this.insertAfter(newElement, restoreSelection);
      return newElement;
    }
    const { anchor, focus } = selection;
    const firstPoint = anchor.isBefore(focus) ? anchor : focus;
    const firstSelectionNode = firstPoint.getNode();
    // 文字列が存在する時のEnterの挙動
    if ($isTextNode(firstSelectionNode)) {
      let node = firstSelectionNode;
      const insertNodes = [];
      while (true) {
        if ($isTextNode(node)) {
          insertNodes.push($createTextNode());
          const nextNode = node.getNextSibling<TextNode>();
          if (!nextNode) {
            break;
          }
          node = nextNode;
        } else {
          break;
        }
      }
      const split = firstSelectionNode.splitText(anchor.offset)[0];
      const x = anchor.offset === 0 ? 0 : 1;
      const index = split.getIndexWithinParent() + x;
      const codeNode = firstSelectionNode.getParentOrThrow();
      const nodesToInsert = [$createLineBreakNode(), ...insertNodes];
      codeNode.splice(index, 0, nodesToInsert);
      // キャメルを改行後の行に移行する
      const last = insertNodes[insertNodes.length - 1];
      if (last) {
        last.select();
      } else if (anchor.offset === 0) {
        split.selectPrevious();
      } else {
        split.getNextSibling()!.selectNext(0, 0);
      }
    }
    // 文字列がない行での改行した時の挙動を制御
    if ($isMessageContentNode(firstSelectionNode)) {
      const { offset } = selection.anchor;
      firstSelectionNode.splice(offset, 0, [$createLineBreakNode()]);
      firstSelectionNode.select(offset + 1, offset + 1);
    }
    return null;
  }
}
export function $createMessageContentNode(
  messageType?: MessageTypes
): MessageContentNode {
  return $applyNodeReplacement(new MessageContentNode(messageType));
}
export function $isMessageContentNode(
  node: LexicalNode | null | undefined
): node is MessageContentNode {
  return node instanceof MessageContentNode;
}
基本的に独自の Node を作る場合は、ElementNode・DecoratorNode・DecoratorBlockNodeを継承し、独自の定義を実装します。
どの Node を継承するかは自分の中でハッキリと使い分けはできていないのですが、要素としては単純な Node だが各操作に対しての処理を記載したい場合は ElementNode を使用しています。
一方で、DecoratorNode や DecoratorBloackNode は画面に表示させたい要素がかなり複雑で、コンポーネントを表示させるようにしたい場合に使用しています。
まあ、そこまで厳密には使い分けはできていないです。
Node の定義ができたら、その Node を作成する関数と、ガード関数を作成します。
基本的に自分独自の Node を定義する時は、Node クラスの定義、Node を作成する関数、ガード関数をセットで作ることが多いです。
Node 作成関数とガード関数は見たら分かると思うので、省略します。
Node 作成部分についてはお作法的なところだけ軽く触れます。
以下のメソッドは独自 Node を作成する時は定義します。
    static getType(){}
    static clone(node) {}
    createDOM() {}
    updateDOM(): boolean {}
    exportDOM(): DOMExportOutput {}
    static importJSON(serializedNode) {}
    exportJSON(){}
各役割は以下の通りです。
- static getType()
このメソッドは、カスタムノードの型を文字列で返します。この型は、エディタ内でノードを一意に識別するために使用されます。Lexical は、この型を使用してノードの作成、シリアライズ、デシリアライズを行います。getType()メソッドは、クラスの静的メソッドとして定義され、ノードの型を変更することはできません。 - static clone(node)
このメソッドは、既存のノードのクローンを作成します。ノードをコピーする際に使用されます。clone()メソッドは、元のノードと同じ型とプロパティを持つ新しいノードインスタンスを返します。これにより、ノードの状態を変更せずに、ノードのコピーを作成することができます。 - createDOM()
このメソッドは、ノードに対応する DOM エレメントを作成します。Lexical は、このメソッドを呼び出して、エディタ内でノードを表示するための DOM エレメントを生成します。createDOM()メソッドでは、ノードの種類に応じて適切な DOM エレメントを作成し、必要なクラス名やスタイルを設定します。 - updateDOM(): boolean
このメソッドは、ノードの状態が変更された際に、対応する DOM エレメントを更新するために呼び出されます。updateDOM()メソッドは、ノードの現在の状態と DOM エレメントの状態を比較し、必要に応じて DOM エレメントを更新します。このメソッドは、変更が行われた場合は true を、変更が不要な場合は false を返します。 - exportDOM(): DOMExportOutput
このメソッドは、ノードをシリアライズして DOM エレメントに変換する際に使用されます。exportDOM()メソッドは、ノードの現在の状態を表す DOM エレメントを作成し、そのエレメントを返します。このメソッドは、エディタの内容を HTML 形式でエクスポートする際に使用されます。 - static importJSON(serializedNode)
このメソッドは、シリアライズされたノードデータ(JSON 形式)からカスタムノードのインスタンスを作成するために使用されます。importJSON()メソッドは、シリアライズされたデータを受け取り、そのデータを元に新しいノードインスタンスを作成して返します。このメソッドは、エディタの状態を復元する際に使用されます。 - exportJSON()
このメソッドは、カスタムノードを JSON 形式にシリアライズするために使用されます。exportJSON()メソッドは、ノードの現在の状態を表す JSON オブジェクトを生成して返します。この JSON オブジェクトには、ノードの型、バージョン、プロパティなどの情報が含まれます。exportJSON()メソッドは、エディタの状態を保存する際に使用されます。
文字だけで見ると何のこっちゃという感じですが、実際に開発してみてソースコードを見てとやっていくと、なんとなくイメージがつかめます。
これらが作成できたら、使用する Node を定義しているリストに追加して、
export const nodes: Klass<LexicalNode>[] = [
  MessageContentNode,
  ...その他のNode,
];
Plugin を Lexical の初期設定コンポーネントの中に記載します。
<LexicalComposer initialConfig={initialConfig}>
  色々なプラグインは省略
  <MessagePlugin></MessagePlugin>
</LexicalComposer>
基本的な流れは上記の通りです。
コピペによるリンク変換からプレビューカードまでの実装
こちらの記事を大いに参考(かなりを丸パクリ)していますので、詳細は記載しません。
画像の貼り付け
ここもこちらの記事を大いに参考(かなりを丸パクリ)していますので、詳細は記載しません。
エディタの内容を HTML に変換する
Markdown 変換する処理については主にこの機能を達成するために実装しています。
具体的には以下の通りです。
"use client";
import { useLexicalComposerContext } from "@lexical/react/LexicalComposerContext";
import { $convertToMarkdownString } from "@lexical/markdown";
import { convertHtml } from "@/app/actions";
import { TRANSFORMER_PATTERNS } from "./MarkdownPlugin";
import PrimaryButton from "../../button/PrimaryButton";
import { useState } from "react";
export default function GenerateHtmlPlugin() {
  const [editor] = useLexicalComposerContext();
  // ローディング制御用のState
  const [isLoading, setIsLoading] = useState(false);
  // ボタンクリック時に実行
  const generateHtml = async () => {
    // ローディングを開始
    setIsLoading(() => true);
    // LexicalのEditor Statesを更新する
    editor.update(async () => {
      // 変換パターンに合わせてEditor StatesをMarkdownに変換する処理
      const markdown = $convertToMarkdownString(TRANSFORMER_PATTERNS);
      // サーバー側で動くconvertHtml関数を呼び出している
      convertHtml(markdown)
        .then(async (res) => {
          // クリックボードにHTMLのコードをコピー
          await global.navigator.clipboard.writeText(res);
          alert("クリップボードに保存しました");
        })
        .catch((e) => Promise.reject(e))
        .finally(() => {
          setIsLoading(() => false);
        });
    });
  };
  // HTML作成用ボタン
  return (
    <PrimaryButton onClick={generateHtml}>
      {isLoading ? "...実行中" : "ブログ用にHTML生成"}
    </PrimaryButton>
  );
}
ここで注目するのは$convertToMarkdownString関数だけです。
後はあまり Lexical と大きく関係ないです。
$convertToMarkdownString関数ですが、引数に ElementTransformer や TextMatchTransformer を渡すことで、予め export プロパティで定義した内容を実行してくれます。
そして、変換処理が終わった後の Markdown を返してくれます。
convertHtml 関数の処理は以下の通りです。
export async function convertHtml(markdown: string, isBlog: boolean = true) {
const pickNoSrcImgPattern = /<img(?=\s+alt)(?![\s>]*src)[\s\S]*? \/>/gi;
const pickBase64SourcePattern = /\(data:image\/[a-zA-Z0-9\+\/,;\=]+\)/gi;
const pickBase64Source = markdown.match(pickBase64SourcePattern);
const normalMessagePattern =
/:::message(?!\s+(?:warning|alert))\s*([\s\S]*?)\s*:::/g;
const normalMessageKey = "----normal----";
const normalMessages = markdown.match(normalMessagePattern);
let convertMarkDown = markdown
.replaceAll(normalMessagePattern, normalMessageKey)
.replaceAll(":::message warning", ":::message ");
const linkCardPattern = /@(?:\[linkCard\])(?:\(([^(]+)\))/gi;
const matchLinkCards = markdown.match(linkCardPattern);
const urls: string[] = [];
matchLinkCards?.forEach((val) => {
convertMarkDown = convertMarkDown.replace(val, `----focusUrl----`);
urls.push(val.replace(/@\[linkCard\]\(/gi, "").replace(/\)$/, ""));
});
const tweetPattern =
/----tweetEmbed----\(https?:\/\/(?:www\.)?(twitter|x)\.com\/(?:#!\/)?(?:\w+)\/status(?:es)?\/(\d+)\)/gi;
const matchTweets = convertMarkDown.match(tweetPattern);
const matchTweetIds = matchTweets?.map((t) =>
t
.replace(
/----tweetEmbed----\(https?:\/\/(?:www\.)?(twitter|x)\.com\/(?:#!\/)?(?:\w+)\/status(?:es)?\//,
""
)
.replace(")", "")
);
convertMarkDown = convertMarkDown.replaceAll(
/----tweetEmbed----\(https?:\/\/(?:www\.)?(twitter|x)\.com\/(?:#!\/)?(?:\w+)\/status(?:es)?\//gi,
"----tweetEmbed----"
);
let contentHtml = markdownToHtml(
isBlog ? addNewLinesInCode(convertMarkDown) : convertMarkDown
);
urls.forEach((val) => {
contentHtml = contentHtml.replace(
"<p>----focusUrl----</p>",
`<p><iframe class="hatenablogcard" style="width: 100%;height: 155px;max-width: 680px;border-style:none;"src="https://hatenablog-parts.com/embed?url=${val}"></iframe></p>`
);
});
normalMessages?.forEach((val) => {
const insertText = val
.replace(":::message \n", "")
.replace("\n:::", "")
.replaceAll("\n", "<br />");
contentHtml = contentHtml.replace(
`<p>${normalMessageKey}</p>`,
`<aside class="msg normal"><span class="msg-symbol">!</span><div class="msg-content"><p>${insertText}</p></aside>`
);
});
const pickNoSrcImg = contentHtml.match(pickNoSrcImgPattern);
pickBase64Source?.forEach((val, index) => {
if (pickNoSrcImg) {
contentHtml = contentHtml.replace(
pickNoSrcImg[index],
`${pickNoSrcImg[index].replace("/>", "")} src="${val.replace(
/\(|\)/gi,
""
)}" >`
);
}
});
matchTweetIds?.forEach((val, index) => {
if (!matchTweets) {
return;
}
const matchTweetUrl = matchTweets[index]
.replace("----tweetEmbed----(", "")
.replace(/\)$/gi, "");
contentHtml = contentHtml.replace(
`<p>----tweetEmbed----${val})</p>`,
`<div class="twitter-tweet twitter-tweet-rendered"
style="display: flex; max-width: 550px; width: 100%; margin-top: 10px; margin-bottom: 10px;position:relative;height: 300px;overflow-y:hidden;">
<a href="${matchTweetUrl}"
onMouseOut="this.style.opacity='0.8';" onMouseOver="this.style.opacity='0.6'"
target="_blank" rel="noopener noreferrer"
style="position: absolute;bottom: 0;width: 100%;height: 100px;background-color: #fff;opacity: 0.8;display: flex;align-items: center;justify-content: center;">
詳細を確認する
</a>
<iframe id="twitter-widget-0" scrolling="no" frameborder="0" allowtransparency="true" allowfullscreen="true"
class="tweet-iframe"
style="position: static; visibility: visible; width: 550px; height: 400%; display: block; flex-grow: 1;pointer-events: none;"
title="X Post"
src="https://platform.twitter.com/embed/Tweet.html?dnt=false&embedId=twitter-widget-0&features=e30%3D&frame=false&hideCard=false&hideThread=false&id=${val}&lang=en&origin=file%3A%2F%2Fwsl%24%2FUbuntu%2Fvar%2Fwww%2Fdocument-blog%2Ftest.html&theme=light&widgetsVersion=2615f7e52b7e0%3A1702314776716&width=550px"
data-tweet-id="${val}"></iframe>
</div>`
);
});
contentHtml = contentHtml.replaceAll(
'<p><span class="embed-block embed-youtube">',
'<p class="youtube-embed-warpper"><span class="embed-block embed-youtube">'
);
const html = `<style>${css}</style><div class='znc'>${contentHtml.replaceAll(
replaceWord,
"<br />"
)}</div>`;
return html;
}
const css = `@import url(https://fonts.googleapis.com/css?family=Noto+Sans+JP);p{margin-top:0;margin-bottom:0}h3{margin-top:0;margin-bottom:0}.znc{line-height:1.5;font-family:'Noto Sans JP',sans-serif!important}.znc>*:first-child{margin-top:0}.znc i,.znc cite,.znc em{font-style:italic}.znc strong{font-weight:700}.znc a{color:#0f83fd}.znc a:hover{text-decoration:underline}.znc ul,.znc ol{margin:.75rem 0;line-height:1.7}.znc ul>li,.znc ol>li{margin:.4rem 0}.znc ul ul,.znc ul ol,.znc ol ul,.znc ol ol{margin:.2em 0}.znc ul p,.znc ol p{margin:0}.znc ul{padding-left:1.8em}.znc ul>li{list-style:disc}.znc ul>li::marker{font-size:1.1em;color:#65717b}.znc ol{padding-left:1.7em}.znc ol>li{list-style:decimal;padding-left:.2em}.znc ol>li::marker{color:#65717b;font-weight:600;letter-spacing:-.05em}.znc .contains-task-list .task-list-item{list-style:none}.znc .task-list-item-checkbox{margin-left:-1.5em;font-size:1em;pointer-events:none}.znc h1{padding-bottom:.2em;font-size:1.7em;border-bottom:solid 1px #d6e3ed}.znc h2{padding-bottom:.3em;font-size:1.5em;border-bottom:solid 1px #d6e3ed}.znc h3{font-size:1.3em}.znc h4{font-size:1.1em}.znc h5{font-size:1em}.znc h6{font-size:.9em}@media screen and (max-width:576px){.znc h1{font-size:1.6em}.znc h2{font-size:1.4em}.znc h3{font-size:1.2em}.znc h4{font-size:1.1em}.znc h5{font-size:1em}.znc h6{font-size:.85em}}.znc hr{border-top:2px solid #d6e3ed;margin:2.5rem 0}.znc blockquote{font-size:.97em;margin:1.4rem 0;border-left:solid 3px #8f9faa;padding:2px 0 2px .7em;color:#65717b}.znc blockquote p{margin:1rem 0}.znc blockquote>:first-child{margin-top:0}.znc blockquote>:last-child{margin-bottom:0}.znc blockquote.twitter-tweet{display:none}.znc table{margin:.5rem auto;width:auto;border-collapse:collapse;font-size:.95em;line-height:1.5;word-break:normal;display:block;overflow:auto;-webkit-overflow-scrolling:touch}.znc th,.znc td{padding:.5rem;border:solid 1px #d6e3ed;background:#fff}.znc th{font-weight:700;background:#edf2f7}.znc code{padding:.2em .4em;background:rgba(33,90,160,.07);font-size:.85em;border-radius:4px;vertical-align:.08em}.znc code,.znc .code-block-filename{font-family:"SFMono-Regular",Consolas,"Liberation Mono",Menlo,monospace,"Apple Color Emoji","Segoe UI Emoji","Segoe UI Symbol","Noto Color Emoji";-webkit-font-smoothing:antialiased}.znc pre{margin:1.3rem 0;background:#1a2638;overflow-x:auto;-webkit-overflow-scrolling:touch;border-radius:4px;word-break:normal;word-wrap:normal;display:flex}.znc pre:after{content:"";width:8px;flex-shrink:0}.znc pre code{margin:0;padding:0;background:rgba(0,0,0,0);font-size:.9em;color:#fff}.znc pre>code{display:block;padding:1.1rem}@media screen and (max-width:576px){.znc pre>code{padding:1rem .8rem;font-size:.85em}}.znc .code-block-container{position:relative;margin:1.3rem 0}.znc .code-block-container pre{margin:0}.znc .code-block-filename{display:table;max-width:100%;background:#323e52;color:rgba(255,255,255,.9);font-size:12px;line-height:1.3;border-radius:4px 4px 0 0;padding:6px 12px 20px;margin-bottom:-16px}.znc .code-block-filename-container+pre{border-top-left-radius:0}.znc img:not(.emoji){display:table;max-width:100%;height:auto}.znc img+br{display:none}.znc img~em{display:block;margin:-1rem auto 0;line-height:1.3;text-align:center;color:#65717b;font-size:.92em}.znc a:has(img){display:table;margin:0 auto}.znc details{font-size:.95em;margin:1rem 0;line-height:1.7}.znc summary{cursor:pointer;outline:0;padding:.7em .7em .7em .9em;border:solid 1px #d6e3ed;color:var(--c-contrast);font-size:.9em;border-radius:14px;background:#fff}.znc summary::-webkit-details-marker{color:#65717b}.znc details[open]>summary{border-radius:14px 14px 0 0;box-shadow:none;background:#f1f5f9;border-bottom:none}.znc .details-content{padding:.5em .9em;border:solid 1px #d6e3ed;border-radius:0 0 14px 14px;background:#fff}.znc .details-content>*{margin:.5em 0}.znc span.embed-block{display:block;width:100%;margin:1.5rem 0}.znc .embed-slideshare,.znc .embed-speakerdeck,.znc .embed-codepen,.znc .embed-jsfiddle,.znc .embed-youtube,.znc .embed-stackblitz{padding-bottom:calc(56.25% + 38px);position:relative;width:100%;height:0}.znc .embed-slideshare iframe,.znc .embed-speakerdeck iframe,.znc .embed-codepen iframe,.znc .embed-jsfiddle iframe,.znc .embed-youtube iframe,.znc .embed-stackblitz iframe{position:absolute;top:0;left:0;width:100%;height:100%;border:none}.znc .embed-slideshare iframe{border:1px solid #d6e3ed}.znc .embed-jsfiddle iframe{border:1px solid #d6e3ed}.znc .embed-figma{border:1px solid #d6e3ed}.znc .zenn-embedded iframe{width:100%;display:block}.znc .zenn-embedded-link-card{margin:1rem auto}.znc .zenn-embedded-link-card iframe{height:125px}.znc .zenn-embedded-tweet,.znc .zenn-embedded-mermaid,.znc .zenn-embedded-github,.znc .zenn-embedded-gist{margin:1.5rem auto}.znc embed-katex:not([display-mode="1"]){display:inline-flex;overflow-x:auto;max-width:100%;-ms-overflow-style:none;scrollbar-width:none}.znc embed-katex:not([display-mode="1"])::-webkit-scrollbar{display:none}.znc embed-katex[display-mode="1"]{display:block;width:100%;overflow-x:auto}.znc pre[class*=language-]{position:relative}.znc .token.namespace{opacity:.7}.znc .token.comment,.znc .token.prolog,.znc .token.doctype,.znc .token.cdata{color:#94a1b3}.znc .token.operator,.znc .token.boolean,.znc .token.number{color:#ffc56d}.znc .token.attr-name,.znc .token.string{color:#ffc56d}.znc .token.entity,.znc .token.url,.znc .language-css .token.string,.znc .style .token.string{color:#ffc56d}.znc .token.selector{color:#ff8fa3}.znc .token.atrule,.znc .token.attr-value,.znc .token.keyword,.znc .token.important{color:#ff8fa3}.znc .token.deleted{color:#ff8fa3}.znc .token.inserted{color:#b4ff9b}.znc .token.deleted:not(.prefix){background:rgba(218,54,50,.2);color:inherit;display:block}.znc .token.prefix{user-select:none}.znc .token.inserted:not(.prefix){background:rgba(0,146,27,.2);color:inherit;display:block}.znc .token.coord{color:#aad4ff}.znc .token.regex,.znc .token.statement{color:#ffc56d}.znc .token.placeholder,.znc .token.variable{color:#fff}.znc .token.important,.znc .token.statement,.znc .token.bold{font-weight:700}.znc .token.punctuation{color:#939bc1}.znc .token.entity{cursor:help}.znc .token.italic{font-style:italic}.znc .token.tag,.znc .token.property,.znc .token.function{color:#38c7ff}.znc .token.attr-name{color:#ff8fa3}.znc .token.attr-value{color:#ffc56d}.znc .token.style,.znc .token.script{color:#ffc56d}.znc .token.script .token.keyword{color:#ffc56d}.znc aside.msg{display:flex;align-items:flex-start;margin:.5rem 0;padding:.75em 1em;border-radius:4px;background:#fff6e4;color:rgba(0,0,0,.7);font-size:.94em;line-height:1.6}.znc aside.msg.alert{background:#ffeff2}.znc aside.msg.normal{background:#e9f2ff}.znc aside.msg a{color:inherit;text-decoration:underline}.znc .msg-symbol{display:flex;align-items:center;justify-content:center;font-weight:700;width:1.4rem;height:1.4rem;border-radius:99rem;background-color:#ffb84c;color:#fff}.znc aside.msg.alert .msg-symbol{background-color:#ff7670}.znc aside.msg.normal .msg-symbol{background-color:#1d7afc}.znc .msg-content{flex:1;margin-left:.6em;min-width:0}.znc .msg-content>*{margin:.7rem 0}.znc .msg-content>*:first-child{margin-top:0}.znc .msg-content>*:last-child{margin-bottom:0}.znc .footnotes{margin-top:3rem;color:#65717b;font-size:.9em}.znc .footnotes li::marker{color:#65717b}.znc .footnotes-title{padding-bottom:3px;border-bottom:solid 1px #65717b;font-weight:700;font-size:15px}.znc .footnotes-list{margin:13px 0 0}.znc .footnote-item:target{background:#f1f5f9}.twitter-tweet>a{position:absolute;bottom:0;width:100%;height:100px;background-color:#fff;opacity:.8;display:flex;align-items:center;justify-content:center}.twitter-tweet>a:hover{opacity:.6}.youtube-embed-warpper{max-width:550px}.embed-figma{max-width:550px}`;
色々分かりづらいコードですが、とりあえず以下のことをやっています。
①zenn-editorの zenn-markdown-html で HTML 変換をしている
② 上記賄えない部分を独自で正規表現などを使い HTML 変換している
③zenn-content-cssを一部改変したものと生成した HTML コードをくっつけて返す
ちょっと周りくどいのと、Lexical には HTML コードへのエクスポート機能があります。
では、それを使用すれば良いと思うのは当然のことですが、特に独自で作った Node は自分で HTML 変換する際の要素を定義する必要があります。
ちょっとそれを面倒に思ったのと、コードブロックのスタイルをいい感じにすることができなかったため、Zenn の力を借りています。
将来的には Tailwind CSS も使いつつ、自前で賄えるようにしていきたいです。
既存の Editor States を反映する
Lexical は一度 Editor States を設定したら update メソッドを経由しないと基本的には値を変更はできません。
ですが、特定の値ではなく Editor States そのものを置き換えることは可能です。
その特性を活かし、編集画面にアクセスした時以前の内容を反映できるようにしています。
具体的な実装は以下の通りです。
import { getBlogJsonByPublicDir } from "@/app/actions";
import { useLexicalComposerContext } from "@lexical/react/LexicalComposerContext";
import { useEffect } from "react";
export const ImportPlugin = ({ postId }: { postId: string }) => {
  const [editor] = useLexicalComposerContext();
  useEffect(() => {
    getBlogJsonByPublicDir(postId)
      .then((res) => {
        const editorState = editor.parseEditorState(res ?? "");
        editor.setEditorState(editorState);
      })
      .catch(() => {
        alert("エラーによってインポートができませんでした");
      });
  }, []);
  return null;
};
export default ImportPlugin;
React ベースで開発していると、LexicalComposer コンポーネントで囲む必要があるので、null を返すようにしています。
また、getBlogJsonByPublicDir 関数は ID をもとに JSON ファイルを取得し、それを JSON.stringfy したものを返します。
parseEditorState メソッドは文字列を Lexical の Editor States に変換します。
最後に setEditorState メソッドで今開いている画面の Editor States を getBlogJsonByPublicDir 関数で取得したものに置き換えます。
Editor States は JSON 形式で保存できるため、データベースに JSON 文字列をそのまま保存もできますし、ストレージに JSON ファイルとして保存することもできます。
そのため、要件に合わせた保存方法を選択できるのは強みかなと感じています。
自動で保存するしくみを作成
前までは書いたら Ctr + s で保存ということをよくやっていたと思います。
今ももちろんその作業が完全になくなっているわけではないですが、大分減ったと思います。
Notion や Google ドキュメントなどは書いている内容を自動で保存してくれるためです。
となると都度保存ボタンを押さないといけないのは、今だと面倒になると思い自動で保存する機能を搭載しました。
実装は以下の通りです。
"use client";
import { storeContent } from "@/app/actions";
import { useLexicalComposerContext } from "@lexical/react/LexicalComposerContext";
import { $getRoot, EditorState } from "lexical";
import { useEffect, useRef } from "react";
let isFirst = true;
const AutoSavePlugin = ({ postId }: { postId: string }) => {
  const [editor] = useLexicalComposerContext();
  // settimeout関数を格納する
  const timer = useRef<NodeJS.Timeout | null>(null);
  useEffect(() => {
    // Editor Statesが更新されたタイミングで処理が走るように登録しておく
    return editor.registerUpdateListener(({ editorState }) => {
      /**
       * 最新のEditor Stateで処理を行う
       * Editor Statesは更新する予定はないが、Lexicalのユーティリティ関数を使用した
       * よって、readメソッドを使っている
       */
      editorState.read(() => {
        // 最初に画面を開いた時は自動で保存することをさけるため
        if (isFirst) {
          isFirst = false;
          return;
        }
        // 登録しているsettimeout関数の処理があれば削除する
        if (timer.current) {
          clearTimeout(timer.current);
        }
        // refにsettimeout関数を代入する
        timer.current = setTimeout(async () => {
          // Elasticsearchなどで検索する用のテキストを作成
          const editorStateTextString = createTextForSearch(editorState);
          // サーバー側での処理。今回はディレクトリにJSONファイルとtxtファイルを書き込んでいる
          await storeContent(
            editorState.toJSON(),
            editorStateTextString,
            postId
          );
        }, 3000);
      });
    });
  }, [editor]);
  const createTextForSearch = (state: EditorState) => {
    // 現在のEditor StatesをJSON文字列にする
    const stringifiedEditorState = JSON.stringify(state.toJSON());
    // 文字列からEditor Statesを作成
    const parsedEditorState = editor.parseEditorState(stringifiedEditorState);
    // テキスト検索用のファイルを作成
    return parsedEditorState.read(() => $getRoot().getTextContent());
  };
  return null;
};
export default AutoSavePlugin;
自動保存機能自体は Lexical の内容はほぼ使用していないです。
ただ、文字が入力されたタイミング(≒Editor States が更新されたタイミング)で処理が走って欲しいため、registerUpdateListener メソッドを使ってハンドラーを登録しています。
また、今回は Editor States の内容を更新したいわけではなく、Editor States の内容を使用したいだけなので、read メソッドを使用しています。
肝心の自動保存機能自体は以下の部分です。
// 登録しているsettimeout関数の処理があれば削除する
if (timer.current) {
  clearTimeout(timer.current);
}
// refにsettimeout関数を代入する
timer.current = setTimeout(async () => {
  // Elasticsearchなどで検索する用のテキストを作成
  const editorStateTextString = createTextForSearch(editorState);
  // サーバー側での処理。今回はディレクトリにJSONファイルとtxtファイルを書き込んでいる
  await storeContent(editorState.toJSON(), editorStateTextString, postId);
}, 3000);
registerUpdateListener メソッドは文字が入力されたタイミングで都度処理が実行されます。
となると、文字を数文字入力しただけで同じ回数保存処理が実行されてしまいます。
保存するという目的は達成しているものの、入力の度処理が実行されるのは少々過剰です。
そこで、setTimeout 関数と useRef を使い入力が終わってから 3 秒後に一回保存処理が走るようにしています。
仕組みとしては、登録した setTimeout 関数を useRef に設定し、useRef に登録した setTimeout 関数があった場合、登録自体を無くすようにしています。
これによって、最後に入力した setTimeout 関数しか登録された状態になっていないので、リクエストが一回で済みます。
後は setTimeout 関数内でサーバー側に JSON とテキストを渡し、それを元にファイルに書き込んでいます。
以上で自動保存の仕組みができます。
意外とフロント側でやることはないので、気軽に設定できます。
Lexical で開発したいときの手順
Lexical は 2024 年 6 月中旬時点でバージョンが 0.16.0 とメジャーバージョンになっておりません。
すなわち、まだまだ変更が大いになされる可能性が高いです。
そのためか、お世辞にもドキュメントは充実しているとは言えません。
基本的なことは書いていますが、発展的な内容についてはソースコードのリンクだけで中身の説明がないこともあります。
なので、Lexical を触る時はドキュメントではなく、プレイグラウンドを触って見ることをお勧めします。
プレイグラウンドで気になる機能があれば、GitHub のlexical-playground内に該当しそうなコードを探すようにすれば、思っているよりもすんなり実装できます。
ドキュメントも不十分で、日本語の記事も豊富とは言えない(とはいえ数少ない日本語の記事は素晴らしいものばかりですが)ので、基本的にはプレイグラウンドとそれに該当するコードを読んでいく開発方法をお勧めします。
おわりに
今回は Lexical についての概要を簡単に見ていき、実装の一部を紹介していきました。
特に実装部分はところどころ省略している部分があったり、前提条件がちゃんと共有せずに書いている部分もあります。
記事としてはあまり完成度が高くなく恐縮ですが、少しでも Lexical の可能性を感じてもらえたら幸いです。
一応実装しているリポジトリも共有しておくので、気になったら覗いてもらえる幸いです。
Lexical の実装についてはnextjs-lexical/src/app/_components/lexicalにあります。
ここまで読んでいただきありがとうございました。
参考資料
Meta の新しいリッチテキストエディターフレームワーク Lexical を調べる
Lexical の日本語記事において最も有用な記事の一つ。ただでさえ日本語の文献が少ない中で、このレベルの記事があるのは投稿者に感謝しかないです。
Meta の新しいリッチテキストエディターフレームワーク Lexical を調べる(実践編)
上と同じ投稿者で、神記事 Part2 です。私が作っているエディタはこの記事の拡張版になります。
ドキュメント


Discussion