社内でFlutterハンズオン勉強会をしてみた
勉強会で作成したアプリ
先日、社内でFlutterをハンズオン形式で勉強会をやってみましたので、その内容をここにまとめておきたいと思います。
- Flutterをがっつり教えてあげる時間はないけど、1日くらいは時間が取れそう
- Flutterを触ったことない人に教えたい
今回がまさにそんなシチュエーションでもありましたので、同じような境遇の方の参考になれば幸いです。
※本記事は技術解説記事ではありません。
勉強会開催の経緯
私が今の職場を近々退職予定。退職前にFlutterを伝授しておく機会を設けたかった。
特に状態管理ライブラリとしてよく利用されているRiverpodは初見で理解することは難しいので、僕がいなくなる前に一度触れる機会を設けておく必要がありました。
メンバー構成
僕の他に若手アプリエンジニアが1名。組み込み系エンジニアが2名の計3名に説明。
メンバーの熟練度は様々で、
- 若手アプリエンジニアはFlutterはある程度扱える
- 組み込みエンジニアのうち1名は個人でアプリ開発(SwiftUI)を学習しており、こちらは理解度十分な感じ
- もう1人はアプリ開発未経験
アプリ開発未経験のメンバーがいることから、今回はFlutterの初歩から説明することにしました。
勉強会環境
- 自分が会社のWindows PC, 一人が自Macbook, 一人が会社のMac mini、若手アプリエンジニアにはサポートで入ってもらった。
- 席は隣同士で実施。Teamsのビデオ通話で自分の画面を映し、コードを打ちながら説明。
参加者にもコードを打ってもらいながら進めた。 - 開発はVSCodeで、動作確認はそれぞれシミュレータを起動して確認。
単に説明を聞くだけの勉強会ではなく、実践を通して覚えてもらいました。
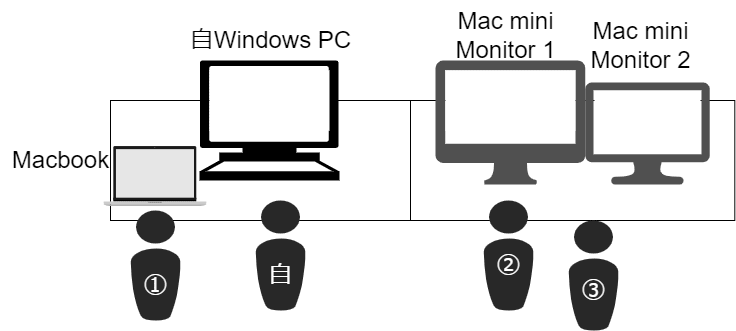
勉強会配置図
- ①アプリ開発(SwiftUI)学習者:自Macbook使用
- ②未経験者:Mac mini使用
- ③Flutter経験者:②のサポート
お互いの画面がすぐに確認できるような環境で行いました。
PCが確保できない場合は、モブプログラミングのような形で進めるのも良いかもしれませんね。
事前準備
開発効率向上のため、事前にFlutterのインストールに加え、以下を準備してもらいました。
VSCode拡張機能をインストール
こちらの「VSCode Extensions for Flutter Development」をインストールしてもらいました。
コードスニペット(dart.json)の設定
こちらにまとめているコードスニペットを設定してもらいました。
今後も効率よく開発を進めてもらえるよう、自分も普段使うコードスニペットはなるべく説明中にも使うようにしました。
説明したこと
- プロジェクト作成方法
- Flutter StatefulWidgetとStatelessWidgetの違いについて
- 主要なWidgetについて
- Widget構築に関する開発Tips
- Dartの基本文法・命名規則について
- 状態管理ライブラリRiverpodの説明
- RiverpodのTipsをはさむ
順にまとめていきます。
1. プロジェクト作成方法
以下のコマンドではじめからパッケージ名を指定してプロジェクトを作成できます。
flutter create --org com.example riverpod_counter_app
--org以下にパッケージ名、つづいてプロジェクト名を入力できます。
2. Flutter StatefulWidgetとStatelessWidgetの違いについて
プロジェクト作成時にあるサンプルのカウンターアプリを例に、StatefulWidgetとStatelessWidgetの違いについて簡単に説明。
setStateを使って状態更新を伝えてあげることで、画面がリビルド(再構築)されるんですよ~など。
3. 主要なWidgetについて
プロジェクト作成時のサンプルのカウンターアプリを改造しながら下記の使い方を覚えてもらいました。
- Row, mainAxisAlignment
- Column
- child, children
- ElevatedButton, TextButton, IconButton

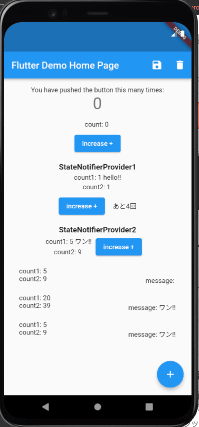
アプリイメージ
見た目は残念なアプリですが、今回は使い方が分かればいいので。
この時点ではカウント部やメッセージ部はハードコードで実装。
後のRiverpodの学習で実装していくことにしました。
カウンターページのサンプルコードです。
カウンターページサンプルコード
import 'package:flutter/material.dart';
class CounterPage extends StatefulWidget {
const CounterPage({super.key, required this.title});
final String title;
State<CounterPage> createState() => _CounterPageState();
}
class _CounterPageState extends State<CounterPage> {
var _counter = 0;
void _incrementCounter() {
setState(() {
_counter++;
});
}
Widget build(BuildContext context) {
return Scaffold(
appBar: AppBar(
title: Text(widget.title),
actions: [
IconButton(
onPressed: () {},
icon: const Icon(Icons.save),
),
IconButton(
onPressed: () {},
icon: const Icon(Icons.delete),
),
],
),
body: Center(
child: Padding(
padding: const EdgeInsets.all(16.0),
child: Column(
mainAxisAlignment: MainAxisAlignment.start,
children: <Widget>[
const Text(
'You have pushed the button this many times:',
),
Text(
'$_counter',
style: Theme.of(context).textTheme.headline4,
),
const SizedBox(height: 16),
// 自分で作成したカウンター
..._buildCounterByStateProvider(),
const SizedBox(height: 16),
..._buildCounterByStateNotifierProvider1(
'StateNotifierProvider1'),
const SizedBox(height: 16),
..._buildCounterByStateNotifierProvider2(
'StateNotifierProvider2'),
const SizedBox(height: 16),
],
),
),
),
floatingActionButton: FloatingActionButton(
onPressed: _incrementCounter,
tooltip: 'Increment',
child: const Icon(Icons.add),
),
);
}
List<Widget> _buildCounterByStateProvider() {
return [
const Text('count: 0'),
const SizedBox(height: 8),
Row(
mainAxisAlignment: MainAxisAlignment.center,
children: [
ElevatedButton(
onPressed: () {},
child: const Text('increase +'),
),
],
)
];
}
List<Widget> _buildCounterByStateNotifierProvider1(String title) {
return [
Text(
title,
style: const TextStyle(
fontSize: 16.0,
fontWeight: FontWeight.bold,
),
),
const SizedBox(height: 4),
const Text('count1: 0'),
const SizedBox(height: 4),
const Text('count2: 0'),
const SizedBox(height: 8),
Row(
mainAxisAlignment: MainAxisAlignment.center,
children: [
ElevatedButton(
onPressed: () {},
child: const Text('increase +'),
),
const SizedBox(width: 16),
],
),
];
}
List<Widget> _buildCounterByStateNotifierProvider2(String title) {
return [
Text(
title,
style: const TextStyle(
fontSize: 16.0,
fontWeight: FontWeight.bold,
),
),
Row(
mainAxisAlignment: MainAxisAlignment.center,
children: [
Column(
children: const [
SizedBox(height: 4),
Text('count1: 1'),
SizedBox(height: 4),
Text('count2: 1'),
SizedBox(height: 8),
],
),
const SizedBox(width: 8),
ElevatedButton(
onPressed: () {},
child: const Text('increase +'),
),
const SizedBox(width: 16),
],
),
];
}
}
4. Widget構築に関する開発Tips
一人で学習していては覚えづらい下記のTipsにも触れておきました。
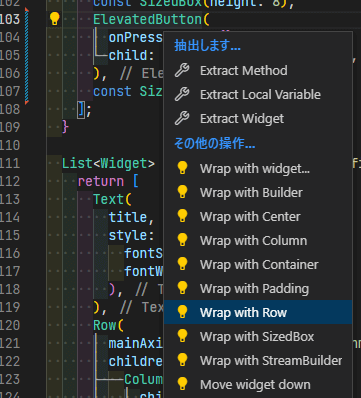
-
VSCodeクイックFixの活用
command + . (windowsはctrl + .)で、ウィジェットをラップして作成したり(Wrap With~~)、メソッドやクラスを作成することができる。
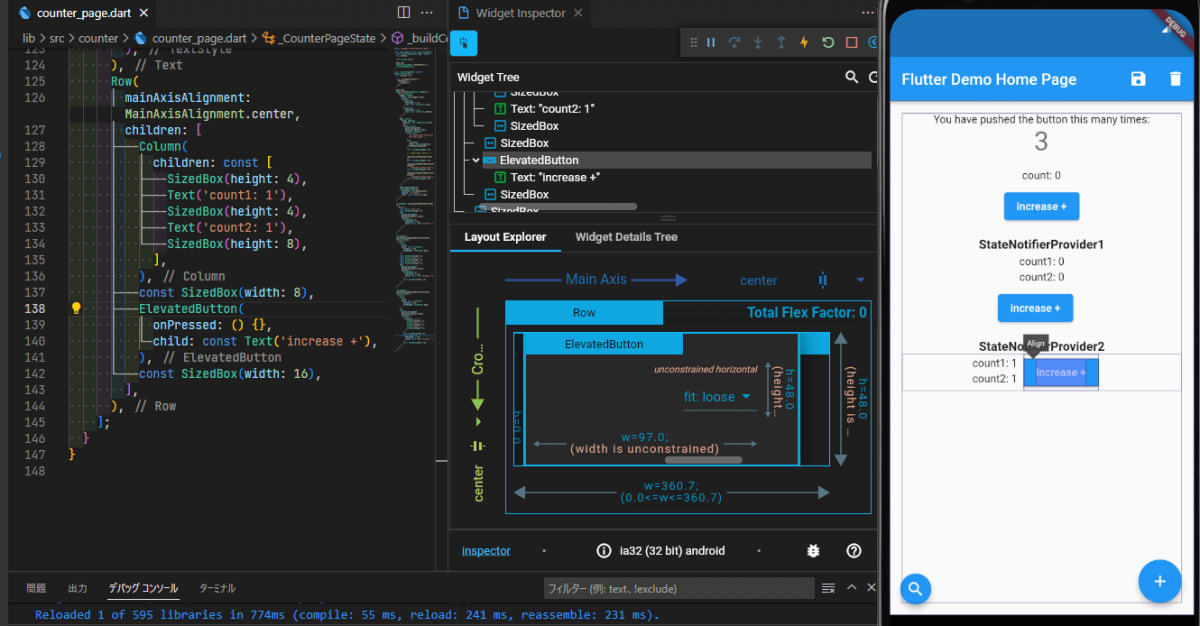
-
Widget InspecterでWidgetのコード該当箇所が分かる
-
,は最後の行にも打てる。自動整形できれいに縦に整列できるので、最後の行にも打つべし。
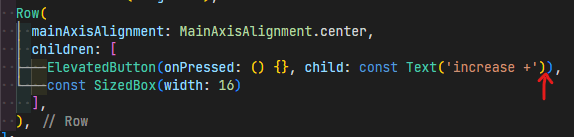
Before
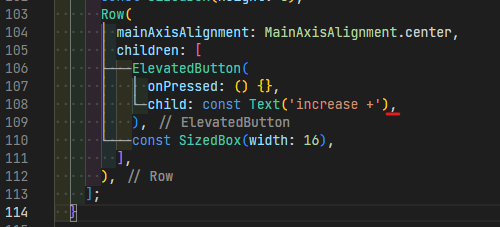
After
5. Dartの基本文法・命名規則について
下記のようなことをおさえました。
- 変数宣言時に値を代入した場合、型を省略できる。
var _counter = 0; - Dartの命名規則は公式のEffective Dart: Styleにまとめられている。たとえば、ファイル名はsnake_case。クラス名はUpperCamelCase、privateスコープ以外には先頭に_(アンダースコア)をつけてはいけないなど。遵守しないとエディタ上に警告が出るため、基本的にはこれに従えば良い。
- スプレッド構文(...)について
https://flutterzero.com/spread-operator/#index_id1 - 文字列中に変数の内容を表示したいときは、
$,${}
6. 状態管理ライブラリRiverpodの説明
ここからはRiverpodを導入して、StatefulWidgetで実現していたようなカウンターアプリをRiverpodでも実現できるようにしていきました。
仕様は下記のような感じ。
この実践を通して、下記のようなことをおさえました。
- Provider, StateProvider, StateNotifierなどそれぞれのProviderを使いながら説明
https://riverpod.dev/ja/docs/concepts/providers - Riverpodを活用することのメリットについて
画面と切り離して状態管理することで、様々な場所から状態にアクセスできるようになる、など。 - factoryメソッドについて
- Providerを組み合わせてみる
https://riverpod.dev/ja/docs/concepts/combining_providers - ローカルDBを扱うリポジトリクラスのProviderを作成してみる
-
ref.refreshの使って、ローカルDBからデータを再取得する - 非同期処理後のステート更新は、mountedの確認が必要であること
- 非同期処理Futureの説明
FutureProvider、StreamProviderまで触れるとキャパオーバーだと感じ、日を改めて学習の機会を設けることにしました。
Provider, StateProvider, StateNotifierを実践したサンプルコードです。
main.dart
import 'package:env/src/counter/counter_page.dart';
import 'package:env/src/counter/counter_repository.dart';
import 'package:flutter/material.dart';
import 'package:hive_flutter/hive_flutter.dart';
import 'package:hooks_riverpod/hooks_riverpod.dart';
Future<void> main() async {
// ここでawait使う場合は必要
WidgetsFlutterBinding.ensureInitialized();
/// ローカルDBの初期化処理です。
await Hive.initFlutter();
await Hive.openBox<dynamic>(kCounterRecordBoxName);
runApp(
const ProviderScope(
child: MyApp(),
),
);
}
class MyApp extends StatelessWidget {
const MyApp({Key? key}) : super(key: key);
Widget build(BuildContext context) {
return MaterialApp(
title: 'Flutter Demo',
theme: ThemeData(
primarySwatch: Colors.blue,
),
home: const CounterPage(title: 'Flutter Demo Home Page'),
);
}
}
counter_notifier.dart
各Providerの構成
- StateProviderが
counterStateProvider0を - StateNotifierが
counterStateProvider1を - Providerを組み合わせてみて実現したのが、
counterResponseProvider - StateNotifierとローカルDBを扱うリポジトリクラスのProviderを組み合わせたのが、
counterStateProvider2
となっています。
import 'package:hooks_riverpod/hooks_riverpod.dart';

import 'counter_repository.dart';
import 'counter_state.dart';

///
/// StateProvider - ひとつの状態を保持、変更できます。
///
final counterStateProvider0 = StateProvider<int>((ref) {
  return 0;
});

///--------------------------------------------------------------------------------------

///
/// StateNotifierProvider - 複数の状態(ここではCounterStateクラスの各フィールド)を保持、変更できます。
///
final counterStateProvider1 =
    StateNotifierProvider.autoDispose<CounterNotifier1, CounterState>(
  (ref) => CounterNotifier1(),
);

class CounterNotifier1 extends StateNotifier<CounterState> {
  CounterNotifier1() : super(CounterState.empty());

  void increase() {
    state = state.copyWith(
      // *idを更新しないと同じレコードを更新することになります。
      id: DateTime.now().toIso8601String(),
      count1: state.count1 + 1,
      count2: state.count2 + 2,
    );

    state = state.copyWith(
      message: state.count1 % 5 == 0 ? 'ワン!!' : '',
    );
  }
}

///
/// Provider
/// - 外部からは変更できない状態を管理します。
/// 他のProviderをwatchして、データ変換したり、
/// メソッドを実行したりします(CounterRepository参照)。
///
final counterResponseProvider = Provider.autoDispose<String>((ref) {
  final counterState = ref.watch(counterStateProvider1);

  return 'あと${5 - counterState.count1 % 5}回';
});

///--------------------------------------------------------------------------------------

///
/// StateNotifierProvider + Repositoryで永続化
///
final counterStateProvider2 =
    StateNotifierProvider.autoDispose<CounterNotifier2, CounterState>(
  (ref) => CounterNotifier2(
    ref,
    // 下記のように特定のProviderを指定してしまう方法もアリ
    // ref.read(counterRepositoryProvider),
  ),
);

class CounterNotifier2 extends StateNotifier<CounterState> {
  CounterNotifier2(
    this._ref,
    // this._repository,
  ) : super(CounterState.empty());

  final AutoDisposeStateNotifierProviderRef _ref;
  // final CounterRepositoryBase _repository;

  void increase() {
    state = state.copyWith(
      count1: state.count1 + 1,
      count2: state.count2 + 2,
    );

    state = state.copyWith(
      message: state.count1 % 5 == 0 ? 'ワン!!' : '',
    );
  }

  Future<bool> trySave() async {
    if (state.message == 'ワン!!') {
      await _ref.read(counterListRepositoryProvider).save(state);
      // _repository.save(state);
      return true;
    }

    return false;
  }

  Future<void> deleteAll() async {
    await _ref.read(counterListRepositoryProvider).deleteAll();
    // _repository.deleteAll();
  }
}
counter_state.dart
import 'dart:convert';
import 'package:flutter/cupertino.dart';
import 'package:flutter/foundation.dart';
/// Dart Data Class Generatorを使うと楽に生成できます。
class CounterState {
final String id;
final int count1;
final int count2;
final String message;
const CounterState({
required this.id,
required this.count1,
required this.count2,
required this.message,
});
/// factoryメソッドを使って初期化 ※このクラスに初期値の知識が集約できる
factory CounterState.empty() {
return CounterState(
id: DateTime.now().toIso8601String(),
count1: 1,
count2: 1,
message: 'hello!!',
);
}
CounterState copyWith({
String? id,
int? count1,
int? count2,
String? message,
}) {
return CounterState(
id: id ?? this.id,
count1: count1 ?? this.count1,
count2: count2 ?? this.count2,
message: message ?? this.message,
);
}
Map<String, dynamic> toMap() {
return {
'id': id,
'count1': count1,
'count2': count2,
'message': message,
};
}
factory CounterState.fromMap(Map<String, dynamic> map) {
return CounterState(
id: map['id'] ?? '',
count1: map['count1']?.toInt() ?? 0,
count2: map['count2']?.toInt() ?? 0,
message: map['message'] ?? '',
);
}
String toJson() => json.encode(toMap());
factory CounterState.fromJson(String source) =>
CounterState.fromMap(json.decode(source));
String toString() {
return 'CounterState(id: $id, count1: $count1, count2: $count2, message: $message)';
}
bool operator ==(Object other) {
if (identical(this, other)) return true;
return other is CounterState &&
other.id == id &&
other.count1 == count1 &&
other.count2 == count2 &&
other.message == message;
}
int get hashCode {
return id.hashCode ^ count1.hashCode ^ count2.hashCode ^ message.hashCode;
}
}
counter_page.dart
import 'package:env/src/counter/counter_notifier.dart';
import 'package:env/src/counter/counter_repository.dart';
import 'package:flutter/material.dart';
import 'package:hooks_riverpod/hooks_riverpod.dart';
class CounterPage extends StatefulHookConsumerWidget {
const CounterPage({super.key, required this.title});
final String title;
ConsumerState<ConsumerStatefulWidget> createState() => _CounterPageState();
}
class _CounterPageState extends ConsumerState<CounterPage> {
int _counter = 0;
void _incrementCounter() {
setState(() {
_counter++;
});
}
Widget build(BuildContext context) {
return Scaffold(
appBar: AppBar(
title: Text(widget.title),
actions: [
IconButton(
onPressed: () async {
final isSuccess =
await ref.read(counterStateProvider2.notifier).trySave();
/// *非同期処理後に画面の更新する際はmountedの確認が必要です。
if (mounted) {
if (isSuccess) {
// *リストを更新するためにProviderに更新を指示します。
ref.refresh(counterListStateProvider);
// ↓こっちでもいけました。
// ref.refresh(counterListRepositoryProvider);
} else {
ScaffoldMessenger.of(context).showSnackBar(
const SnackBar(
content: Text('保存に失敗しました。'),
),
);
}
}
},
icon: const Icon(Icons.save),
),
IconButton(
onPressed: () async {
await ref.read(counterStateProvider2.notifier).deleteAll();
ref.refresh(counterListStateProvider);
},
icon: const Icon(Icons.delete),
),
],
),
body: Center(
child: Padding(
padding: const EdgeInsets.all(16.0),
child: Column(
mainAxisAlignment: MainAxisAlignment.start,
children: <Widget>[
const Text(
'You have pushed the button this many times:',
),
Text(
'$_counter',
style: Theme.of(context).textTheme.headline4,
),
const SizedBox(height: 16),
// 自分で作成したカウンター
..._buildCounterByStateProvider(),
const SizedBox(height: 16),
..._buildCounterByStateNotifierProvider1(
'StateNotifierProvider1'),
const SizedBox(height: 16),
..._buildCounterByStateNotifierProvider2(
'StateNotifierProvider2'),
const SizedBox(height: 16),
const CounterLog(),
],
),
),
),
floatingActionButton: FloatingActionButton(
onPressed: _incrementCounter,
tooltip: 'Increment',
child: const Icon(Icons.add),
),
);
}
List<Widget> _buildCounterByStateProvider() {
// Providerを読み取ります。
// `.notifier` を付けなければ、 `state` つまり int が取得できます。
final counterState = ref.watch(counterStateProvider0);
return [
Text('count: $counterState '),
const SizedBox(height: 8),
Row(
mainAxisAlignment: MainAxisAlignment.center,
children: [
ElevatedButton(
// `.notifier` を付けると `StateController` が取得できます。
onPressed: () => ref
.read(counterStateProvider0.notifier)
.update((state) => state + 1),
child: const Text('increase +'),
),
],
)
];
}
List<Widget> _buildCounterByStateNotifierProvider1(String title) {
final counterState = ref.watch(counterStateProvider1);
final counterResponse = ref.watch(counterResponseProvider);
return [
Text(
title,
style: const TextStyle(
fontSize: 16.0,
fontWeight: FontWeight.bold,
),
),
const SizedBox(height: 4),
Text('count1: ${counterState.count1} ${counterState.message}'),
const SizedBox(height: 4),
Text('count2: ${counterState.count2} '),
const SizedBox(height: 8),
Row(
mainAxisAlignment: MainAxisAlignment.center,
children: [
ElevatedButton(
// `.notifier` を付けると `StateController` が取得できます。
onPressed: () =>
ref.read(counterStateProvider1.notifier).increase(),
child: const Text('increase +'),
),
const SizedBox(width: 16),
Text(counterResponse),
],
),
];
}
List<Widget> _buildCounterByStateNotifierProvider2(String title) {
final counterState = ref.watch(counterStateProvider2);
return [
Text(
title,
style: const TextStyle(
fontSize: 16.0,
fontWeight: FontWeight.bold,
),
),
Row(
mainAxisAlignment: MainAxisAlignment.center,
children: [
Column(
children: [
const SizedBox(height: 4),
Text('count1: ${counterState.count1} ${counterState.message}'),
const SizedBox(height: 4),
Text('count2: ${counterState.count2} '),
const SizedBox(height: 8),
],
),
const SizedBox(width: 8),
ElevatedButton(
// `.notifier` を付けると `StateController` が取得できます。
onPressed: () =>
ref.read(counterStateProvider2.notifier).increase(),
child: const Text('increase +'),
),
const SizedBox(width: 16),
],
),
];
}
}
class CounterLog extends StatefulHookConsumerWidget {
const CounterLog({super.key});
ConsumerState<ConsumerStatefulWidget> createState() => _CounterLogState();
}
class _CounterLogState extends ConsumerState<CounterLog> {
Widget build(BuildContext context) {
final counterList = ref.watch(counterListStateProvider);
/// *リストが空のとき、ListViewはまったくつくられずエラーが出るので、空のときはぐるぐる表示にします。
return counterList.isEmpty
? const Center(child: CircularProgressIndicator())
: Expanded(
child: ListView.builder(
itemCount: counterList.length,
itemBuilder: (BuildContext context, int index) {
final counter = counterList[index];
return ListTile(
onTap: () {},
leading: Column(
children: [
Text('count1: ${counter.count1}'),
Text('count2: ${counter.count2}'),
],
),
trailing: Text('message: ${counter.message}'),
);
},
),
);
}
}
7.RiverpodのTipsをはさむ
Riverpodについても下手に躓かないために、下記Tipsについて触れておきました。
-
コードの記述量が多いのでVSCodeの各拡張機能やコードスニペットを活用すべし
>>VSCode Extensions for Flutter Development
>>【コピペOK】Riverpod向け VSCodeコードスニペット集 -
とりあえずStatefulHookConsumerWidgetでウィジェット作成しておく
-
宣言時、型がよく分からなければ、カーソルを置いて確認してみよ
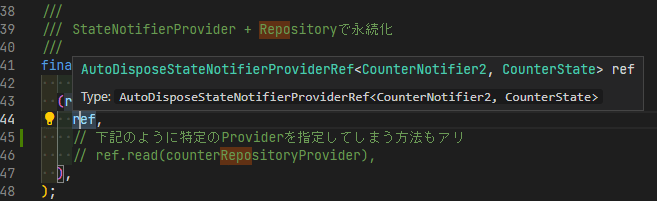
型の確認例
心がけたこと
開発効率向上に繋がるTipsを伝える
Flutterの開発効率はいかにエディター上のショートカットキーやクイックFixを駆使するかでもあり、これらは静的な学習コンテンツだけでは身につけるのが難しいところでもあります。
そのため、今回はそれらをちゃんと活用しながら説明しました。
あえてつまづく
うまくいかないケースを説明。たとえば、単にローカルDBに保存しただけでは、ListViewにデータが表示されず、ref.refresh()を使ってデータを再取得しないと表示されません。
そこをあえて、保存しただけのコードにして、保存したのにListViewに更新されないのはなぜだろう?と考えてもらったりしました。
今は覚えなくて良いところはさらっと進めた
すべてを一度に覚えてもらうのは不可能。ということで、今回はRiverpodの使い方をメインで覚えてほしかったので、それ以外のところはさらっと説明orコードコピーで実装OKとしました。たとえば、今回はデータの永続化のため、ローカルDB Hiveを使用していますが、使い方の説明は思いっきり省略しています。
感想
ここまでで休憩を挟んでトータル6時間ほど。実際は二日に分けて行いました。
理解度については差がありました。さすがに未経験者には難しかったようで、特にProviderの理解だけでなく、基本的には僕が書いたコードに倣って書いていくだけでしたが、それでも苦戦していました。
Riverpodのコードで頻出するジェネリクス(総称型) が原因かなと感じています。
ジェネリクスは見慣れていないせいか、スゴい抵抗感を持っているように見えました。
一変、開発効率を向上させるような便利技は他の言語でも活かせる内容でもあり、反応は良かったです。
今回はRiverpodを学ぶまでほぼ最短ルートで学習していきました。
開発を進める上ではまだまだ拾いきれていない内容ではありましたが、自分で調べてもなかなか理解が難しいところをこのような機会で一度触れておけたことは良かったのではないかと思います。
今の職場が嫌で辞めるわけではないので、開発メンバーに少しでも貢献できていれば嬉しいですね。
また、現職ではBLE通信やビーコンと組み合わせたアプリが多いため、辞めるまでにこのあたりの勉強会も開催したいと思います。
宣伝にはなりますが、Flutter BeaconとRiverpodの書籍を書いております。
※基礎レベルの内容です。
ご興味ありましたら、ご一読ください。
ここまで読んでいただきありがとうございました。
Discussion