Blockcerts について調べる
はじめに
ブロックチェーンベースの証明書を発行・閲覧・検証するためのオープンソースである blockcerts について調べる
まずは簡単なチュートリアルを完了させることを目標とする
スクラップが記事になりました
Blockcerts を使って Ethereum ブロックチェーン証明書を発行する方法
参考記事
PitPa さんの Zenn 記事がとてもわかりやすい
公式ドキュメント
blockcerts の公式サイトと W3C の Verifiable Credentials Data Model v1.1 が公式といえるだろうか
発行元を検証する方法
ENS を使っているのか、なるほど
NFT側の工夫としては、ENSを用いることで発行元が千葉工業大学であるということが一目でわかるようにしていることや、SBT化によって学位の横流し防止などを行いました。
Blockcerts のバージョン
v3 は Verificable Credentials Data Model に対応している様子
v2はW3Cに対応していないため、v3を採用しています。
Blockcerts の代替案
Opencerts や DCC がある
DCCやOpencertsを検討していました。
Quick Start
閲覧・検証(Viewing and verifying certificates)と発行(Issuing certificates end-to-end)の2つがある
閲覧・検証
blockcerts-verifier のレポジトリをクローンして README に書かれている手順で起動してみてくださいと書かれている
The easiest way for developers to get familiar with Blockchain Certificates is to clone the blockcerts-verifier repo and perform the steps in the README to launch.
リポジトリはこちら
git clone https://github.com/blockchain-certificates/blockcerts-verifier
cd blockcerts-verifier
npm install
npm start
ブラウザで https://localhost:8081/demo/ にアクセスする
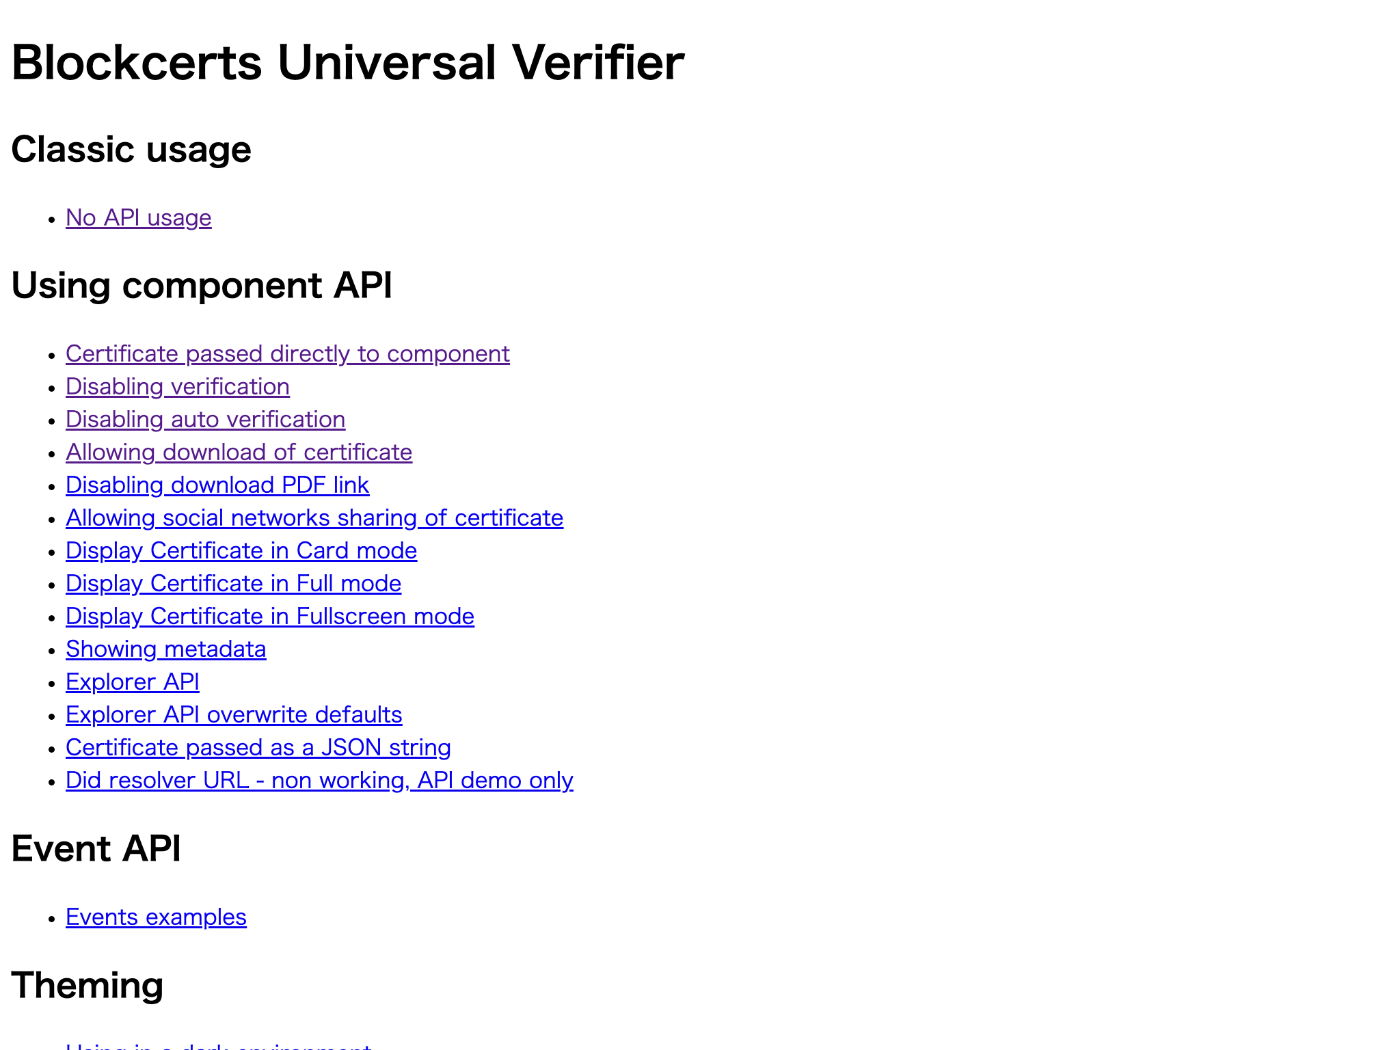
独自の UI を作成するために cert-verifier-js というのもある、blockcerts verifier や Android / iOS アプリもこちらを使用している
証明書発行の Quick Start
まずは cert-tools を使って証明書を作成する必要がある
手っ取り早く試したい場合は cert-issuer のサンプルをダウンロードして使用する → コンテナイメージの中に入っているのでダウンロードする必要はなかった
cert-issuer の Quick start using Docker のセクションに具体的手順が記載されている
コンテナを起動するまで
git clone https://github.com/blockchain-certificates/cert-issuer.git && cd cert-issuer
docker build -t bc/cert-issuer:1.0 .
docker run -it bc/cert-issuer:1.0 bash
証明書発行者のアドレスを作成する
bitcoin-cli createwallet "testwallet"
bitcoin-cli listwallets
issuer=`bitcoin-cli getnewaddress`
sed -i.bak "s/<issuing-address>/$issuer/g" /etc/cert-issuer/conf.ini
bitcoin-cli dumpprivkey $issuer > /etc/cert-issuer/pk_issuer.txt
証明書の発行
cp /cert-issuer/examples/data-testnet/unsigned_certificates/verifiable-credential.json /etc/cert-issuer/data/unsigned_certificates/
bitcoin-cli -generate 101
bitcoin-cli getbalance
今のところうまくいかない、残高が0のまま
Regtest
色々試した結果 -regtest をつければ良いことがわかった
kill `pgrep bitcoind`
bitcoind -chain=regtest -daemon
bitcoin-cli -chain=regtest createwallet "testwallet"
issuer=`bitcoin-cli  -chain=regtest getnewaddress`
sed -i.bak "s/<issuing-address>/$issuer/g" /etc/cert-issuer/conf.ini
bitcoin-cli  -chain=regtest dumpprivkey $issuer > /etc/cert-issuer/pk_issuer.txt

cp /cert-issuer/examples/data-testnet/unsigned_certificates/verifiable-credential.json /etc/cert-issuer/data/unsigned_certificates/
bitcoin-cli -chain=regtest -generate 101
bitcoin-cli -chain=regtest getbalance
bitcoin-cli -chain=regtest sendtoaddress $issuer 5
Fallback fee
下記のエラーが表示される場合は /root/.bitcoin/bitcoin.conf の末尾にfallbackfee=0.00001 を追加する
Fee estimation failed. Fallbackfee is disabled. Wait a few blocks or enable -fallbackfee.
echo "fallbackfee=0.00001" >> /root/.bitcoin/bitcoin.conf
kill `pgrep bitcoind`
bitcoind -chain=regtest -daemon
bitcoin-cli -chain=regtest loadwallet "/root/.bitcoin/regtest/wallets/testwallet/"
BTCの送金
bitcoin-cli -chain=regtest sendtoaddress $issuer 5
発行
cert-issuer -c /etc/cert-issuer/conf.ini --verification_method "did:example:23adb1f712ebc6f1c276eba4dfa"
エラーが出て失敗する、DIDには何を指定すれば良いのだろう
発行した証明書を取り出す方法
まだ証明書を発行していないが下記の通りらしい
docker cp 63d9dfeb5a9b:/etc/cert-issuer/data/blockchain_certificates/verifiable-credential.json ~/Downloads/verifiable-credential.json
コンテナ起動時に --name をつけた方が良いかも知れない
このスクラップのゴール
下記に設定しようと思う
- 自分で自分に画像付きの証明書を発行する
- 発行した証明書を URL で閲覧できる
- 発行した証明書を検証できる
証明書を発行するには DID の知識が必要そうだ
W3C の公式ドキュメントは長すぎて読むのが大変
参考になる Web 記事を探して勉強しよう
この分野で PitPa さんが最強すぎる
気になるURL
nft-vc
PitPa さんの nft-vc の GitHub リポジトリにシナリオのドキュメントがあった
読んでいくと下記の NFT にたどり着く
Web サイトを表示すると画像が表示される

これがオープンソースで公開されていることが素晴らしい
できた
Bitcoin じゃなくて Ethereum にしたら15分できた
はじめから Ethereum にしておけばよかった、返して僕の8時間
やったこと
@context から https://www.w3.org/2018/credentials/examples/v1 を削除する
{
  "@context": [
    "https://www.w3.org/2018/credentials/v1",
    "https://w3id.org/blockcerts/v3"
  ],
  "id": "urn:uuid:bbba8553-8ec1-445f-82c9-a57251dd731c",
  "type": [
    "VerifiableCredential",
    "BlockcertsCredential"
  ],
  "issuer": "did:example:23adb1f712ebc6f1c276eba4dfa",
  "issuanceDate": "2022-01-01T19:33:24Z",
  "credentialSubject": {
    "id": "did:example:ebfeb1f712ebc6f1c276e12ec21",
    "alumniOf": {
      "id": "did:example:c276e12ec21ebfeb1f712ebc6f1"
    }
  }
}
設定ファイルを Ethereum 用に書き換える
issuing_address = 0x063Eae33729EdB89FaadFDe5c813d4A06d176E4c

chain=ethereum_goerli

usb_name=/etc/cert-issuer/
key_file=ethereum_private_key.txt

unsigned_certificates_dir=/etc/cert-issuer/data/unsigned_certificates
blockchain_certificates_dir=/etc/cert-issuer/data/blockchain_certificates
work_dir=/etc/cert-issuer/work

no_safe_mode
できた証明書がこちら
{"@context": ["https://www.w3.org/2018/credentials/v1", "https://w3id.org/blockcerts/v3"], "id": "urn:uuid:bbba8553-8ec1-445f-82c9-a57251dd731c", "
type": ["VerifiableCredential", "BlockcertsCredential"], "issuer": "did:web:loremipsumcojp-cert-issuer.storage.googleapis.com", "issuanceDate": "20
22-01-01T19:33:24Z", "credentialSubject": {"id": "did:example:ebfeb1f712ebc6f1c276e12ec21", "alumniOf": {"id": "did:example:c276e12ec21ebfeb1f712eb
c6f1"}}, "proof": {"type": "MerkleProof2019", "created": "2022-12-28T02:41:00.339057", "proofValue": "z7veGu1qoKR3AS5Aw3gvTMFS83GiRbzcvYvHUvzCGUfYp
6c2zWEDEHhBAm7N57ZvRZ1vYtAdFkUJoTL3RMdktyjwdjZgbam2bDiyLtCZL6uc2QdEnJPRii6CFQVyXQ3oEAFUiemgAHo497EAFF2LrjLHrCc4nD2BPpxUtLvN9rbMsT2iUCXitinCTCca35ey
CDrDyQrALux4txeFu6QR1V4eZust7idQxyB2szMAaGu8AzCXSqUf6DU7xeCjsarXAR81pdNakH8os4cSK2DeBMqMiMUZVLc8XmzdAZvU2tyVStSu4ehn5z", "proofPurpose": "assertion
Method", "verificationMethod": "did:web:loremipsumcojp-cert-issuer.storage.googleapis.com#key-1"}}
検証は失敗してしまう
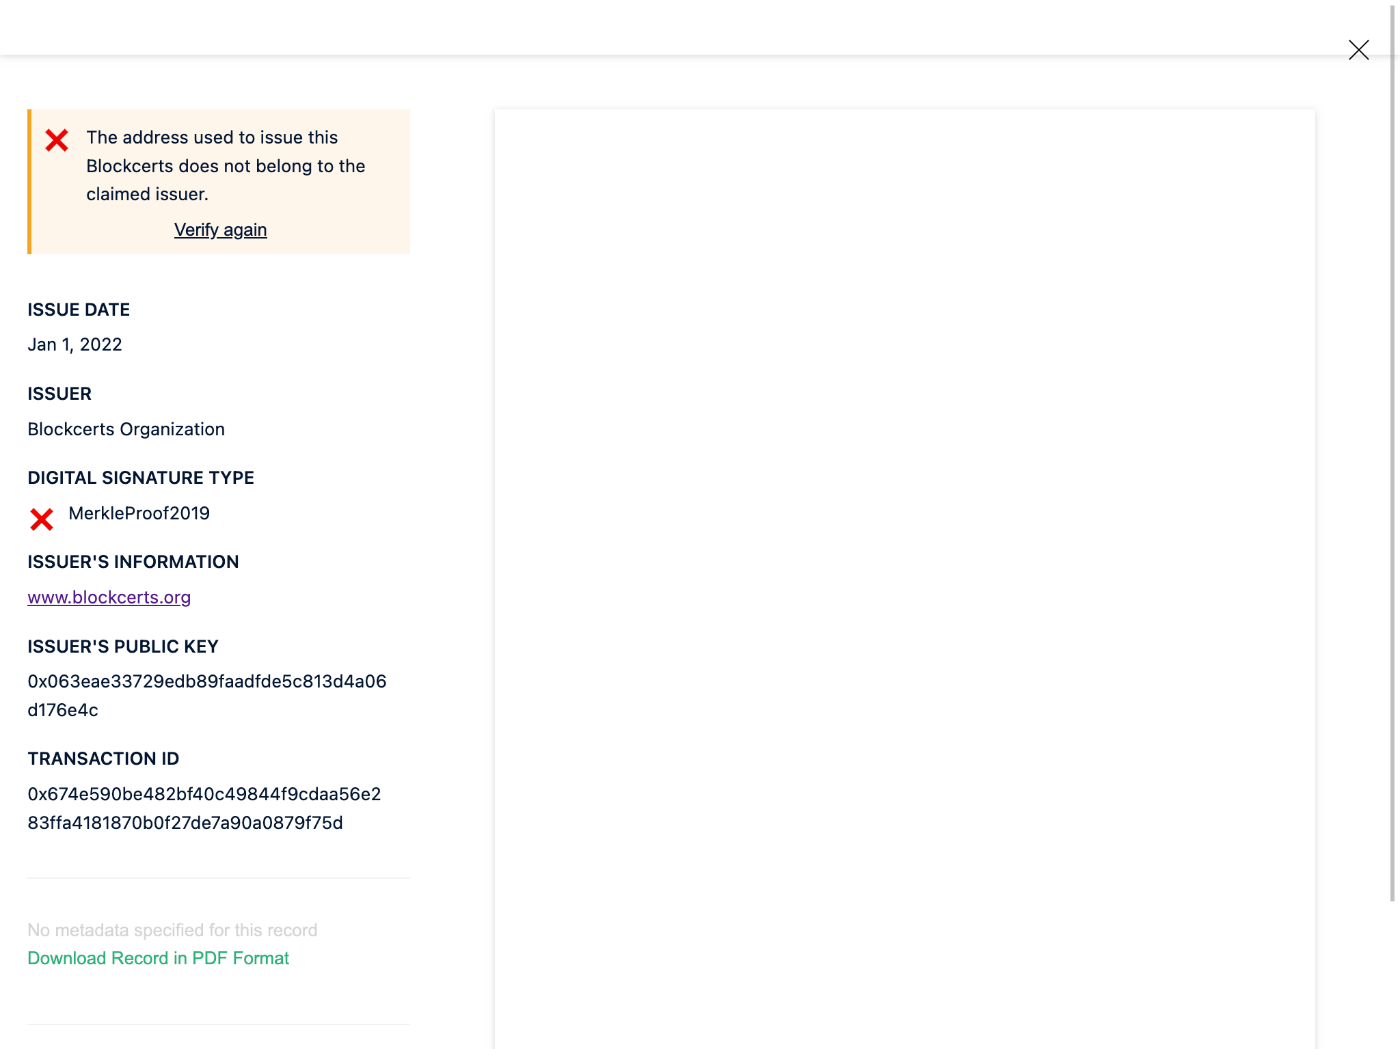
できた!

ちゃんと profile.json を設定したらできた!
{
  "@context": [
      "https://w3id.org/openbadges/v2",
      "https://w3id.org/blockcerts/3.0"
  ],
  "type": "Profile",
  "id": "https://loremipsumcojp-cert-issuer.storage.googleapis.com/profile.json",
  "name": "PitPa, Inc.",
  "url": "https://did.staging.sakazuki.xyz/",
  "publicKey": [
      {
          "id": "ecdsa-koblitz-pubkey:0x063Eae33729EdB89FaadFDe5c813d4A06d176E4c",
          "created": "2022-06-20T10:00:00.000000+00:00"
      }
  ],
  "revocationList": "https://did.staging.sakazuki.xyz/blockcerts_revocation_list.json"
}
{
  "id": "did:web:loremipsumcojp-cert-issuer.storage.googleapis.com",
  "verificationMethod": [
    {
      "id": "#key-1",
      "controller": "did:web:loremipsumcojp-cert-issuer.storage.googleapis.com",
      "type": "EcdsaSecp256k1VerificationKey2019",
      "publicKeyJwk": {
        "kty": "EC",
        "crv": "K-256",
        "x": "oTj4PkPzlNowto09OpAU0BVJ6DJc2vg_lFoW9wiZ60A",
        "y": "D9VaE9hbsOagGab_0euWcNUaCDphfBPg-C_aWD7npx4"
      }
    }
  ],
  "service": [
    {
      "id": "#service-1",
      "type": "IssuerProfile",
      "serviceEndpoint": "https://loremipsumcojp-cert-issuer.storage.googleapis.com/profile.json"
    }
  ]
}
variable "project" {}
variable "bucket_name" {}
variable "bucket_location" {}

provider "google" {
  project = var.project
}

resource "google_storage_bucket" "my_bucket" {
  name                        = var.bucket_name
  location                    = var.bucket_location
  force_destroy               = true

  cors {
    origin          = ["*"]
    method          = ["GET"]
    response_header = ["Content-Type"]
    max_age_seconds = 30
  }
}

resource "google_storage_default_object_access_control" "public_rule" {
  bucket = google_storage_bucket.my_bucket.name
  role   = "READER"
  entity = "allUsers"
}

resource "google_storage_bucket_object" "did" {
  bucket = google_storage_bucket.my_bucket.name
  name   = ".well-known/did.json"
  source = "dist/.well-known/did.json"
  cache_control = "public, max-age=30"
}

resource "google_storage_bucket_object" "profile" {
  bucket = google_storage_bucket.my_bucket.name
  name   = "profile.json"
  source = "dist/profile.json"
  cache_control = "public, max-age=30"
}

output "bucket_name" {
  value = google_storage_bucket.my_bucket.name
}
ありがとう、やり遂げた後は全てが美しく輝いて見える
明日以降に再現してみよう
再現性に疑問があるので明日以降に繰り返しやってみる
再現性の確認
今日は cert-issuer の公式ドキュメント(GitHub Page)にツッコミを入れながら進んでいこう
まず Quick start だが半分くらいかそれ以上が Bitcoin の設定
しかもそのために Docker を使っている感じがある
はじめから Bitcoin や Ethereum のテストネットを使う手順を紹介すれば良いのにと思う
テストネットを使う場合は Goerli Faucet などからテスト用の Ether をもらう必要があってそれはそれで面倒だけど Bitcoin のノードをローカルで設定・起動するのに比べたらはるかに簡単
Docker ではなくローカルで cert-issuer をインストールするには下記でできる
pip3 install cert-issuer
どこにインストールされたかは下記で確認できる
$ pip3 show cert-issuer
Name: cert-issuer
Version: 3.3.0
Summary: Issues blockchain certificates using the Bitcoin blockchain
Home-page: https://github.com/blockchain-certificates/cert-issuer
Author: Blockcerts
Author-email: info@blockcerts.org
License: MIT
Location: /Library/Frameworks/Python.framework/Versions/3.7/lib/python3.7/site-packages
Requires: cert-core, cert-schema, configargparse, glob2, jsonschema, lds-merkle-proof-2019, merkletools, mock, pycoin, pyld, pysha3, python-bitcoinlib, requests, tox
Required-by:
自分の場合は /Library/Frameworks/Python.framework/Versions/3.7/lib/python3.7/site-packages にインストールされた
cert-issuer は下記のように呼び出すことができる
$ /Library/Frameworks/Python.framework/Versions/3.7/bin/cert-issuer
usage: cert-issuer [-h] [-c MY_CONFIG] --issuing_address ISSUING_ADDRESS
                   --verification_method VERIFICATION_METHOD --usb_name
                   USB_NAME --key_file KEY_FILE
                   [--unsigned_certificates_dir UNSIGNED_CERTIFICATES_DIR]
                   [--signed_certificates_dir SIGNED_CERTIFICATES_DIR]
                   [--blockchain_certificates_dir BLOCKCHAIN_CERTIFICATES_DIR]
                   [--work_dir WORK_DIR] [--max_retry MAX_RETRY]
                   [--chain CHAIN] [--safe_mode] [--no_safe_mode]
                   [--dust_threshold DUST_THRESHOLD] [--tx_fee TX_FEE]
                   [--batch_size BATCH_SIZE]
                   [--satoshi_per_byte SATOSHI_PER_BYTE] [--bitcoind]
                   [--no_bitcoind] [--gas_price GAS_PRICE]
                   [--gas_limit GAS_LIMIT]
                   [--etherscan_api_token ETHERSCAN_API_TOKEN]
                   [--ethereum_rpc_url ETHEREUM_RPC_URL]
                   [--ropsten_rpc_url ROPSTEN_RPC_URL]
                   [--goerli_rpc_url GOERLI_RPC_URL]
                   [--sepolia_rpc_url SEPOLIA_RPC_URL]
                   [--blockcypher_api_token BLOCKCYPHER_API_TOKEN]
                   [--context_urls CONTEXT_URLS [CONTEXT_URLS ...]]
                   [--context_file_paths CONTEXT_FILE_PATHS [CONTEXT_FILE_PATHS ...]]
cert-issuer: error: the following arguments are required: --issuing_address, --verification_method, --usb_name, --key_file
頻繁に利用するのであればパスを設定してしまった方が良い
export PATH=$PATH:/Library/Frameworks/Python.framework/Versions/3.7/bin
Ethereum を使うための依存関係のインストール
Ethereum を使うためには追加のパッケージのインストールが必要になる
touch ethereum_requirements.txt
web3<=4.4.1
coincurve==7.1.0
ethereum==2.3.1
rlp<1
eth-account<=0.3.0
pip3 install -r ethereum_requirements.txt
なぜ requirements.txt に書かずに別々に分けたのだろう
ディレクトリの作成
署名する前や後の証明書や作業用のディレクトリを作成する
mkdir -p data/unsigned_certificates
mkdir -p data/blockchain_certificates
mkdir -p data/work
名前は何でも良いが一応 cert-issuer のデフォルトのディレクトリ名に倣った
署名していない証明書の作成
touch data/unsigned_certificates/my_certificate.json
こちらは cert-issuer の GitHub で examples ディレクトリに含まれているものだがそのまま使えない
{
  "@context": [
    "https://www.w3.org/2018/credentials/v1",
    "https://www.w3.org/2018/credentials/examples/v1",
    "https://w3id.org/blockcerts/v3"
  ],
  "id": "urn:uuid:bbba8553-8ec1-445f-82c9-a57251dd731c",
  "type": [
    "VerifiableCredential",
    "BlockcertsCredential"
  ],
  "issuer": "did:example:23adb1f712ebc6f1c276eba4dfa",
  "issuanceDate": "2022-01-01T19:33:24Z",
  "credentialSubject": {
    "id": "did:example:ebfeb1f712ebc6f1c276e12ec21",
    "alumniOf": {
      "id": "did:example:c276e12ec21ebfeb1f712ebc6f1"
    }
  }
}
下記のようなエラーが表示される
Traceback (most recent call last):
  File "/Library/Frameworks/Python.framework/Versions/3.7/lib/python3.7/site-packages/pyld/jsonld.py", line 1134, in to_rdf
    expanded = self.expand(input_, options)
  File "/Library/Frameworks/Python.framework/Versions/3.7/lib/python3.7/site-packages/pyld/jsonld.py", line 835, in expand
    expanded = self._expand(active_ctx, None, document, options, False)
  File "/Library/Frameworks/Python.framework/Versions/3.7/lib/python3.7/site-packages/pyld/jsonld.py", line 2090, in _expand
    active_ctx, element['@context'], options)
  File "/Library/Frameworks/Python.framework/Versions/3.7/lib/python3.7/site-packages/pyld/jsonld.py", line 2740, in _process_context
    code='invalid local context')
pyld.jsonld.JsonLdError: ('Invalid JSON-LD syntax; @context must be an object.',)
原因は https://www.w3.org/2018/credentials/examples/v1
理由は恐らくだが @context に含まれる https://www.w3.org/ns/odrl.jsonld が文字列であるためと推測する
エラーを回避するには https://www.w3.org/2018/credentials/examples/v1 を削除すれば良い
ただし削除すると alumniOf の語彙を使えないので alumniOf 以下も削除する必要がある
最終的に出来上がる証明書の内容は下記の通り
{
  "@context": [
    "https://www.w3.org/2018/credentials/v1",
    "https://w3id.org/blockcerts/v3"
  ],
  "id": "urn:uuid:bbba8553-8ec1-445f-82c9-a57251dd731c",
  "type": [
    "VerifiableCredential",
    "BlockcertsCredential"
  ],
  "issuer": "did:example:23adb1f712ebc6f1c276eba4dfa",
  "issuanceDate": "2022-01-01T19:33:24Z",
  "credentialSubject": {
    "id": "did:example:ebfeb1f712ebc6f1c276e12ec21"
  }
}
鍵ファイルと設定ファイルの作成
touch cert-issuer.conf key_file.txt
issuing_address = 0x0000000000000000000000000000000000000000
verification_method = did:example:1234
usb_name=.
key_file=key_file.txt

unsigned_certificates_dir=/Users/susukida/workspace/web3/blockcerts/data/unsigned_certificates
blockchain_certificates_dir=/Users/susukida/workspace/web3/blockcerts/data/blockchain_certificates
work_dir=/Users/susukida/workspace/web3/blockcerts/data/work

chain = ethereum_goerli
goerli_rpc_url = https://eth-goerli.g.alchemy.com/v2/xxxxxxxxxxxxxxxxxxxxxxxxxxxxxxxx

no_safe_mode
下記6点は環境に応じて変える必要がある
- issuing_address
- verification_method
- unsigned_certificates_dir
- blockchain_certificates_dir
- work_dir
- goerli_rpc_url
issuing_address は MetaMask などからコピーする
verification_method は適当でも署名できてしまうが検証時にエラーになるので適切なものを設定する必要がある
適切な verification_method を設定するには適切な内容で DID を作成する必要があるが、その方法が公式 GitHub にほとんど書かれていないので初めての人にはかなり厳しい
DID を作成する方法については後から詳しく説明する
3つの dir はデフォルトのディレクトリ名を使っていれば指定しなくても良さそうな感じもするがフルパス指定が必要
その理由はベースがコマンド実行時の作業ディレクトリではなく、cert-issuer の実行ファイルのあるディレクトリとなるため
goerli_rpc_url は Alchemy などで Goerli のエンドポイントを作成して API キー付きの URL を使用する
goerli_rpc_url を設定しなくても運が良ければ動く、謎の混雑しているエンドポイントが使われる
key_file.txt には MataMask からエクスポートした秘密鍵をコピー&ペーストする
とりあえずこの時点で実行してみる
設定に問題なければこの時点で cert-issuer を実行できる
/Library/Frameworks/Python.framework/Versions/3.7/bin/cert-issuer -c cert-issuer.conf
実行結果はこちら
WARNING - Your app is configured to skip the wifi check when the USB is plugged in. Read the documentation to ensure this is what you want, since this is less secure
INFO - This run will try to issue on the ethereum_goerli chain
INFO - Set cost constants to recommended_gas_price=20000000000.000000, recommended_gas_limit=25000.000000
INFO - Processing 1 certificates
INFO - Processing 1 certificates under work path=/Users/susukida/workspace/web3/blockcerts/data/work
INFO - Getting balance with EthereumRPCProvider: 198279040000000000
INFO - Total cost will be 500000000000000 wei
INFO - Starting finalizable signer
WARNING - app is configured to skip the wifi check when the USB is plugged in. Read the documentation to ensure this is what you want, since this is less secure
INFO - Stopping finalizable signer
WARNING - app is configured to skip the wifi check when the USB is plugged in. Read the documentation to ensure this is what you want, since this is less secure
INFO - here is the op_return_code data: f4906de7db4f9a826b5998472f51eaac762d429b29b6c2496f38870a477929d9
INFO - Fetching nonce with EthereumRPCProvider
INFO - Starting finalizable signer
WARNING - app is configured to skip the wifi check when the USB is plugged in. Read the documentation to ensure this is what you want, since this is less secure
INFO - Stopping finalizable signer
WARNING - app is configured to skip the wifi check when the USB is plugged in. Read the documentation to ensure this is what you want, since this is less secure
INFO - signed Ethereum trx = f884048504a817c8008261a894deaddeaddeaddeaddeaddeaddeaddeaddeaddead80a0f4906de7db4f9a826b5998472f51eaac762d429b29b6c2496f38870a477929d92da01b0801ad15681457103aff952fc6a1a6b327b8eb1840455c37fec07609a6cccca068922ac353d38527ed5c5c68a02d73c740cc95efd1d0a75172af29317cb32af5
INFO - verifying ethDataField value for transaction
INFO - verified ethDataField
INFO - Broadcasting transaction with EthereumRPCProvider
INFO - Broadcasting succeeded with method_provider=<cert_issuer.blockchain_handlers.ethereum.connectors.EthereumRPCProvider object at 0x7fc1e0d04e50>, txid=0xca8732ae20f0e67c8091af0b83055f5e21a32776c5df7f15fa2da25743320a7e
INFO - merkle_json: {'path': [], 'merkleRoot': 'f4906de7db4f9a826b5998472f51eaac762d429b29b6c2496f38870a477929d9', 'targetHash': 'f4906de7db4f9a826b5998472f51eaac762d429b29b6c2496f38870a477929d9', 'anchors': ['blink:eth:goerli:0xca8732ae20f0e67c8091af0b83055f5e21a32776c5df7f15fa2da25743320a7e']}
INFO - Broadcast transaction with txid 0xca8732ae20f0e67c8091af0b83055f5e21a32776c5df7f15fa2da25743320a7e
INFO - Your Blockchain Certificates are in /Users/susukida/workspace/web3/blockcerts/data/blockchain_certificates
できあがるブロックチェーン証明書がこちら、本物は未整形だが見やすさのために整形しています
{
  "@context": [
    "https://www.w3.org/2018/credentials/v1",
    "https://w3id.org/blockcerts/v3"
  ],
  "id": "urn:uuid:bbba8553-8ec1-445f-82c9-a57251dd731c",
  "type": ["VerifiableCredential", "BlockcertsCredential"],
  "issuer": "did:example:23adb1f712ebc6f1c276eba4dfa",
  "issuanceDate": "2022-01-01T19:33:24Z",
  "credentialSubject": { "id": "did:example:ebfeb1f712ebc6f1c276e12ec21" },
  "proof": {
    "type": "MerkleProof2019",
    "created": "2022-12-29T08:48:59.459458",
    "proofValue": "z7veGu1qoKR3AS5M3xfNxYMVGUCxFzaEQ5NkRWDGTowFPyL2gB7vtCVDfK2e4oETN19HnnqmXL3CS2qpMgnWe2XUHCVN7ufHArBc54QVVk2XouWzakWMU83iHnAsk186DuvJv5vLXN2p9bFXRcwFTfqxkyzDL9E8G8CEZ43X9HnFNz6Yz38U4ypGt6XbmKM7EnLTK5NaKRkHrQehPyRfFCFhjBEhgdT9QTHf56PxwqmyF7Q8Gwf3MEZwbu5SNst58qSvRFQch7zaW1ZDw85Zqk1uMGJBwomRnwPtgmaKknR6rn3Pd4FMYp",
    "proofPurpose": "assertionMethod",
    "verificationMethod": "did:example:1234"
  }
}
DID の作成
touch did.json
touch profile.json
touch main.tf terraform.tfvars
まずは検証が中途半端に成功してしまう内容で作成する
{
  "@context": [
    "https://www.w3.org/ns/did/v1"
  ],
  "id": "did:web:loremipsumcojp-cert-issuer-20221229.storage.googleapis.com",
  "service": [
    {
      "id": "#issuer-profile",
      "type": "IssuerProfile",
      "serviceEndpoint": "https://loremipsumcojp-cert-issuer-20221229.storage.googleapis.com/profile.json"
    }
  ]
}
loremipsumcojp-cert-issuer-20221229 の部分は環境にあわせて適宜変更する
{
  "@context": [
    "https://w3id.org/openbadges/v2"
  ],
  "id": "https://loremipsumcojp-cert-issuer-20221229.storage.googleapis.com/profile.json",
  "type": "Profile",
  "name": "Lorem Ipsum Co. Ltd.",
  "url": "https://www.loremipsum.co.jp",
  "publicKey": [
    {
      "id": "ecdsa-koblitz-pubkey:0x063Eae33729EdB89FaadFDe5c813d4A06d176E4c",
      "created": "2021-12-29T00:00:00"
    }
  ]
}
こちらも同様にloremipsumcojp-cert-issuer-20221229 の部分は環境にあわせて適宜変更する
variable "project" {}
variable "bucket_name" {}
variable "bucket_location" {}

provider "google" {
  project = var.project
}

resource "google_storage_bucket" "my_bucket" {
  name                        = var.bucket_name
  location                    = var.bucket_location
  force_destroy               = true

  cors {
    origin          = ["*"]
    method          = ["GET"]
    response_header = ["Content-Type"]
    max_age_seconds = 30
  }
}

resource "google_storage_bucket_iam_binding" "public_rule" {
  bucket = google_storage_bucket.my_bucket.name
  role = "roles/storage.legacyObjectReader"
  members = [
    "allUsers",
  ]
}

resource "google_storage_bucket_object" "did" {
  bucket = google_storage_bucket.my_bucket.name
  name   = ".well-known/did.json"
  source = "did.json"
  cache_control = "public, max-age=30"
}

resource "google_storage_bucket_object" "profile" {
  bucket = google_storage_bucket.my_bucket.name
  name   = "profile.json"
  source = "profile.json"
  cache_control = "public, max-age=30"
}
project         = "xxxxxxxx"
bucket_name     = "loremipsumcojp-cert-issuer-20221229"
bucket_location = "ASIA-NORTHEAST1"
terraform.tfvars の内容は環境に応じて変更する
{
  "@context": [
    "https://www.w3.org/2018/credentials/v1",
    "https://w3id.org/blockcerts/v3"
  ],
  "id": "urn:uuid:bbba8553-8ec1-445f-82c9-a57251dd731c",
  "type": [
    "VerifiableCredential",
    "BlockcertsCredential"
  ],
  "issuer": "did:web:loremipsumcojp-cert-issuer-20221229.storage.googleapis.com",
  "issuanceDate": "2022-01-01T19:33:24Z",
  "credentialSubject": {
    "id": "did:example:ebfeb1f712ebc6f1c276e12ec21"
  }
}
my_certificates.json の issuer も忘れずに変更する
下記のコマンドを実行してバケットやオブジェクトを作成する
terraform init
terraform apply
完了したらアクセスして確認する
- https://loremipsumcojp-cert-issuer-20221229.storage.googleapis.com/.well-known/did.json
- https://loremipsumcojp-cert-issuer-20221229.storage.googleapis.com/profile.json
cert-issuer.conf の conf を忘れずに修正する
verification_method = did:web:loremipsumcojp-cert-issuer-20221229.storage.googleapis.com
これらが終わったらコマンドを実行する
/Library/Frameworks/Python.framework/Versions/3.7/bin/cert-issuer -c cert-issuer.conf
出力された証明書を Blockcerts の Web サイトにアップロードして検証する、Choose JSON file を使う

Identity Verification がいつまで立っても終わらない
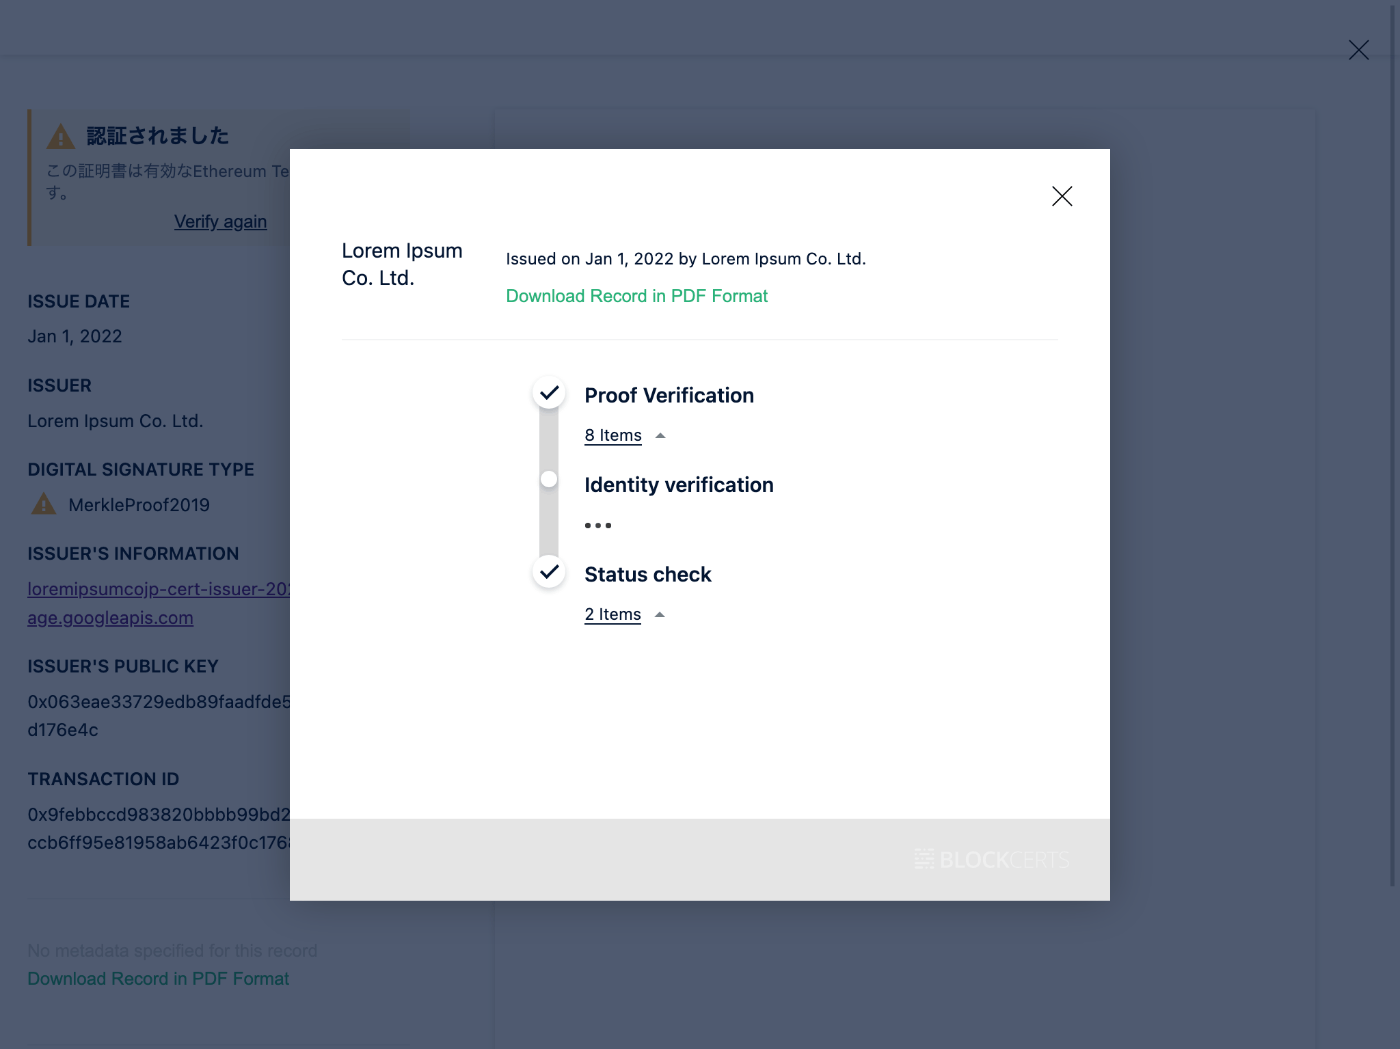
検証を成功させるには
DID に verificationMethod の内容を追加する必要がある
そのためには Ethereum の秘密鍵の公開鍵の JWK を作成する必要がある
作成のための Node.js スクリプトを作成する
npm init -y
npm install --save-dev @trust/keyto
touch convert.js
const fs = require('fs');
const keyto = require("@trust/keyto");

if (require.main === module) {
  main();
}

function main() {
  const file = process.argv[2];
  const blk = fs.readFileSync(file, 'utf-8');
  const key = keyto.from(blk, "blk");
  const jwk = key.toJwk("public");

  console.log(JSON.stringify(jwk, null, 2));
}
node convert.js key_file.txt
こんな感じの内容が出力される
{
  "kty": "EC",
  "crv": "K-256",
  "x": "oTj4PkPzlNowto09OpAU0BVJ6DJc2vg_lFoW9wiZ60A",
  "y": "D9VaE9hbsOagGab_0euWcNUaCDphfBPg-C_aWD7npx4"
}
この内容を下記のように did.json にコピー&ペーストして追記する
{
  "@context": ["https://www.w3.org/ns/did/v1"],
  "id": "did:web:loremipsumcojp-cert-issuer-20221229.storage.googleapis.com",
  "service": [
    {
      "id": "#issuer-profile",
      "type": "IssuerProfile",
      "serviceEndpoint": "https://loremipsumcojp-cert-issuer-20221229.storage.googleapis.com/profile.json"
    }
  ],
  "verificationMethod": [
    {
      "id": "#key-1",
      "controller": "did:web:loremipsumcojp-cert-issuer-20221229.storage.googleapis.com",
      "type": "EcdsaSecp256k1VerificationKey2019",
      "publicKeyJwk": {
        "kty": "EC",
        "crv": "K-256",
        "x": "oTj4PkPzlNowto09OpAU0BVJ6DJc2vg_lFoW9wiZ60A",
        "y": "D9VaE9hbsOagGab_0euWcNUaCDphfBPg-C_aWD7npx4"
      }
    }
  ]
}
忘れずに Google Cloud Storage へアップロードする
terraform apply
cert-issuer.conf も忘れずに変更する
verification_method = did:web:loremipsumcojp-cert-issuer-20221229.storage.googleapis.com#key-1
コマンドを実行
/Library/Frameworks/Python.framework/Versions/3.7/bin/cert-issuer -c cert-issuer.conf
出力されたブロックチェーン証明書を Blockcerts のサイトで検証すると「認証されました」と表示される
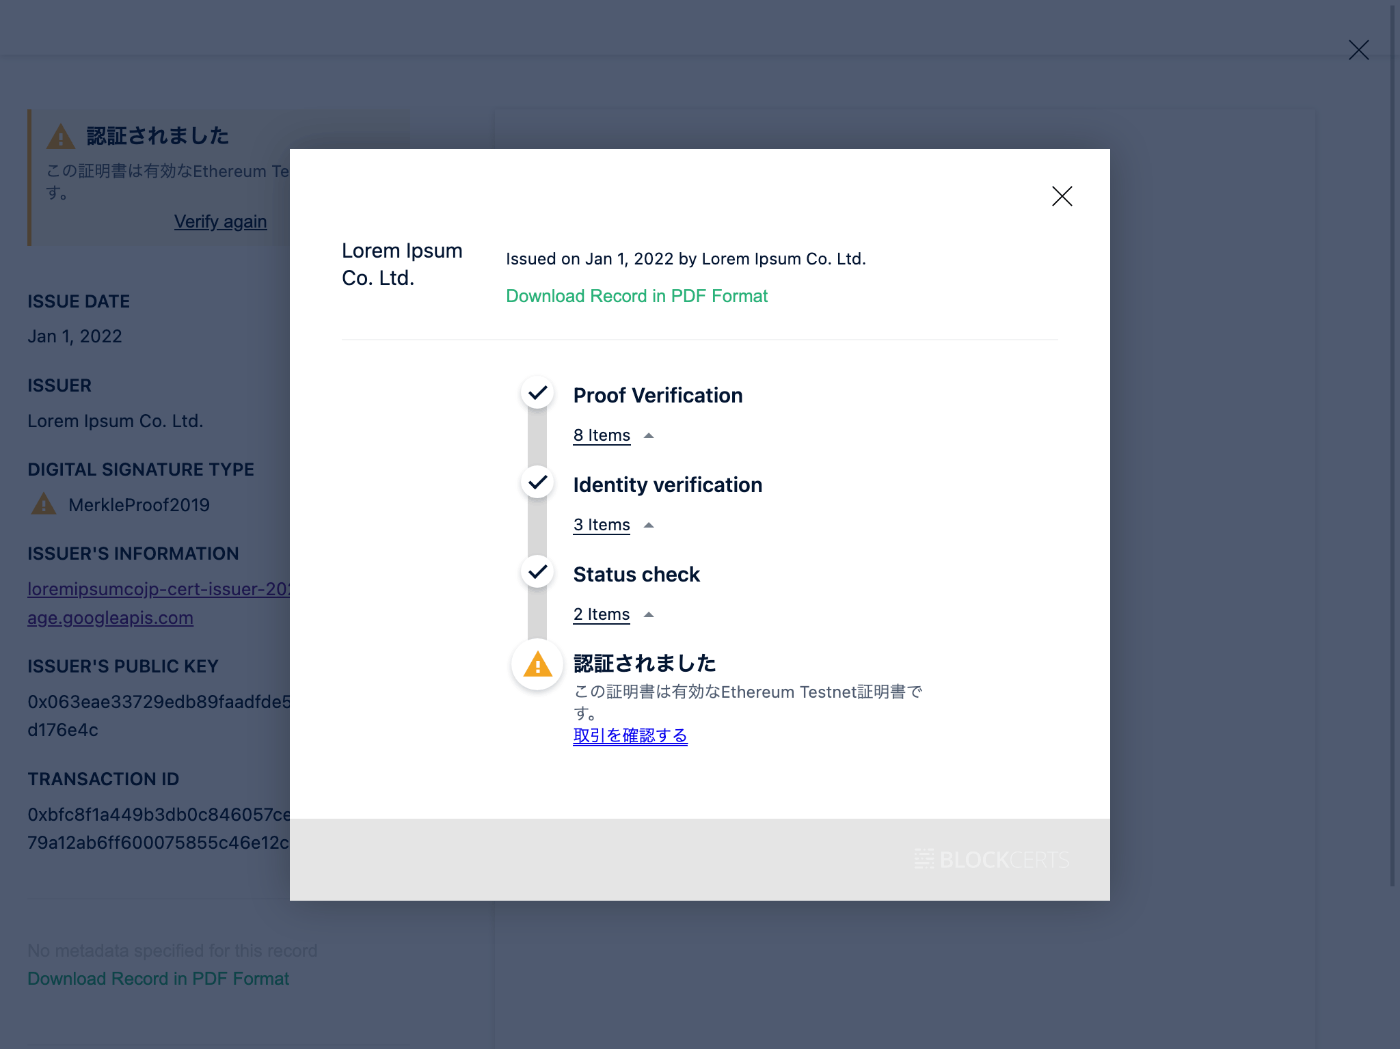
取引を確認するリンクをクリックすると Etcherscan のページが表示される

0xdeaddead... に 0 ether を送金してその時の Input Data として何かを送っている、署名データと推測する

おわりに
途中で諦めかけたが最後まで行けて良かった
スクラップがとっ散らかってしまったので後日記事にまとめよう
千葉工業大学の NFT
自分はどうやってこれを見つけたんだろう
Open Badge
今度はオープンバッジが面白い
ブロックチェーン証明書に含まれる proofValue
デコードにはパッケージのインストールが必要
const { Decoder } = require('@vaultie/lds-merkle-proof-2019')
const decoder = new Decoder(proofValueBase58)

decoder.decode() // JSON object with proofValue
今知ったけど1通発行しようが100通発行しようが Ethereum には1つのトランザクションしか発行されないようだ
詳しくはこちら
気になるリンク
ちょうどBlockCertsについて調べていたので大変参考になりました!
お役に立てて嬉しいです!コメントとたくさんのいいねをいただいてとても励みになります、ありがとうございます😄
Bitcoin でも出来た
1時間くらい頑張ったら Bitcoin でも証明書を作れたようだ
Mac の場合は python3 ではなくて /usr/bin/python3 を使うとか、秘密鍵を WIF 形式で指定する必要があるとか色々つまづいたけど出来て良かった
WIF 形式は mainnet と testnet で違うことがわかって勉強になった
import { Networks, PrivateKey } from "bitcore-lib";
import { readFileSync } from "fs";

const address = JSON.parse(readFileSync('address.json', 'utf8'));
const privateKey = new PrivateKey(address.privateKey, Networks.testnet);

console.log(privateKey.toWIF())
まだ検証はしていないので後から時間をとってまとめたい
Ethereum ばかりだったけど単純にデータを保存するなら Bitcoin もストレージとして有用だと思うようになった
Bitcoin の場合の発行手順
だいぶ日が空いてしまったけど Bitcoin の場合のやり方についてまとめよう
まずは cert-issuer のインストール
/usr/bin/pip3 install cert-issuer
なぜ /usr/bin/python3 の方に cert-issuer を再度インストールする必要があるのか?
理由は /usr/local/bin/python3 の方で cert-issuer 実行時に SSL のライブラリが読み込めなくてエラーになるから
私の Mac で python3 を実行すると /usr/local/bin/python3 がデフォルトになっている様子
$ which python3
/usr/local/bin/python3
PATH の環境変数を変更しても良いけど面倒なのでフルパスで指定する(それはそれで面倒だけど)
どこにインストールするかを確認するには下記のコマンドを実行する
$ /usr/bin/pip3 show cert-issuer
Name: cert-issuer
Version: 3.3.0
Summary: Issues blockchain certificates using the Bitcoin blockchain
Home-page: https://github.com/blockchain-certificates/cert-issuer
Author: Blockcerts
Author-email: info@blockcerts.org
License: MIT
Location: /Users/susukida/Library/Python/3.9/lib/python/site-packages
Requires: cert-core, cert-schema, configargparse, glob2, jsonschema, lds-merkle-proof-2019, merkletools, mock, pycoin, pyld, pysha3, python-bitcoinlib, requests, tox
Required-by:
Location を見ると /Users/susukida/Library/Python/3.9/bin あたりにインストールされたのではないかと思われる
$ /Users/susukida/Library/Python/3.9/bin/cert-issuer
usage: cert-issuer [-h] [-c MY_CONFIG] --issuing_address ISSUING_ADDRESS
                   --verification_method VERIFICATION_METHOD --usb_name
                   USB_NAME --key_file KEY_FILE
                   [--unsigned_certificates_dir UNSIGNED_CERTIFICATES_DIR]
                   [--signed_certificates_dir SIGNED_CERTIFICATES_DIR]
                   [--blockchain_certificates_dir BLOCKCHAIN_CERTIFICATES_DIR]
                   [--work_dir WORK_DIR] [--max_retry MAX_RETRY]
                   [--chain CHAIN] [--safe_mode] [--no_safe_mode]
                   [--dust_threshold DUST_THRESHOLD] [--tx_fee TX_FEE]
                   [--batch_size BATCH_SIZE]
                   [--satoshi_per_byte SATOSHI_PER_BYTE] [--bitcoind]
                   [--no_bitcoind] [--gas_price GAS_PRICE]
                   [--gas_limit GAS_LIMIT]
                   [--etherscan_api_token ETHERSCAN_API_TOKEN]
                   [--ethereum_rpc_url ETHEREUM_RPC_URL]
                   [--ropsten_rpc_url ROPSTEN_RPC_URL]
                   [--goerli_rpc_url GOERLI_RPC_URL]
                   [--sepolia_rpc_url SEPOLIA_RPC_URL]
                   [--blockcypher_api_token BLOCKCYPHER_API_TOKEN]
                   [--context_urls CONTEXT_URLS [CONTEXT_URLS ...]]
                   [--context_file_paths CONTEXT_FILE_PATHS [CONTEXT_FILE_PATHS ...]]
cert-issuer: error: the following arguments are required: --issuing_address, --verification_method, --usb_name, --key_file
ばっちりだ
ワークスペースの準備
mkdir blockcerts-bitcoin
cd blockcerts-bitcoin
npm init -y
npm install --save-dev bitcoinjs-lib ecpair tiny-secp256k1 ts-node
touch address.ts
import { networks, payments } from "bitcoinjs-lib";
import ECPairFactory from "ecpair";
import * as ecc from "tiny-secp256k1";

function main() {
  const ECPair = ECPairFactory(ecc);
  const keyPair = ECPair.makeRandom({
    network: networks.testnet,
  });

  const payment = payments.p2wpkh({
    pubkey: keyPair.publicKey,
    network: networks.testnet,
  });

  const wif = keyPair.toWIF();
  const address = payment.address!;

  console.log(JSON.stringify({ wif, address }, null, 2));
}

main();
npx ts-node address.ts > address.json
{
  "wif": "cXXXXXXXXXXXXXXXXXXXXXXXXXXXXXXXXXXXXXXXXXXXXXXXXXXX",
  "address": "tb1XXXXXXXXXXXXXXXXXXXXXXXXXXXXXXXXXXXXXXX"
}
wif は c から始まっていて address は tb1 から始まっていることを確認する
Bitcoin のアドレスの種類については下記が詳しい
テスト用のビットコインをもらう
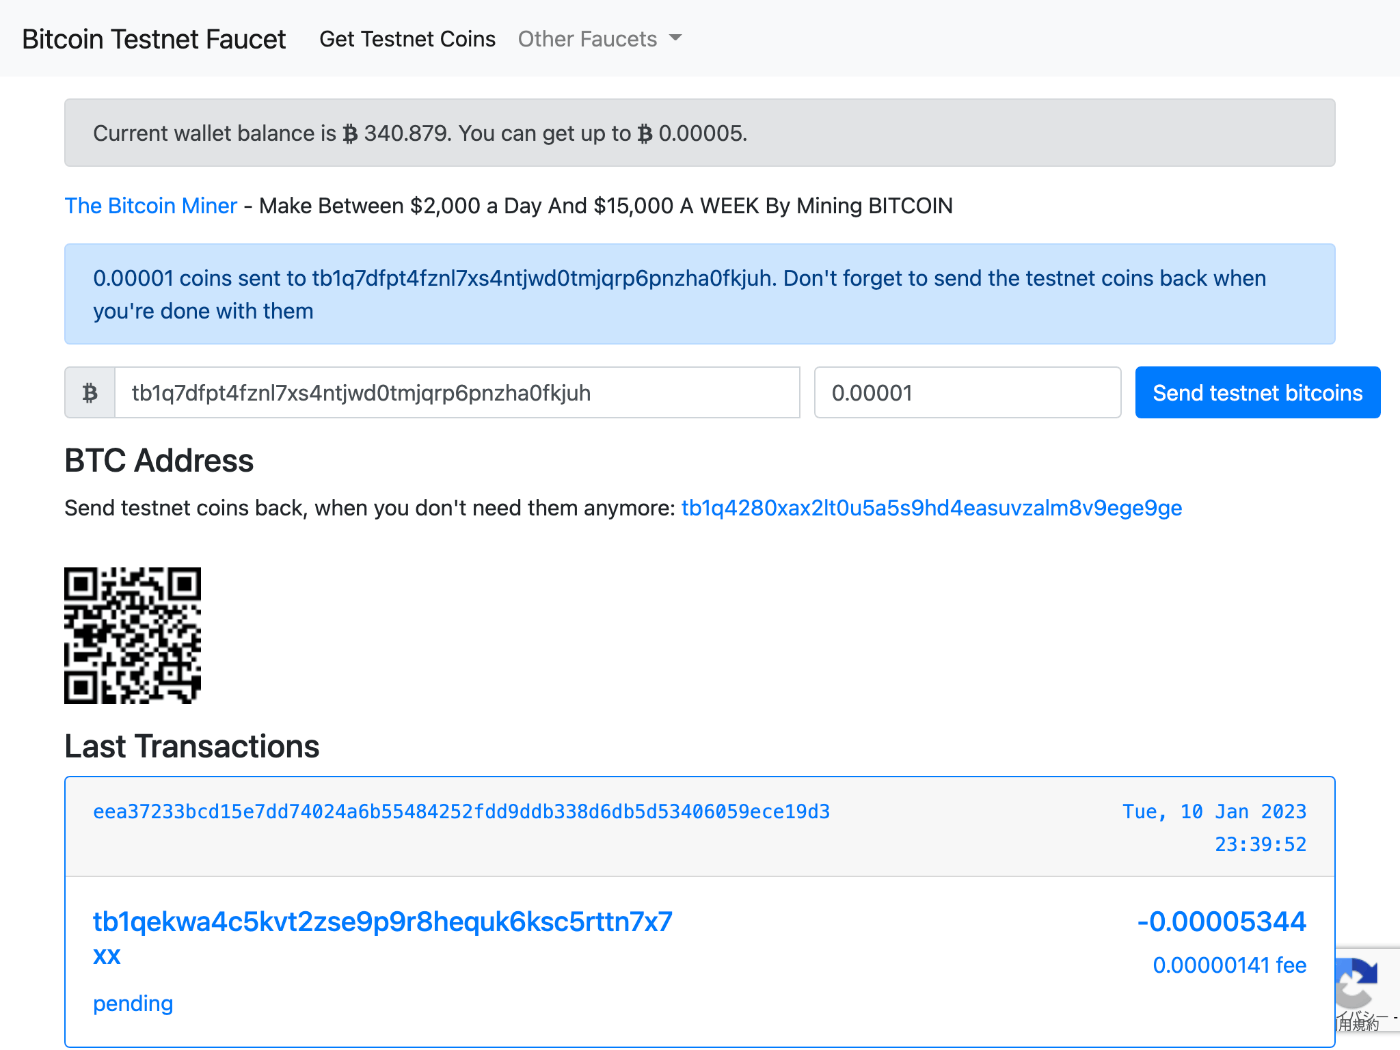
Bitcoin アドレスを入力して Send testnet bitcoins ボタンを押す
トランザクションについては Blockstream や BlockCypher で確認できる
いつもは下記を使っているのだけど調子が悪いみたい
key_file.txt を作成する
touch key_file.txt
address.json の wif の内容を key_file.txt にコピー&ペーストする
cXXXXXXXXXXXXXXXXXXXXXXXXXXXXXXXXXXXXXXXXXXXXXXXXXXX
ここが WIF 形式じゃないとエラーが出るので注意しましょう
Bitcoin は秘密鍵もアドレスも形式が何種類かあるので紛らわしい
conf.ini を作成する
touch conf.ini
issuing_address=tb1q7dfpt4fznl7xs4ntjwd0tmjqrp6pnzha0fkjuh
verification_method=did:web:blockcerts-20230104.storage.googleapis.com#key-2
usb_name=.
key_file=key_file.txt

unsigned_certificates_dir=/Users/susukida/workspace/web3/blockcerts3/data/unsigned_certificates
blockchain_certificates_dir=/Users/susukida/workspace/web3/blockcerts3/data/blockchain_certificates
work_dir=/Users/susukida/workspace/web3/blockcerts3/data/work

chain=bitcoin_testnet
no_safe_mode

dust_threshold=0.00000500
tx_fee=0.00000200
satoshi_per_byte=2
とりあえず実行してみる
証明書の内容は現在のままで OK
{
  "@context": [
    "https://www.w3.org/2018/credentials/v1",
    "https://w3id.org/blockcerts/v3"
  ],
  "id": "urn:uuid:bbba8553-8ec1-445f-82c9-a57251dd731c",
  "type": [
    "VerifiableCredential",
    "BlockcertsCredential"
  ],
  "issuer": "did:web:blockcerts-20230104.storage.googleapis.com",
  "issuanceDate": "2023-01-04T00:00:00Z",
  "credentialSubject": {
    "id": "did:example:ebfeb1f712ebc6f1c276e12ec21"
  }
}
DID ドキュメントに Bitcoin の公開鍵を追加する必要があるけど後からやろう、これもそのまま
{
  "@context": ["https://www.w3.org/ns/did/v1"],
  "id": "did:web:blockcerts-20230104.storage.googleapis.com",
  "service": [
    {
      "id": "#issuer-profile",
      "type": "IssuerProfile",
      "serviceEndpoint": "https://blockcerts-20230104.storage.googleapis.com/profile.json"
    }
  ],
  "verificationMethod": [
    {
      "id": "#key-1",
      "controller": "did:web:blockcerts-20230104.storage.googleapis.com",
      "type": "EcdsaSecp256k1VerificationKey2019",
      "publicKeyJwk": {
        "kty": "EC",
        "crv": "K-256",
        "x": "oTj4PkPzlNowto09OpAU0BVJ6DJc2vg_lFoW9wiZ60A",
        "y": "D9VaE9hbsOagGab_0euWcNUaCDphfBPg-C_aWD7npx4"
      }
    }
  ]
}
とりあえず実行してみる
$ /Users/susukida/Library/Python/3.9/bin/cert-issuer -c conf.ini
WARNING - Your app is configured to skip the wifi check when the USB is plugged in. Read the documentation to ensure this is what you want, since this is less secure
INFO - This run will try to issue on the bitcoin_testnet chain
INFO - Set cost constants to recommended_tx_fee=0.000002,min_per_output=0.000005,satoshi_per_byte=2
INFO - Processing 1 certificates
INFO - Processing 1 certificates under work path=/Users/susukida/workspace/web3/blockcerts3/data/work
INFO - Total cost will be 1068 satoshis
ERROR - Please add 68 satoshis to the address tb1q7dfpt4fznl7xs4ntjwd0tmjqrp6pnzha0fkjuh
Traceback (most recent call last):
  File "/Users/susukida/Library/Python/3.9/bin/cert-issuer", line 8, in <module>
    sys.exit(cert_issuer_main())
  File "/Users/susukida/Library/Python/3.9/lib/python/site-packages/cert_issuer/__main__.py", line 17, in cert_issuer_main
    issue_certificates.main(parsed_config)
  File "/Users/susukida/Library/Python/3.9/lib/python/site-packages/cert_issuer/issue_certificates.py", line 34, in main
    return issue(app_config, certificate_batch_handler, transaction_handler)
  File "/Users/susukida/Library/Python/3.9/lib/python/site-packages/cert_issuer/issue_certificates.py", line 14, in issue
    transaction_handler.ensure_balance()
  File "/Users/susukida/Library/Python/3.9/lib/python/site-packages/cert_issuer/blockchain_handlers/bitcoin/transaction_handlers.py", line 51, in ensure_balance
    raise InsufficientFundsError(error_message)
cert_issuer.errors.InsufficientFundsError: Please add 68 satoshis to the address tb1q7dfpt4fznl7xs4ntjwd0tmjqrp6pnzha0fkjuh
satoshis が足りないと言われている
もらったのが 0.00001 tBTC = 1,000 satoshis で Total cost が 1,068 satoshis なので確かに足りない
conf.ini を修正してみる
dust_threshold=0.00000500
tx_fee=0.00000100
satoshi_per_byte=1
これでどうだ
$ /Users/susukida/Library/Python/3.9/bin/cert-issuer -c conf.ini
WARNING - Your app is configured to skip the wifi check when the USB is plugged in. Read the documentation to ensure this is what you want, since this is less secure
INFO - This run will try to issue on the bitcoin_testnet chain
INFO - Set cost constants to recommended_tx_fee=0.000001,min_per_output=0.000005,satoshi_per_byte=1
INFO - Processing 1 certificates
INFO - Processing 1 certificates under work path=/Users/susukida/workspace/web3/blockcerts3/data/work
INFO - Total cost will be 534 satoshis
INFO - Starting finalizable signer
WARNING - app is configured to skip the wifi check when the USB is plugged in. Read the documentation to ensure this is what you want, since this is less secure
INFO - Stopping finalizable signer
WARNING - app is configured to skip the wifi check when the USB is plugged in. Read the documentation to ensure this is what you want, since this is less secure
INFO - here is the op_return_code data: 532bbb70882b4186eeaaf427db152546194ea5463f415d15db5e7d0320a82238
INFO - Unsigned hextx=0100000001a78e2ffdabf68e8dc0a6fc58d570b63460586ad68dba4bd2d0c7a7c5e50f263f0100000000ffffffff02fc02000000000000160014f35215d5229ffc68566b939af5ee401874198afd0000000000000000226a20532bbb70882b4186eeaaf427db152546194ea5463f415d15db5e7d0320a8223800000000
INFO - Preparing tx for signing
INFO - Starting finalizable signer
WARNING - app is configured to skip the wifi check when the USB is plugged in. Read the documentation to ensure this is what you want, since this is less secure
ERROR - Unable to sign transaction. hextx=01000000000101a78e2ffdabf68e8dc0a6fc58d570b63460586ad68dba4bd2d0c7a7c5e50f263f0100000000ffffffff02fc02000000000000160014f35215d5229ffc68566b939af5ee401874198afd0000000000000000226a20532bbb70882b4186eeaaf427db152546194ea5463f415d15db5e7d0320a8223802483045022100f4f7e03ba90acb77c3dfe2c2288914ecba9cb130ce619ecbfac526f935c609e202207e33a2bf67c445057628b0596bc624e6abc789e39a4dce142052b814f090a5ce012102d4b15382373da9faa3d0f1e48a5dbec0836f3051b048ea5f80e7b4cfff2ef40200000000
INFO - Stopping finalizable signer
WARNING - app is configured to skip the wifi check when the USB is plugged in. Read the documentation to ensure this is what you want, since this is less secure
Traceback (most recent call last):
  File "/Users/susukida/Library/Python/3.9/bin/cert-issuer", line 8, in <module>
    sys.exit(cert_issuer_main())
  File "/Users/susukida/Library/Python/3.9/lib/python/site-packages/cert_issuer/__main__.py", line 17, in cert_issuer_main
    issue_certificates.main(parsed_config)
  File "/Users/susukida/Library/Python/3.9/lib/python/site-packages/cert_issuer/issue_certificates.py", line 34, in main
    return issue(app_config, certificate_batch_handler, transaction_handler)
  File "/Users/susukida/Library/Python/3.9/lib/python/site-packages/cert_issuer/issue_certificates.py", line 20, in issue
    tx_id = issuer.issue(app_config.chain)
  File "/Users/susukida/Library/Python/3.9/lib/python/site-packages/cert_issuer/issuer.py", line 27, in issue
    txid = self.transaction_handler.issue_transaction(blockchain_bytes)
  File "/Users/susukida/Library/Python/3.9/lib/python/site-packages/cert_issuer/blockchain_handlers/bitcoin/transaction_handlers.py", line 56, in issue_transaction
    signed_tx = self.sign_transaction(prepared_tx)
  File "/Users/susukida/Library/Python/3.9/lib/python/site-packages/cert_issuer/blockchain_handlers/bitcoin/transaction_handlers.py", line 92, in sign_transaction
    signed_tx = signer.sign_transaction(prepared_tx)
  File "/Users/susukida/Library/Python/3.9/lib/python/site-packages/cert_issuer/models/__init__.py", line 99, in sign_transaction
    return self.signer.sign_transaction(self.wif, transaction_to_sign)
  File "/Users/susukida/Library/Python/3.9/lib/python/site-packages/cert_issuer/blockchain_handlers/bitcoin/signer.py", line 35, in sign_transaction
    raise UnableToSignTxError('Unable to sign transaction')
cert_issuer.errors.UnableToSignTxError: Unable to sign transaction
いい感じの所まで行ったけどまだダメだ、もらった Bitcoin が 6 confirmations まで行ってないのが原因?
そういえば regtest で頑張っている時にも出たな Unable to sign transaction っていうエラーメッセージ
Bitcoin おかわりしてみたけどダメだった
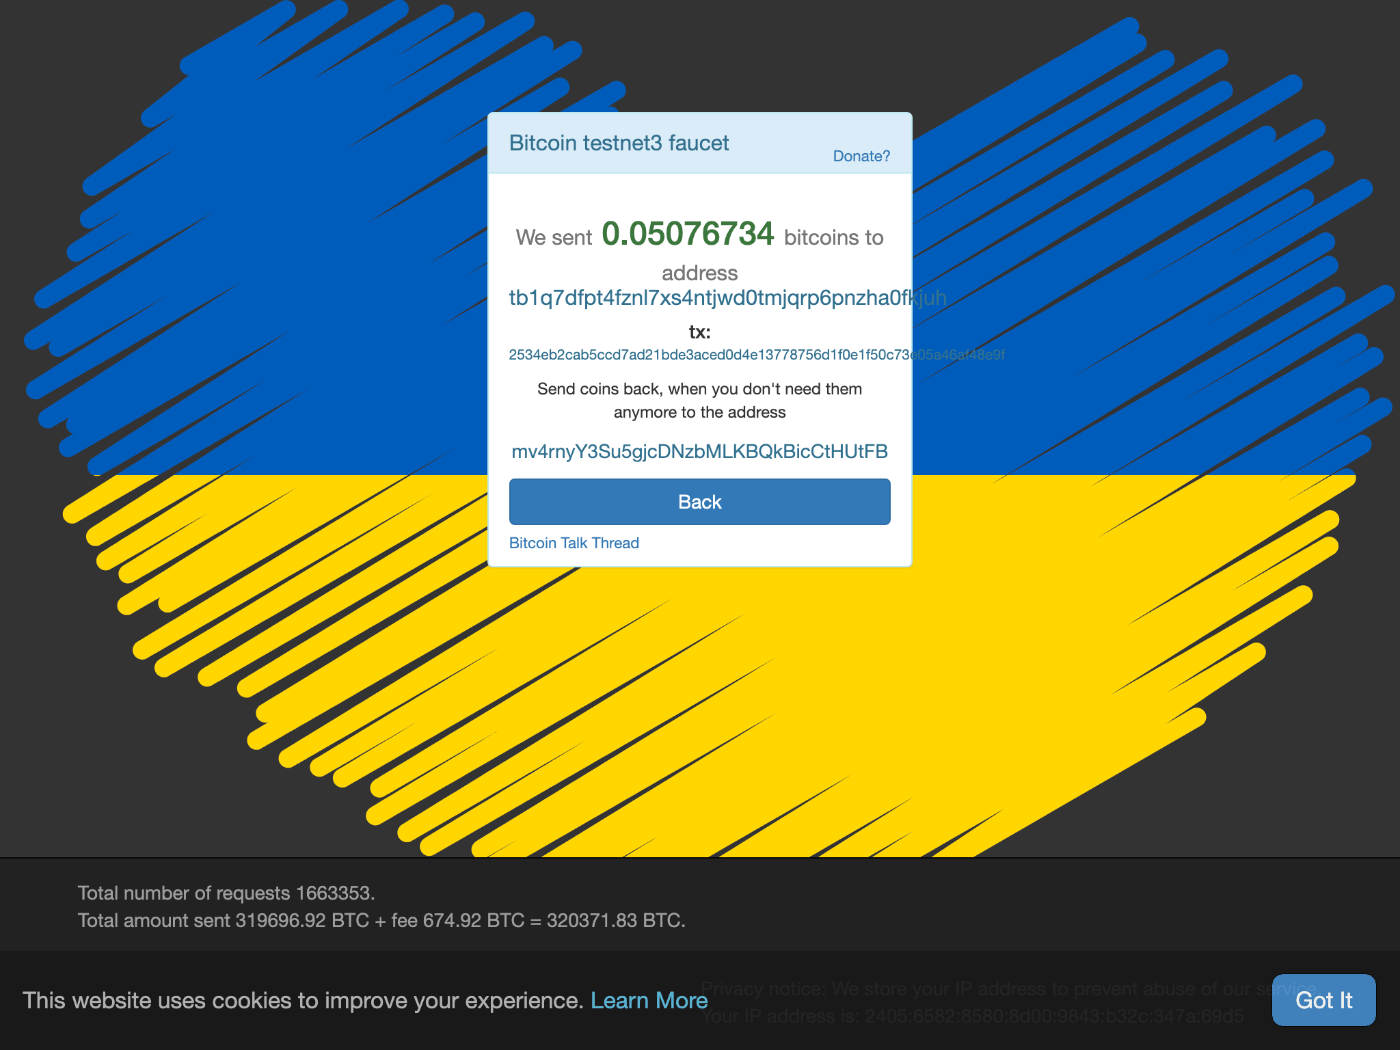
同じようにやってるつもりでもうまく行きませんね
一度うまくいっても振り返ることが重要だと痛感しました
というか 0.05 tBTC ももらってしまった、終わったら返さないとだ
もしかして m か n から始まるアドレスならいける?
行けた!
$ /Users/susukida/Library/Python/3.9/bin/cert-issuer -c conf.ini
WARNING - Your app is configured to skip the wifi check when the USB is plugged in. Read the documentation to ensure this is what you want, since this is less secure
INFO - This run will try to issue on the bitcoin_testnet chain
INFO - Set cost constants to recommended_tx_fee=0.000010,min_per_output=0.000028,satoshi_per_byte=1
INFO - Processing 1 certificates
INFO - Processing 1 certificates under work path=/Users/susukida/workspace/web3/blockcerts3/data/work
INFO - Total cost will be 998 satoshis
INFO - Starting finalizable signer
WARNING - app is configured to skip the wifi check when the USB is plugged in. Read the documentation to ensure this is what you want, since this is less secure
INFO - Stopping finalizable signer
WARNING - app is configured to skip the wifi check when the USB is plugged in. Read the documentation to ensure this is what you want, since this is less secure
INFO - here is the op_return_code data: 532bbb70882b4186eeaaf427db152546194ea5463f415d15db5e7d0320a82238
INFO - Unsigned hextx=01000000014c9506f38f00c4d94d7e4e1e4b20b72be2d21ed3381e22ddc0584f5e3a6fbbf20000000000ffffffff029f724d00000000001976a914f35215d5229ffc68566b939af5ee401874198afd88ac0000000000000000226a20532bbb70882b4186eeaaf427db152546194ea5463f415d15db5e7d0320a8223800000000
INFO - Preparing tx for signing
INFO - Starting finalizable signer
WARNING - app is configured to skip the wifi check when the USB is plugged in. Read the documentation to ensure this is what you want, since this is less secure
INFO - Stopping finalizable signer
WARNING - app is configured to skip the wifi check when the USB is plugged in. Read the documentation to ensure this is what you want, since this is less secure
INFO - The actual transaction size is 234 bytes
INFO - Signed hextx=01000000014c9506f38f00c4d94d7e4e1e4b20b72be2d21ed3381e22ddc0584f5e3a6fbbf2000000006a4730440220292c73f9e9e89d4ccf0dc375b7bed97e2b72217ebfb2f3b57802b9f696d42b3b02201ab9bfae6f53d24cab2fcbce259545caeb564dfda3df43c5ec71e11f8cb834ec012102d4b15382373da9faa3d0f1e48a5dbec0836f3051b048ea5f80e7b4cfff2ef402ffffffff029f724d00000000001976a914f35215d5229ffc68566b939af5ee401874198afd88ac0000000000000000226a20532bbb70882b4186eeaaf427db152546194ea5463f415d15db5e7d0320a8223800000000
INFO - Signed hextx=01000000014c9506f38f00c4d94d7e4e1e4b20b72be2d21ed3381e22ddc0584f5e3a6fbbf2000000006a4730440220292c73f9e9e89d4ccf0dc375b7bed97e2b72217ebfb2f3b57802b9f696d42b3b02201ab9bfae6f53d24cab2fcbce259545caeb564dfda3df43c5ec71e11f8cb834ec012102d4b15382373da9faa3d0f1e48a5dbec0836f3051b048ea5f80e7b4cfff2ef402ffffffff029f724d00000000001976a914f35215d5229ffc68566b939af5ee401874198afd88ac0000000000000000226a20532bbb70882b4186eeaaf427db152546194ea5463f415d15db5e7d0320a8223800000000
INFO - verifying op_return value for transaction
INFO - verified OP_RETURN
INFO - Broadcasting succeeded with method_provider=<bound method BlockcypherProvider.broadcast_tx of <cert_issuer.blockchain_handlers.bitcoin.connectors.BlockcypherProvider object at 0x10f54aac0>>, txid=6c5fd0c1b240831fbc1e94490473491dd30db586d44c3cb4d19c61af98ff7d68
INFO - Broadcasting succeeded with method_provider=<bound method BlockstreamBroadcaster.broadcast_tx of <cert_issuer.blockchain_handlers.bitcoin.connectors.BlockstreamBroadcaster object at 0x10f7e8040>>, txid=6c5fd0c1b240831fbc1e94490473491dd30db586d44c3cb4d19c61af98ff7d68
INFO - merkle_json: {'path': [], 'merkleRoot': '532bbb70882b4186eeaaf427db152546194ea5463f415d15db5e7d0320a82238', 'targetHash': '532bbb70882b4186eeaaf427db152546194ea5463f415d15db5e7d0320a82238', 'anchors': ['blink:btc:testnet:6c5fd0c1b240831fbc1e94490473491dd30db586d44c3cb4d19c61af98ff7d68']}
INFO - Broadcast transaction with txid 6c5fd0c1b240831fbc1e94490473491dd30db586d44c3cb4d19c61af98ff7d68
INFO - Your Blockchain Certificates are in /Users/susukida/workspace/web3/blockcerts3/data/blockchain_certificates
ずいぶんと日が空いてしまった
とりあえず状況を整理しよう
tb1 から始まるアドレスはダメだったアドレス
tb1q7dfpt4fznl7xs4ntjwd0tmjqrp6pnzha0fkjuh
はじめに Bitcoin Testnet Faucent から 0.00001 BTC もらった
次に Bitcoin testnet3 faucet から 0.05076734 BTC もらった
最後に n3hWq46tuvfRzBffsMwB92Gxa4ULA9xgF1 に 0.05076614 BTC を送金した(手数料は 0.0000012 BTC だった)
OP_RETURN したトランザクションが 6c5fd0c1b240831fbc1e94490473491dd30db586d44c3cb4d19c61af98ff7d68
UTXO が 6c5fd0c1b240831fbc1e94490473491dd30db586d44c3cb4d19c61af98ff7d68 の 0 番目
アドレスを P2WPKH から P2PKH へ変換した
address2.ts というファイル名がセンス無いけどとりあえず気にしない
import { networks, payments } from "bitcoinjs-lib";
import ECPairFactory from "ecpair";
import * as ecc from "tiny-secp256k1";

function main() {
  const ECPair = ECPairFactory(ecc);
  const keyPair = ECPair.fromWIF(
    require("./address.json").wif,
    networks.testnet
  );

  const payment = payments.p2pkh({
    pubkey: keyPair.publicKey,
    network: networks.testnet,
  });

  const wif = keyPair.toWIF();
  const address = payment.address!;

  console.log(JSON.stringify({ wif, address }, null, 2));
}

main();
npx ts-node address2.ts > address2.json
{
  "wif": "cXXXXXXXXXXXXXXXXXXXXXXXXXXXXXXXXXXXXXXXXXXXXXXXXXXX",
  "address": "n3hWq46tuvfRzBffsMwB92Gxa4ULA9xgF1"
}
はじめからこうだったら良かった
import { networks, payments } from "bitcoinjs-lib";
import ECPairFactory from "ecpair";
import * as ecc from "tiny-secp256k1";

function main() {
  const ECPair = ECPairFactory(ecc);
  const keyPair = ECPair.makeRandom({
    network: networks.testnet,
  });

  const payment = payments.p2pkh({
    pubkey: keyPair.publicKey,
    network: networks.testnet,
  });

  const wif = keyPair.toWIF();
  const address = payment.address!;

  console.log(JSON.stringify({ wif, address }, null, 2));
}

main();
Bitcoin Testnet Faucet は tb1 から始まるアドレス(P2WPKH)にしか対応していない
したがって P2PKH の場合(m か n から始まるアドレスの場合)は Bitcion testnet3 faucent を利用する必要がある
Bitcoin testnet3 faucet からはたくさん tBTC を貰えるから使い終わったら返さないとというプレッシャーがすごい
conf.ini を修正する
issuing_address=n3hWq46tuvfRzBffsMwB92Gxa4ULA9xgF1
verification_method=did:web:blockcerts-20230104.storage.googleapis.com#key-2
usb_name=.
key_file=key_file.txt

unsigned_certificates_dir=/Users/susukida/workspace/web3/blockcerts3/data/unsigned_certificates
blockchain_certificates_dir=/Users/susukida/workspace/web3/blockcerts3/data/blockchain_certificates
work_dir=/Users/susukida/workspace/web3/blockcerts3/data/work

chain=bitcoin_testnet
no_safe_mode

tx_fee=0.00000999
satoshi_per_byte=1
といっても issuing_address を変更するだけ
変更した conf.ini を指定して cert-issuer を実行する
/Users/susukida/Library/Python/3.9/bin/cert-issuer -c conf.ini
Mac では python3 が複数インストールされていることがある
使用する python3 によっては SSL のライブラリが読み込めなくて失敗することがあるので、その場合は別の python3 を試してみると良い
JWK と ecdsa-koblitz-pubkey を作る
JWK は @trust/keyto を使って作る
const fs = require("fs");
const keyto = require("@trust/keyto");

if (require.main === module) {
  main();
}

function main() {
  const { wif } = require("./address2.json");
  const key = keyto.from(wif, "blk");
  const jwk = key.toJwk("public");

  console.log(JSON.stringify(jwk, null, 2));
}
相変わらず convert2.js というファイル名がセンス無いが気にしない
node convert2.js > convert2.json
{
  "kty": "EC",
  "crv": "K-256",
  "x": "8aO1pajLb2Dhn4Jd6jk_kZCxYO99T6c0wBivrM7UMoY",
  "y": "sy6LVNtGzf5apuwOG38c8xTSZiewLdMusETacokRabQ"
}
ecdsa-koblitz-pubkey は P2PKH のアドレスをコピー&ペーストする
ecdsa-koblitz-pubkey:n3hWq46tuvfRzBffsMwB92Gxa4ULA9xgF1
DID と IssuerProfile を更新する
JWK と ecdsa-koblitz-pubkey を did.json と profile.json にそれぞれ追加する
{
  "@context": ["https://www.w3.org/ns/did/v1"],
  "id": "did:web:blockcerts-20230104.storage.googleapis.com",
  "service": [
    {
      "id": "#issuer-profile",
      "type": "IssuerProfile",
      "serviceEndpoint": "https://blockcerts-20230104.storage.googleapis.com/profile.json"
    }
  ],
  "verificationMethod": [
    {
      "id": "#key-1",
      "controller": "did:web:blockcerts-20230104.storage.googleapis.com",
      "type": "EcdsaSecp256k1VerificationKey2019",
      "publicKeyJwk": {
        "kty": "EC",
        "crv": "K-256",
        "x": "oTj4PkPzlNowto09OpAU0BVJ6DJc2vg_lFoW9wiZ60A",
        "y": "D9VaE9hbsOagGab_0euWcNUaCDphfBPg-C_aWD7npx4"
      }
    },
    {
      "id": "#key-2",
      "controller": "did:web:blockcerts-20230104.storage.googleapis.com",
      "type": "EcdsaSecp256k1VerificationKey2019",
      "publicKeyJwk": {
        "kty": "EC",
        "crv": "K-256",
        "x": "8aO1pajLb2Dhn4Jd6jk_kZCxYO99T6c0wBivrM7UMoY",
        "y": "sy6LVNtGzf5apuwOG38c8xTSZiewLdMusETacokRabQ"
      }
    }
  ]
}
{
  "@context": [
    "https://w3id.org/openbadges/v2",
    "https://w3id.org/blockcerts/v3"
  ],
  "id": "https://blockcerts-20230104.storage.googleapis.com/profile.json",
  "type": "Profile",
  "name": "Lorem Ipsum Co. Ltd.",
  "url": "https://www.loremipsum.co.jp",
  "email": "blockcerts@loremipsum.co.jp",
  "publicKey": [
    {
      "id": "ecdsa-koblitz-pubkey:0x063Eae33729EdB89FaadFDe5c813d4A06d176E4c"
    },
    {
      "id": "ecdsa-koblitz-pubkey:n3hWq46tuvfRzBffsMwB92Gxa4ULA9xgF1"
    }
  ]
}
追加し終わったら Terraform で反映する
terraform apply
my_certificate.json の issuer と conf.ini の verification_method は変更の必要なし
とりあえずこの状態で検証してみる
DID と IssuerProfile を更新する前はそもそも検証画面に進まなかった
verificationMethod(#key-2)が無かったので当り前
#key-2 を指定してやってみたがダメだった
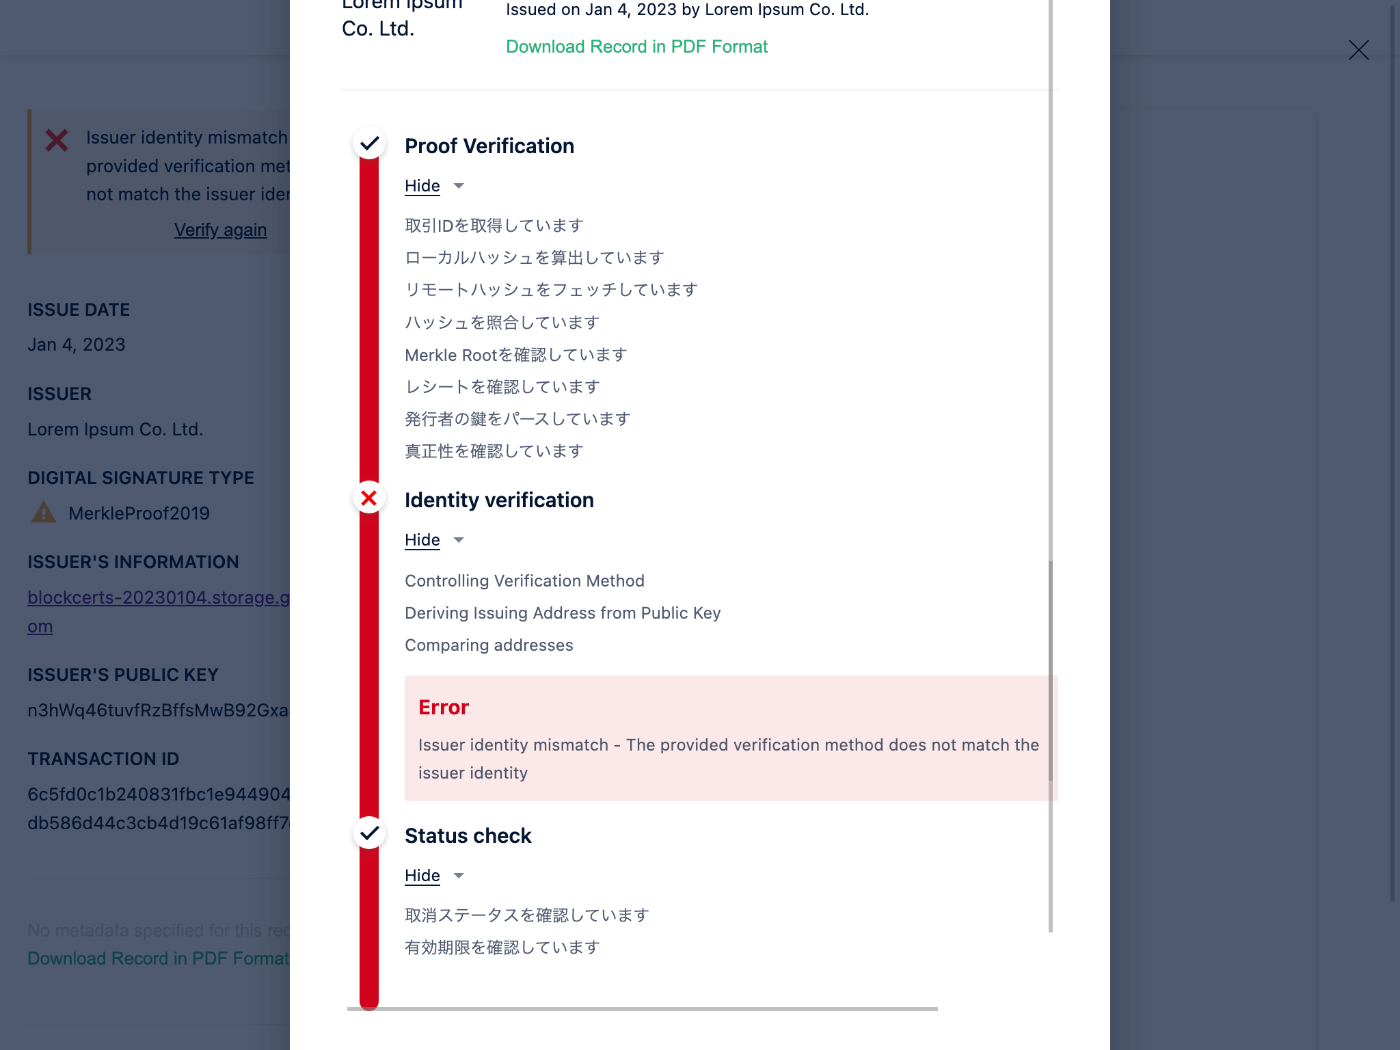
ちなみに my_certificate.json の内容は下記のような感じ
{
  "@context": [
    "https://www.w3.org/2018/credentials/v1",
    "https://w3id.org/blockcerts/v3"
  ],
  "id": "urn:uuid:bbba8553-8ec1-445f-82c9-a57251dd731c",
  "type": ["VerifiableCredential", "BlockcertsCredential"],
  "issuer": "did:web:blockcerts-20230104.storage.googleapis.com",
  "issuanceDate": "2023-01-04T00:00:00Z",
  "credentialSubject": { "id": "did:example:ebfeb1f712ebc6f1c276e12ec21" },
  "proof": {
    "type": "MerkleProof2019",
    "created": "2023-01-11T09:59:26.518465",
    "proofValue": "zMcm4LfQFUZkWZxqxWNu9NK6WA45DaLfMFW1ST2qmvgncHQLwNt4EcFX4DXXx9NmXUSkZAXaY7KF5ftiJQwWabQdnpKRLxduM9xHBXeaKuaoGXJwPcEpDE12pc3WUwqPDT2Yi7MnivtKYyFKwtzkWvBNtXn3GekykgEydVoYRPiUkh5XgJJvnAoNMUptQtWMCnbwwcJTcY9d2JJwLPHHBQ7jcvXUik9D4i9MLAduGAM1cecqdWUyzNNeQQGiTwfKLrpxMo85ajQTS7fgPYx33m9M2BQtgAe2mH7vkZGaR9A2GdBkGTZ",
    "proofPurpose": "assertionMethod",
    "verificationMethod": "did:web:blockcerts-20230104.storage.googleapis.com#key-2"
  }
}
もしかして JWK が間違っている?
address2.ts と convert2.js を編集する
import { networks, payments } from "bitcoinjs-lib";
import ECPairFactory from "ecpair";
import * as ecc from "tiny-secp256k1";

function main() {
  const ECPair = ECPairFactory(ecc);
  const keyPair = ECPair.fromWIF(
    require("./address.json").wif,
    networks.testnet
  );

  const payment = payments.p2pkh({
    pubkey: keyPair.publicKey,
    network: networks.testnet,
  });

  const wif = keyPair.toWIF();
  const privateKeyHex = keyPair.privateKey!.toString("hex");
  const address = payment.address!;

  console.log(JSON.stringify({ wif, privateKeyHex, address }, null, 2));
}

main();
const keyto = require("@trust/keyto");

if (require.main === module) {
  main();
}

function main() {
  const { privateKeyHex } = require("./address2.json");
  const key = keyto.from(privateKeyHex, "blk");
  const jwk = key.toJwk("public");

  console.log(JSON.stringify(jwk, null, 2));
}
npx ts-node address2.ts > address2.json
node convert2.js > convert2.json
{
  "kty": "EC",
  "crv": "K-256",
  "x": "1LFTgjc9qfqj0PHkil2-wINvMFGwSOpfgOe0z_8u9AI",
  "y": "0ugnwVtUcLzj54pFKr-inSeQg8CNLU8tFxALcClC8WQ"
}
違うものが出てきた
これを DID にコピー&ペーストする
{
  "@context": ["https://www.w3.org/ns/did/v1"],
  "id": "did:web:blockcerts-20230104.storage.googleapis.com",
  "service": [
    {
      "id": "#issuer-profile",
      "type": "IssuerProfile",
      "serviceEndpoint": "https://blockcerts-20230104.storage.googleapis.com/profile.json"
    }
  ],
  "verificationMethod": [
    {
      "id": "#key-1",
      "controller": "did:web:blockcerts-20230104.storage.googleapis.com",
      "type": "EcdsaSecp256k1VerificationKey2019",
      "publicKeyJwk": {
        "kty": "EC",
        "crv": "K-256",
        "x": "oTj4PkPzlNowto09OpAU0BVJ6DJc2vg_lFoW9wiZ60A",
        "y": "D9VaE9hbsOagGab_0euWcNUaCDphfBPg-C_aWD7npx4"
      }
    },
    {
      "id": "#key-2",
      "controller": "did:web:blockcerts-20230104.storage.googleapis.com",
      "type": "EcdsaSecp256k1VerificationKey2019",
      "publicKeyJwk": {
        "kty": "EC",
        "crv": "K-256",
        "x": "1LFTgjc9qfqj0PHkil2-wINvMFGwSOpfgOe0z_8u9AI",
        "y": "0ugnwVtUcLzj54pFKr-inSeQg8CNLU8tFxALcClC8WQ"
      }
    }
  ]
}
Terraform で反映
terraform apply
反映されたか確認する
これでどうだ
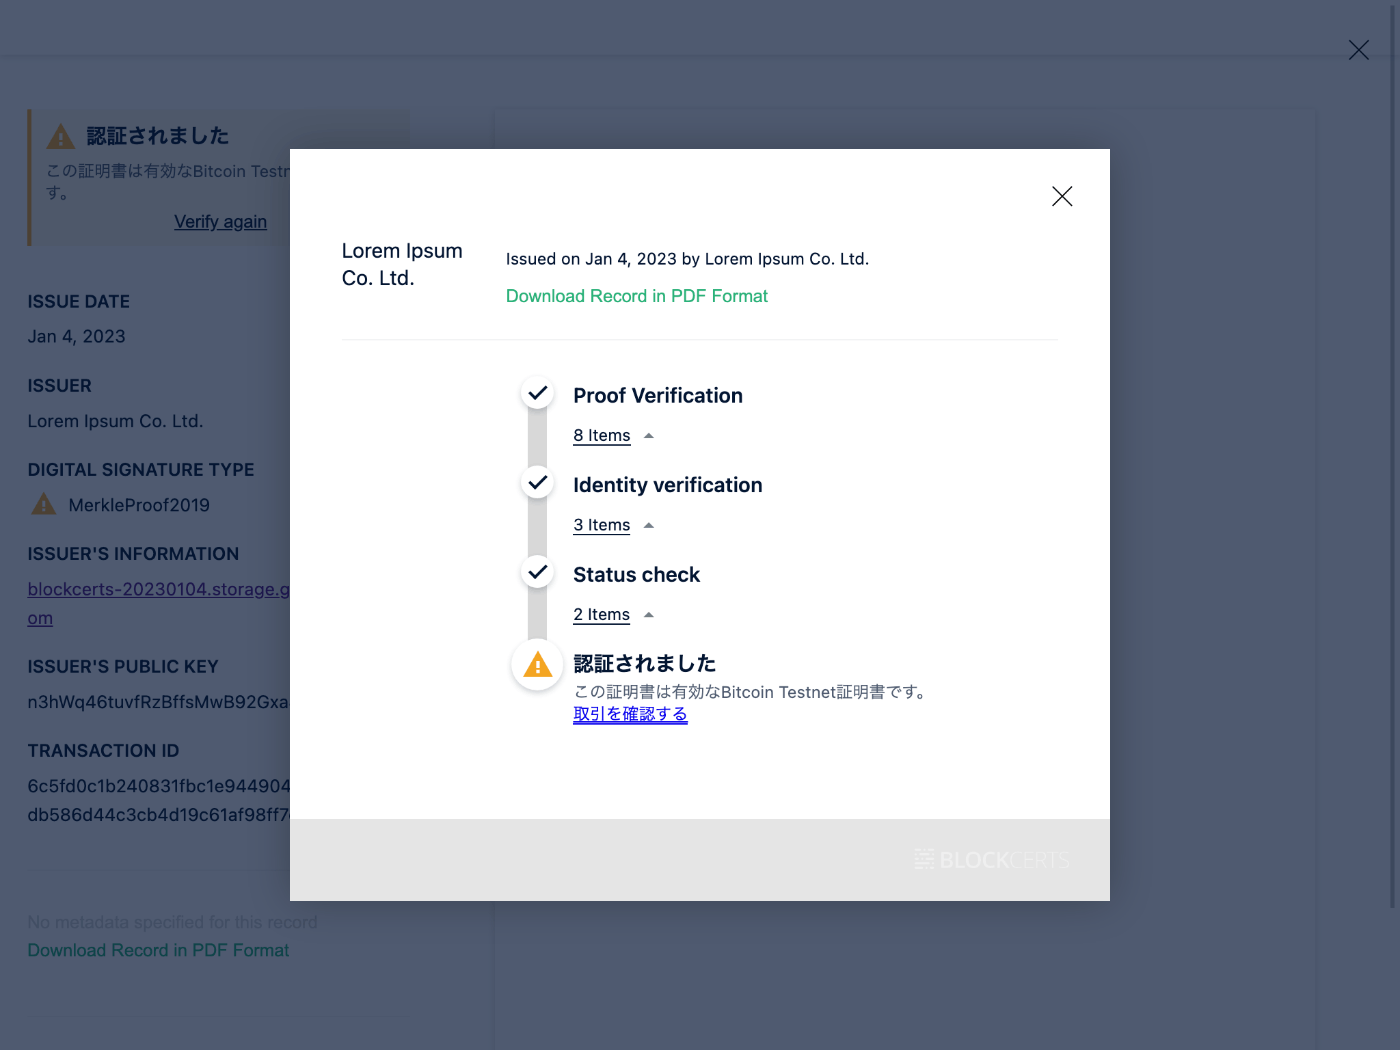
やったぜ!
Verify again リンクをクリックすると失敗するのでページをリロードした方が良い
なぜかファイルを選択できなくなったのでブラウザを再起動したらうまくいった
もらった tBTC を忘れずに返却する
BitPay を使おうとしたけどかえって面倒そうだったのでプログラムを書くことにする
import { networks, payments, Psbt } from "bitcoinjs-lib";
import ECPairFactory from "ecpair";
import * as ecc from "tiny-secp256k1";

const utxoHash =
  "6c5fd0c1b240831fbc1e94490473491dd30db586d44c3cb4d19c61af98ff7d68";
const utxoIndex = 0;
const utxoTransactionHex =
  "01000000014c9506f38f00c4d94d7e4e1e4b20b72be2d21ed3381e22ddc0584f5e3a6fbbf2000000006a4730440220292c73f9e9e89d4ccf0dc375b7bed97e2b72217ebfb2f3b57802b9f696d42b3b02201ab9bfae6f53d24cab2fcbce259545caeb564dfda3df43c5ec71e11f8cb834ec012102d4b15382373da9faa3d0f1e48a5dbec0836f3051b048ea5f80e7b4cfff2ef402ffffffff029f724d00000000001976a914f35215d5229ffc68566b939af5ee401874198afd88ac0000000000000000226a20532bbb70882b4186eeaaf427db152546194ea5463f415d15db5e7d0320a8223800000000";
const utxoValue = 0.05075615e8;
const transactionFee = 200;

function main() {
  const ECPair = ECPairFactory(ecc);
  const keyPair = ECPair.fromWIF(
    require("./address.json").wif,
    networks.testnet
  );

  const psbt = new Psbt({ network: networks.testnet });

  psbt.addInput({
    hash: utxoHash,
    index: utxoIndex,
    nonWitnessUtxo: Buffer.from(utxoTransactionHex, "hex"),
  });

  const payment = payments.p2pkh({
    address: "mv4rnyY3Su5gjcDNzbMLKBQkBicCtHUtFB",
    network: networks.testnet,
  });

  psbt.addOutput({
    script: payment.output!,
    value: utxoValue - transactionFee,
  });

  psbt.signInput(0, keyPair);
  psbt.finalizeAllInputs();

  process.stdout.write(psbt.extractTransaction().toHex());
}

main();
utxoHash がわかれば utxoIndex, utxoValue は Blockstream の Explorer で調べることができる
トランザクション生データの16進数文字列は Blockstream の API を使って調べることができる
transactionFee はそのままで OK(手数料は 1 satoshi/vbyte を想定しています)
下記のコマンドを実行して生トランザクションを出力する
npx ts-node send.tx > send.txt
出力したトランザクションを Blockstream の API を使って送信する
curl \
  -X POST \
  -H 'Content-Type: text/plain' \
  --data-binary @send.txt \
  https://blockstream.info/testnet/api/tx
送信に成功するとトランザクション ID が表示される
182cdb9bacba5f2feaab7aff9a6b06069dbc00481768e5a238d96df6cd76e914
トランザクションを Explorer で確認してみる
アドレスの残高を調べるのは BlockCypher の方が便利
おわりに
長かった Blockcerts のスクラップも遂に終わりを迎えました
気が向いたら Bitcoin テストネット証明書の発行手順を記事にまとめてみようと思います
日本で数少ないBlockcerts証明書発行成功者を探し、ここに辿り着きました。
検証までの道のり成功、おめでとうございます。
初めまして。Blockcertsを学んでいる素人です。
cert-issuerのRead Meに従ってDockerを使用したクイックスタートに手を付け、
やっとのことで「証明書の発行」まで来て50(偽の)BTCを得ることが出来たのですが、
この後何をしたらよいのか混乱し停滞しているところです。
(そもそも全体を理解していない状態です)
やるべき流れは以下のように考えています。
・秘密鍵 → JWK 公開鍵へ変換
・DID ドキュメントの作成
・Profile ドキュメントの作成
・Cloud Storage バケットの作成
何をどう処理していけば本環境で証明書を発行し検証成功に至るでしょうか。
御教示頂ければ幸いです。
コメントありがとうございます、嬉しいです!
cert-issuer の Read Me に書かれている Docker を使用したクイックスタートについては実は僕も途中で挫折したので詳しくはわからないのですが、50(偽の)BTCを得た後は下記の手順で証明書を発行しようとしました。
- Fallback fee の設定
- BTCの送金
- 証明書の発行(ここでエラーが出て挫折)
詳しくは下記の投稿をお読みいただければ幸いです。
クイックスタートで紹介されている方法では検証が成功する証明書は作成できず、検証が成功する証明書を作成するためには Ethereum か Bitcoin のメインネットかテストネットを使う必要があります。
Ethereum 証明書の方が簡単なのでまずは下記の記事を参考にしていただいて Ethereum 証明書の発行から始めてみることをおすすめします。
やるべき流れについては福地さんのお考えの通りです。
上記の Ethereum 証明書発行の記事から大まかな流れを引用いたします。
- インストール
- cert-issuer のインストール
- 依存関係の追加インストール
- DID の作成
- ワークスペースの作成
- 秘密鍵のエクスポート
- 秘密鍵 → JWK 公開鍵へ変換
- DID ドキュメントの作成
- Profile ドキュメントの作成
- Cloud Storage バケットの作成
- ブロックチェーン証明書の発行
- 証明書の作成
- 設定ファイルの作成
- ブロックチェーン証明書の発行
- ブロックチェーン証明書の検証
なお、上記の手順に従う前に下記の前提条件を満たす必要があります。
- gcloud CLI がインストールされていること
- MetaMask がインストールされていること
- Alchemy のアカウントを持っていること
- Goerli Faucet などからテスト用の ETH を貰っていること
- Terraform がインストールされていること
Bitcoin 証明書の発行手順についてはあまり良くまとまっていないのですが下記の投稿とそれ以降が参考になるのではないかと思います。
うまくいくことをお祈りしております。
丁寧に且つこんなに早く回答頂けるとは・・。感謝致します。
焦らず理解を深めながら進めていきます。
ありがとうございます。