CodePipelineとTerraformで、API Gatewayをビルド【CodeFamily Practices 7/7】
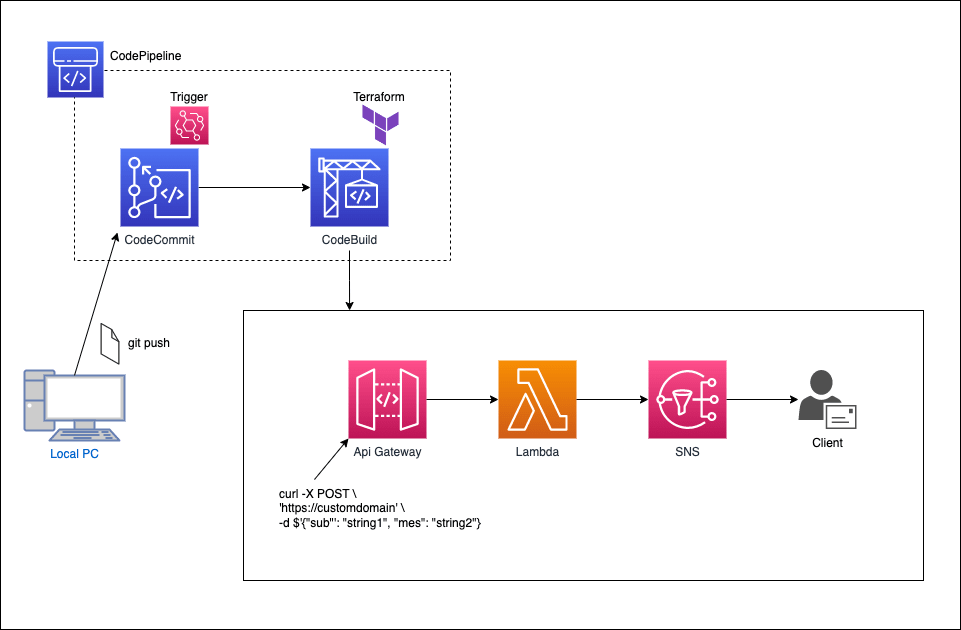
構成図
API GatewayとLambdaの挙動を確認するための、シンプルな構成。
- ソースステージをCodeCommit、ビルドステージをCodeBuildに設定したCodePipelineを構築。
- ビルドはTerraformを使用。
- API Gatewayへメールのタイトルと本文を指定してアクセスをすると、SNSトピックのサブスクリプションへメールを送信
- 送信に成功すると、サブジェクトとメッセージの値をレスポンス。
-
コマンド
オプション-vは、リクエストとレスポンスの詳細を返すために入力。
メールを送るだけなら不要。
curl -v -X POST \
'https://Your-domain-name' \
-d $'{"sub": "テスト", "mes": "動作異常なし。"}'
実行結果
実際に行われているリクエストとレスポンスを出力。
Note: Unnecessary use of -X or --request, POST is already inferred.
*   Trying xxx.xxx.xxx.xxx:443...
* Connected to Your-domain-name (xxx.xxx.xxx.xxx) port 443 (#0)
* ALPN: offers h2
* ALPN: offers http/1.1
*  CAfile: /Users/username/opt/anaconda3/ssl/cacert.pem
*  CApath: none
* TLSv1.3 (OUT), TLS handshake, Client hello (1):
* TLSv1.3 (IN), TLS handshake, Server hello (2):
* TLSv1.2 (IN), TLS handshake, Certificate (11):
* TLSv1.2 (IN), TLS handshake, Server key exchange (12):
* TLSv1.2 (IN), TLS handshake, Server finished (14):
* TLSv1.2 (OUT), TLS handshake, Client key exchange (16):
* TLSv1.2 (OUT), TLS change cipher, Change cipher spec (1):
* TLSv1.2 (OUT), TLS handshake, Finished (20):
* TLSv1.2 (IN), TLS handshake, Finished (20):
* SSL connection using TLSv1.2 / ECDHE-RSA-AES128-GCM-SHA256
* ALPN: server accepted h2
* Server certificate:
*  subject: CN=*.DomainName
*  start date: Apr 26 00:00:00 2023 GMT
*  expire date: May 25 23:59:59 2024 GMT
*  subjectAltName: host "Your-domain-name" matched cert's "*.DomainName"
*  issuer: C=US; O=Amazon; CN=Amazon RSA 2048 M01
*  SSL certificate verify ok.
* Using HTTP2, server supports multiplexing
* Copying HTTP/2 data in stream buffer to connection buffer after upgrade: len=0
* h2h3 [:method: POST]
* h2h3 [:path: /]
* h2h3 [:scheme: https]
* h2h3 [:authority: Your-domain-name]
* h2h3 [user-agent: curl/7.84.0]
* h2h3 [accept: */*]
* h2h3 [content-length: 52]
* h2h3 [content-type: application/x-www-form-urlencoded]
* Using Stream ID: 1 (easy handle 0x7faf7c013200)
> POST / HTTP/2
> Host: Your-domain-name
> user-agent: curl/7.84.0
> accept: */*
> content-length: 52
> content-type: application/x-www-form-urlencoded
>
* Connection state changed (MAX_CONCURRENT_STREAMS == 128)!
* We are completely uploaded and fine
< HTTP/2 200
< date: Tue, 02 May 2023 06:08:45 GMT
< content-type: application/json
< content-length: 49
< x-amzn-requestid: ea5fdaa9-9d87-4746-a9f1-7d129dc5d09b
< x-amz-apigw-id: ER9U_HIxtjMFzwA=
< x-amzn-trace-id: Root=1-6450a8ec-4159b6d05aea26b77a5239ff;Sampled=0;lineage=ca71e3f6:0
<
* Connection #0 to host Your-domain-name left intact
Subject: テスト Message: 動作異常なし。%
メール

コード
対応するコードはGitHubに公開しています!
buildspecファイル
-
buildspec.yml
ビルドに必要なポリシーを付与したCodeBuildのサービスロールを使用の場合。
-
buildspec.yml(アクセスキーID・シークレットキー使用)
アクセスキーID、シークレットキーを使用する場合。
Secrets Managerへキーの登録
Codebuildのサービスロールに secretsmanager:GetSecretValueアクションのポリシーを付与。
Secrets Mangerのコンソール画面で、"Store a new secret"を選択。

"Other type of secret"を選択し、"Plantext"にキーの値を入力。
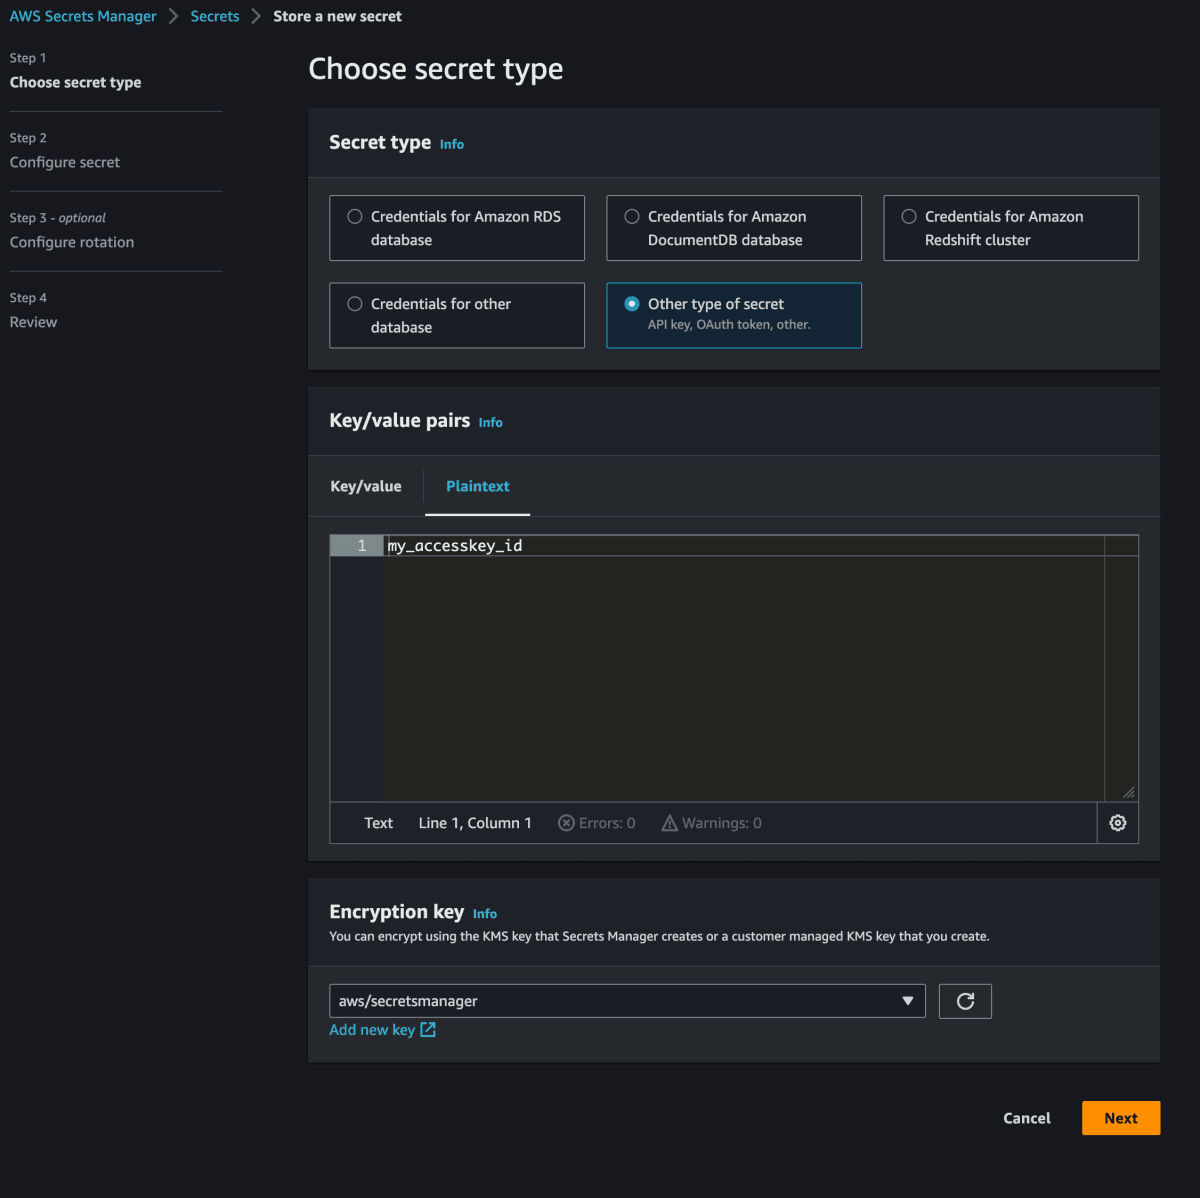
"Secret name"に任意の名称を付与。buildspec.ymlの環境変数の値として使用。

"Configure rotation"は無効のまま。

レビューを確認し、作成完了。シークレットキーも同様に作成。

tfファイル
- providers.tf
- backend.tf
- variables.tf
- data.tf
- main.tf
- main.tf(リソースパスあり)
パイプラインの構築
ソースステージとビルドステージの二つを持つパイプラインを作成。
CodeCommitにリポジトリ(api-terraform)を作成し、ソースコードとbuildspec.ymlをプッシュ。

CodeBuildへ移動し、以下の内容でビルドプロジェクトを作成。
| 項目 | 設定 |
|---|---|
| Source provider | CodeCommit |
| repository | api-terraform |
| Git clone depth | 1 (デフォルト) |
| Image | aws/codebuild/amazonlinux2-x86_64-standard:corretto8 |
| Environment type | Linux |
| Artifact | No artifact |
| Cache | No cache |
| CloudWatch Logs | ENABLED |

CodePipelineへ移動し、パイプラインの設定を開始。

前述で作成したリポジトリを指定。
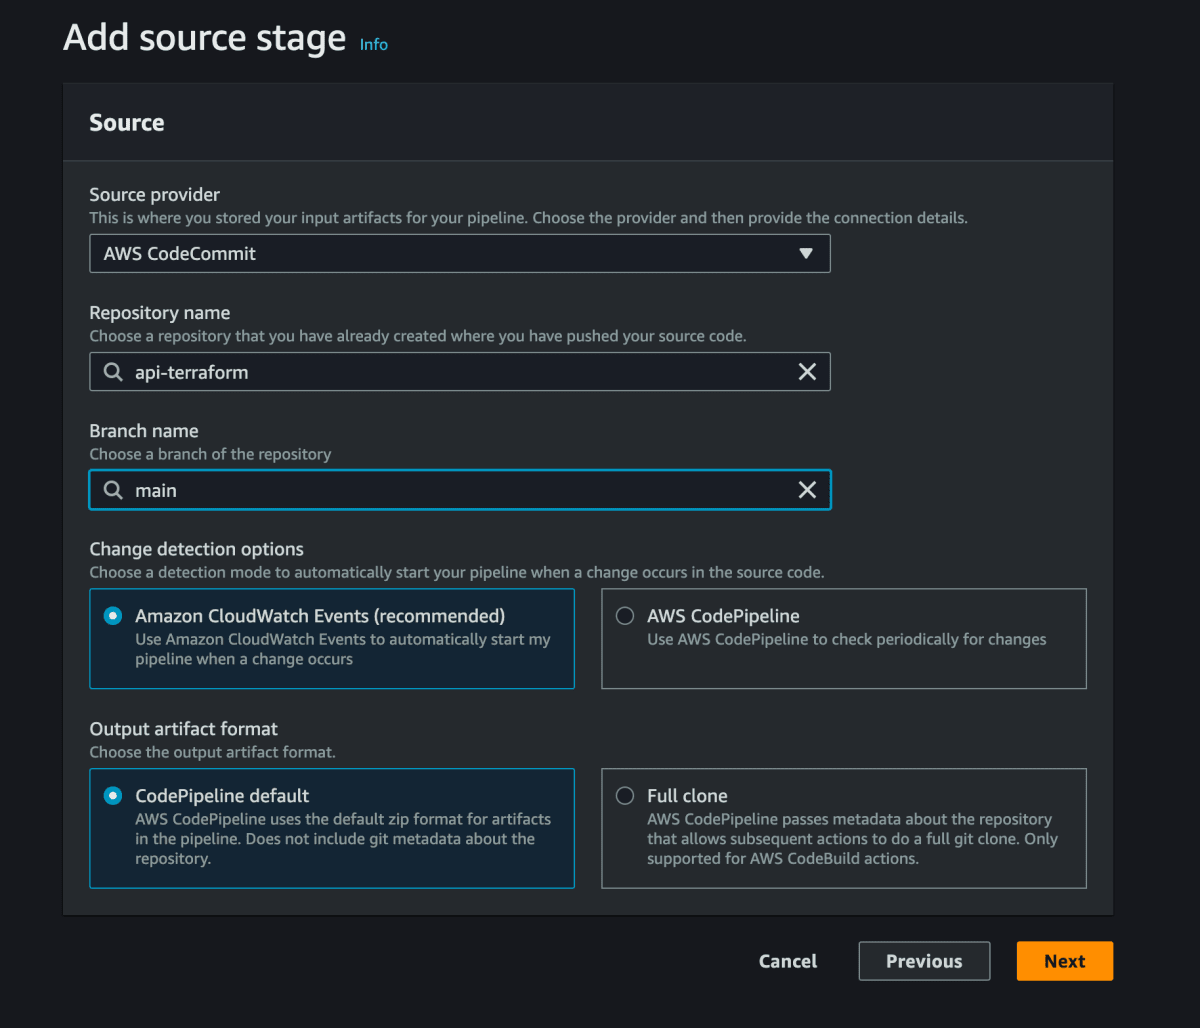
前述で作成したビルドプロジェクトを指定。

デプロイを行わないためスキップ。

設定内容を確認の上、"Create pipeline"を選択。
選択後、自動的にパイプラインを開始。

自動構築
SourceとBuild、両方のステージが成功。

CodeBuildのログを確認。
Amazon Linux2のDockerイメージを使用したコンテナで、CodeCommitからダウンロードしたBuildspec.ymlを参照。
Terraformをインストールし、リソースをデプロイ。

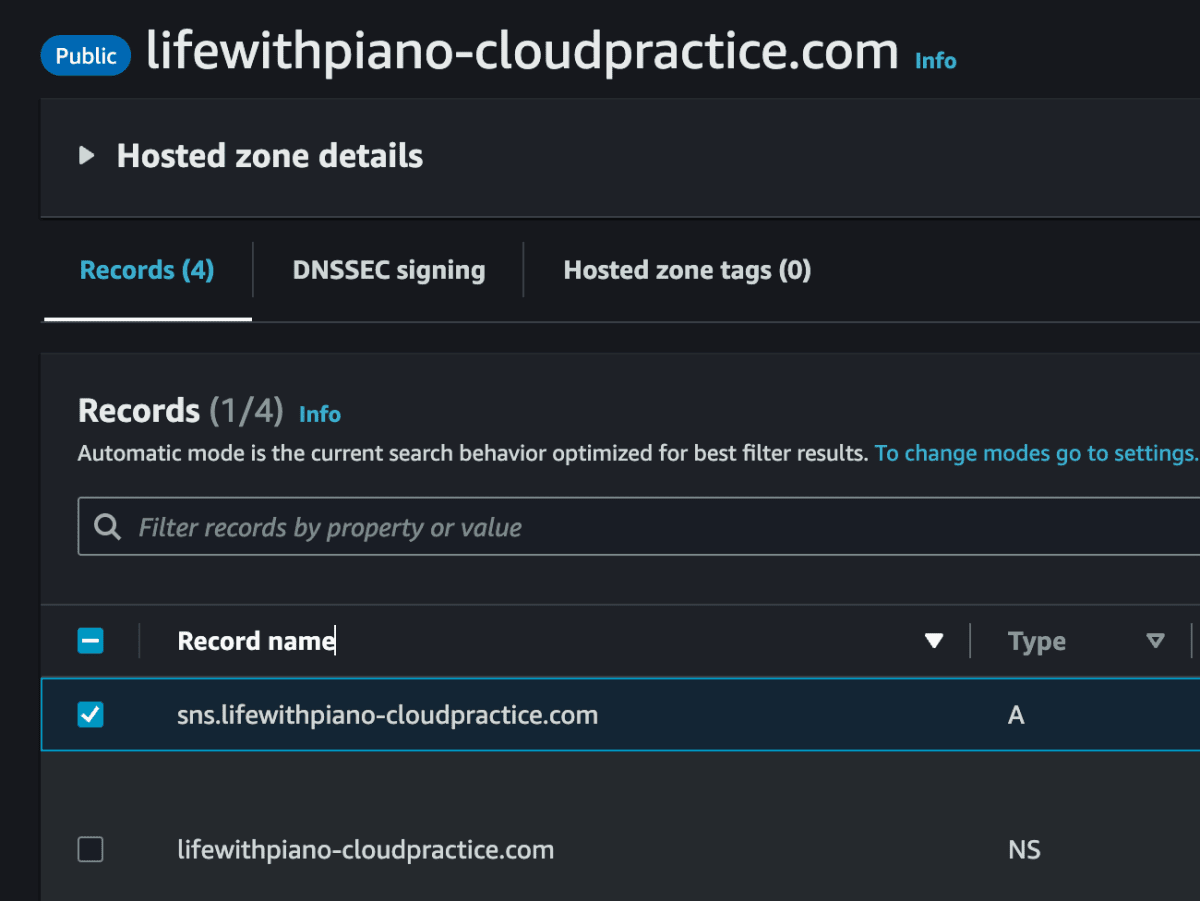
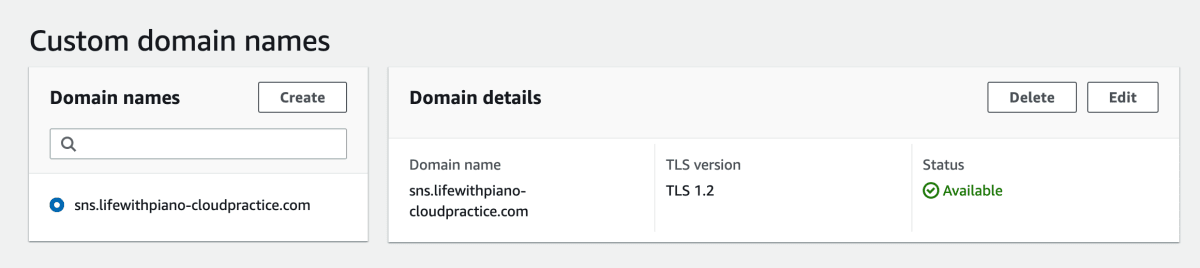
Domain Managerは、ホストゾーンにデフォルトでAレコードを生成。
REST APIプロキシ統合のAPI Gatewayを作成。

カスタムドメインとして登録。
Lambdaを作成。

Cloudwatch Logsのポリシーを反映。

CloudWatch Logsにロググループを作成。

SNSのポリシーを反映。

トリガーにAPI Gatewayを設定。

SNSにトピックを作成。エンドポイントは、サブスクリプションの確認メールで承認の必要あり。

まとめ
今回はコンソールを使用してビルドプロジェクトやパイプラインを作成。
今後はパイプライン自体をTerraformで作成し、再利用を行いたい。
合わせて読みたい👀👉CodeFamily Practicesの記事
CodeCommitとローカル環境の連携 【CodeFamily Practices 1/7】
CodeBuildでビルドプロジェクトを作ってみよう 【CodeFamily Practices 2/7】
CodeDeployでEC2にアプリケーションをデプロイ 【CodeFamily Practices 3/7】
CodePipelineでシンプルなパイプラインを構築してみた 【CodeFamily Practices 4/7】
CodePipelineとCloudformationで、API Gatewayをビルド【CodeFamily Practices 5/7】
CodePipelineとServerless Frameworkでビルド【CodeFamily Practices 6/7】
👀👉Terraform関連の記事
Terraformの基本的な使い方
Discussion