1. はじめに
前回の記事で、「ボタンを押すと一定距離を素早く一直線に進む」というダッシュ機能を、LinearVelocityのVectorモードを使って実装しました。
まだ前回の記事を読んでいない方は、先にこちらをご覧ください。
前回までの形だと、坂道や壁に接触すると引っかかってしまう問題がありました。
厳密に対応しようとすると色々と工夫が必要なのですが、今回はある程度簡易的に対応する方法をご紹介します。
まずは、壁に接触した時の問題の対応です。
Vectorモードだと壁に接触した時に引っかかってしまうのは、壁によって押し出されて発生した左右のベクトルに対して、LinearVelocityが指定されているベクトル(今回は0)に補正しようとしてしまい、左右にズレられなくなっているからです。
よって、ベクトルの左右の成分は指定せず、それ以外を指定できればOKということになります。
そういう時に利用できるのがPlaneモードです!
バージョン:0.669.0.6690660
2. Planeモード
Planeモードは、名前の通り空間上に平面(Plane)を定義した上で、PlaneVelocityというVecter2のプロパティでその平面上のベクトルのみを指定し、その平面に対して垂直なベクトル成分は指定せずそのままにするモードです。
これで前後と上下のベクトルを指定し、左右のベクトルを指定しないようにすれば、壁に当たった時の押し出しによる横方向のベクトルは補正されないので、適切にズレられつつ、空中でも落下しない形にできそうです。
どのような平面にするかの指定は、前回も出てきたRelativeToによって方法が変わります。
RelativeTo
Attachment0、Attachment1、Worldの三種類があるのはどのモードでも共通です。
Attachment0の場合、BasePartに接続するために使っているAttachmentの向きを基準にするのですが、Attachment.AxisとAttachment.SecondaryAxisによって作られる面がベクトルの指定可能な面になります。
Attachmentなので、付けているBasePartの向きに連動してくれる点はVectorモードと同様です。
直感的にわかりづらいかもしれませんが、Attachmentの向きがデフォルトの場合を可視化するとこういうことになります。
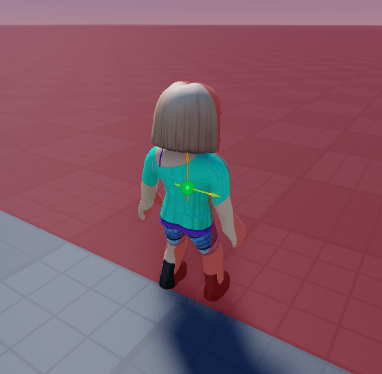
黄色い矢印がAxis、オレンジの矢印がSecondaryAxis、赤い面がベクトルを指定可能な面
デフォルトのままの場合、上下左右方向の成分は指定できますが、前後の成分は指定できないということです。
前回のVectorモードとは違い、デフォルトのままではダッシュに使えませんが、Attachmentの向きを変更すれば問題無さそうです。
Attachment1は、Vectorモードの時と同様、LinearVelocity.Attachment1を参照する点だけが異なり、それ以外はAttachment0と同じとなっています。
Worldの場合は、LinearVelocityのプロパティのPrimaryTangentAxisとSecondaryTangentAxisという二つの正規化されたVecter3の値が有効になり、これを使って面を指定します。
考え方自体はAttachmentのAxis、SecondaryAxisと同じで、二つのベクトルによって作られる面が指定可能な面になります。
こちらの場合、付けているBasePartやAttachmentの向きには影響されず、そのままワールド空間における面になります。
今回は、左右は指定したくないけど、前後と上下は指定したいので、Attachment0を使って以下の画像ような平面上のベクトルを指定すればよさそうです。

黄色い矢印がAxis、オレンジの矢印がSecondaryAxis、赤い面がベクトルを指定可能な面
Scriptの修正
それでは、前回作ったScriptを以下のように修正してください。
 ------- 省略 -------

 -- LinearVelocity用のAttachmentを作成.
local attachment = Instance.new("Attachment", rootPart_)
attachment.WorldPosition = rootPart_.AssemblyCenterOfMass -- 重心に力をかければ、角速度には影響しない.
+
+-- Attachmentの方向を設定.
+attachment.Axis = Vector3.new(0, 0, -1) -- 一つ目の軸は前方.
+attachment.SecondaryAxis = Vector3.new(0, 1, 0) -- 二つ目の軸は上方.

 -- LinearVelocityを作成.
local linearVelocity_ = Instance.new("LinearVelocity", rootPart_)
linearVelocity_.Name = "DashLinearVelocity"
linearVelocity_.Enabled = false
linearVelocity_.ForceLimitsEnabled = false -- LinearVelocityの強さに制限を付けない.
linearVelocity_.Attachment0 = attachment
linearVelocity_.RelativeTo = Enum.ActuatorRelativeTo.Attachment0 -- Attachment0の方向を基準にベクトルを決める.

+linearVelocity_.VelocityConstraintMode = Enum.VelocityConstraintMode.Plane -- モードをPlaneに設定.
-linearVelocity_.VelocityConstraintMode = Enum.VelocityConstraintMode.Vector -- モードをVectorに設定.

+-- Planeモード用の設定.
+linearVelocity_.PlaneVelocity = Vector2.new(DASH_FORCE, 0) -- 一つ目の軸を前方に指定したので、一つ目にダッシュ力を入れる.
-- Vectorモード用の設定.
-linearVelocity_.VectorVelocity = Vector3.new(0, 0, -DASH_FORCE) -- 負のZ方向は前方を示す.

 -- AnimationTruckを作成.
local animator_ = humanoid_:WaitForChild("Animator")::Animator
local dashAnimTrack_ = animator_:LoadAnimation(script:WaitForChild("DashAnimation"))
dashAnimTrack_.Priority = Enum.AnimationPriority.Action

 -- 保険の転倒禁止.
humanoid_:SetStateEnabled(Enum.HumanoidStateType.FallingDown, false)

 ------- 省略 -------

 -- ダッシュ関数.
local function dash()

 	------- 省略 -------

 	-- ダッシュ中毎フレーム行うイベントを接続.
	local rotation = rootPart_.CFrame.Rotation
	heartbeatConnection_ = RunService.Heartbeat:Connect(function(deltaTime: number)
 		-- ダッシュ中は常に進行方向を向かせる.
		rootPart_.CFrame = CFrame.new(rootPart_.CFrame.Position) * rotation
+
+		-- AssemblyLinearVelocityを補正.
+		local osVec = rootPart_.CFrame:VectorToObjectSpace(rootPart_.AssemblyLinearVelocity)
+		rootPart_.AssemblyLinearVelocity = rootPart_.CFrame:VectorToWorldSpace(Vector3.new(0, 0, osVec.Z))
	end)

 	-- Animationを再生.
	dashAnimTrack_:Play(0.1, nil, 0)
	dashAnimTrack_.TimePosition = 0.6

 	------- 省略 -------

end
Attachmentを作成した後、一つ目の軸(Axis)を前方、二つ目の軸(SecondaryAxis)を上方に指定し、モードをPlaneに設定しています。
RelativeToはAttachment0にしているので、これで先ほどの画像のように、前後と上下のベクトルだけを指定できるようになります。
指定した面に合わせて、PlaneVelocityの一つ目の値にダッシュ力を入れています。
毎フレーム行う処理の中で、AssemblyLinearVelocityを前方のみのベクトルに修正しています。
Heartbeatは物理演算の処理が行われた後の処理なので、左右のベクトルが0になってもVectorモードの時のように引っかかったりはしません。
こうすることで、壁に沿ってダッシュしている時に接触している壁が無くなった場合、また前方にダッシュするようになります。
本来は壁と接触しない状態になった時にだけ行った方がよさそうなのですが、簡易的な対応としてこのようにしています。
それではさっそく実行して確認してみましょう。
壁に沿ってスムーズに移動するようになりました!
しかし、坂道に対しては上下のベクトルを固定しているため、まだ引っかかってしまいます。
その対応として、今度はLineモードを利用します!
3. Lineモード
Lineモードは、Planeモードのように今度は空間上に直線(Line)を定義した上で、LineVelocityというnumberのプロパティでそのベクトルの強さのみを指定し、その直線に対して直交するベクトル成分は指定せずそのままにするモードです。
これで前後のベクトルを指定し、上下左右のベクトルを指定しないようにすれば、地形に当たった時の押し出しによる縦方向、横方向のベクトルは補正されないので、適切にズレられるようになります。
どのような直線にするかの指定は、やはりRelativeToによって方法が変わります。
RelativeTo
Attachment0の場合、BasePartに接続するために使っているAttachmentの向きを基準にするのですが、Attachment.Axisの方向がそのままベクトルの指定可能な直線になります。
Attachmentなので付けているBasePartの向きに連動してくれる点も同様です。
Attachmentの向きがデフォルトの場合を可視化するとこういうことになります。

黄色い矢印がAxis キャラクターの右を向いている
デフォルトのままの場合、左右方向の成分は指定できますが、上下前後の成分は指定できないということです。
Attachment1は、やはりLinearVelocity.Attachment1を参照する点だけが異なり、それ以外はAttachment0と同じとなっています。
Worldの場合は、LinearVelocityのプロパティのLineDirectionという正規化されたVecter3の値が有効になり、これを使って直線を指定します。
こちらの場合、付けているBasePartやAttachmentの向きには影響されず、そのままワールド空間における直線になります。
今回は前後だけを指定したいので、Attachment0を使って以下の画像ような直線のベクトルを指定すればよさそうです。

黄色い矢印がAxis キャラクターの前方を向いている
おや、この場合、先ほどPlaneモードで使ったAttachmentの設定がそのまま使えそうです!
Scriptの修正
早速Lineモード用にScriptを修正…なんですが、よく考えたら上下方向のベクトルを指定しないということは空中で普通に落下してしまうので、Lineモードだと空中ダッシュにならないですよね。
というわけで今度は、地上にいる間はLineモード、空中にいる時はPlaneモードになるようにして使い分けます!
 ------- 省略 -------

 -- LinearVelocityを作成.
local linearVelocity_ = Instance.new("LinearVelocity", rootPart_)
linearVelocity_.Name = "DashLinearVelocity"
linearVelocity_.Enabled = false
linearVelocity_.ForceLimitsEnabled = false -- LinearVelocityの強さに制限を付けない.
linearVelocity_.Attachment0 = attachment
linearVelocity_.RelativeTo = Enum.ActuatorRelativeTo.Attachment0 -- Attachment0の方向を基準にベクトルを決める.

+linearVelocity_.VelocityConstraintMode = Enum.VelocityConstraintMode.Line -- モードをLineに設定.
-linearVelocity_.VelocityConstraintMode = Enum.VelocityConstraintMode.Plane -- モードをPlaneに設定.

 -- Planeモード用の設定.
linearVelocity_.PlaneVelocity = Vector2.new(DASH_FORCE, 0) -- 一つ目の軸を前方に指定したので、一つ目にダッシュ力を入れる.

+-- Lineモード用の設定.
+linearVelocity_.LineVelocity = DASH_FORCE
+
 -- AnimationTruckを作成.
local animator_ = humanoid_:WaitForChild("Animator")::Animator
local dashAnimTrack_ = animator_:LoadAnimation(script:WaitForChild("DashAnimation"))
dashAnimTrack_.Priority = Enum.AnimationPriority.Action

 ------- 省略 -------

 -- FloorMaterialで地上と空中を判断.
humanoid_:GetPropertyChangedSignal("FloorMaterial"):Connect(function()
	if humanoid_.FloorMaterial == Enum.Material.Air then
+		-- 空中用にPlaneにモード変更.
+		linearVelocity_.VelocityConstraintMode = Enum.VelocityConstraintMode.Plane
+
 		-- ダッシュで空中に出た時、1回空中ダッシュ使用済みとして扱う.
		if not linearVelocity_.Enabled then
			return
		end
		airDashCount_ += 1

	else
+		-- 地上用にLineにモード変更.
+		linearVelocity_.VelocityConstraintMode = Enum.VelocityConstraintMode.Line
+
		-- 接地時に空中ダッシュ回数をリセット
		airDashCount_ = 0
	end
end)
デフォルトのモードはLineにしておきました。
Attachment.Axisは、Planeモードの時の設定で前方になっているので、そのまま変更の必要はありません。
LineVelocityを設定と、FloorMaterialが変化した際のモードの切り替えだけを追記しています。
それではさっそく実行して確認してみましょう。
地形に沿ってスムーズに移動するようになりました!
4. サンプルコード
今回作成した最終的なサンプルコードを掲載しておきます。
サンプルコード
--!strict

-- Service
local RunService = game:GetService("RunService")

-- Constant
local AIR_DASH_MAX = 1 -- 最大空中ダッシュ回数.
local DASH_FORCE = 100 -- ダッシュの強さ.
local DASH_DURATION = 0.5 -- ダッシュ時間(秒単位).
local ACTION_NAME: "Dash" = "Dash" -- アクション名.

-- Variable
local player_ = game:GetService("Players").LocalPlayer
local character_ = player_.Character or player_.CharacterAdded:Wait()
local rootPart_ = character_:WaitForChild("HumanoidRootPart")::Part
local humanoid_ = character_:FindFirstChildWhichIsA("Humanoid")

local baseWalkSpeed_ = humanoid_.WalkSpeed -- 元々の移動速度を保持.
local airDashCount_ = 0 -- 現在のダッシュ回数.

local heartbeatConnection_: RBXScriptConnection?
local endThread_: thread?

-- LinearVelocity用のAttachmentを作成.
local attachment = Instance.new("Attachment", rootPart_)
attachment.WorldPosition = rootPart_.AssemblyCenterOfMass -- 重心に力をかければ、角速度には影響しない.

-- Attachmentの方向を設定.
attachment.Axis = Vector3.new(0, 0, -1) -- 一つ目の軸は前方.
attachment.SecondaryAxis = Vector3.new(0, 1, 0) -- 二つ目の軸は上方.

-- LinearVelocityを作成.
local linearVelocity_ = Instance.new("LinearVelocity", rootPart_)
linearVelocity_.Name = "DashLinearVelocity"
linearVelocity_.Enabled = false
linearVelocity_.ForceLimitsEnabled = false -- LinearVelocityの強さに制限を付けない.
linearVelocity_.Attachment0 = attachment
linearVelocity_.RelativeTo = Enum.ActuatorRelativeTo.Attachment0 -- Attachment0の方向を基準にベクトルを決める.

linearVelocity_.VelocityConstraintMode = Enum.VelocityConstraintMode.Line -- モードをLineに設定.

-- Planeモード用の設定.
linearVelocity_.PlaneVelocity = Vector2.new(DASH_FORCE, 0) -- 一つ目の軸を前方に指定したので、一つ目にダッシュ力を入れる.

-- Lineモード用の設定.
linearVelocity_.LineVelocity = DASH_FORCE

-- AnimationTruckを作成.
local animator_ = humanoid_:WaitForChild("Animator")::Animator
local dashAnimTrack_ = animator_:LoadAnimation(script:WaitForChild("DashAnimation"))
dashAnimTrack_.Priority = Enum.AnimationPriority.Action

-- 保険の転倒禁止.
humanoid_:SetStateEnabled(Enum.HumanoidStateType.FallingDown, false)

-- ダッシュ終了処理.
local function dashEnd()
	-- ダッシュ中でなければ何もしない.
	if not linearVelocity_.Enabled then
		return
	end

	-- 終了処理が予約されていたらキャンセル.
	if endThread_ then
		pcall(task.cancel, endThread_)
		endThread_ = nil
	end

	-- イベントを切断.
	if heartbeatConnection_ then
		heartbeatConnection_:Disconnect()
		heartbeatConnection_ = nil
	end

	-- ダッシュ終了.
	linearVelocity_.Enabled = false

	-- 移動速度を元に戻す.
	humanoid_.WalkSpeed = baseWalkSpeed_

	-- 終わり際のAssemblyLinearVelocityを補正.
	local osVec = rootPart_.CFrame:VectorToObjectSpace(rootPart_.AssemblyLinearVelocity)
	rootPart_.AssemblyLinearVelocity = rootPart_.CFrame:VectorToWorldSpace(Vector3.new(0, 0, osVec.Z * 0.5))

	-- Animation終了.
	dashAnimTrack_:Stop(0.2)
end

-- ダッシュ関数.
local function dash()
	-- ダッシュ中は使用不可.
	if linearVelocity_.Enabled then
		return
	end

	-- 死亡中は使用不可.
	if humanoid_:GetState() == Enum.HumanoidStateType.Dead then
		return
	end

	-- 空中ダッシュ回数上限.
	if airDashCount_ >= AIR_DASH_MAX then
		return
	end

	-- 空中の場合、空中ダッシュ回数をカウント.
	if humanoid_.FloorMaterial == Enum.Material.Air then
		airDashCount_ += 1
	end

	--現在の移動入力方向を取得.
	local direction = humanoid_.MoveDirection

	-- 移動している場合.
	if direction ~= Vector3.new() then
		-- 向きを移動方向に.
		rootPart_.CFrame = CFrame.new(rootPart_.Position, rootPart_.Position + direction)
	end

	-- 歩行速度を0に.
	humanoid_.WalkSpeed = 0

	-- LinearVelocityを有効にして現在の向きへダッシュ.
	linearVelocity_.Enabled = true

	-- ダッシュ中毎フレーム行うイベントを接続.
	local rotation = rootPart_.CFrame.Rotation
	heartbeatConnection_ = RunService.Heartbeat:Connect(function(deltaTime: number)
		-- ダッシュ中は常に進行方向を向かせる.
		rootPart_.CFrame = CFrame.new(rootPart_.CFrame.Position) * rotation

		-- AssemblyLinearVelocityを補正.
		local osVec = rootPart_.CFrame:VectorToObjectSpace(rootPart_.AssemblyLinearVelocity)
		rootPart_.AssemblyLinearVelocity = rootPart_.CFrame:VectorToWorldSpace(Vector3.new(0, 0, osVec.Z))
	end)

	-- Animationを再生.
	dashAnimTrack_:Play(0.1, nil, 0)
	dashAnimTrack_.TimePosition = 0.6

	-- 一定時間後に終了
	endThread_ = task.delay(DASH_DURATION, dashEnd)
end

-- BindActionで、キーボードならEキー、スマートデバイスならUI上のボタンを押した時にダッシュするようにする.
do
	-- BindActionで設定するコールバック関数
	local function onAction(actionName: string, inputState: Enum.UserInputState, _inputObject: InputObject)
		if actionName ~= ACTION_NAME then
			return
		end

		if inputState ~= Enum.UserInputState.Begin then
			return
		end

		-- ダッシュ.
		dash()
	end

	-- アクションを設定 Eキーでダッシュ.
	local ContextActionService = game:GetService("ContextActionService")
	ContextActionService:BindAction(ACTION_NAME, onAction, true, Enum.KeyCode.E)

	-- スマートデバイス用のUIボタンを調整.
	local button = ContextActionService:GetButton(ACTION_NAME)::ImageButton
	if button then
		button.AnchorPoint = Vector2.new(1, 1)
		button.Size = UDim2.fromOffset(button.Size.X.Offset * 1.5, button.Size.Y.Offset * 1.5)
	end
end

-- ジャンプでキャンセルできるように.
humanoid_.StateChanged:Connect(function(old: Enum.HumanoidStateType, new: Enum.HumanoidStateType)
	if new == Enum.HumanoidStateType.Jumping then
		dashEnd()
	end
end)

-- FloorMaterialで地上と空中を判断.
humanoid_:GetPropertyChangedSignal("FloorMaterial"):Connect(function()
	if humanoid_.FloorMaterial == Enum.Material.Air then
		-- 空中用にPlaneにモード変更.
		linearVelocity_.VelocityConstraintMode = Enum.VelocityConstraintMode.Plane

		-- ダッシュで空中に出た時、1回空中ダッシュ使用済みとして扱う.
		if not linearVelocity_.Enabled then
			return
		end
		airDashCount_ += 1

	else
		-- 地上用にLineにモード変更.
		linearVelocity_.VelocityConstraintMode = Enum.VelocityConstraintMode.Line

		-- 接地時に空中ダッシュ回数をリセット
		airDashCount_ = 0
	end
end)
5. まとめ
- Planeモードは、平面を定義して、その範囲内のベクトルのみを指定するモード
- RelativeToがAttachment0の場合、平面はAttachment.AxisとAttachment.SecondaryAxisで定義する
- RelativeToがWorldの場合、平面はPrimaryTangentAxisとSecondaryTangentAxisで定義する
- ベクトルは、PlaneVelocityで設定する
- Lineモードは、直線を定義して、その方向のベクトルのみを指定するモード
- RelativeToがAttachment0の場合、直線はAttachment.Axisで定義する
- RelativeToがWorldの場合、直線はLineDirectionで定義する
- 速度は、LineVelocityで設定する
今回は、LinearVelocityのPlaneモードとLineモードを使って、ダッシュ中に地形に触れたの時の問題に対応しました!
簡易的な対応のため、壁に対して垂直に近い角度で当たるとまだ怪しい挙動をしてしまったりするのですが、今回は一旦ここまでとしておきます。
ちなみに、今回作ったダッシュは、主観視点にした時などのCharacterが常にカメラ前方を向くモードには対応していません。
主観視点の場合は、RelativeToをWorldにして、ダッシュ時に毎回ベクトルを指定してやる必要がありますので、主観に対応してみたい方はぜひその改良にも挑戦してみてください。
次回は、このダッシュのスピード感を強調する風のエフェクトを実装してみようと思いますので、そちらもぜひご覧ください!
最後までお読みいただき、ありがとうございました!
6. 参考

当社ではRobloxを活用したゲームの開発、 また企業の商品やサービスの認知度拡大に寄与する3Dワールドの制作など、 Robloxにおける様々な活用支援を行っております。 Robloxのコンテンツ開発をご検討されている企業様は、お気軽にご相談ください。 landho.co.jp/
Discussion