1. はじめに
前回は、PlayerCharacterに付いてくるNPCの基礎を作成しました。
まだ前回の記事を読んでいない方は、先にこちらをご覧ください。
前回作成したNPCは基礎的な構造ができただけで、NPCとしてはまだ色々と気になる所があるので、今回はブラッシュアップしていきます!
バージョン: 0.664.0.6640713
2. 距離に応じて動きを調整する
現状では、NPCは常にPlayerCharacterの座標を目指しているので、常に密着しようとしてしまいます。
そこで、適度な距離を保つようにします。
ターゲットの座標からある程度離れた位置を目標にすればよいのですが、単純に離した位置にすると、位置関係によっては薄い壁の向こう側を目標にしてしまうなど、時々問題になりそうです。
そこで、目標地点の決定にRaycastを利用します。
ターゲットの座標から少しNPC寄りにズラした座標を出し、ターゲットからその座標に向けてRayを飛ばして、何かにヒットした場合はそのヒットした場所を目標地点にすれば、間に壁があっても大丈夫です。
これで一定の距離はとるようになりますが、このままだと、ちょうど目標地点付近の距離を歩いている時に、ガクガクと不自然な動き方をしてしまいます。
そこで、一定距離以内にいるときは経路探索をしないようにしておきましょう。
その距離は、先ほどのRayを飛ばす距離より少しだけ遠くにしておくと、移動を開始する距離と停止する距離にバッファが生まれ、ガクガクせずに自然な動きになります。
では、以下のコードをRunService.Heartbeatのコールバック関数に追加してください。
game:GetService("RunService").Heartbeat:Connect(function(deltaTime: number)
	-- タイマーを進める.
	timer_ -= deltaTime

	-- 規定時間を過ぎるまでは何もしない.
	if timer_ > 0 then
		return
	end
	timer_ += WAIT

	-- 自分の状態チェック.
	local state = humanoid_:GetState()::Enum.HumanoidStateType
	if state == Enum.HumanoidStateType.Dead then
		return
	end

	-- ターゲットの存在チェック.
	if not target_ then
		return
	end

+	-- ターゲットとの距離を測る.
+	local targetPos = target_:GetPivot().Position
+	local vec = script.Parent:GetPivot().Position - targetPos
+	local magnitude = vec.Magnitude
+	local unit = vec.Unit
+
+	-- 一定距離より近かったら何もしない.
+	if magnitude <= (unit * 7).Magnitude then
+		return
+	end
+
+	-- ターゲットから少し自分寄りの位置を目標地点に.
+	local destination = targetPos + unit * 5
+
+	-- ターゲットから目標地点にRayを飛ばし、ヒットした場合はそこが最終的な目標地点.
+	local param = RaycastParams.new()
+	param:AddToFilter(target_)
+	local rayResult = workspace:Raycast(targetPos, destination - targetPos, param)
+	if rayResult then
+		destination = rayResult.Position
+	end

	-- 経路探索と移動開始.
+	toDestination(humanoid_, destination)
-	toDestination(humanoid_, target_:GetPivot().Position)
end)
せっかくなので、ある程度近づいたらゆっくり歩く処理も追加してみましょう。
まずはAccompanyingNpcの最初で立てる変数を一つ追加して、最初の移動速度を保持しておくようにします。
 -- Variable
local TargetValue = script:WaitForChild("Target")
local target_:PVInstance? = TargetValue.Value

local humanoid_ = script.Parent:WaitForChild("Humanoid")
local timer_ = 0
+local baseWalkSpeed_ = humanoid_.WalkSpeed
そして、ターゲットとの距離を測った後に、距離に応じて移動速度を変更するコードを追加します。
この時、ジャンプの距離が足りなくなる事を防止するため、ジャンプ行動中や空中では変更しないようにしておきましょう。
歩くようになる距離は、経路探索をしなくなる距離よりもう少し遠くにしておきます。
	-- ターゲットとの距離を測る.
	local targetPos = target_:GetPivot().Position
	local vec = script.Parent:GetPivot().Position - targetPos
	local magnitude = vec.Magnitude
	local unit = vec.Unit

+	-- ジャンプ中でなく、一定距離より近かったら歩く.
+	local nowWaypoint = waypoints_[nextWaypointId_]
+	if (nowWaypoint and not string.find(nowWaypoint.Label, "Jump")) and humanoid_.FloorMaterial ~= Enum.Material.Air then
+		if magnitude <= (unit * 10).Magnitude then
+			humanoid_.WalkSpeed = baseWalkSpeed_ * 0.5
+		else
+			humanoid_.WalkSpeed = baseWalkSpeed_
+		end
+	end
+
	-- 一定距離より近かったら何もしない.
	if magnitude <= (unit * 7).Magnitude then
		return
	end
これだけでも大分、「付いてくるNPC」らしい動きになったんじゃないでしょうか!
3. ジャンプを補正する
次は、ジャンプの補正です。
現状では、時々ジャンプしても次の足場に届かず落ちてしまう場合があります。
その原因はいくつかあるのですが、その一つは、Humanoid:MoveToが目標地点へ到達したと判定される範囲がそれなりに広いため、実際に足場まで到達していないのに進行を止めてしまう場合があるからです。
こちらはHumanoid:MoveToを使用する以上回避できず、こちらに対する直接的な対策は手間がかかります。
もう一つの原因は、以前の記事でご紹介したナビゲーションメッシュを表示するとわかります。
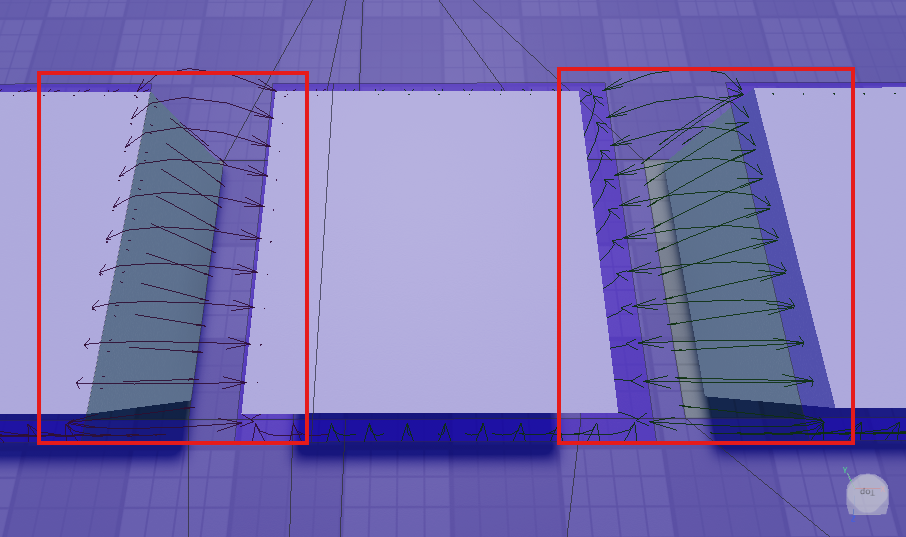
この画像をみると、左側の谷間は判定ギリギリにナビゲーションメッシュがあるのに対し、右側の谷間は、判定よりちょっとはみ出しているのがわかるでしょうか?
ナビゲーションメッシュは大まかな形で付けられるため、置き方によっては最大1スタッド程度のズレが生じ、ジャンプポイントもそれに則って判定の外についてしまいます。
Waypointが生成される時には実際の判定の範囲内に補正されるものの、地形の崖ギリギリがジャンプの目標地点になってしまうため、Humanoid:MoveToの到達判定の問題と合わさり、うまく着地できずに落下してしまうのです。
他にも細かな原因は色々あるのですが、ひとまずジャンプが届かない問題の対策として、ジャンプを補正することにします。
具体的には、ジャンプの目標地点をちょっと遠くにした上で、ジャンプ時には少しだけ移動速度を上げてあげます。
まずは、move関数の前に以下の関数を追加してください。
--[[
	PathWaypointに従ってジャンプを行います.
	@param humanoid :Humanoid パートナーのHumanoid
	@param startPathWaypoint :PathWaypoint 移動元のPathWaypoint
	@param endPathWaypoint :PathWaypoint 移動先のPathWaypoint
]]
local function jump(humanoid :Humanoid, startPathWaypoint :PathWaypoint, endPathWaypoint :PathWaypoint)
	-- ポイントのちょっと向こう側を目指す.
	local startPos = startPathWaypoint.Position
	local vec = Vector3.new(endPathWaypoint.Position.X, startPos.Y, endPathWaypoint.Position.Z) - startPos
	local endPos = endPathWaypoint.Position + vec.Unit * 2.5

	-- ジャンプ中だけ移動速度を少し上げる.
	humanoid.WalkSpeed = baseWalkSpeed_ + 2

	-- 空中ジャンプ防止.
	if humanoid.FloorMaterial ~= Enum.Material.Air then
		-- ジャンプ.
		humanoid:ChangeState(Enum.HumanoidStateType.Jumping)
	end
	humanoid:MoveTo(endPos)
end
前項で距離に応じて移動速度を変える処理を作った時に、ジャンプ中は変えないようにしているのは、ここで少し上げた移動速度を上書きされないようにするためです。
そして、move関数の中のジャンプ処理を、今追加したjump関数の呼び出しに差し替えます。
 --[[
 	PathWaypointに従って移動を行います.
 	@param humanoid :Humanoid 対象のHumanoid
 	@param startPathWaypoint :PathWaypoint 移動元のPathWaypoint
 	@param endPathWaypoint :PathWaypoint 移動先のPathWaypoint
 ]]
local function move(humanoid :Humanoid, startPathWaypoint :PathWaypoint, endPathWaypoint :PathWaypoint)
	if endPathWaypoint.Action == Enum.PathWaypointAction.Walk then -- 歩行.
		humanoid:MoveTo(endPathWaypoint.Position)

	elseif endPathWaypoint.Action == Enum.PathWaypointAction.Jump then	-- ジャンプ.
+		jump(humanoid, startPathWaypoint, endPathWaypoint)
-		-- 空中ジャンプ防止.
-		if humanoid.FloorMaterial ~= Enum.Material.Air then
-			-- ジャンプ.
-			humanoid:ChangeState(Enum.HumanoidStateType.Jumping)
-		end
-		humanoid:MoveTo(endPathWaypoint.Position)

	end
end
これで、ある程度ジャンプが安定して届くようになりました!
ただしこの方法だと、非常に狭い足場にジャンプしようとした場合に、行き過ぎて向こう側へ落下してしまう場合があります。
地形そのものに余裕を持たせたり、後述のPathfindingLinkを使って手動でジャンプポイントを設定してやる必要があるでしょう。
4. 梯子を登る
梯子(TrussPart)も登れるようにしましょう。
梯子は、PathWaypoint.ActionではEnum.PathWaypointAction.Customに分類されます。
Customと言いつつ、WalkとJump以外は全部Customに分類されるため、PathWaypoint.Labelの文字列でどんな処理を行うか判断します。
TrussPartの場合はPathWaypoint.Labelに「Climb」が入っています。
梯子を登る動作そのものは、Humanoid:MoveToで歩いている時に触れれば登ってくれるので、特別な処理は必要ありません。
ではまず、Pathを作る際に与えるAgentParamsに、梯子関連の設定を追加します。
 -- Pathの作成.
local path_:Path do
	local agentParams_ = {
		-- AgentRadiusとAgentHeightは今回は固定値だが、Modelの情報を元に設定しても良い.
		AgentRadius = 2.5,
		AgentHeight = 6,
		AgentCanJump = true,
+		AgentCanClimb = true,
		WaypointSpacing = 4,
		Costs = {
			Jump = 3,
+			Climb = 4,
		}
	}::{[string]:any}

	path_ = PathfindingService:CreatePath(agentParams_)
end
AgentCanClimbがtrueだと梯子を登れる事を示します。
コストも設定しておきました。
次に、move関数の中に、以下のコードを追加してください。
 --[[
 	PathWaypointに従って移動を行います.
 	@param humanoid :Humanoid 対象のHumanoid
 	@param startPathWaypoint :PathWaypoint 移動元のPathWaypoint
 	@param endPathWaypoint :PathWaypoint 移動先のPathWaypoint
 ]]
local function move(humanoid :Humanoid, startPathWaypoint :PathWaypoint, endPathWaypoint :PathWaypoint)
	if endPathWaypoint.Action == Enum.PathWaypointAction.Walk then -- 歩行.
		humanoid:MoveTo(endPathWaypoint.Position)

	elseif endPathWaypoint.Action == Enum.PathWaypointAction.Jump then -- ジャンプ.
		jump(humanoid, startPathWaypoint, endPathWaypoint)
+
+	elseif endPathWaypoint.Action == Enum.PathWaypointAction.Custom then -- カスタム.
+		-- カスタムの場合はラベルをチェックする.
+		if string.find(endPathWaypoint.Label, "Climb") then
+			-- 梯子登り.
+			humanoid:MoveTo(endPathWaypoint.Position)
+		else
+			-- その他 想定されていないが、一応歩行するようにしておく.
+			humanoid:MoveTo(endPathWaypoint.Position)
+		end
	end
end
ところで、前回の記事で梯子を登っている時は再探索をOKにした事を覚えていますでしょうか?
意図せず触れて掴まってしまった時に停止しないためですが、意図的に登らせたい時に再探索されてしまうと、空中で再探索してしまった時と同様近くの足元が次の目標になってしまうため、梯子を登ることができません。
現在のWaypointのLabelがClimbである場合には再探索不可にしておきましょう。
ただしその場合、一度長い梯子を登り始めると、ターゲットが下に降りても一旦上まで登り続けてしまいます。
というわけで、今回は簡易的に、梯子登り中にターゲットが下に行ったら梯子を離す処理も一緒に追加します。
 --[[
 	経路探索、及び移動の開始を行います.
 	@param humanoid: Humanoid 行動するHumanoid.
 	@param destination: Vector3 目標地点.
 	@return boolean 経路探索の成否.
 ]]
local function toDestination(humanoid: Humanoid, destination :Vector3)
	-- 現在の行動がジャンプ中だったら何もしない.
	local waypoint = waypoints_[nextWaypointId_]
	if waypoint and string.find(waypoint.Label, "Jump") then
		return false
	end

+	-- 現在の行動が梯子登り中だったら経路探索しない.
+	if waypoint and string.find(waypoint.Label, "Climb") then
+		-- ターゲットが自分より下に行ったら梯子を離して落下.
+		if target_ and script.Parent:GetPivot().Position.Y > target_:GetPivot().Position.Y + 1 then
+			humanoid:ChangeState(Enum.HumanoidStateType.Jumping)
+
+			-- 現在のWaypointsなどを初期化
+			waypoints_ = {}
+			nextWaypointId_ = 2
+
+		end
+		return false
+	end
+
	-- 足元が現在空中じゃない ただし、梯子登り中は空中でもOK 意図的でない梯子判定に触れて固まってしまうのを回避するため.
	local state = humanoid:GetState()
	if humanoid_.FloorMaterial == Enum.Material.Air and state ~= Enum.HumanoidStateType.Climbing then
		return false
	end

	------ 省略 ------
これで、梯子を登れるようになりました!
ただし、ターゲットが下に行った時に梯子を離す処理は、「梯子を登って壁を乗り越えた後、降りた先に行かなければならない」という場合に、目標地点に到達できなくなってしまう問題があります。
この問題は、ゲーム内容や地形、どのようにPathfindingを使いたいかによって適切な解決方法が変わってくるところなので、状況に応じた解決策を考えてみて下さい!
ゲーム内に短い梯子しかないなら、特に処理はせず一旦上まで登る動きのままでもあまり問題は無いですしね。
5. PathfindingLink
Robloxは「細いパーツがいくつも並んでいる」みたいな状態を、自動的に梯子として登れるようにしています。

しかし、これはTrussPartと違ってPathfindingでは梯子扱いにならないため、先ほど追加した梯子登りの処理では登ることができません。
PathfindingLinkを使って手動で梯子ポイントを追加してやる必要があります。
また、手動でジャンプポイントを付けたい場合もあると思いますので、それも含めてPathfindingLinkに対応する処理を追加していきましょう。
次のWaypointがPathfindingLinkの場合、PathWaypoint.ActionはCustomになります。
PathWaypoint.LabelにはPathfindingLink.Labelに設定した文字列が入っているため、それを見て判断します。
今回は、梯子のPathfindingLink.Labelには「Climb_Link」ジャンプのPathfindingLink.Labelには「Jump_Link」と設定しました。

まずは、AgentParamsのコストを設定します。
 -- Pathの作成.
local path_:Path do
	local agentParams_ = {
		-- AgentRadiusとAgentHeightは今回は固定値だが、Modelの情報を元に設定しても良い.
		AgentRadius = 2.5,
		AgentHeight = 6,
		AgentCanJump = true,
		AgentCanClimb = true,
		WaypointSpacing = 4,
		Costs = {
			Jump = 3,
+			Jump_Link = 3,
			Climb = 4,
+			Climb_Link = 4,
		}
	}::{[string]:any}

	path_ = PathfindingService:CreatePath(agentParams_)
end
次に、move関数の中に以下のコードを追加してください。
 --[[
 	PathWaypointに従って移動を行います.
 	@param humanoid :Humanoid 対象のHumanoid
 	@param startPathWaypoint :PathWaypoint 移動元のPathWaypoint
 	@param endPathWaypoint :PathWaypoint 移動先のPathWaypoint
 ]]
local function move(humanoid :Humanoid, startPathWaypoint :PathWaypoint, endPathWaypoint :PathWaypoint)
	if endPathWaypoint.Action == Enum.PathWaypointAction.Walk then -- 歩行.
		humanoid:MoveTo(endPathWaypoint.Position)

	elseif endPathWaypoint.Action == Enum.PathWaypointAction.Jump then -- ジャンプ.
		jump(humanoid, startPathWaypoint, endPathWaypoint)

	elseif endPathWaypoint.Action == Enum.PathWaypointAction.Custom then -- カスタム.
		-- カスタムの場合はラベルをチェックする.
		if string.find(endPathWaypoint.Label, "Climb") then
			-- 梯子登り.
			humanoid:MoveTo(endPathWaypoint.Position)

+		elseif string.find(endPathWaypoint.Label, "Jump") then
+			-- PathfindingLinkによるジャンプ.
+			jump(humanoid, startPathWaypoint, endPathWaypoint)
+
		else
			-- その他 想定されていないが、一応歩行するようにしておく.
			humanoid:MoveTo(endPathWaypoint.Position)
		end
	end
end
「あれ、Jumpだけ?」と思うかもしれませんが、梯子はもともとActionがCustomのため、追記する必要がないのです。
endPathWaypoint.Label == "Climb"ではなくstring.find(endPathWaypoint.Label, "Climb")で判定していたのはこのためです。
Jumpについても、Actionは見ずにLabelだけで判定してもよいかもしれません。
その上で、Climb系やJump系の中で特別に処理したい例がある場合、==での比較をすればよい、というわけです。
Label名自体も、今回は説明のために「Climb_Link」「Jump_Link」としていますが、特に違いを付けない場合は単純に「Climb」「Jump」にしても問題無いかと思います。
梯子やジャンプ以外にも、特殊な処理が必要な移動ではPathfindingLinkを使ってLabelで判定すれば処理を追加できます。
これで、PathfindingLinkに対応できました!
6. サンプルコード
前回同様に、最終的なサンプルコードを掲載しておきます。
サンプルコード
--!strict

-- Service
local PathfindingService = game:GetService("PathfindingService")

-- Constant
local WAIT = 0.16

-- Variable
local TargetValue = script:WaitForChild("Target")
local target_:PVInstance? = TargetValue.Value

local humanoid_ = script.Parent:WaitForChild("Humanoid")
local timer_ = 0
local baseWalkSpeed_ = humanoid_.WalkSpeed

-- 経路探索関連.
local reachedConnection_: RBXScriptConnection?
local blockedConnection_: RBXScriptConnection?
local waypoints_: {PathWaypoint} = {}
local nextWaypointId_ = 2

-- Pathの作成.
local path_:Path do
	local agentParams_ = {
		-- AgentRadiusとAgentHeightは今回は固定値だが、Modelの情報を元に設定しても良い.
		AgentRadius = 2.5,
		AgentHeight = 6,
		AgentCanJump = true,
		AgentCanClimb = true,
		WaypointSpacing = 4,
		Costs = {
			Jump = 3,
			Jump_Link = 3,
			Climb = 4,
			Climb_Link = 4,
		}
	}::{[string]:any}

	path_ = PathfindingService:CreatePath(agentParams_)
end

-- 追尾ターゲットが変わったら設定.
TargetValue:GetPropertyChangedSignal("Value"):Connect(function()
	if TargetValue.Value and TargetValue.Value:IsA("PVInstance") then
		target_ = TargetValue.Value
	else
		target_ = nil
	end
end)

--[[
	PathWaypointに従ってジャンプを行います.
	@param humanoid :Humanoid パートナーのHumanoid
	@param startPathWaypoint :PathWaypoint 移動元のPathWaypoint
	@param endPathWaypoint :PathWaypoint 移動先のPathWaypoint
]]
local function jump(humanoid :Humanoid, startPathWaypoint :PathWaypoint, endPathWaypoint :PathWaypoint)
	-- ポイントのちょっと向こう側を目指す.
	local startPos = startPathWaypoint.Position
	local vec = Vector3.new(endPathWaypoint.Position.X, startPos.Y, endPathWaypoint.Position.Z) - startPos
	local endPos = endPathWaypoint.Position + vec.Unit * 2.5

	-- ジャンプ中だけ移動速度を少し上げる.
	humanoid.WalkSpeed = baseWalkSpeed_ + 2

	-- 空中ジャンプ防止.
	if humanoid.FloorMaterial ~= Enum.Material.Air then
		-- ジャンプ.
		humanoid:ChangeState(Enum.HumanoidStateType.Jumping)
	end
	humanoid:MoveTo(endPos)
end

--[[
	PathWaypointに従って移動を行います.
	@param humanoid :Humanoid 対象のHumanoid
	@param startPathWaypoint :PathWaypoint 移動元のPathWaypoint
	@param endPathWaypoint :PathWaypoint 移動先のPathWaypoint
]]
local function move(humanoid :Humanoid, startPathWaypoint :PathWaypoint, endPathWaypoint :PathWaypoint)
	if endPathWaypoint.Action == Enum.PathWaypointAction.Walk then -- 歩行.
		humanoid:MoveTo(endPathWaypoint.Position)

	elseif endPathWaypoint.Action == Enum.PathWaypointAction.Jump then -- ジャンプ.
		jump(humanoid, startPathWaypoint, endPathWaypoint)

	elseif endPathWaypoint.Action == Enum.PathWaypointAction.Custom then -- カスタム.
		-- カスタムの場合はラベルをチェックする.
		if string.find(endPathWaypoint.Label, "Climb") then
			-- 梯子登り.
			humanoid:MoveTo(endPathWaypoint.Position)

		elseif string.find(endPathWaypoint.Label, "Jump") then
			-- PathfindingLinkによるジャンプ.
			jump(humanoid, startPathWaypoint, endPathWaypoint)

		else
			-- その他 想定されていないが、一応歩行するようにしておく.
			humanoid:MoveTo(endPathWaypoint.Position)
		end
	end
end

-- 目標のWaypointに到達した時のイベントコールバック関数.
local function onMoveToFinished(reached: boolean)
	-- MoveToがタイムアウトした時は現在のWaypointsなどを初期化する.
	if not reached then
		waypoints_ = {}
		nextWaypointId_ = 2
		return
	end

	-- 次のポイントへ向かう.
	if nextWaypointId_ < #waypoints_ then
		nextWaypointId_ += 1
		-- 移動開始.
		move(humanoid_, waypoints_[nextWaypointId_ - 1], waypoints_[nextWaypointId_])
	end
end

-- 経路が遮断された時のイベントコールバック関数.
local function onBlocked(blockedWaypointIdx: number)
	-- 今向かっているWaypointより背後だったら無視.
	if blockedWaypointIdx < nextWaypointId_ then
		return
	end

	-- 前方だったら移動を中断.
	if reachedConnection_ then
		reachedConnection_:Disconnect()
		reachedConnection_ = nil
	end
	if blockedConnection_ then
		blockedConnection_:Disconnect()
		blockedConnection_ = nil
	end
end

--[[
	経路探索、及び移動の開始を行います.
	@param humanoid: Humanoid 行動するHumanoid.
	@param destination: Vector3 目標地点.
	@return boolean 経路探索の成否.
]]
local function toDestination(humanoid: Humanoid, destination :Vector3)
	-- 現在の行動がジャンプ中だったら何もしない.
	local waypoint = waypoints_[nextWaypointId_]
	if waypoint and string.find(waypoint.Label, "Jump") then
		return false
	end

	-- 現在の行動が梯子登り中だったら経路探索しない.
	if waypoint and string.find(waypoint.Label, "Climb") then
		-- ターゲットが自分より下に行ったら梯子を離して落下.
		if target_ and script.Parent:GetPivot().Position.Y > target_:GetPivot().Position.Y + 1 then
			humanoid:ChangeState(Enum.HumanoidStateType.Jumping)

			-- 現在のWaypointsなどを初期化
			waypoints_ = {}
			nextWaypointId_ = 2

		end
		return false
	end

	-- 足元が現在空中じゃない ただし、梯子登り中は空中でもOK 意図的でない梯子判定に触れて固まってしまうのを回避するため.
	local state = humanoid:GetState()
	if humanoid_.FloorMaterial == Enum.Material.Air and state ~= Enum.HumanoidStateType.Climbing then
		return false
	end

	-- 経路探索.
	local success = pcall(path_.ComputeAsync, path_, script.Parent:GetPivot().Position, destination)
	if not success or path_.Status == Enum.PathStatus.NoPath then
		return false
	end

	-- 過去の接続があったら破棄.
	if reachedConnection_ then
		reachedConnection_:Disconnect()
		reachedConnection_ = nil
	end
	if blockedConnection_ then
		blockedConnection_:Disconnect()
		blockedConnection_ = nil
	end

	-- イベントを接続.
	reachedConnection_ = humanoid.MoveToFinished:Connect(onMoveToFinished)
	blockedConnection_ = path_.Blocked:Connect(onBlocked)

	-- WaypointIdを初期化 開始地点が1なので、最初の目標地点は2.
	nextWaypointId_ = 2

	-- PathWaypointの配列を取得.
	waypoints_ = path_:GetWaypoints()::{PathWaypoint}

	-- 移動開始.
	if waypoints_[nextWaypointId_] then
		move(humanoid, waypoints_[nextWaypointId_ - 1], waypoints_[nextWaypointId_])
	end

	return true
end

game:GetService("RunService").Heartbeat:Connect(function(deltaTime: number)
	-- タイマーを進める.
	timer_ -= deltaTime

	-- 規定時間を過ぎるまでは何もしない.
	if timer_ > 0 then
		return
	end
	timer_ += WAIT

	-- 自分の状態チェック.
	local state = humanoid_:GetState()::Enum.HumanoidStateType
	if state == Enum.HumanoidStateType.Dead then
		return
	end

	-- ターゲットの存在チェック.
	if not target_ then
		return
	end

	-- ターゲットとの距離を測る.
	local targetPos = target_:GetPivot().Position
	local vec = script.Parent:GetPivot().Position - targetPos
	local magnitude = vec.Magnitude
	local unit = vec.Unit

	-- ジャンプ中でなく、一定距離より近かったら歩く.
	local nowWaypoint = waypoints_[nextWaypointId_]
	if (nowWaypoint and not string.find(nowWaypoint.Label, "Jump")) and humanoid_.FloorMaterial ~= Enum.Material.Air then
		if magnitude <= (unit * 10).Magnitude then
			humanoid_.WalkSpeed = baseWalkSpeed_ * 0.5
		else
			humanoid_.WalkSpeed = baseWalkSpeed_
		end
	end

	-- 一定距離より近かったら何もしない.
	if magnitude <= (unit * 7).Magnitude then
		return
	end

	-- ターゲットから少し自分寄りの位置を目標地点に.
	local destination = targetPos + unit * 5

	-- ターゲットから目標地点にRayを飛ばし、ヒットした場合はそこが最終的な目標地点.
	local param = RaycastParams.new()
	param:AddToFilter(target_)
	local rayResult = workspace:Raycast(targetPos, destination - targetPos, param)
	if rayResult then
		destination = rayResult.Position
	end

	-- 経路探索と移動開始.
	toDestination(humanoid_, destination)
end)
7. まとめ
- Raycastを用いることで、ターゲットから少し離れた位置を適切に目標地点にすることができる
- 経路探索を行わなくなる距離を目標地点より少し遠くに設定することで、不自然な動きを予防できる
- 地上では距離に応じて移動速度を変えることで、より自然な動きに近づく
- ジャンプポイントの少し遠くを目標地点にすることで、ジャンプが届かない可能性を減らすことができる
- ジャンプ時には移動速度を上げることで、より安定させられる
- 梯子は、梯子の先に対してHumanoid:MoveToで移動していれば自動的に登ってくれる
- TrussPartを使った経路には、Waypoint.LabelにClimbが入っている
- LabelにClimbが含まれる場合には再探索不可にすることで、意図的に梯子を登っている時のみ再探索不可にできる
- PathfindingLinkを使った経路は、PathfindingLink.Labelに設定した文字列がWaypoint.Labelに入っている
- 「Jump」や「Climb」などの共通の文字列を含めておけば、共通の処理にしたい部分をstring.findを用いて一纏めに書くことができる
今回は、PlayerCharacterに付いてくるNPCのブラッシュアップを行いました。
だいぶ、安定した動作や自然な動きに近づいたんじゃないかと思います!
とはいえ、現状でも想定外の形で目標地点に到達できなかった場合は、Humanoid:MoveToの8秒のタイムアウトまで停止してしまいますし、段差を降りるだけの際にもジャンプしてしまうなど、プレイヤーから見るとまだまだ不自然な部分もあります。
際限が無くなってしまうので記事としてはここまでにしますが、Pathfindingを使いたい状況や目的に合わせて、自分なりのブラッシュアップに取り組んでみてください!
最後までお読みいただき、ありがとうございました!
8. 参考

当社ではRobloxを活用したゲームの開発、 また企業の商品やサービスの認知度拡大に寄与する3Dワールドの制作など、 Robloxにおける様々な活用支援を行っております。 Robloxのコンテンツ開発をご検討されている企業様は、お気軽にご相談ください。 landho.co.jp/
Discussion