🐕
Nuxt3+AmplifyでGraphQLを用いたL●NE風リアルタイムチャットアプリ
概要
Nuxtとamplifyを用いてLine風チャットアプリを作成します。
amplifyでのストレージ/認証管理, appsyncのsubscriptionsが気になったので、その周辺技術のチュートリアルと考えていただけると幸いです。
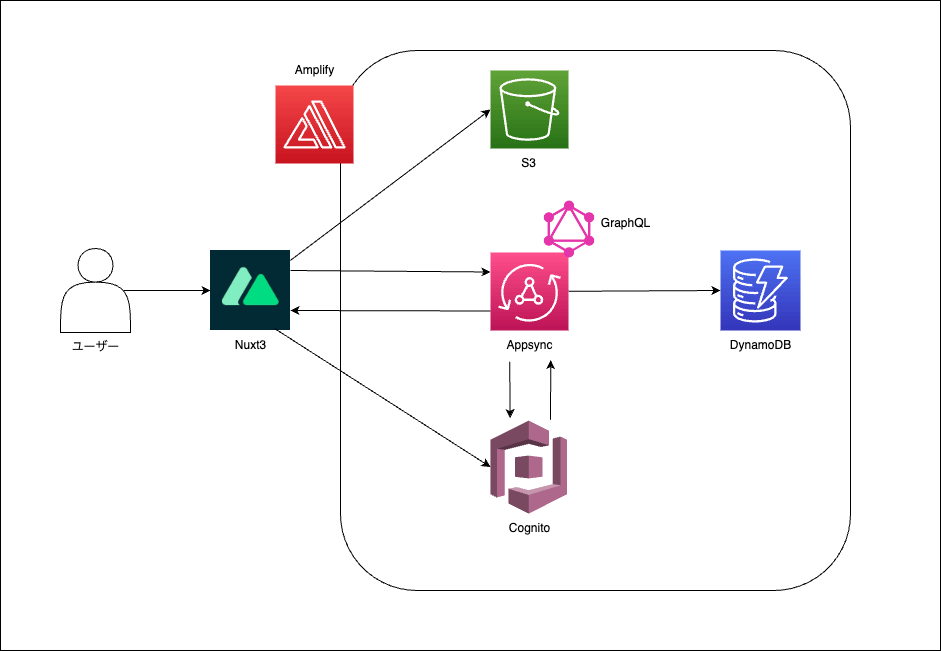
サービス構成
実装画面

1.前提条件
- amplifyでappsyncとdynamoDB環境の作成完了
- nuxtでgraphQLを使用できる状態
2.認証機能の作成
amplify側の設定
- 先に画像保存用のS3を作成しておく
- S3を後に登録すると、下記のエラーが生じる可能性がある。これはcognitoユーザーにS3へ参照する為のRoleを引き受ける権限ないことによるエラーである。
Error : InvalidIdentityPoolConfigurationException: Invalid identity pool configuration. Check assigned IAM roles for this pool.- 解決先のissue
- S3を後に登録すると、下記のエラーが生じる可能性がある。これはcognitoユーザーにS3へ参照する為のRoleを引き受ける権限ないことによるエラーである。
S3の作成(amplify add storage)
% amplify add storage
? Select from one of the below mentioned services: Content (Images, audio, video, etc.)
✔ You need to add auth (Amazon Cognito) to your project in order to add storage for user files. Do you want to add auth now? (Y/n) · yes
Using service: Cognito, provided by: awscloudformation

 The current configured provider is Amazon Cognito.

 Do you want to use the default authentication and security configuration? Default configuration
 Warning: you will not be able to edit these selections.
 How do you want users to be able to sign in? Email
 Do you want to configure advanced settings? No, I am done.
✅ Successfully added auth resource nuxtappsyncchat7a4b8398 locally

✅ Some next steps:
"amplify push" will build all your local backend resources and provision it in the cloud
"amplify publish" will build all your local backend and frontend resources (if you have hosting category added) and provision it in the cloud

✔ Provide a friendly name for your resource that will be used to label this category in the project: · s3f526f447
✔ Provide bucket name: · nuxtappsyncchata56f46751c42453bb7fdf961d51e40d3
✔ Who should have access: · Auth users only
✔ What kind of access do you want for Authenticated users? · create/update, read, delete
✔ Do you want to add a Lambda Trigger for your S3 Bucket? (y/N) · no
✅ Successfully added resource s3f526f447 locally

⚠️ If a user is part of a user pool group, run "amplify update storage" to enable IAM group policies for CRUD operations
✅ Some next steps:
"amplify push" builds all of your local backend resources and provisions them in the cloud
"amplify publish" builds all of your local backend and front-end resources (if you added hosting category) and provisions them in the cloud
- 認証機能の追加(cognito)
amplify add auth
% amplify add auth
Using service: Cognito, provided by: awscloudformation

 The current configured provider is Amazon Cognito.

 Do you want to use the default authentication and security configuration? Default configuration
 Warning: you will not be able to edit these selections.
 How do you want users to be able to sign in? Email
 Do you want to configure advanced settings? No, I am done.
✅ Successfully added auth resource nuxtappsyncchat107dbcab locally

✅ Some next steps:
"amplify push" will build all your local backend resources and provision it in the cloud
"amplify publish" will build all your local backend and frontend resources (if you have hosting category added) and provision it in the cloud
- ストレージ(S3)と認証機能(cognito)をデプロイする。
amplify push
% amplify push
⠼ Fetching updates to backend environment: dev from the cloud.
⚠️  WARNING: your GraphQL API currently allows public create, read, update, and delete access to all models via an API Key. To configure PRODUCTION-READY authorization rules, review: https://docs.amplify.aws/cli/graphql/authorization-rules

⠦ Fetching updates to backend environment: dev from the cloud.✅ GraphQL schema compiled successfully.

Edit your schema at /xxx/amplify/backend/api/nuxtappsyncchat/schema.graphql or place .graphql files in a directory at /xxx//amplify/backend/api/nuxtappsyncchat/schema
✔ Successfully pulled backend environment dev from the cloud.

    Current Environment: dev

┌──────────┬─────────────────────────┬───────────┬───────────────────┐
│ Category │ Resource name           │ Operation │ Provider plugin   │
├──────────┼─────────────────────────┼───────────┼───────────────────┤
│ Auth     │ nuxtappsyncchat107dbcab │ Create    │ awscloudformation │
├──────────┼─────────────────────────┼───────────┼───────────────────┤
│ Storage  │ s3f526f447              │ Create    │ awscloudformation │
├──────────┼─────────────────────────┼───────────┼───────────────────┤
│ Api      │ nuxtappsyncchat         │ No Change │ awscloudformation │
└──────────┴─────────────────────────┴───────────┴───────────────────┘
✔ Are you sure you want to continue? (Y/n) · yes

Deployment completed.
Deploying root stack nuxtappsyncchat [ ==============================---------- ] 3/4
        amplify-nuxtappsyncchat-dev-b… AWS::CloudFormation::Stack     UPDATE_COMPLETE_CLEANUP_IN_PR… Mon Apr 08 2024 19:14:04…
        storages3f526f447              AWS::CloudFormation::Stack     CREATE_COMPLETE                Mon Apr 08 2024 19:14:00…
        apinuxtappsyncchat             AWS::CloudFormation::Stack     UPDATE_COMPLETE                Mon Apr 08 2024 19:13:09…
        authnuxtappsyncchat107dbcab    AWS::CloudFormation::Stack     CREATE_COMPLETE                Mon Apr 08 2024 19:13:34…
Deployed auth nuxtappsyncchat107dbcab [ ======================================== ] 6/6
        UserPoolClientRole             AWS::IAM::Role                 CREATE_IN_PROGRESS             Mon Apr 08 2024 19:13:04…
        UserPool                       AWS::Cognito::UserPool         CREATE_COMPLETE                Mon Apr 08 2024 19:13:06…
        UserPoolClient                 AWS::Cognito::UserPoolClient   CREATE_COMPLETE                Mon Apr 08 2024 19:13:08…
        UserPoolClientWeb              AWS::Cognito::UserPoolClient   CREATE_COMPLETE                Mon Apr 08 2024 19:13:09…
        IdentityPool                   AWS::Cognito::IdentityPool     CREATE_COMPLETE                Mon Apr 08 2024 19:13:11…
        IdentityPoolRoleMap            AWS::Cognito::IdentityPoolRol… CREATE_COMPLETE                Mon Apr 08 2024 19:13:14…
Deployed storage s3f526f447 [ ======================================== ] 7/7
        S3Bucket                       AWS::S3::Bucket                CREATE_COMPLETE                Mon Apr 08 2024 19:13:29…
        S3AuthPrivatePolicy            AWS::IAM::Policy               CREATE_IN_PROGRESS             Mon Apr 08 2024 19:13:29…
        S3AuthPublicPolicy             AWS::IAM::Policy               CREATE_IN_PROGRESS             Mon Apr 08 2024 19:13:29…
        S3AuthUploadPolicy             AWS::IAM::Policy               CREATE_IN_PROGRESS             Mon Apr 08 2024 19:13:29…
        S3AuthReadPolicy               AWS::IAM::Policy               CREATE_IN_PROGRESS             Mon Apr 08 2024 19:13:29…
        S3AuthProtectedPolicy          AWS::IAM::Policy               CREATE_IN_PROGRESS             Mon Apr 08 2024 19:13:29…

Deployment state saved successfully.

GraphQL transformer version: 2
Nuxt側の実装
- package.jsonに下記を追加し、
npm iをしてください-
"@aws-amplify/ui-vue": "^4.2.3"が、ログイン画面のUIとなります。 - aws-amplify/ui-vueの詳細はこちら
-
package.json
{
  "name": "nuxt-app",
  "private": true,
  "type": "module",
  "scripts": {
    "build": "nuxt build",
    "dev": "nuxt dev",
    "generate": "nuxt generate",
    "preview": "nuxt preview",
    "postinstall": "nuxt prepare"
  },
  "dependencies": {
    "aws-amplify": "^6.0.27",
    "nuxt": "^3.11.2",
    "vue": "^3.4.21",
    "vue-router": "^4.3.0",
    "@aws-amplify/ui-vue": "^4.2.3"
  }
}
- フロント部分を実装
src/pages/index.vue
<template>
	<div class="auth-container">
		<authenticator>
			<template v-slot:sign-in-header>
				<h2 style="padding: var(--amplify-space-xl) 0 0 var(--amplify-space-xl)">チャットアプリへようこそ</h2>
				<h3 style="padding: var(--amplify-space-xl) 0 0 var(--amplify-space-xl)">
					Sign in to your account
				</h3>
			</template>
			<template v-slot:sign-up-header>
				<h3 style="padding: var(--amplify-space-xl) 0 0 var(--amplify-space-xl)">
					Create a new account
				</h3>
			</template>
			<template v-slot="{ user, signOut }">
				<div class="user-greeting">
					ようこそ
				</div>
			</template>
		</authenticator>
	</div>
</template>

<script setup lang="ts">
import { Authenticator } from "@aws-amplify/ui-vue";
import "@aws-amplify/ui-vue/styles.css";

</script>

<style>
.auth-container {
	height: 100vh;
	display: flex;
	justify-content: center;
	align-items: center;
}

.user-greeting {
	text-align: center;
	margin-bottom: 20px;
}
</style>
- ローカルホストの起動
-
npm run devで起動し、localhostにアクセスしてください。下記の動画のようになれば成功です。
-
3.リアルタイム通信の実装
DBの更新
- amplify/backend/api/nuxtappsync/schema.graphqlを下記に更新する。
- schemaの型はここに記載されています。
amplify/backend/api/nuxtappsync/schema.graphql
# This "input" configures a global authorization rule to enable public access to
# all models in this schema. Learn more about authorization rules here: https://docs.amplify.aws/cli/graphql/authorization-rules
input AMPLIFY { globalAuthRule: AuthRule = { allow: public } } # FOR TESTING ONLY!

type Message @model {
  id: ID!
  name: String!
  content: String
  img: String
}
- テーブルの更新を反映
amplify push
amplify push --allow-destructive-graphql-schema-updates
⠏ Fetching updates to backend environment: dev from the cloud.⠋ Building resource api/nuxtappsyncchat
⚠️  WARNING: your GraphQL API currently allows public create, read, update, and delete access to all models via an API Key. To configure PRODUCTION-READY authorization rules, review: https://docs.amplify.aws/cli/graphql/authorization-rules

⠋ Building resource api/nuxtappsyncchat✅ GraphQL schema compiled successfully.

Edit your schema at /xxx/amplify/backend/api/nuxtappsyncchat/schema.graphql or place .graphql files in a directory at /xxx/amplify/backend/api/nuxtappsyncchat/schema
✔ Successfully pulled backend environment dev from the cloud.
⠋ Building resource api/nuxtappsyncchat
⚠️  WARNING: your GraphQL API currently allows public create, read, update, and delete access to all models via an API Key. To configure PRODUCTION-READY authorization rules, review: https://docs.amplify.aws/cli/graphql/authorization-rules

⠏ Building resource api/nuxtappsyncchat✅ GraphQL schema compiled successfully.

Edit your schema at /xxx/amplify/backend/api/nuxtappsyncchat/schema.graphql or place .graphql files in a directory at /xxx/amplify/backend/api/nuxtappsyncchat/schema

    Current Environment: dev

┌──────────┬─────────────────────────┬───────────┬───────────────────┐
│ Category │ Resource name           │ Operation │ Provider plugin   │
├──────────┼─────────────────────────┼───────────┼───────────────────┤
│ Api      │ nuxtappsyncchat         │ Update    │ awscloudformation │
├──────────┼─────────────────────────┼───────────┼───────────────────┤
│ Auth     │ nuxtappsyncchat107dbcab │ No Change │ awscloudformation │
├──────────┼─────────────────────────┼───────────┼───────────────────┤
│ Storage  │ s3f526f447              │ No Change │ awscloudformation │
└──────────┴─────────────────────────┴───────────┴───────────────────┘
✔ Are you sure you want to continue? (Y/n) · yes

⚠️  WARNING: your GraphQL API currently allows public create, read, update, and delete access to all models via an API Key. To configure PRODUCTION-READY authorization rules, review: https://docs.amplify.aws/cli/graphql/authorization-rules

✅ GraphQL schema compiled successfully.

Edit your schema at /xxx//amplify/backend/api/nuxtappsyncchat/schema.graphql or place .graphql files in a directory at /xxx/amplify/backend/api/nuxtappsyncchat/schema
⠋ Building resource api/nuxtappsyncchat
⚠️  WARNING: your GraphQL API currently allows public create, read, update, and delete access to all models via an API Key. To configure PRODUCTION-READY authorization rules, review: https://docs.amplify.aws/cli/graphql/authorization-rules

⠹ Building resource api/nuxtappsyncchat✅ GraphQL schema compiled successfully.

Edit your schema at /xxx/amplify/backend/api/nuxtappsyncchat/schema.graphql or place .graphql files in a directory at /xxx/amplify/backend/api/nuxtappsyncchat/schema
? Do you want to update code for your updated GraphQL API Yes
? Do you want to generate GraphQL statements (queries, mutations and subscription) based on your schema types?
This will overwrite your current graphql queries, mutations and subscriptions Yes

Deployment completed.
Deploying root stack nuxtappsyncchat [ ==============================---------- ] 3/4
        amplify-nuxtappsyncchat-dev-b… AWS::CloudFormation::Stack     UPDATE_COMPLETE_CLEANUP_IN_PR… Mon Apr 08 2024 22:09:38…
        apinuxtappsyncchat             AWS::CloudFormation::Stack     UPDATE_COMPLETE                Mon Apr 08 2024 22:09:34…
        storages3f526f447              AWS::CloudFormation::Stack     UPDATE_COMPLETE                Mon Apr 08 2024 22:08:17…
        authnuxtappsyncchat107dbcab    AWS::CloudFormation::Stack     UPDATE_COMPLETE                Mon Apr 08 2024 22:08:19…
Deployed api nuxtappsyncchat [ ======================================== ] 6/6
        GraphQLAPITransformerSchema3C… AWS::AppSync::GraphQLSchema    UPDATE_COMPLETE                Mon Apr 08 2024 22:08:33…
        GraphQLAPIDefaultApiKey215A6D… AWS::AppSync::ApiKey           UPDATE_COMPLETE                Mon Apr 08 2024 22:08:22…
        Message                        AWS::CloudFormation::Stack     CREATE_COMPLETE                Mon Apr 08 2024 22:09:23…

✔ Generated GraphQL operations successfully and saved at src/graphql
✔ Code generated successfully and saved in file src/API.ts
Deployment state saved successfully.

GraphQL endpoint: https://xxx.appsync-api.ap-northeast-1.amazonaws.com/graphql
GraphQL API KEY: xxxxx

GraphQL transformer version: 2
UIツールのインストール(Vuetify)
- package.jsonに下記を追加し、
npm iをしてください- Vuetifyの詳細はこちら
package.json
    "sass": "^1.74.1",
    "@mdi/font": "^7.4.47",
    "vite-plugin-vuetify": "^2.0.3",
    "vuetify": "^3.5.14"
- vuetifyの初期設定
src/plugins/vuetify.ts
// import this after install `@mdi/font` package
import '@mdi/font/css/materialdesignicons.css'

import 'vuetify/styles'
import { createVuetify } from 'vuetify'

export default defineNuxtPlugin((app) => {
  const vuetify = createVuetify({
    // ... your configuration
  })
  app.vueApp.use(vuetify)
})
- nuxtconfigでvuetifyのインポート設定
nuxt.config.ts
// https://nuxt.com/docs/api/configuration/nuxt-config
import vuetify, { transformAssetUrls } from 'vite-plugin-vuetify'

export default defineNuxtConfig({
  devtools: { enabled: true },
  ssr: true,
  srcDir: "src/",
  plugins: ["@/plugins/amplify.ts"],
  build: {
    transpile: ['vuetify'],
  },
  modules: [
    (_options, nuxt) => {
      nuxt.hooks.hook('vite:extendConfig', (config) => {
        // @ts-expect-error
        config.plugins.push(vuetify({ autoImport: true }))
      })
    },
    //...
  ],
  vite: {
    vue: {
      template: {
        transformAssetUrls,
      },
    },
  },
})
フロント側の実装
- modelの設定
src/models.ts
import type { Message } from "@/API";
import type { GetUrlOutput } from 'aws-amplify/storage'

export interface User {
	username: string;
	userId: string;
	signInDetails: {
		loginId: string;
		authFlowType: string;
	}
}

export type StorageAccessLevel = 'public' | 'protected' | 'private'


// Message型の拡張
export interface MessageWithImgUrl extends Message {
  imgUrl: GetUrlOutput; // imgUrlプロパティを追加
}
- Homeコンポーネントの作成(チャット画面)
src/pages/home.vue
<template>
	<div class="chat-container">
	  <div class="messages">
		<div v-for="message in messages" :key="message.id" class="message" :class="message.name === user.signInDetails.loginId ? 'self' : ''">
		  <div class="message-bubble" :class="message.name === user.signInDetails.loginId ? 'self' : ''">
			<p class="message-content">{{ message.content }}</p>
			<figure v-if="message.imgUrl">
			  <img :src="message.imgUrl.url.href" alt="Message Image"/>
			</figure>
		  </div>
		  <p class="message-sender">{{ message.name }}</p>
		  <span class="timestamp">{{ formatDate(message.createdAt) }}</span>
		</div>
	  </div>
	  <div class="input-area">
		<textarea v-model="inputMessage" placeholder="Type a message"></textarea>
		<button @click="onSendMessage">Send</button>
		<button @click="onLogout">Logout</button>
	  </div>
	  <div>
		<v-file-input v-model="fileinput" label="File input" @change="onFileChange" clearable></v-file-input>
		<div v-if="previewUrl">
			<img :src="previewUrl" alt="Preview" />
		</div>
	  </div>
	</div>
  </template>

<script setup lang="ts">
import { ref, onUnmounted, onMounted, watch, nextTick } from 'vue';
import { generateClient } from "aws-amplify/api";
import { listMessages } from "@/graphql/queries";
import { createMessage } from "@/graphql/mutations";
import { onCreateMessage } from "@/graphql/subscriptions";
import "@aws-amplify/ui-vue/styles.css";
import { useAuthenticator } from "@aws-amplify/ui-vue";
import type { User, MessageWithImgUrl } from "@/models";
import { uploadData, getUrl } from 'aws-amplify/storage';

const auth=useAuthenticator();
const client=generateClient();
const createSub=ref<any>(null);

const user=ref<User>(auth.user); // リアクティブな参照としてユーザー情報を保持
const messages=ref<MessageWithImgUrl[]>([]);
const inputMessage=ref('');

const fileinput=ref<File[]>([])
const previewUrl=ref<string | null>(null)

const formatDate=(date: string) => {
	const originalDate=new Date(date);

	const month=String(originalDate.getMonth()+1).padStart(2, '0'); // 月は0-indexedなので+1する
	const day=String(originalDate.getDate()).padStart(2, '0');
	const hours=String(originalDate.getHours()).padStart(2, '0');
	const minutes=String(originalDate.getMinutes()).padStart(2, '0');

	const formattedDate=`${month}/${day} ${hours}:${minutes}`;
	return formattedDate;
}

const onFileChange = (event: any) => {
      const file = event.target.files[0];
      previewUrl.value = URL.createObjectURL(file);
      // ここでファイルをサーバーにアップロード
}

const uploadFiles=async () => {
	if (fileinput.value.length>0) {
		try {
			return await uploadData({
				key: fileinput.value[0].name,
				data: fileinput.value[0],
			}).result;
		} catch (error) {
			console.log('Error : ', error);
		}
	}
	return null;
};

watch(() => auth.user, (newUser: User) => {
	console.log("Authenticated user:", newUser);
	user.value=newUser; // ユーザー情報の更新
});

const onSendMessage=async () => {
	console.log(user.value.signInDetails.loginId, inputMessage.value)
	const file=await uploadFiles();
	await client.graphql({
		query: createMessage,
		variables: {
			input: {
				name: user.value.signInDetails.loginId,
				content: inputMessage.value,
				img: file? file.key:""
			}
		}
	});
};

// メッセージを取得し、createdAtで降順に並び替える関数
const getMessages=async () => {
	const result=await client.graphql({
		query: listMessages
	});

	const messagesWithImgUrl=await Promise.all((result.data.listMessages.items as  MessageWithImgUrl[]).map(async (message: MessageWithImgUrl) => {
		if (message.img) {
			console.log(message.img);
			message.imgUrl=await getUrl({
				key: message.img,
				options: {
					expiresIn: 60*60
				}
			});
		}
		return message;
	}));

	messages.value=messagesWithImgUrl.sort((a, b) => new Date(a.createdAt).getTime()-new Date(b.createdAt).getTime());
};


// メッセージリストを監視し、変更があるたびに自動スクロール
watch(messages, async () => {
	await nextTick(); // DOMの更新を待つ
	const messagesContainer=document.querySelector('.messages');
	if (messagesContainer) {
		messagesContainer.scrollTop=messagesContainer.scrollHeight; // スクロール位置を最下部に設定
	}
}, { deep: true }); // deepオプションでネストされたプロパティの変更も監視

onMounted(async () => {
	// Subscribe to creation of Todo
	await getMessages();
	createSub.value=client
		.graphql({ query: onCreateMessage })
		.subscribe({
			next: async (data: any) => {
				console.log("triggered onCreateTodo");
				console.log(data);
				previewUrl.value=null;
				fileinput.value=[];
				inputMessage.value="";
				await getMessages();
			},
			error: (error: any) => console.warn(error)
		});
});

const onLogout=() => {
	auth.signOut();
};

onUnmounted(() => {
	if (createSub.value) {
		createSub.value.unsubscribe();
	}
});
</script>

<style scoped lang="scss">
.chat-container {
  display: flex;
  flex-direction: column;
  height: 100vh;
}

.messages {
  flex: 1;
  overflow-y: auto;
  padding: 20px;
  display: flex;
  flex-direction: column;
}

	.message {
	display: flex;
	flex-direction: column;
	align-items: flex-start;
	margin-bottom: 15px;
	animation: fadeIn 0.5s ease;

	@keyframes fadeIn {
	from {
		opacity: 0;
		transform: translateY(20px);
	}
	to {
		opacity: 1;
		transform: translateY(0);
	}
	}

  &.self {
    align-items: flex-end;
  }
  .message-bubble {
    max-width: 70%;
    padding: 10px;
    border-radius: 20px;
    background-color: #f0f0f0;
    &.self {
      background-color: #dcf8c6;
    }
    img {
      max-width: 200px;
      border-radius: 10px;
    }
  }
  .message-content {
    margin: 0;
  }
  .message-sender {
    font-size: 0.8em;
    opacity: 0.8;
  }
  .timestamp {
    font-size: 0.7em;
    opacity: 0.7;
  }
}

.input-area {
  display: flex;
  justify-content: space-between;
  padding: 10px;
  background-color: #f0f0f0;
  gap: 1em;
  textarea {
    flex: 1;
    margin-right: 10px;
    padding: 10px;
    border: none;
    border-radius: 20px;
    resize: none;
  }
  button {
    padding: 10px 20px;
    border: none;
    border-radius: 20px;
    background-color: #4CAF50;
    color: white;
    cursor: pointer;
    &:hover {
      background-color: #45a049;
    }
  }
}

</style>
- ログイン後、チャット画面を表示する。
src/pages/index.vue
<template>
	<div class="auth-container">
		<authenticator>
			<template v-slot:sign-in-header>
				<h2 style="padding: var(--amplify-space-xl) 0 0 var(--amplify-space-xl)">チャットアプリへようこそ</h2>
				<h3 style="padding: var(--amplify-space-xl) 0 0 var(--amplify-space-xl)">
					Sign in to your account
				</h3>
			</template>
			<template v-slot:sign-up-header>
				<h3 style="padding: var(--amplify-space-xl) 0 0 var(--amplify-space-xl)">
					Create a new account
				</h3>
			</template>
			<template v-slot="{ user, signOut }">
				<div class="user-greeting">
					<Home/>
				</div>
			</template>
		</authenticator>
	</div>
</template>

<script setup lang="ts">
import { Authenticator } from "@aws-amplify/ui-vue";
import Home from "./home";
import "@aws-amplify/ui-vue/styles.css";

</script>

<style>
.auth-container {
	height: 100vh;
	display: flex;
	justify-content: center;
	align-items: center;
}

.user-greeting {
	text-align: center;
	margin-bottom: 20px;
}
</style>
コードの解説
- onMounted
- onCreateMessageにサブスクリプションを作成しています。これがあることで、onCreateMessageが動作すると(他ユーザーからも含む)、nextが発火します。
- onUnmounted
- 意図しないSubscribeを避けたいので、unsubscribeを行なっています。
- uploadFiles関数
- amplify/storageのuploadData関数を用いて、S3に登録しています。{key: ファイル名, data: File型}としてアップロードします。
- onSendMessage関数
- imgファイルが存在する場合、S3にアップロード後、そのkey(ファイル名)をデータに添えて登録します。なければ、usernameとmessageのみの登録です。
- getMessages関数
- 全てのメッセージを取得し、昇順に並び替えています。amplify/storageのgetUrl関数を用いて、imgのファイル名から情報を取得しています。
4.動作確認
npm run devを行い動作確認を行う。
動作確認手順
- ブラウザを二つ用意する。シークレットブラウザ等を使用すると良い
- 二つアカウント作成し、ログインを行う
- チャット画面に遷移
- 片方でチャットしたものが、もう片方にリアルタイムで反映されていれば成功
- 画像の投稿も正常にできているか確認
gifのような挙動になっていれば成功です。
5.サイトの公開
- npm run buildを行い、「✔ Generated public」の値を見確認してください。筆者は「.output/public」になります。
- amplify configure project
- 「? Distribution Directory Path: .output/public」を設定します。
- Nuxt3のbaseDirectoryは{Generated public}となりますので、書き換えてください。
- 「? Build Command: npm run generate」を設定します。
- Nuxt3のビルドコマンドは npm run generateですので、書き換えてください。
- 「? Distribution Directory Path: .output/public」を設定します。
amplify configure project
% amplify configure project

Project information
| Name: nuxtappsyncchat
| Environment: dev
| Default editor: vscode
| App type: javascript
| Javascript framework: vue
| Source Directory Path: src
| Distribution Directory Path: dist
| Build Command: npm run-script build
| Start Command: npm run-script serve

AWS Profile setting
| Selected profile: xxxx

Advanced: Container-based deployments
| Leverage container-based deployments: No

? Which setting do you want to configure? Project information
? Enter a name for the project nuxtappsyncchat
? Choose your default editor: Visual Studio Code
✔ Choose the type of app that you're building · javascript
Please tell us about your project
? What javascript framework are you using vue
? Source Directory Path:  src
? Distribution Directory Path: .output/public
? Build Command:  npm run generate
? Start Command: npm run-script serve
Using default provider  awscloudformation

Successfully made configuration changes to your project.
- ホストの作成
amplify add hosting
% amplify add hosting
✔ Select the plugin module to execute · Hosting with Amplify Console (Managed hosting with custom domains, Continuous deployment)

? Choose a type Manual deployment

You can now publish your app using the following command:

Command: amplify publish
- ローカルのソースコードを公開
amplify publish
% amplify publish
⠸ Fetching updates to backend environment: dev from the cloud.⠋ Building resource api/nuxtappsyncchat
⚠️  WARNING: your GraphQL API currently allows public create, read, update, and delete access to all models via an API Key. To configure PRODUCTION-READY authorization rules, review: https://docs.amplify.aws/cli/graphql/authorization-rules

⠧ Building resource api/nuxtappsyncchat✅ GraphQL schema compiled successfully.

Edit your schema at /xxx/amplify/backend/api/nuxtappsyncchat/schema.graphql or place .graphql files in a directory at /xxx/amplify/backend/api/nuxtappsyncchat/schema
✔ Successfully pulled backend environment dev from the cloud.

    Current Environment: dev

┌──────────┬─────────────────────────┬───────────┬───────────────────┐
│ Category │ Resource name           │ Operation │ Provider plugin   │
├──────────┼─────────────────────────┼───────────┼───────────────────┤
│ Hosting  │ amplifyhosting          │ Create    │ awscloudformation │
├──────────┼─────────────────────────┼───────────┼───────────────────┤
│ Api      │ nuxtappsyncchat         │ No Change │ awscloudformation │
├──────────┼─────────────────────────┼───────────┼───────────────────┤
│ Auth     │ nuxtappsyncchat107dbcab │ No Change │ awscloudformation │
├──────────┼─────────────────────────┼───────────┼───────────────────┤
│ Storage  │ s3f526f447              │ No Change │ awscloudformation │
└──────────┴─────────────────────────┴───────────┴───────────────────┘
✔ Are you sure you want to continue? (Y/n) · yes

Deployment completed.
Deployed root stack nuxtappsyncchat [ ======================================== ] 5/5
        amplify-nuxtappsyncchat-dev-b… AWS::CloudFormation::Stack     UPDATE_COMPLETE                Mon Apr 08 2024
        apinuxtappsyncchat             AWS::CloudFormation::Stack     UPDATE_COMPLETE                Mon Apr 08 2024
        hostingamplifyhosting          AWS::CloudFormation::Stack     CREATE_COMPLETE                Mon Apr 08 2024
        storages3f526f447              AWS::CloudFormation::Stack     UPDATE_COMPLETE                Mon Apr 08 2024
        authnuxtappsyncchat107dbcab    AWS::CloudFormation::Stack     UPDATE_COMPLETE                Mon Apr 08 2024
Deployed hosting amplifyhosting [ ======================================== ] 1/1
        AmplifyBranch                  AWS::Amplify::Branch           CREATE_COMPLETE                Mon Apr 08 2024

Deployment state saved successfully.

GraphQL transformer version: 2

Publish started for amplifyhosting

> build
> nuxt build...
- 最後のログに、「https://xxxx.amplifyapp.com」と表示されるので、アクセスして正常に表示されていれば公開完了になります。
6.まとめ
amplifyを使用して「ユーザーの認証機構」、「リアルタイム通信」、「ファイルのアップロード機構」の三つを実装しました。
ほとんどがAmplify側で自動生成してくれるので開発者が実装する箇所はフロントのみでした。また、S3の画像にアクセスする権限周りやGraphQLのAPIにリクエストできるユーザーもcognitoでフィルタリングできました。その為、セキュリティ性も担保しつつ迅速に開発できる為、Amplifyはwebアプリ開発でかなりおすすめのツールになりました。
Discussion