Nuxt3(Vue)+Amplify+Appsync+DynamoDBでGraphQLを使う
概要
Nuxt3でGraphQLを使用できる環境を作成していきます。
基本的にはチュートリアルに沿った構築していきます。
Nuxtバージョンの環境構築がなかったのと英語の内容がボリューミーなので、こちらの記事でお役に立てれば幸いです。
サービス構成
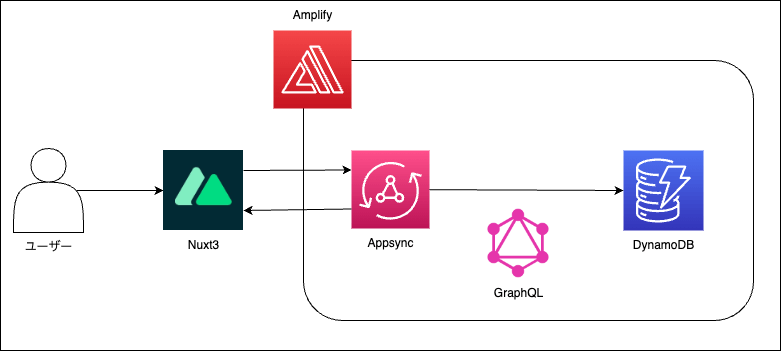
使用サービスの紹介
Amplify
公式
Amplify には、AWS でフルスタックのウェブアプリやモバイルアプリを構築するために必要なものがすべて揃っています。フロントエンドの構築とホスティング、認証やストレージなどの機能の追加、リアルタイムのデータソースへの接続、デプロイと数百万人のユーザーへの拡張が可能です。
今回は下記の辺りをCLIで自動化してくれます。
- Appsyncの生成
- モデルの生成(typescriptの場合)
- CRUD操作用の下記を自動生成
- スキーマ
- リゾルバ
- クエリー/ミューテーション/サブスクリプション
- DynamoDBの生成
- Deploy
Appsync
公式
サーバーレスの GraphQL および Pub/Sub API を作成し、単一のエンドポイントを通じて安全にデータの照会、更新、公開を行うことで、アプリケーションの開発を簡素化します。
GraphQLは単一のエンドポイントを用い、クエリーの内容で操作を識別する。Pub/Sub APIをサーバーレスで動作させることができるため、リアルタイム通信も簡単に行えてしまうGraphQLサービス。
DynamoDB
公式
あらゆる規模で一桁ミリ秒のパフォーマンスを実現する、サーバーレス NoSQL フルマネージドデータベース
Appsyncを用いる上で、DynamoDBがデフォルトの設定となっている為採用。
低レイテンシーの為、リアルタイム通信には向いているのかもしれないです。
1.前提条件
- Nuxt: ^3.11.2
- Vue: ^3.4.21
- Node: 20.10.0(Bun: 1.1.1)
- Npm: 10.5.0
下記コマンドでnuxtプロジェクトの作成とプロジェクトの階層に移動しておいてください。
% npx nuxi@latest init <project-name>
% cd <project-name>
npx nuxi@latest init <project-name> && cd <project-name>
% npx nuxi@latest init nuxt-appsync

✔ Which package manager would you like to use?
npm
◐ Installing dependencies...                                                                                                           22:30:02

> postinstall
> nuxt prepare

✔ Types generated in .nuxt                                                                                                            22:31:40

added 826 packages, and audited 828 packages in 2m

166 packages are looking for funding
  run `npm fund` for details

found 0 vulnerabilities
✔ Installation completed.                                                                                                             22:31:40

✔ Initialize git repository?
Yes
ℹ Initializing git repository...                                                                                                      23:03:18

Initialized empty Git repository in xxxx/nuxt-appsync/.git/
                                                                                                                                       23:03:18
✨ Nuxt project has been created with the v3 template. Next steps:
 › cd nuxt-appsync                                                                                                                     23:03:18
 › Start development server with npm run dev

% cd nuxt-appsync
ここから順番に始めていきます。
2.Amplifyの環境構築
- Amplifyのインストール
% npm install -g @aws-amplify/cli
- Amplifyの認証設定
amplify configure
% amplify configure
Follow these steps to set up access to your AWS account:

Sign in to your AWS administrator account:
https://console.aws.amazon.com/
Press Enter to continue

Specify the AWS Region
? region:  ap-northeast-1
Follow the instructions at
https://docs.amplify.aws/cli/start/install/#configure-the-amplify-cli

to complete the user creation in the AWS console
https://console.aws.amazon.com/iamv2/home#/users/create
Press Enter to continue

Enter the access key of the newly created user:
? accessKeyId:  ********************
? secretAccessKey:  ****************************************
This would update/create the AWS Profile in your local machine
? Profile Name:

Successfully set up the new user.
- Amplifyプロジェクトの作成
amplify init
% amplify init
Note: It is recommended to run this command from the root of your app directory
? Enter a name for the project nuxtappsync
The following configuration will be applied:

Project information
| Name: nuxtappsync
| Environment: dev
| Default editor: Visual Studio Code
| App type: javascript
| Javascript framework: vue
| Source Directory Path: src
| Distribution Directory Path: dist
| Build Command: npm run-script build
| Start Command: npm run-script serve

? Initialize the project with the above configuration? Yes
Using default provider  awscloudformation
? Select the authentication method you want to use: AWS profile

For more information on AWS Profiles, see:
https://docs.aws.amazon.com/cli/latest/userguide/cli-configure-profiles.html

? Please choose the profile you want to use xxxx
Adding backend environment dev to AWS Amplify app: xxxx

Deployment completed.
Deployed root stack nuxtappsync [ ==============================
        amplify-nuxtappsync-dev-9504b  AWS::CloudFormation::Stack     C
        UnauthRole                     AWS::IAM::Role                 C
        AuthRole                       AWS::IAM::Role                 C
        DeploymentBucket               AWS::S3::Bucket                C

✔ Help improve Amplify CLI by sharing non-sensitive project configurations on failures (y/N) · no


    You can always opt-in by running "amplify configure --share-project-config-on"
Deployment state saved successfully.
✔ Initialized provider successfully.
✅ Initialized your environment successfully.
✅ Your project has been successfully initialized and connected to the cloud!
追加されたディレクトリ/ファイルについて
amplifyの初期設定は完了しました。下記二つのディレクトリのファイルが生成されました。
│
├── amplify/
└── src/
     └── aws-exports.js
amplify ディレクトリ
- 内容: バックエンド環境の設定(認証、API、ストレージなどの設定)、リソースの定義(CloudFormationテンプレート)、およびプロジェクト全体の設定が含まれます。
- 主な機能: プロジェクトのバックエンドリソースをAWSにデプロイする際や、環境間でのリソースの同期を行う際に利用されます。Amplify CLIのコマンドを使用することで、これらの設定やリソースを管理できます。
※ よく使用する箇所- ファイル: /nuxt-appsync/amplify/backend/api/nuxtappsync/schema.graphql
- 役割: GraphQLのスキーマが定義されている。GraphQL APIを通じてアクセス可能なデータの型(type)やAPIを介して実行可能な操作(query, mutation)を定義します。
aws-exports.js
- 今回の使用方法: Nuxtプロジェクト側でこの認証情報を使用してAppsyncと疎通します。
- 内容: AWSリソースへの接続情報(APIエンドポイントのURL、認証情報、ストレージのバケット名など)がJavaScriptオブジェクトとしてエクスポートされています。
- 主な機能: このファイルをアプリケーションからインポートすることで、AmplifyライブラリがAWSリソースに適切にアクセスするための設定を自動的に読み込みます。つまり、バックエンドリソースの変更がフロントエンドアプリケーションに反映されるようになります。
3.GraphQL APIの作成とデプロイ
- GraphQLの作成
amplify add api
% amplify add api
? Select from one of the below mentioned services: GraphQL
? Here is the GraphQL API that we will create. Select a setting to edit or continue Continue
? Choose a schema template: Single object with fields (e.g., “Todo” with ID, name, description)

⚠️  WARNING: your GraphQL API currently allows public create, read, update, and delete access to all models via an API Key. To configure PRODUCTION-READY authorization rules, review: https://docs.amplify.aws/cli/graphql/authorization-rules

✅ GraphQL schema compiled successfully.

Edit your schema at xxx/nuxt-appsync/amplify/backend/api/nuxtappsync/schema.graphql or place .graphql files in a directory at xxx/nuxt-appsync/amplify/backend/api/nuxtappsync/schema
✔ Do you want to edit the schema now? (Y/n) · yes
Edit the file in your editor: xxx/nuxt-appsync/amplify/backend/api/nuxtappsync/schema.graphql
✅ Successfully added resource nuxtappsync locally

✅ Some next steps:
"amplify push" will build all your local backend resources and provision it in the cloud
"amplify publish" will build all your local backend and frontend resources (if you have hosting category added) and provision it in the cloud
- Amplify環境のデプロイ
※ typescriptを使用しています。
amplify push
% amplify push
⠼ Fetching updates to backend environment: dev from the cloud.
⚠️  WARNING: your GraphQL API currently allows public create, read, update, and delete access to all models via an API Key. To configure PRODUCTION-READY authorization rules, review: https://docs.amplify.aws/cli/graphql/authorization-rules

⠴ Fetching updates to backend environment: dev from the cloud.✅ GraphQL schema compiled successfully.

Edit your schema at xxx/nuxt-appsync/amplify/backend/api/nuxtappsync/schema.graphql or place .graphql files in a directory at xxx/nuxt-appsync/amplify/backend/api/nuxtappsync/schema
✔ Successfully pulled backend environment dev from the cloud.
⠋ Building resource api/nuxtappsync
⚠️  WARNING: your GraphQL API currently allows public create, read, update, and delete access to all models via an API Key. To configure PRODUCTION-READY authorization rules, review: https://docs.amplify.aws/cli/graphql/authorization-rules

⠇ Building resource api/nuxtappsync✅ GraphQL schema compiled successfully.

Edit your schema at xxx/nuxt-appsync/amplify/backend/api/nuxtappsync/schema.graphql or place .graphql files in a directory at xxx/nuxt-appsync/amplify/backend/api/nuxtappsync/schema

    Current Environment: dev

┌──────────┬───────────────┬───────────┬───────────────────┐
│ Category │ Resource name │ Operation │ Provider plugin   │
├──────────┼───────────────┼───────────┼───────────────────┤
│ Api      │ nuxtappsync   │ Create    │ awscloudformation │
└──────────┴───────────────┴───────────┴───────────────────┘
✔ Are you sure you want to continue? (Y/n) · yes

⚠️  WARNING: your GraphQL API currently allows public create, read, update, and delete access to all models via an API Key. To configure PRODUCTION-READY authorization rules, review: https://docs.amplify.aws/cli/graphql/authorization-rules

✅ GraphQL schema compiled successfully.

Edit your schema at xxx/nuxt-appsync/amplify/backend/api/nuxtappsync/schema.graphql or place .graphql files in a directory at xxx/nuxt-appsync/amplify/backend/api/nuxtappsync/schema
⠋ Building resource api/nuxtappsync
⚠️  WARNING: your GraphQL API currently allows public create, read, update, and delete access to all models via an API Key. To configure PRODUCTION-READY authorization rules, review: https://docs.amplify.aws/cli/graphql/authorization-rules

⠧ Building resource api/nuxtappsync✅ GraphQL schema compiled successfully.

Edit your schema at xxx/nuxt-appsync/amplify/backend/api/nuxtappsync/schema.graphql or place .graphql files in a directory at xxx/nuxt-appsync/amplify/backend/api/nuxtappsync/schema
? Do you want to generate code for your newly created GraphQL API Yes
? Choose the code generation language target typescript
? Enter the file name pattern of graphql queries, mutations and subscriptions src/graphql/**/*.ts
? Do you want to generate/update all possible GraphQL operations - queries, mutations and subscriptions Yes
? Enter maximum statement depth [increase from default if your schema is deeply nested] 2
? Enter the file name for the generated code src/API.ts

Deployment completed.
Deploying root stack nuxtappsync [ ====================-------------------- ] 1/2
        amplify-nuxtappsync-dev-9504b  AWS::CloudFormation::Stack     UPDATE_IN_PROGRESS             Fri Apr 05 2024 22:35:59…
        apinuxtappsync                 AWS::CloudFormation::Stack     CREATE_COMPLETE                Fri Apr 05 2024 22:37:38…
Deployed api nuxtappsync [ ======================================== ] 6/6
        GraphQLAPI                     AWS::AppSync::GraphQLApi       CREATE_COMPLETE                Fri Apr 05 2024 22:36:09…
        GraphQLAPIDefaultApiKey215A6D… AWS::AppSync::ApiKey           CREATE_COMPLETE                Fri Apr 05 2024 22:36:11…
        GraphQLAPINONEDS95A13CF0       AWS::AppSync::DataSource       CREATE_COMPLETE                Fri Apr 05 2024 22:36:11…
        GraphQLAPITransformerSchema3C… AWS::AppSync::GraphQLSchema    CREATE_COMPLETE                Fri Apr 05 2024 22:36:22…
        Todo                           AWS::CloudFormation::Stack     CREATE_IN_PROGRESS             Fri Apr 05 2024 22:36:22…

✔ Generated GraphQL operations successfully and saved at src/graphql
✔ Code generated successfully and saved in file src/API.ts
Deployment state saved successfully.

GraphQL endpoint: xxx.ap-northeast-1.amazonaws.com/graphql
GraphQL API KEY: xxx

GraphQL transformer version: 2
追加されたディレクトリ/ファイルについて
GraphQLのデプロイは完了しました。下記二つが作成されました。
│
└── src/
     └── graphql/
     └── API.ts
graphQLディレクトリ
CRUD操作を可能にするqueries.ts, mutations, subscriptionsが入っています。
- queriesはGET methodのようにDynamoDBからデータを取得するクエリーです。
- mutationsはPOSTやPUT methodのようにDynamoDBの値を変更する際に使用するクエリーです
- subscriptionsはリアルタイム通信を行いたい際に使用するクエリーです。
API.ts
amplifyの設定でtypescriptを使用すると、モデルのtsファイルが作成されます。
主に、Appsyncを用いる際に使用する全てのモデルが集約されています。その為、このファイル内のモデルを用いて、フロントは型付けを行なっていきます。
4.NuxtとAppsyncの連携
- 必要なパッケージをインストールします。package.jsonを参考にして
npm iをしてください
package.json
{
  "name": "nuxt-app",
  "private": true,
  "type": "module",
  "scripts": {
    "build": "nuxt build",
    "dev": "nuxt dev",
    "generate": "nuxt generate",
    "preview": "nuxt preview",
    "postinstall": "nuxt prepare"
  },
  "dependencies": {
    "aws-amplify": "^6.0.27",
    "nuxt": "^3.11.2",
    "vue": "^3.4.21",
    "vue-router": "^4.3.0"
  }
}
- src/pluginsディレクトリを作成し、amplify.tsに下記を記載してください。
src/plugins/amplify.ts
import { defineNuxtPlugin } from "#app";
import { Amplify } from "aws-amplify";
import awsExports from "@/aws-exports";

export default defineNuxtPlugin(() => {
  Amplify.configure(awsExports);
});
- nuxtの設定
nuxt.config.tsに下記を記載
// https://nuxt.com/docs/api/configuration/nuxt-config
export default defineNuxtConfig({
  devtools: { enabled: true },
  srcDir: "src/",
  plugins: ["@/plugins/amplify.ts"],
})
- フロントエンドの作成
※ デフォルトで生成されているapp.vueは削除してください
src/pages/index.vue
<template>
	<label>名前</label>
	<input v-model="inputName"><br>
	<label>すること</label>
	<input v-model="inputDescription"><br>
	<button @click="createTodo()">createTodo</button>
	<button @click="getTodoList()">getTodoList</button>
	<button @click="unSubscribeCreateTodo()">unSubscribeCreateTodo</button>
	<button @click="subscribeCreateTodo()">subscribeCreateTodo</button>
	<table>
		<thead>
			<tr>
				<th>id</th>
				<th>名前</th>
				<th>すること</th>
			</tr>
		</thead>
		<tbody>
			<tr v-for="todo in todoList" :key="todo.id">
				<td>{{todo.id}}</td>
				<td>{{todo.name}}</td>
				<td>{{todo.description}}</td>
			</tr>
		</tbody>
	</table>
</template>

<script setup lang="ts">
import { ref, onUnmounted } from 'vue';
import { generateClient } from "aws-amplify/api";
import * as queries from "@/graphql/queries";
import * as mutations from "@/graphql/mutations";
import * as subscriptions from "@/graphql/subscriptions";
import * as models from "@/API"

const todoList=ref<models.Todo[]>([])
const inputName=ref<string>("")
const inputDescription=ref<string>("")
const createSub=ref<any>(null)
const client=generateClient();

const createTodo=async () => {
	await client.graphql({
		query: mutations.createTodo,
		variables: {
			input: {
				name: inputName.value,
				description: inputDescription.value
			}
		}
	})
	inputName.value=""
	inputDescription.value=""
}

const getTodoList=async () => {
	const result=await client.graphql({
		query: queries.listTodos
	})
	todoList.value=result.data.listTodos.items
}

const unSubscribeCreateTodo=async () => {
	createSub.value.unsubscribe();
}

const subscribeCreateTodo=async () => {
	// Subscribe to creation of Todo
	createSub.value=client
		.graphql({ query: subscriptions.onCreateTodo })
		.subscribe({
			next: (data: any) => {
				console.log("triggered onCreateTodo")
				console.log(data)
			},
			error: (error: any) => console.warn(error)
		});
}

onUnmounted(() => {
	createSub.value.unsubscribe();
	console.log("unsubscribed");
});
</script>

<style>
th,
td {
	border: 1px solid rgb(160 160 160);
	padding: 8px 10px;
}
</style>
コードの解説
-
generateClientで、graphQLのコントローラーを作成しています。これによって作成されたものを通じて、Appsyncにquery, mutation, subscriptionの動作をリクエストします。 -
subscribeでは、onCreateTodoをサブスクライブしています。その為、createTodoのmutationを使用したことを検知すると、next()部分が発火します。
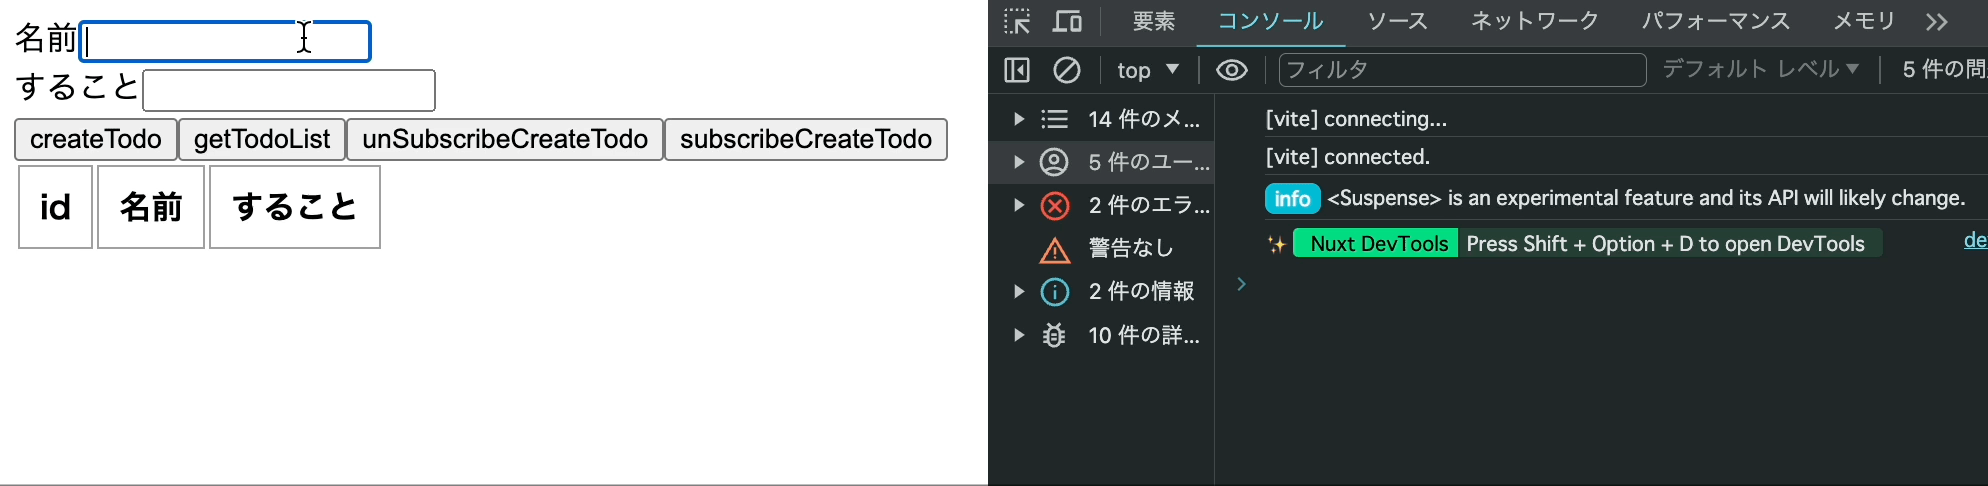
5.動作確認
localhostで立ち上げて(npm run dev)下記が正常に動作していれば、Nuxt上でGraphQLを正常に使用できる状態です。
- createTodo: inputに入力したデータをDynamoDBに登録
- getTodoList: DynamoDBのデータを全て取得
- unSubscribeCreateTodo: CreateTodoをアンサブスクライブ
- subscribeCreateTodo: CreateTodoをサブスクライブ
動作画面
まとめ
Amplifyを用いるとGraphQL環境の構築が迅速にできることがわかりました。
CRUD操作のquery, mutation, subscriptionと各モデルが自動生成されるため、管理のコストが大幅に削減できると思いました。
subscriptionを用いるとリアルタイム通信がすんなりできることに驚きました。
Discussion