Docusaurusスタートガイド
Docusaurusをはじめたい方のためのスタートガイドです。
対象者
- Docusaurus利用してみたい人
今回やること
- ローカルにDocusaurus構築
- GitHubリポジトリにpush
- Netlifyにデプロイ
- デフォルト設定を自分用に修正
- ヘッダー・フッタの修正
- 試しにドキュメント追加
- docusaurus.config.jsの修正
- Meta tag設定
- Blogの設定
- 多言語設定(i18n)
ローカルにDocusaurus構築
ターミナルで下記実行します。
npx create-docusaurus@latest documents classic
下記表示されるので、yを入力しEnter。
Ok to proceed? (y)
documentsディレクトリが作成されるので、移動し npm start実行します。
cd documents
npm start
ブラウザで http://localhost:3000にアクセスすると、表示されます。

GitHubリポジトリにpush
GitHubリポジトリにpushします。
リポジトリを新規作成します。

ローカルのDocusaurusを、作成したリポジトリにpushします。
git init
git add .
git commit -m "first commit"
git branch -M main
git remote add origin https://github.com/[ユーザ名]/documents.git
git push -u origin main
以上でGitHubにpushされました。

Netlifyにデプロイ
次にデプロイします。
今回はNetlifyにデプロイします。
[Add new site] -> [Important an existing project]をクリックします。

GitHubをクリックします。

先ほど作成したリポジトリを選択します。

設定し、[Deploy start] をクリック。

以上でデプロイ完了です。URLが発行されます。

参考:URLを変更する場合。
デフォルトでサイト名(URL)はランダムで作成されます。こちらは自由に修正可能です。
修正する場合は、[SIte settings] -> [Change site name]をクリックし、Site nameを修正します。

デフォルト設定を自分用に修正
次にデフォルトの設定を修正します。
ヘッダやフッタのリンクを修正

ヘッダのGitHubリンク
themeConfig:のGitHubリンクを修正
themeConfig:
  ・・・中略・・・
          {
   -         href: 'https://github.com/facebook/docusaurus',
   +       href: 'https://github.com/facebook/docusaurus',
            label: 'GitHub',
            position: 'right',
          },
        ],
      },
フッタのリンク
下記を修正
 footer: {
        style: 'dark',
        links: [
          {
記事のEdit this page のリンク先修正

docusaurus.config.jsの修正
 presets: [
    [
      'classic',
      /** @type {import('@docusaurus/preset-classic').Options} */
      ({
        docs: {
          sidebarPath: require.resolve('./sidebars.js'),
          // Please change this to your repo.
          editUrl:
 -           'https://github.com/facebook/docusaurus/tree/main/packages/create-docusaurus/templates/shared/',
 +           'https://github.com//[ユーザ名]/documents/edit/main/',
        },
        blog: {
          showReadingTime: true,
          // Please change this to your repo.
          editUrl:
-            'https://github.com/facebook/docusaurus/tree/main/packages/create-docusaurus/templates/shared/',
+            'https://github.com//[ユーザ名]/documents/edit/main/',
        },
[Edit this page]クリックで、GitHubのeditページへ遷移するように設定した。
(不特定多数のユーザに編集させたくない場合、権限等の設定に注意してください。)
試しにドキュメント追加
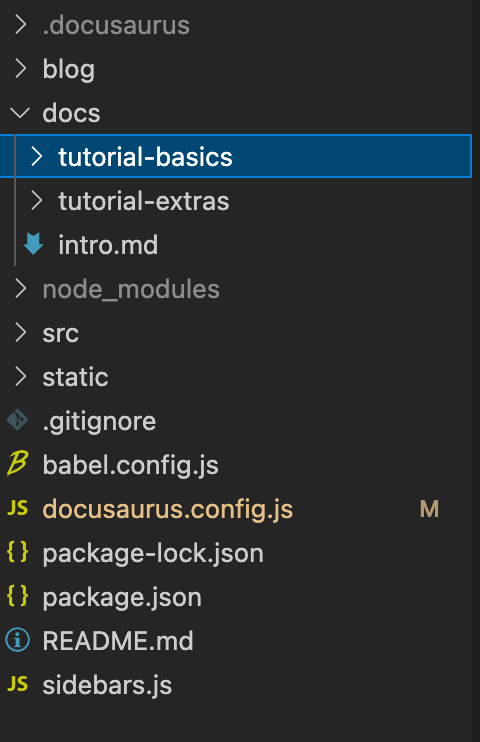
docsディレクトリ配下にmdファイルを配置します。

今回は、demo.mdを追加しました。
ファイル

画面

メモ
- Markdown Headersにはサイドバーの表示位置を記載
sidebar_position: 1 - H1がタイトルになる
docusaurus.config.jsの修正
docusaurus.config.jsにサイトURLを記載する必要があります。また、サイト名やorganizationName等の記載もあるので、併せて修正します。
docusaurus.config.jsを下記の通り修正します。
const config = {
-   title: 'My Site',
+   title: 'My documents',
   tagline: 'Dinosaurs are cool',
-   url: 'https://your-docusaurus-test-site.com',
+   url: 'https://my-documents.netlify.app/',
  baseUrl: '/',
  onBrokenLinks: 'throw',
  onBrokenMarkdownLinks: 'warn',
  favicon: 'img/favicon.ico',
-   organizationName: 'facebook', // Usually your GitHub org/user name.
+   organizationName: 'KoushiKagawa', // Usually your GitHub org/user name.
-   projectName: 'docusaurus', // Usually your repo name.
+   projectName: 'documents', // Usually your repo name.
Meta tag設定
各mdファイルのMeta tag設定を確認します。
Meta tagは、mdファイルのheaderに下記を追加することで設定できます。
---
sidebar_position: 1
title: Tutorial Intro
description: A short description of this page
keywords: [keywords, describing, the main topics]
---

Blogの設定
Blogの設定をします。

authorの設定
/blog/authors.yml に下記追加します。
Koshi:
  name: Koshi Kagawa
  title: PM
  url: https://github.com/koushikagawa
  image_url: https://avatars.githubusercontent.com/u/19630409?v=4
2019-05-28-first-blog-post.md の修正
試しにデフォルトの 2019-05-28-first-blog-post.md を修正します。
---
slug: first-blog-post
title: First Blog Post
authors: Koshi
tags: [docusaurus]
---

I used docusaurus.

It is useful because it is simple and lacks markdown.

How to get started is summarized in [zenn](https://zenn.dev/koushikagawa/scraps/6f38fbc8a2b3ee).
また、ファイル名を 2022-04-22-first-blog-post.md に修正する。

反映されました。
Tips:Blog不要な場合
Blogが不要な場合は、下記で対応できます。
- blogディレクトリを削除
- configファイルより
blog: falseに修正する。
**And if you don't want a blog**: just delete this directory, and use `blog: false` in your Docusaurus config.
多言語設定(i18n)
多言語設定を行います。
今回は下記で設定します。
- 主言語:英語(en)
- 複言語:日本語(ja)
config設定
docusaurus.config.js に下記追加します。
const config = {
  title: 'My documents',
  tagline: 'Dinosaurs are so cool',
  ・・・中略・・・

+  i18n: {
+    defaultLocale: 'en',
+    locales: ['en', 'ja'],
+  },
翻訳ドキュメントの配置ディレクトリ作成
翻訳するドキュメント(今回は日本語)を配置するディレクトリを作成します。
下記実行します。
npm run write-translations -- --locale ja
すると、下記ファイルが作成されます。
[INFO] 56 translations will be written at i18n/ja/code.json.
[INFO] 4 translations will be written at i18n/ja/docusaurus-theme-classic/navbar.json.
[INFO] 9 translations will be written at i18n/ja/docusaurus-theme-classic/footer.json.
[INFO] 3 translations will be written at i18n/ja/docusaurus-plugin-content-blog/options.json.
[INFO] 3 translations will be written at i18n/ja/docusaurus-plugin-content-docs/current.json.
次に、翻訳したファイルを作成します。
デフォルトで存在する /docs/intro.mdを翻訳ディレクトリにコピーします。
cp docs/intro.md i18n/ja/docusaurus-plugin-content-docs/current/intro.md
i18n/ja/docusaurus-plugin-content-docs/current/intro.mdを日本語にします。
---
sidebar_position: 1
---

# 日本語Intro
翻訳されたmdファイル
localで確認する
ローカル環境でi18n確認するためには、下記実行します。
npm run start -- --locale ja
http://localhost:3000 で確認できます。
Blogのi18nについて
Blogの翻訳については、/i18n/ja/docusaurus-plugin-content-blog/ 配下に同様のファイル名を作成し、ローカライズすればOKです。
TODO
今後追記したい内容です。
- Algolia連携
Docsearchを利用したく、現在利用申請中です。申請されたらドキュメント追加します。
参考
Docusaurus利用にあたり参考になるサイトです。私もこちらのドキュメントを参考にしました。ありがとうございました。
Discussion