Wordpressの記事投稿・更新時にVectorStoreも自動的に更新する
Wordpressのブログの記事をベースにRAGを構築し、そのRAGを活用したアプリケーションとしてブログ上にQAボットを構築しました。次の課題は、新規記事の投稿時や既存記事の更新時に、どのようにVectorStoreを更新するかということになります。Wordpressには、記事投稿・更新時にフックできるPHP関数が用意されているので、それを用いて自動的にVectorStoreを更新するシステムを構築してみました。
Wordpressの記事更新時にVectorStoreも自動的に更新するシステム
ブログに限らず、Webサイトというのは、常にコンテンツの追加や更新が発生します。RAGを用いたQAボットを提供している場合には、新しいコンテンツに関する質問にも適切に答えられるように、VectorStoreの更新も必要になります。
前回の記事で、Wordpress上でRAGを用いたQAボットを実装するところまで実現しました。
今回は、そのQAボットに利用しているVectorStoreの内容を、記事投稿・更新時に自動的に更新するシステムを構築してみます。
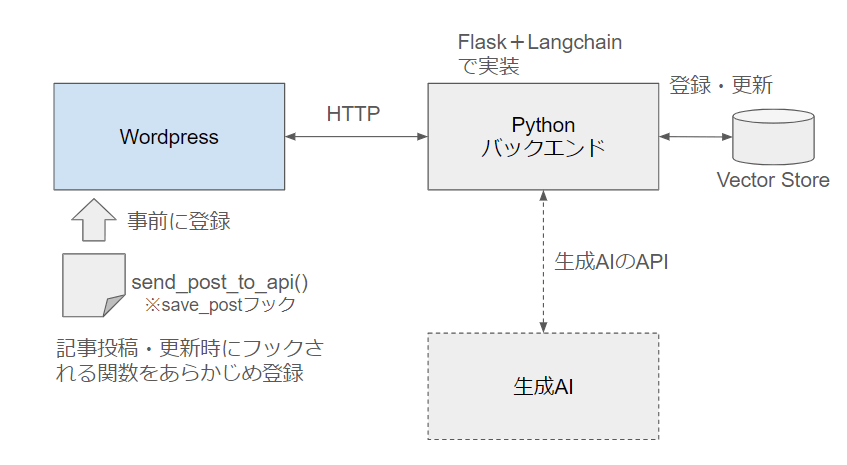
システム全体の構成図は以下のとおりです。

Wordpressに標準で用意されている、記事投稿・更新時に任意のPHP関数を呼び出すことができるsave_postというフックを活用します。
save_postフックで呼び出されたPHP関数で、記事の内容(HTMLコンテンツ)とタイトル、URL、post_idなどのメタデータを取り出して、VectorStoreを管理しているバックエンドのAPIを叩きます。
Python+Langchainで構築したバックエンドでは、Wordpressの記事に一意に付与されるpost_idでVectorStoreを検索し、既存の記事があればそれを更新、なければ新規に追加をします。
記事投稿・更新時にフックしてAPIにコンテンツを送信するPHP関数
Wordpressのsave_postフックは、記事の新規投稿や更新時にフックされます。このフックに自作のPHP関数を登録しておくと、記事投稿・更新時にその関数が呼び出されて実行されます。
今回は、save_postフックに以下のPHP関数send_post_to_api()を登録します。Wordpressのfunctions.phpに定義します。
<?php
function send_post_to_api($post_id) {
    // 自動保存とリビジョンをチェック
    if (defined('DOING_AUTOSAVE') && DOING_AUTOSAVE) return;
    if (wp_is_post_revision($post_id)) return;

    // 投稿データを取得
    $post = get_post($post_id);
    $title = $post->post_title;
    $content = $post->post_content;
    $url = get_permalink($post_id);
    $last_modified = $post->post_modified;
    $categories = get_the_category($post_id);

    $category_names = array_map(function($cat) {
        return $cat->name;
    }, $categories);

    // 送信するデータを準備
    $data = array(
        'post_id' => $post_id,
        'title' => $title,
        'content' => $content,
        'url' => $url,
        'modified' => $last_modified,
        'category' => $category_names
    );

    // Python API にデータを送信
    $response = wp_remote_post('https://example.com/api/', array(
        'headers'     => array('Content-Type' => 'application/json; charset=utf-8',
                               'API-KEY' => '<api key>'),
        'body'        => json_encode($data),
        'method'      => 'POST',
        'data_format' => 'body',
    ));

    // 応答をチェック(オプション)
    if (is_wp_error($response)) {
        $error_message = $response->get_error_message();
        error_log("Something went wrong: $error_message");
    } else {
        error_log('Post sent to Python backend successfully.');
    }
}
add_action('save_post', 'send_post_to_api');
?>
コードを順にみていきます。
// 自動保存とリビジョンをチェック
if (defined('DOING_AUTOSAVE') && DOING_AUTOSAVE) return;
if (wp_is_post_revision($post_id)) return;
最初に、記事の投稿や更新が、自動保存やリビジョンの更新でないことをチェックします。Wordpressには編集中の記事の自動保存機能がありますが、自動保存によりsave_postフックが呼ばれたときには、DOING_AUTOSAVEの値がtrueになります。それをチェックして、自動保存の場合は何もせずに終了します。
また、Wordpressでは履歴の編集もできるようになっていますが、更新された記事が(最新のものではなく)過去のリビジョンのものであった場合にも、何もせずに終了します。これは、wp_is_post_rivision()関数でチェックできます。
// 投稿データを取得
$post = get_post($post_id);
$title = $post->post_title;
$content = $post->post_content;
$url = get_permalink($post_id);
$last_modified = $post->post_modified;
$categories = get_the_category($post_id);

$category_names = array_map(function($cat) {
    return $cat->name;
}, $categories);
次に、バックエンドのAPIに送信するデータを準備します。save_postフックでは$post_idを引数として受け取りますので、これを利用して、記事の内容$contentに加えて、タイトル$title、URL$url、更新日時$last_modified、カテゴリ$categoriesなどを取得します。
カテゴリについては、get_the_category($post_id)で取得できるものがWordpressのカテゴリオブジェクトの配列となりますので、$category_namesにカテゴリ名($cat->name)のみを取り出しています。
// 送信するデータを準備
$data = array(
	'post_id' => $post_id,
	'title' => $title,
	'content' => $content,
	'url' => $url,
	'modified' => $last_modified,
	'category' => $category_names
);

// Python API にデータを送信
$response = wp_remote_post('https://example.com/api/', array(
	'headers'     => array('Content-Type' => 'application/json; charset=utf-8',
							'API-KEY' => '<api key>'),
	'body'        => json_encode($data),
	'method'      => 'POST',
	'data_format' => 'body',
));

// 応答をチェック(オプション)
if (is_wp_error($response)) {
	$error_message = $response->get_error_message();
	error_log("Something went wrong: $error_message");
} else {
	error_log('Post sent to Python backend successfully.');
}
取得したデータをwp_remote_post()で送信します。記事内容やメタデータは$data連想配列に格納して、POSTメソッドのBody部にJSONエンコードして送ります。また、ヘッダにはAPI-KEYなどをセットしています。バックエンドからの応答$responseをチェックして、エラーがあればその内容をログに追加しています。
最後に、作成した関数send_post_to_api()をsave_postフックに登録します。
add_action('save_post', 'send_post_to_api');
save_postフックについては、Wordpressの公式ドキュメントもご覧ください。
VectorStoreを更新するPythonバックエンド
Python+Langchainで構築したバックエンドは、前述のsave_postフックで実行されるsend_post_to_api()から送られてくるコンテンツをAPIで受け取り、その中身をVectorStoreに登録あるいは更新します。
APIは簡易的にFlaskで以下のように実装しました。
@app.route("/api/", methods=["POST"])
def update_stores():

    # check API key
    api_key = request.headers.get('API-KEY')
    if api_key is None:
        return ({"error": "API Key is missing"}, 401)
    if api_key != API_KEY:
        app.logger.info('Authentication: invalid API key')
        return ({"error": "Invalid API Key"}, 403)

    # get article content and metadata
    article_dict = request.json

    # make index
    result = make_index(article_dict, dry_run=False)

    # Logging
    app.logger.info('[Update] ' + result.get('status') + ' ' + result.get('title'))
    return {"title": result.get('title'), "status": result.get('status')}
やっていることは簡単で、API-KEYをチェックしたあと、Body部のコンテンツ本体とメタデータをdict形式で読み出し、それをVectorStoreに登録する関数make_index()に渡しているだけです。
make_index()の概要は以下のとおりです。(長いので一部省略しています)
def make_index(article: dict, dry_run=False):

    # Chroma vector store
    embeddings = OpenAIEmbeddings(model=EMBEDDING_MODEL)
    dbclient = chromadb.PersistentClient(path=PERSISTENT_DIRECTORY)
    vectordb = Chroma(
        collection_name=CHROMA_COLLECTION_NAME,
        embedding_function=embeddings,
        client=dbclient,
    )
    client = vectordb._client
    collection = client.get_collection(name=CHROMA_COLLECTION_NAME)

    # アップデート結果を格納する変数
    update_result = None

    # VectorStoreをpost_idで検索し、すでに記事があればそれを取得する
    # → 通常はpost_idの記事を分割した複数のChunkが取得される
    article_post_id = str(article['post_id'])
    result = collection.get(where={'post_id': {"$eq": article_post_id}})

    #
    # すでにVector Storeに記事がある場合、modified date を比較する
    # VectorStore のドキュメントが古い場合は削除する
    #
    if result.get('ids'):

        # VectorStoreにあるドキュメントと新しいドキュメントの更新日時を取得
        s_metadata = result.get('metadatas')
        s_modified_epoch = s_metadata[0].get('modified_epoch')
        a_modified_epoch = datetime.datetime.strptime(article.get('modified'),
                                                      '%Y-%m-%d %H:%M:%S').timestamp()

        # VectorStoreのドキュメントが古ければ
		# 登録する前にそのドキュメントに属するChunkをすべて削除する
        if s_modified_epoch and a_modified_epoch and int(s_modified_epoch) < int(a_modified_epoch):
            # 古いドキュメントに関連するChunkを削除
            if not dry_run:
                # Vector Store から削除
                collection.delete(result['ids'])
        else:
            # VectorStore のドキュメントが古くなければ何もしない(Skipする)
            return {"title": article['title'], "status": "skip due to not latest"}

    #
    # 新しいドキュメントを VectorStore に登録する
    #

    # Storeに保存するドキュメントを作成
    data = create_docs_from_article(article)

    # 新しいドキュメントをVectorStoreとDocstoreに追加する
    if not dry_run:
        vectordb.add_texts(data['sub_docs'], data['metadatas'])
        update_result = {"title": article['title'], "status": "updated"}
    else:
        update_result = {"title": article['title'], "status": "skip due to DRY run"}

    return update_result
make_index()関数の引数articleには、APIで受信したコンテンツのJSON形式のデータがそのまま入っています。
article_post_id = str(article['post_id'])
result = collection.get(where={'post_id': {"$eq": article_post_id}})
まず、ChromaDBを開き、APIから受信した(新規登録または更新すべき)ドキュメントのpost_idでVectorStoreを検索します。VectorStoreに格納されているドキュメントには、metadataとしてWordpressで一意に付与されるpost_idや、更新日時を示すmodifiedなどを含んでいます。
上記のようにcollection.getでpost_idをキーにして検索すると、resultにはChromaDB内のドキュメント(チャンク)のリストが返ってきます。post_idはWordpressでの記事毎に付与されるのに対して、ChromaDBに格納されているチャンクは、その記事を分割したものになりますので、同一のpost_idを持つチャンクが複数見つかるわけです。
if s_modified_epoch and a_modified_epoch and int(s_modified_epoch) < int(a_modified_epoch):
	# 古いドキュメントに関連するChunkを削除
	if not dry_run:
		# Vector Store から削除
		collection.delete(result['ids'])
else:
	# VectorStore のドキュメントが古くなければ何もしない(Skipする)
	return {"title": article['title'], "status": "skip due to not latest"}
もしChromaDB内に、APIから受信した記事と同じpost_idのチャンクがあれば、それは記事の更新ということになります。その場合は、modifiedに含まれる更新日時を比較して、APIから受信した記事のほうが新しければ、ChromaDB内のチャンクを更新する必要があります。
チャンクを更新する場合には、いったん同じpost_idを持つチャンクをすべて削除してから、新規に登録することになります。collection.delete(result['ids'])でチャンクを削除しています。
# Storeに保存するドキュメントを作成
data = create_docs_from_article(article)

# 新しいドキュメントをVectorStoreに追加する
if not dry_run:
	vectordb.add_texts(data['sub_docs'], data['metadatas'])
	update_result = {"title": article['title'], "status": "updated"}
else:
	update_result = {"title": article['title'], "status": "skip due to DRY run"}
最後に、APIで受け取った記事の中身をチャンクに分割してから、メタデータとともにChromaDBに追加します。create_docs_from_article()は、HTML形式の記事を、<h2><h3>単位でチャンクに分割し、メタデータとともにリストとして返す処理を実施します。
具体的な処理の中身については、以下の記事を参考にしてください。
まとめ
Wordpressの記事投稿・更新に連動して、QAボット用のRAGに使うVectorStoreを更新する仕組みを実装してみました。たまにしか更新されない資料などであれば、その都度、すべて作り直しても良いのですが、ブログのような更新頻度の高いメディアではそれも面倒です。記事更新と同時にVectorStoreも更新するようにすれば、VectorStoreを作り直す手間も省けますし、常に最新の情報をもとにQAボットが動作するメリットもあります。
Discussion