ライブラリ (SimpleWebAuthn) を使用した WebAuthn の RP 実装の勘所
Digital Identity 技術勉強会 #iddance Advent Calendar 2023 3 日目の記事です。
本投稿では、SimpleWebAuthn[1] というライブラリを使用して Web Authentication (WebAuthn) の Relying Party (RP) を実装し、開発するうえで意識する必要がある箇所などの勘所を記載します。
なお、通常、WebAuthn の RP を実装するうえで利用可能なライブラリは各言語ごとに用意されており、特定の言語でも複数のライブラリが公開されている場合があります。
本当投稿で紹介するのはあくまでそのうちの一つのライブラリであり、実装において考慮が必要な点は、利用する言語、ライブラリ、フレームワークなどによって異なる点に留意してください。
どういったライブラリが存在しているかについては、例えば、WebAuthn Awesom[2] というリポジトリから探すことができるため、適宜ご確認ください。
はじめに
まず、WebAuthn の RP を実装するうえで、少なくとも登録および認証の大まかなフローを知っておく必要があります。
登録および認証のフローについては、WebAuthn の仕様の図[3]などから確認でき、サーバー側およびブラウザ側による処理が必要であることがわかります。
以下の図は、WebAuthn の仕様[3:1]から引用した登録および認証時のフローです。WebAuthn の RP を実装する場合、Relying Party Server および RP JavaScript Application で行う処理を実装する必要があります。具体的には、図中の (1) (5) (6) に該当する処理であり、RP サーバーからブラウザへのオプションの送信、WebAuthnAPI の呼び出し (navigator.credentials.create() or navigator.credentials.get())、RP サーバーに対する WebAuthnAPI 呼び出し結果の送信、RP サーバーによる WebAuthnAPI 呼び出し結果の検証などになります。
図中の (2) (3) (4) については、ブラウザで WebAuthn API を呼び出したのちの処理であり、通常、WebAuthn の RP の実装において意識することはありません。

Registration Flow[3:2]

Authentication Flow[3:3]
Relying Party Server と RP JavaScript Application 間のリクエストおよびレスポンスの例は Server Requirements and Transport Binding Profile[4] などから確認することができます。
例えば、/attestation/options、/attestation/result、/attestation/options、/assertion/result といったエンドポイントを用意してオプションの送信および結果の検証を行うことができることがわかります。
この時点で WebAuthn では多くのパラメーターを扱う必要があることに気づくかもしれません。
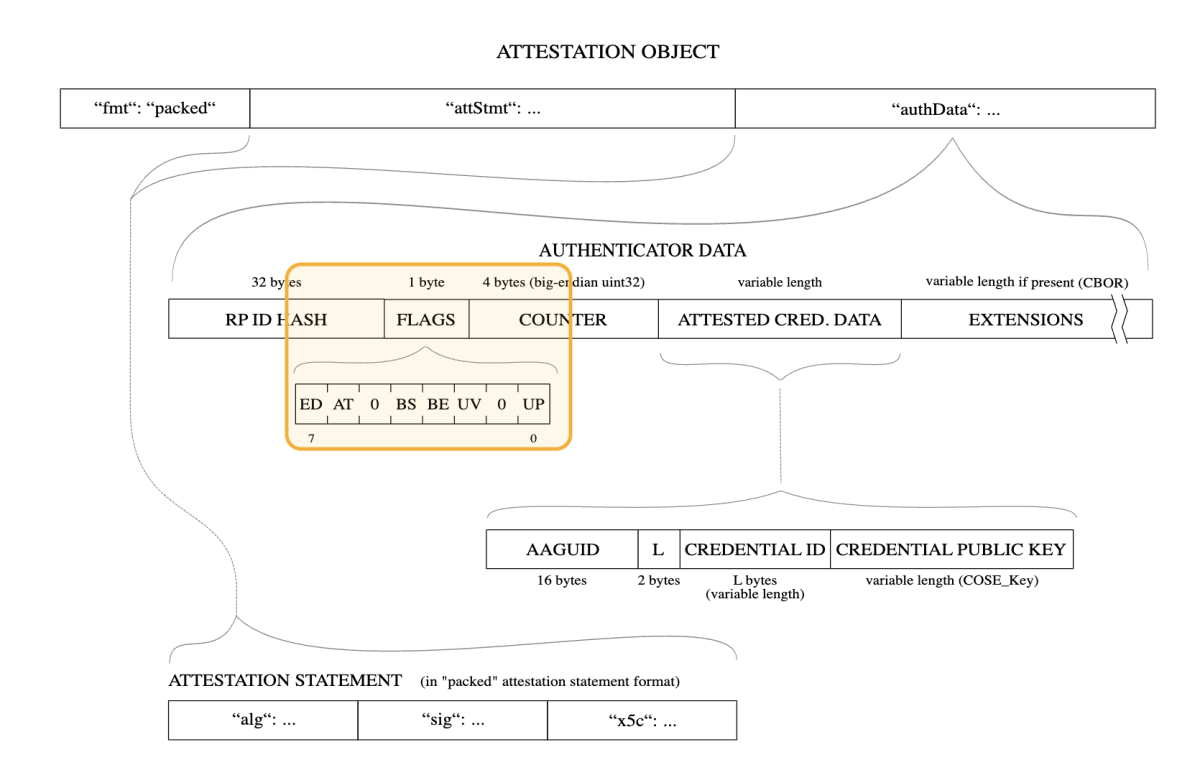
また、WebAuth API の結果は以下のような構造のデータになっています。この中には、CBOR (Concise Binary Object Representation) でエンコードされたattestationObject、authenticatorData といったデータが含まれており、これらのデータをパースして取得できる値などを使用して検証処理が行われます。
Authenticator Attestation Response:
{
    "id": "LFdoCFJTyB82ZzSJUHc-c72yraRc_1mPvGX8ToE8su39xX26Jcqd31LUkKOS36FIAWgWl6itMKqmDvruha6ywA",
    "rawId": "LFdoCFJTyB82ZzSJUHc-c72yraRc_1mPvGX8ToE8su39xX26Jcqd31LUkKOS36FIAWgWl6itMKqmDvruha6ywA",
    "response": {
        "clientDataJSON": "eyJjaGFsbGVuZ2UiOiJOeHlab3B3VktiRmw3RW5uTWFlXzVGbmlyN1FKN1FXcDFVRlVLakZIbGZrIiwiY2xpZW50RXh0ZW5zaW9ucyI6e30sImhhc2hBbGdvcml0aG0iOiJTSEEtMjU2Iiwib3JpZ2luIjoiaHR0cDovL2xvY2FsaG9zdDozMDAwIiwidHlwZSI6IndlYmF1dGhuLmNyZWF0ZSJ9",
        "attestationObject": "o2NmbXRoZmlkby11MmZnYXR0U3RtdKJjc2lnWEcwRQIgVzzvX3Nyp_g9j9f2B-tPWy6puW01aZHI8RXjwqfDjtQCIQDLsdniGPO9iKr7tdgVV-FnBYhvzlZLG3u28rVt10YXfGN4NWOBWQJOMIICSjCCATKgAwIBAgIEVxb3wDANBgkqhkiG9w0BAQsFADAuMSwwKgYDVQQDEyNZdWJpY28gVTJGIFJvb3QgQ0EgU2VyaWFsIDQ1NzIwMDYzMTAgFw0xNDA4MDEwMDAwMDBaGA8yMDUwMDkwNDAwMDAwMFowLDEqMCgGA1UEAwwhWXViaWNvIFUyRiBFRSBTZXJpYWwgMjUwNTY5MjI2MTc2MFkwEwYHKoZIzj0CAQYIKoZIzj0DAQcDQgAEZNkcVNbZV43TsGB4TEY21UijmDqvNSfO6y3G4ytnnjP86ehjFK28-FdSGy9MSZ-Ur3BVZb4iGVsptk5NrQ3QYqM7MDkwIgYJKwYBBAGCxAoCBBUxLjMuNi4xLjQuMS40MTQ4Mi4xLjUwEwYLKwYBBAGC5RwCAQEEBAMCBSAwDQYJKoZIhvcNAQELBQADggEBAHibGMqbpNt2IOL4i4z96VEmbSoid9Xj--m2jJqg6RpqSOp1TO8L3lmEA22uf4uj_eZLUXYEw6EbLm11TUo3Ge-odpMPoODzBj9aTKC8oDFPfwWj6l1O3ZHTSma1XVyPqG4A579f3YAjfrPbgj404xJns0mqx5wkpxKlnoBKqo1rqSUmonencd4xanO_PHEfxU0iZif615Xk9E4bcANPCfz-OLfeKXiT-1msixwzz8XGvl2OTMJ_Sh9G9vhE-HjAcovcHfumcdoQh_WM445Za6Pyn9BZQV3FCqMviRR809sIATfU5lu86wu_5UGIGI7MFDEYeVGSqzpzh6mlcn8QSIZoYXV0aERhdGFYxEmWDeWIDoxodDQXD2R2YFuP5K65ooYyx5lc87qDHZdjQQAAAAAAAAAAAAAAAAAAAAAAAAAAAEAsV2gIUlPIHzZnNIlQdz5zvbKtpFz_WY-8ZfxOgTyy7f3Ffbolyp3fUtSQo5LfoUgBaBaXqK0wqqYO-u6FrrLApQECAyYgASFYIPr9-YH8DuBsOnaI3KJa0a39hyxh9LDtHErNvfQSyxQsIlgg4rAuQQ5uy4VXGFbkiAt0uwgJJodp-DymkoBcrGsLtkI"
    },
    "type": "public-key"
}
Authenticator Assertion Response:
{
    "id":"LFdoCFJTyB82ZzSJUHc-c72yraRc_1mPvGX8ToE8su39xX26Jcqd31LUkKOS36FIAWgWl6itMKqmDvruha6ywA",
    "rawId":"LFdoCFJTyB82ZzSJUHc-c72yraRc_1mPvGX8ToE8su39xX26Jcqd31LUkKOS36FIAWgWl6itMKqmDvruha6ywA",
    "response":{
        "authenticatorData":"SZYN5YgOjGh0NBcPZHZgW4_krrmihjLHmVzzuoMdl2MBAAAAAA",
        "signature":"MEYCIQCv7EqsBRtf2E4o_BjzZfBwNpP8fLjd5y6TUOLWt5l9DQIhANiYig9newAJZYTzG1i5lwP-YQk9uXFnnDaHnr2yCKXL",
        "userHandle":"",
        "clientDataJSON":"eyJjaGFsbGVuZ2UiOiJ4ZGowQ0JmWDY5MnFzQVRweTBrTmM4NTMzSmR2ZExVcHFZUDh3RFRYX1pFIiwiY2xpZW50RXh0ZW5zaW9ucyI6e30sImhhc2hBbGdvcml0aG0iOiJTSEEtMjU2Iiwib3JpZ2luIjoiaHR0cDovL2xvY2FsaG9zdDozMDAwIiwidHlwZSI6IndlYmF1dGhuLmdldCJ9"
    },
    "type":"public-key"
}
通常、WebAuthn の RP を実装し、意図した認証器を使用できるようにするうえで上記のようなパラメーターについて理解することは重要です。
各パラメーターの詳細については WebAuthn の仕様[3:4]から確認できますが、日本語で解説されたドキュメント[5]なども存在しているため併せて参照することをお勧めします。
実装例
SimpleWebAuthn を使用した WebAuthn の RP の実装例については、SimpleWebAuthn のリポジトリ上の example ディレクトリ上に存在しており、こちらから確認することができます。
今回は Server Requirements and Transport Binding Profile[4:1] に合わせる形で実装例を用意してみたため、こちらをもとに説明をします。なお、あくまで動作確認用の実装であり、網羅的な例外処理などはおこなわれていない点には注意していただければと思います。
この実装例では、YubiKey 5 Series を認証器として使用する想定で実装をおこなっています。想定する認証器として YubiKey 5 Series を選択した理由としては、多くの方に認知されている認証器の一つであり、後述の User Presence(UP)と User Verification(UV)の違いを利用して受け入れる認証器の条件の設定などが可能なためです。
登録
Relying Party Server では、WebAuthn API のオプションを送信するエンドポイントと WebAuthn API の結果を検証するためのエンドポイント、RP JavaScript Application では WebAuthn API navigator.credentials.create() の呼び出しをそれぞれ実装します。

Registration Flow[3:5]
Relying Party Server
Relying Party Server では、WebAuthn API のオプションを送信するエンドポイント /attestation/options と WebAuthn API の結果を検証するためのエンドポイント /attestation/result を実装します。
上記のエンドポイントを実装する場合、以下の SimpleWebAuthn の Server 側のドキュメント[6]を参照します。
Credential Creation Options
generateRegistrationOptions() を呼び出して WebAuthn API navigator.credentials.create() のオプションを返します。
あとで WebAuthn API の結果を検証する際に必要となる challenge をセッションに保存しておきます。
import {
  generateRegistrationOptions,
} from '@simplewebauthn/server';
import { AuthenticatorDevice, RegistrationResponseJSON } from '@simplewebauthn/typescript-types';
...

router.post('/options', async (req: Request, res: Response) => {
  ...
  const credentialCreationOptions = await generateRegistrationOptions({
    rpName,
    rpID,
    userID: user.id,
    userName: user.username,
    attestationType: 'direct',
    excludeCredentials: user.authenticators.map(authenticator => ({
      id: authenticator.credentialID,
      type: 'public-key',
      transports: authenticator.transports,
    })),
    authenticatorSelection: {
      residentKey: 'discouraged',
      userVerification: 'discouraged',
      authenticatorAttachment: 'cross-platform',
    },
  });
  ...
  req.session.currentChallenge = options.challenge;
  ...
});
オプションの詳細は以下の W3C の WebAuthentication の仕様[3:6]からも確認することができます。
例えば、ここでは YubiKey を認証器として呼び出すために authenticatorAttachment: 'cross-platform' を指定しています。また、User Verification を要求しないように userVerification: 'discouraged' を指定しています。これらのオプションは、呼び出す想定の認証器の種類や要求するべき認証強度によって適切な値を指定する必要があります。
Authenticator Attestation Response
verifyRegistrationResponse() を呼び出して WebAuthn API navigator.credentials.create() の結果を検証します。
ここでも、受け入れる認証器などに応じて適切な値を引数として指定する必要があります。
Relying Party Server は、verification.verified が true の場合に登録情報をデータベースに保存します。
import {
  VerifyRegistrationResponseOpts,
  verifyRegistrationResponse
} from '@simplewebauthn/server';
import { AuthenticatorDevice, RegistrationResponseJSON } from '@simplewebauthn/typescript-types';
import { isoUint8Array } from '@simplewebauthn/server/helpers';
...
router.post('/result', async (req: Request, res: Response) => {
  ...
  const expectedChallenge = req.session.currentChallenge;
  const opts: VerifyRegistrationResponseOpts = {
    response: body,
    expectedChallenge: `${expectedChallenge}`,
    expectedOrigin: origin,
    expectedRPID: rpID,
    requireUserVerification: false,
  };
  let verification;
  try {
    verification = await verifyRegistrationResponse(opts);
  } catch (error) {
    res.json({
      status: 'failed',
      errorMessage: (error as Error).message
    });
    return
  }
  const { verified, registrationInfo } = verification;
  if (!verified || !registrationInfo) {
    res.json({
      status: 'failed',
      errorMessage: 'Can not validate response signature.'
    })
    return;
  }
  ...
  const { credentialPublicKey, credentialID, counter } = registrationInfo;
  const existingAuthenticator = user.authenticators.find(authenticator =>
    isoUint8Array.areEqual(authenticator.credentialID, credentialID)
  );
  if (!existingAuthenticator) {
    const newDevice: AuthenticatorDevice = {
      credentialID,
      credentialPublicKey,
      counter,
      transports: body.response.transports,
    }
    user.authenticators.push(newDevice);
  }
  req.session.currentChallenge = undefined;
  ...
});
RP JavaScript Application
Relying Party Server のエンドポイント /attestation/options にリクエストし、取得したパラメーターをもとに WebAuthn API navigator.credentials.create() を実行し、結果を Relying Party Server のエンドポイント /attestation/result に送信する処理を実装します。
ここでは、以下の SimpleWebAuthn の Browser 側のドキュメント[7]を参照します。
/attestation/options にリクエストを送信し、取得したパラメーターを使用して startRegistration() を呼び出します。
startRegistration() 経由で WebAuthn API navigator.credentials.create() が呼び出されるため、結果を '/attestation/result に送信します。
<!DOCTYPE html>
...
<script src="https://unpkg.com/@simplewebauthn/browser/dist/bundle/index.umd.min.js"></script>
...
<button type="submit" id="register" onclick="register()">Register</button>
...
<script>
  async function register() {
    const { startRegistration } = SimpleWebAuthnBrowser;
    ...
    const resp = await fetch('/attestation/options', {
      method: 'POST',
      credentials: 'same-origin',
      headers: {
        'Content-Type': 'application/json'
      },
      body: JSON.stringify({
        username: username.value
      })
    });
    let attResp;
    try {
      attResp = await startRegistration(await resp.json());
    } catch (error) {
      if (error.name === 'InvalidStateError') {
        elemError.innerText = 'Error: Authenticator was probably already registered by user';
      } else {
        elemError.innerText = error;
      }
      throw error;
    }
    const verificationResp = await fetch('/attestation/result', {
      method: 'POST',
      headers: {
        'Content-Type': 'application/json',
      },
      body: JSON.stringify(attResp),
    });
    const verificationJSON = await verificationResp.json();

    if (verificationJSON && verificationJSON.status === 'ok') {
      elemSuccess.innerText = 'Successfully registered!';
    } else {
      elemError.innerText = 'Error: ' + verificationJSON.errorMessage;
    }
  }
  ...
</script>
</html>
認証
Relying Party Server では、WebAuthn API のオプションを送信するエンドポイントと WebAuthn API の結果を検証するためのエンドポイント、RP JavaScript Application では WebAuthn API (navigator.credentials.get()) の呼び出しをそれぞれ実装します。

Authentication Flow[3:7]
Relying Party Server
Relying Party Server では、WebAuthn API のオプションを送信するエンドポイント /assertion/options と WebAuthn API の結果を検証するためのエンドポイント /assertion/result を実装します。
上記のエンドポイントを実装する場合、以下の SimpleWebAuthn の Server 側のドキュメント[6:1]を参照します。
Credential Get Options
generateAuthenticationOptions(() を呼び出して WebAuthn API navigator.credentials.get() のオプションを返します。
あとで WebAuthn API の結果を検証する際に必要となる challenge をセッションに保存しておきます。
import {
  generateAuthenticationOptions,
} from '@simplewebauthn/server';
import type {
  GenerateAuthenticationOptionsOpts,
} from '@simplewebauthn/server';
import { AuthenticationResponseJSON } from '@simplewebauthn/server/script/deps';
import { isoBase64URL, isoUint8Array } from '@simplewebauthn/server/helpers';
...
router.post('/options', async (req: Request, res: Response) => {
  ...
  const opts: GenerateAuthenticationOptionsOpts = {
    timeout: 60000,
    allowCredentials: user.authenticators.map(authenticator => ({
      id: authenticator.credentialID,
      type: 'public-key',
      transports: authenticator.transports,
    })),
    userVerification: 'discouraged',
    rpID
  }
  const credentialGetOptions = await generateAuthenticationOptions(opts);
  ...
  req.session.currentChallenge = options.challenge;
  ...
});
オプションの詳細は以下の W3C の WebAuthentication の仕様[3:8]からも確認することができます。
Authenticator Assertion Response
verifyAuthenticationResponse,() を呼び出して WebAuthn API navigator.credentials.get() の結果を検証します。
ここでも、使用する認証器などに応じて適切な値を引数として指定する必要があります。
Relying Party Server は、verification.verified が true の場合に登録情報をデータベースに保存します。
import {
  verifyAuthenticationResponse,
} from '@simplewebauthn/server';
import type {
  VerifiedAuthenticationResponse,
  VerifyAuthenticationResponseOpts,
} from '@simplewebauthn/server';
import { AuthenticationResponseJSON } from '@simplewebauthn/server/script/deps';
import { isoBase64URL, isoUint8Array } from '@simplewebauthn/server/helpers';

router.post('/result', async (req: Request, res: Response) => {
  const body: AuthenticationResponseJSON = req.body;
  const expectedChallenge = req.session.currentChallenge;
  ...
  let verification: VerifiedAuthenticationResponse;
  try {
    const opts: VerifyAuthenticationResponseOpts = {
      response: body,
      expectedChallenge: `${expectedChallenge}`,
      expectedOrigin: origin,
      expectedRPID: rpID,
      authenticator: dbAuthenticator,
      requireUserVerification: false
    };
    verification = await verifyAuthenticationResponse(opts);
  } catch (error) {
    return res.json({
      status: 'failed',
      errorMessage: (error as Error).message,
    });
  }
  const { verified, authenticationInfo } = verification;
  if (!verified || !authenticationInfo) {
    return res.json({
      status: 'failed',
      errorMessage: 'Can not authenticate signature.',
    });
  }
  dbAuthenticator.counter = authenticationInfo.newCounter;
  ...
});
RP JavaScript Application
Relying Party Server のエンドポイント /assertion/options にリクエストし、取得したパラメーターをもとに WebAuthn API navigator.credentials.get() を実行し、結果を Relying Party Server のエンドポイント /assertion/result に送信する処理を実装します。
ここでは、以下の SimpleWebAuthn の Browser 側のドキュメント[7:1]を参照します。
/assertion/options にリクエストを送信し、取得したパラメーターを使用して startAuthentication() を呼び出します。
startAuthentication() 経由で WebAuthn API navigator.credentials.get() が呼び出されるため、結果を '/assertion/result に送信します。
<!DOCTYPE html>
<script src="https://unpkg.com/@simplewebauthn/browser/dist/bundle/index.umd.min.js"></script>
  ...
  async function authenticate() {
    const { startAuthentication } = SimpleWebAuthnBrowser;
    ...
    const resp = await fetch('/assertion/options', {
      method: 'POST',
      credentials: 'same-origin',
      headers: {
        'Content-Type': 'application/json'
      },
      body: JSON.stringify({
        username: username.value
      })
    });
    let asseResp;
    try {
      asseResp = await startAuthentication(await resp.json());
    } catch (error) {
      elemError.innerText = error;
    }
    const verificationResp = await fetch('/assertion/result', {
      method: 'POST',
      headers: {
        'Content-Type': 'application/json',
      },
      body: JSON.stringify(asseResp),
    });
    const verificationJSON = await verificationResp.json();

    if (verificationJSON && verificationJSON.status === 'ok') {
      elemSuccess.innerText = 'Successfully authenticated!';
      await getUserInfo();
    } else {
      elemError.innerText = 'Error: ' + verificationJSON.errorMessage;
    }
  }
  ...
</script>
</html>
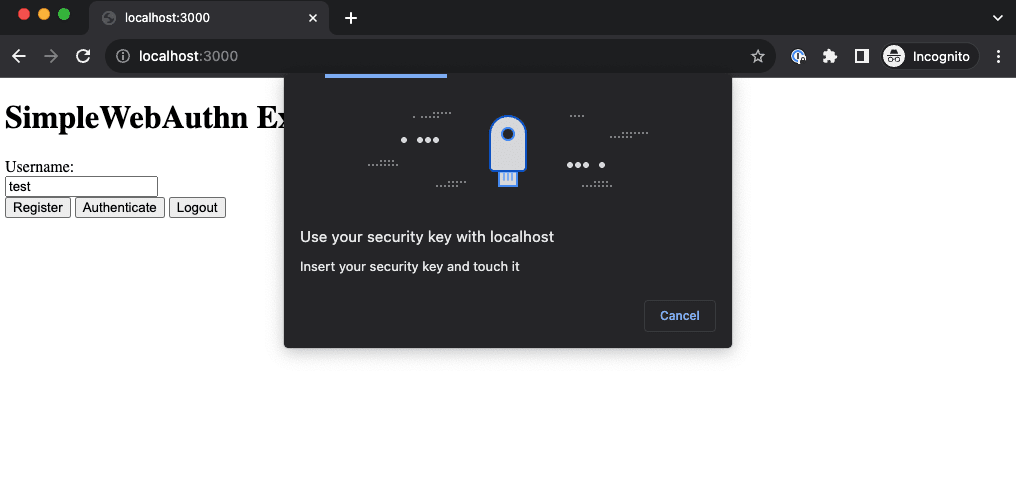
動作確認
今回実装したサンプルは以下の手順で動作確認できます。
$ git clone https://github.com/kg0r0/simplewebauthn-example.git
$ cd simplewebauthn-example
$ npm install
$ npm start
登録および認証において認証器として YubiKey を呼び出して使用できることが確認できるかと思います。
なお、メソッドの引数を変更することによって、追加の検証をおこなうように設定することも可能です。
例えば、登録時に WebAuthn API の結果に含まれる Attestation Object の FLAGS において User Presence(UP)だけでなく User Verification(UV)を検証するように設定することも可能です。
router.post('/result', async (req: Request, res: Response) => {
  ...
  const opts: VerifyRegistrationResponseOpts = {
    ...
    requireUserVerification: true,
  };
  ...
});
再度 YubiKey を認証器として登録しようとした場合、Error: User verification required, but user could not be verified といったエラーが発生するようになることを確認できます。これは、Relying Party Server 側で UV を検証するように設定したものの RP JavaScript Application 側で UV を要求するように設定されていないためです。
ここで、WebAuthn API 実行時に UV を要求するように userVerification の値を指定します。
  const credentialCreationOptions = await generateRegistrationOptions({
    ...
    })),
    authenticatorSelection: {
      residentKey: 'discouraged',
      userVerification: 'required',
      authenticatorAttachment: 'cross-platform',
    },
  });
すると、PIN の入力が要求され User Verification が行われ、UP および UV が検証されたうえで認証器を登録することができるようになりました (なお、YubiKey の動作として preferred を指定した場合においても PIN が要求されることがあるようです[8])。

同様に、認証時においても WebAuthn API の結果に FLAGS が含まれるため、User Verification(UV)を検証するように設定することが可能です。

Authenticator Data[3:9]
この時も Relying Party Server および RP JavaScript Application 側で正しく設定をおこないます。
router.post('/options', async (req: Request, res: Response) => {
  ...
  const opts: GenerateAuthenticationOptionsOpts = {
    ...
    userVerification: 'required',
  }
  ...
});

router.post('/result', async (req: Request, res: Response) => {
  try {
    const opts: VerifyAuthenticationResponseOpts = {
      ...
      requireUserVerification: true
    };
    ...
});
まとめ
本投稿では SimpleWebAuthn[1:1] というライブラリを使用して WebAuthn の RP を実装してみました。
所感としては、ライブラリを使用して実装する場合においても、以下のような点に関する理解は必要であると感じました。
- WebAuthn の登録および認証フロー
- ブラウザおよびサーバー側の処理
- ブラウザから意図した認証器を呼び出すために必要な WebAuthn API のオプション
- サーバーで意図した認証器を受け入れるために検証が必要なデーターおよびパラメーター
一方で、WebAuthn API を呼び出す際のパラメーターの型変換や、WebAuthn API の結果のパースなどはライブラリ側にて吸収されています。
以前の WebAuthn のライブラリが少なかった状況では、CBOR エンコードされたデータなどの取り扱いに大きな労力を必要としましたが、こういった点については基本的に意識することなく実装することができそうです。
なお、WebAuthentication[3:10] の仕様は現在も更新が続いており、各ライブラリも仕様に追従する形で更新されていくことが想定されます。このため、例えば SimpleWebAuthn であれば、ドキュメントの記載だけでなく型定義[9]なども確認してパラメーターの有無を調べてみると良いかもしれません。
今回は基本的な WebAuthn RP の実装について触れました。ここから Passkeys をサポートする方法については以下の記事にて触れているので良ければ確認してみてください。
ではまた!
-
SimpleWebAuthn | Introduction https://simplewebauthn.dev/docs/ ↩︎ ↩︎
-
WebAuthn Awesom https://github.com/herrjemand/awesome-webauthn ↩︎
-
Web Authentication: An API for accessing Public Key Credentials Level 3 | 5. Web Authentication API https://www.w3.org/TR/webauthn-3/#sctn-api ↩︎ ↩︎ ↩︎ ↩︎ ↩︎ ↩︎ ↩︎ ↩︎ ↩︎ ↩︎ ↩︎
-
Server Requirements and Transport Binding Profile https://fidoalliance.org/specs/fido-v2.0-rd-20180702/fido-server-v2.0-rd-20180702.html ↩︎ ↩︎
-
Yahoo! JAPAN での生体認証の取り組み(FIDO2 サーバーの仕組みについて)https://techblog.yahoo.co.jp/advent-calendar-2018/webauthn/ ↩︎
-
SimpleWebAuthn | Server https://simplewebauthn.dev/docs/packages/server ↩︎ ↩︎
-
SimpleWebAuthn | Browser https://simplewebauthn.dev/docs/packages/browser ↩︎ ↩︎
-
Understanding YubiKey PINs https://support.yubico.com/hc/en-us/articles/4402836718866-Understanding-YubiKey-PINs ↩︎
-
SimpleWebAuthn | @simplewebauthn/typescript-types https://github.com/MasterKale/SimpleWebAuthn/tree/master/packages/typescript-types/src ↩︎
Discussion