SimpleWebAuthn で実装した WebAuthn RP で Passkeys をサポートする際の勘所 (TypeScript)
Digital Identity 技術勉強会 #iddance Advent Calendar 2023 4 日目の記事です。
本投稿では、SimpleWebAuthn[1] というライブラリを使用して Web Authentication (WebAuthn) の Relying Party (RP) を実装したのちに Passkeys[2] をサポートする場合の勘所などを記載します。
Passkeys をサポートするその他のライブラリについては以下のドキュメントなどから確認してみてください。
WebAuthn の RP を実装する際の勘所などについては以下の記事で記載しているので、そちらをご確認ください。
はじめに
SimpleWebAuthn[1:1] を使用して実装した WebAuthn の RP で Passkeys をサポートするために必要な設定は以下のドキュメントから確認することができます。
このとき、前提として WebAuthn の登録および認証フロー[3]を理解し、どの処理に関係する設定であるかを理解しておくこと良いでしょう。
また、本投稿で触れる設定は Passkeys の仕様や動作に関係するものであり、適宜以下の passkeys.dev[4] のような Passkeys に関して言及されたドキュメントを参照することをお勧めします。
実装例
SimpleWebAuthn を使用した WebAuthn の RP の実装例については、SimpleWebAuthn のリポジトリ上の example ディレクトリ上に存在しており、こちらから確認することができます。このリポジトリ上の実装例を適宜変更しながら動作を確認することもできます。
また、別の記事で紹介した実装例で Passkeys 対応させたものを passkeys ブランチとして実装していますので必要に応じて確認してみてください。なお、あくまで動作確認用の実装であり、網羅的な例外処理などはおこなわれていない点に注意していただければと思います。
登録
次の図にもとづいて登録時に Relying Party Server および RP JavaScript Application に関係するを記載します。
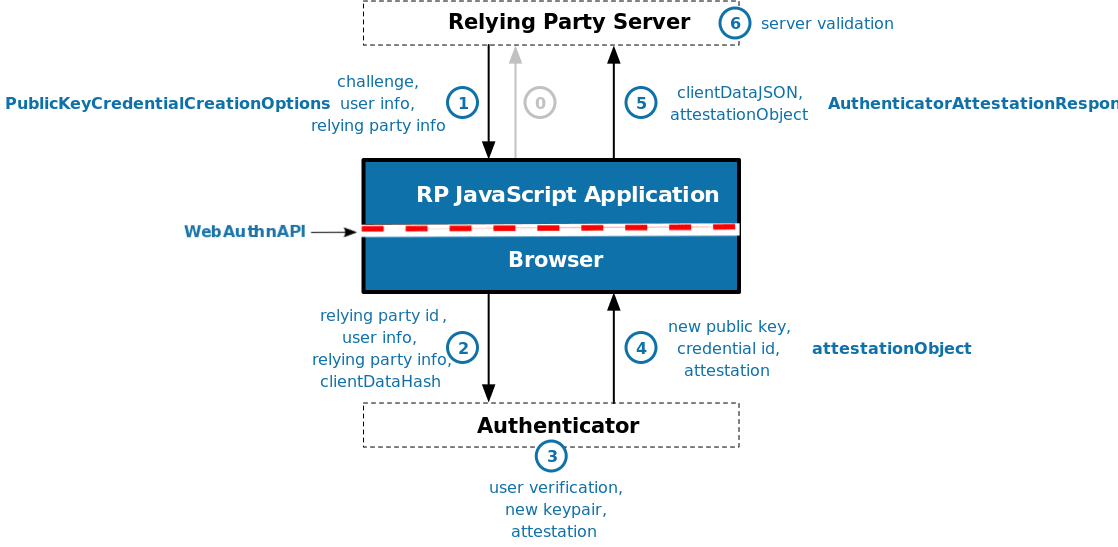
Registration Flow[4:1]
Relying Party Server
SimpleWebAuthn のドキュメントに記載の以下 2 点を実装します。
- Generate a discoverable credential. The authenticator must generate and internally store a credential mapped to (rpID + userID).
- Perform user verification. The authenticator must provide two authentication factors within a single authenticator interaction.
(引用元: https://simplewebauthn.dev/docs/advanced/passkeys#server)
以下は、(1) PublicKeyCredentialCreationOptions に関する設定です。ここで、userVerification: 'preferred' を指定して WebAuthn API navigator.credentials.create() 呼び出し時に user verification が実行できるようなオプションを生成します。
import { generateRegistrationOptions } from '@simplewebauthn/server';

const options = await generateRegistrationOptions({
  // ...
  authenticatorSelection: {
    // "Discoverable credentials" used to be called "resident keys". The
    // old name persists in the options passed to `navigator.credentials.create()`.
    residentKey: 'required',
    userVerification: 'preferred',
    authenticatorAttachment: 'cross-platform'
  },
});
以下は、(6) server validation に関する設定です。ここで、attestationObject から user verification がおこなわれたことを検証するように設定します。
const verification = await verifyRegistrationResponse({
  // ...
  requireUserVerification: true,
});
上記において userVerification: 'preferred' および requireUserVerification: true, を指定する意図としては、以下のドキュメントの通りと想定しています。
This guidance sets userVerification to preferred, meaning that user verification will be attempted when possible.
...
When preferred is used, some platform authenticators will always require a user verification check when the device has biometric sensors, but may skip user verification on devices without them.
...
The user verification result (conveyed in authenticator data flags) will reflect the actual user verification result and should always be validated against your requirements on the server.
(引用元: https://passkeys.dev/docs/use-cases/bootstrapping/#a-note-about-user-verification)
最後に、認証器などに関する情報を user.id および RP ID にマッピングして保存します。これは、以下の WebAuthn の仕様[3:1]の記載にもとづいた処理と想定しています。
User Handle
A user handle is an identifier for a user account, specified by the Relying Party as user.id during registration. Discoverable credentials store this identifier and MUST return it as response.userHandle in authentication ceremonies started with an empty allowCredentials argument.
...
Authenticators map pairs of RP ID and user handle to public key credential sources
(引用元: https://www.w3.org/TR/webauthn-3/#user-handle)
後述の Conditional UI を使用する場合、認証時の AuthenticatorAssertionResponse は以下のようになります。
Conditional UI を使用する際はユーザー名の入力が行われないため、ユーザー名によるデータの取得などは難しいです。一方で、代わりにレスポンスに userHandle が含まれるため、こちらをもとに必要な情報を取得して処理をおこなうことができることを示唆した記述と推察しています。
{
  id: 'LEoFhr5eD-W7TmlnMm-6ixWLs2o',
  rawId: 'LEoFhr5eD-W7TmlnMm-6ixWLs2o',
  response: {
    authenticatorData: 'SZYN5Y...',
    clientDataJSON: 'eyJ0eXBlI...',
    signature: 'MEUCIE...',
    userHandle: 'eae45430d06c51aaa59dcbc9f6f884b2b6fdc1d5ae46433182fcd3ef2c538388'
  },
  type: 'public-key',
  clientExtensionResults: {},
  authenticatorAttachment: 'platform'
}
なお、id や rawId といった公開鍵の ID (Credential ID) を示す値もレスポンスに含まれており、ここから必要な情報を取得することも可能かと思うので、データの保持方法についてはユースケースによって別途考慮する余地があるかもしれません。
RP JavaScript Application
ドキュメントに記載の以下の通り、ブラウザ側で Passkeys をサポートするための特別な設定などはありません。
There isn't a whole lot that changes in how you call the browser methods if you want to support passkeys, as passkeys don't involve any changes in how WebAuthn is ultimately invoked.
startRegistration()
No changes are required.
(引用元: https://simplewebauthn.dev/docs/advanced/passkeys#startregistration)
認証
次の図にもとづいて認証時に Relying Party Server および RP JavaScript Application に関係するを記載します。
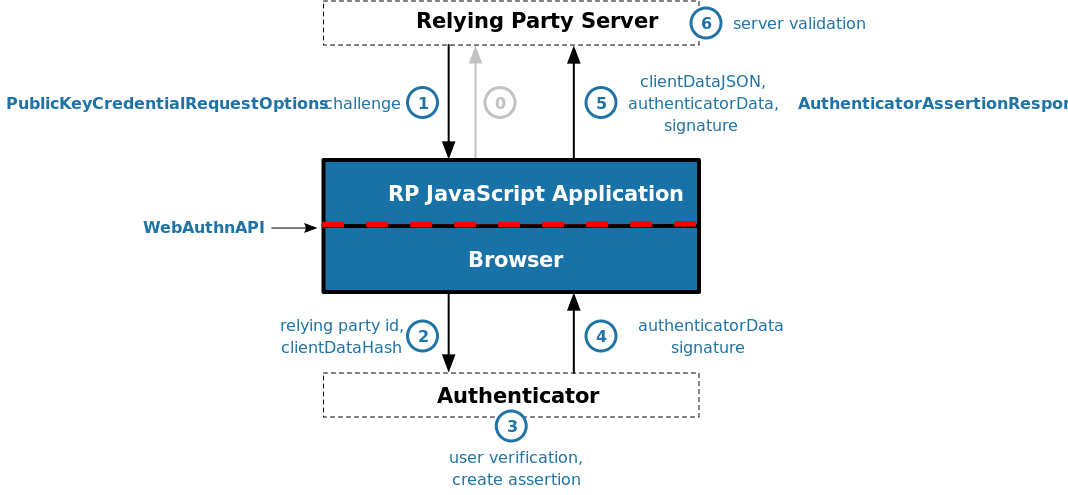
Authentication Flow[4:2]
Relying Party Server
SimpleWebAuthn のドキュメントに記載の以下の点を実装します。
- Perform user verification. The authenticator must provide two authentication factors within a single authenticator interaction.
(引用元: https://simplewebauthn.dev/docs/advanced/passkeys#server)
以下は、(1) PublicKeyCredentialRequestOptions に関する設定です。ここで、userVerification: 'preferred' を指定して WebAuthn API navigator.credentials.get() 呼び出し時に user verification が実行できるようなオプションを生成します。
const options = await generateAuthenticationOptions({
  // ...
  userVerification: 'preferred',
});
上記で preferred を指定する理由については次のドキュメントから確認することができます。
A note about user verification #
This guidance sets userVerification to preferred, meaning that user verification will be attempted when possible.
(引用元: https://passkeys.dev/docs/use-cases/bootstrapping/#a-note-about-user-verification)
以下は、(6) server validation に関する設定です。ここで、authenticatorData から user verification がおこなわれたことを検証するように設定します。
const authVerify = await verifyAuthenticationResponse({
  // ...
  requireUserVerification: true,
});
上記の設定についても、passkesy.dev[4:3] にて記載されている以下の内容を意図した設定と想定しています。
This guidance sets userVerification to preferred, meaning that user verification will be attempted when possible.
(引用元: https://passkeys.dev/docs/use-cases/bootstrapping/#a-note-about-user-verification)
RP JavaScript Application
ドキュメントに記載の以下の通り、通常、ブラウザ側で Passkeys をサポートするための特別な設定などはありません。一方で、Conditional UI を使用する場合、追加でいくつかの実装の調整が必要になります。
There isn't a whole lot that changes in how you call the browser methods if you want to support passkeys, as passkeys don't involve any changes in how WebAuthn is ultimately invoked.
...
startAuthentication()
No changes are required.
(引用元: https://simplewebauthn.dev/docs/advanced/passkeys#startregistration)
Conditional UI を使用する場合の一般的な手順については passkeys.dev から確認することができ、以下の通りになります。
To support the autofill UI for passkeys, make sure to:
- Add the username and webauthn value to any existing autocomplete annotations on the username input field as shown below in the example.
- On page load, check to see if autofill UI (conditional mediation) is available using an if statement, then call navigator.credentials.get() with mediation: "conditional" and userVerification: "preferred".
https://passkeys.dev/docs/use-cases/bootstrapping/
また、SimpleWebAuthn で Conditional UI を使用する場合の追加の手順については、以下のドキュメントから確認することができます。
まず、ブラウザが Conditional UI をサポートしているかどうかを確認します。
SimpleWebAuthn では、ブラウザが Conditional UI をサポートしているかどうかを確認するためのメソッド browserSupportsWebAuthnAutofill() を提供しています。
import { browserSupportsWebAuthnAutofill } from '@simplewebauthn/browser';
なお、browserSupportsWebAuthnAutofill() は startAuthentication() の第二引数を true にすることで内部で呼び出されるようになっています。
This method is automatically called by startAuthentication() when true is passed as a second argument, but it may still be independently useful in, for example, single-page applications that may seek to initiate authentication after page load.
(引用元: https://simplewebauthn.dev/docs/packages/browser#browser-autofill-aka-conditional-ui)
また、startAuthentication() の第二引数を true にした場合、mediation: 'conditional' や allowCredentials: [] といったオプションについても補完されるようです。
前述の手順に記載はありませんでしたが、Conditional UI を使用する場合、通常 allowCredentials: [] を指定します。
If the user account to authenticate is not already identified, then the Relying Party MAY leave this member empty or unspecified. In this case, only discoverable credentials will be utilized in this authentication ceremony, and the user account MAY be identified by the userHandle of the resulting AuthenticatorAssertionResponse.
(引用元: https://www.w3.org/TR/webauthn-3/#dictionary-assertion-options)
上記を踏まえて、以下のように startAuthentication() を呼び出すことで Conditional UI を使用することができます。なお、ここでは startAuthentication() をクリックベントではなく、ページ読み込み時に呼び出す必要がある点に注意してください。
<head>
  <!-- ... -->
  <script>
    const { startAuthentication } = SimpleWebAuthnBrowser;

    fetch('/assertion/options')
      .then((options) => {
        // Note the `true` argument here
        startAuthentication(options, true)
          .then(async asseResp => {
            const verificationResp = await fetch('/assertion/result', {
              method: 'POST',
              headers: {
                'Content-Type': 'application/json',
              },
              body: JSON.stringify(asseResp),
            });
            const verificationJSON = await verificationResp.json();
            if (verificationJSON && verificationJSON.status === 'ok') {
              ...
            }
            ...
          })
          .catch(err => handleError);
      });
  </script>
</head>
<body>
  <!-- ... -->
  <label for="username">Username</label>
  <input type="text" name="username" autocomplete="webauthn">
(サンプルコードで async/await を使用していないのは過去の Issue によるものに見受けられました。対象のバグの Status は Fixed になっていたため、現在は async/await を使用して問題なさそうです。)
動作確認
今回実装したサンプルは以下の手順で動作確認できます。
$ git clone https://github.com/kg0r0/simplewebauthn-example.git
$ cd simplewebauthn-example
$ git checkout passkeys
$ npm install
$ npm start
登録
まずは http://localhost:3000 にアクセスして認証器の登録を進めます。

ここで Relying Party Server で生成されるオプションをログ出力したところ以下のようになりました。事前に指定しておいた residentKey や userVerification の設定が反映されていることが確認できます。
{
  challenge: 'prhJ0p0y_QqwsbjonSRG53wM70RQUHaU7sIcrlPsKXQ',
  rp: { name: 'SimpleWebAuthn Example', id: 'localhost' },
  user: {
    id: 'c4d5de8fbec0f6b118e444cc165d4882fc2c97e703a1028ec91d5a73f58156d0',
    name: 'TEST17',
    displayName: 'TEST17'
  },
  pubKeyCredParams: [
    { alg: -8, type: 'public-key' },
    { alg: -7, type: 'public-key' },
    { alg: -257, type: 'public-key' }
  ],
  timeout: 60000,
  attestation: 'none',
  excludeCredentials: [],
  authenticatorSelection: {
    residentKey: 'required',
    userVerification: 'preferred',
    requireResidentKey: true
  },
  extensions: { credProps: true }
}
その後、ブラウザ上で上記のオプションを使用して navigator.credentials.create() が呼び出されますが、ここは authenticatorAttachment の指定によって動作が異なります。authenticatorAttachment として platform が許可されている場合、以下のように現在使用しているデバイス上で認証および Passkey の作成をおこなう動作になります。
一方で、authenticatorAttachment として cross-platform が許可されていた場合、以下のような QR コードが表示されて異なるデバイスを使用して認証および Passkey の作成をおこなう動作になります。

なお、authenticatorAttachment として platform または cross-platform のいずれも指定していない場合、上記のいずれの方法も利用することができる動作になります。

この時の navigator.credentials.create() の結果をログ出力したところ以下のようになりました。
{
  id: 'vvOPkwVwzwuIXxiEly6qKfrglyo',
  rawId: 'vvOPkwVwzwuIXxiEly6qKfrglyo',
  response: {
    attestationObject: 'o2NmbXRkbm9uZWdhdHRTdG10oGhhdXRoRGF0YViYSZYN5YgOjGh0NBcPZHZgW4_krrmihjLHmVzzuoMdl2NdAAAAAAAAAAAAAAAAAAAAA...',
    clientDataJSON: 'eyJ0eXBlIjoid2ViYXV0aG4uY3JlYXRlIiwiY2hhbGxlbmdlIjoiSGUxeERYRnhTa0p1cmMtX0xoZDBkUG85d1J2bi1uS2ZUbEhRal9xQ1RzVSIsIm9yaWdpbiI6Imh0dHA6Ly9sb2NhbGhvc3Q6MzAwMCJ9',
    transports: [ 'internal', 'hybrid' ],
    publicKeyAlgorithm: -7,
    publicKey: 'MFkwEwYHKoZIzj0CAQYIKoZIzj0DAQcDQgAEbNEBHgAF1MAkp3BOTNd3fa78WvRo4-vUjyQ0F62q9w3P1yu6E-njpXX0qknQMn67ElRT8V_JP-aS...',
    authenticatorData: 'SZYN5YgOjGh0NBcPZHZgW4_krrmihjLHmVzzuoMdl2NdAAAAAAAAAAAAAAAAAAAAAAAAAAAAFL7zj5MFcM8LiF8YhJcuqin64JcqpQECAyYgASFYIGzRAR4ABdT...'
  },
  type: 'public-key',
  clientExtensionResults: { credProps: { rk: true } },
  authenticatorAttachment: 'platform'
}
例えば、登録時に関して設定した user verification の結果は、attestationObject を解析して flags というデータから取得することができます。

Attestation Object[3:2]
上記の結果が Relying Party Server 側で検証されると以下の通り登録が完了したことを確認できます。

認証
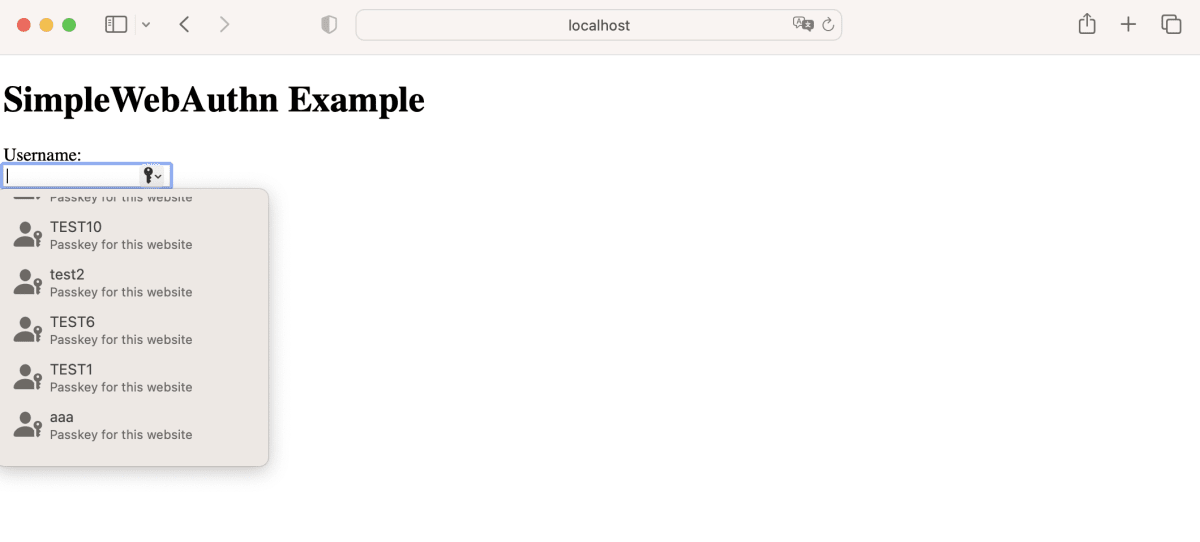
Conditional UI を使用する HTML が表示される http://localhost:3000/login にアクセスして認証を進めます。
入力フォームにカーソルを合わせることで過去に生成した Passkey が表示されます。先ほど登録した TEST10 が表示されていることが確認できます。
ここで Relying Party Server で生成されるオプションをログ出力したところ以下のようになりました。
{
  challenge: 'JuKHqTLpUSudSmAsNI-4nHo1B6xuttTa41BBgec1oFc',
  allowCredentials: [],
  timeout: 60000,
  userVerification: 'preferred',
  extensions: undefined,
  rpId: 'localhost'
}
前述の通り、mediation: 'conditional', は startAuthentication() の内部で補完されるようなので Relying Party Server で生成されるオプションに含まれていなくても問題ないようです。
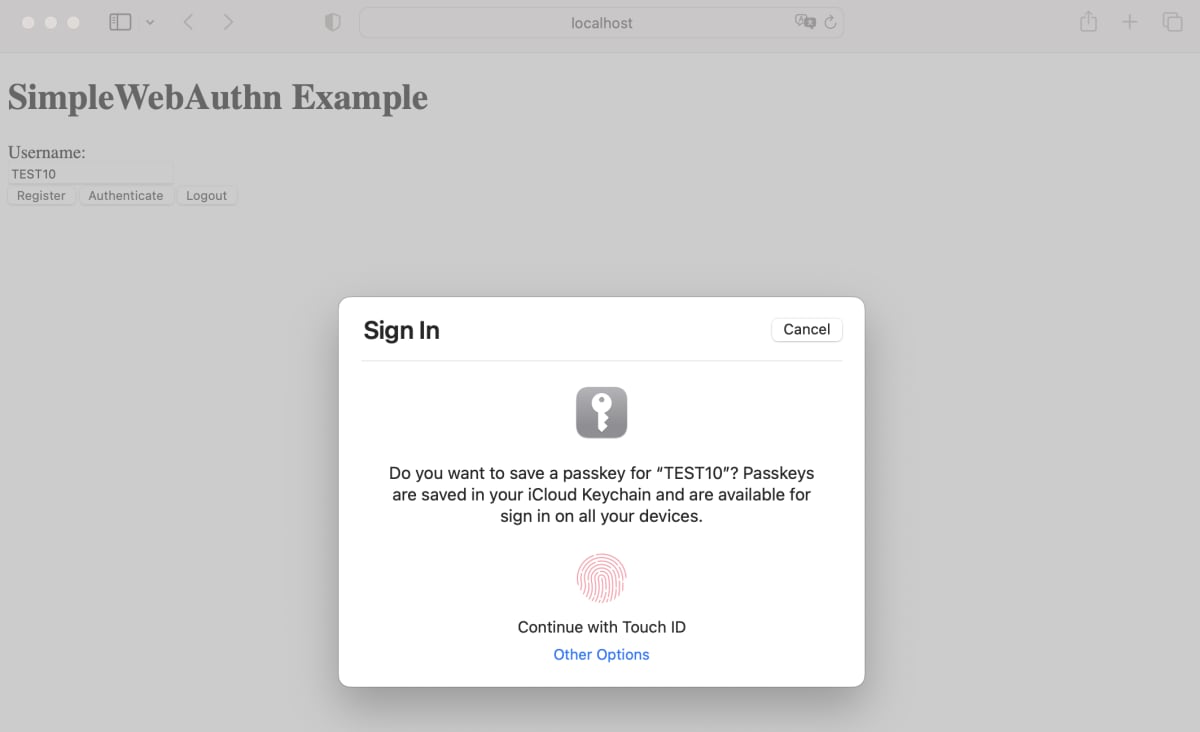
その後、ブラウザ上で上記のオプションを使用して navigator.credentials.get() が呼び出され、使用する Passkey を選択した後、以下のように user verification が要求されます。

この時の navigator.credentials.get() の結果をログ出力したところ以下のようになりました。userHandle として、登録時のオプションとして指定した user.id が返ってきていることなどが確認できます。
{
  id: '_Y88rWPSJ4eegPUAitv7tjJ1-fU',
  rawId: '_Y88rWPSJ4eegPUAitv7tjJ1-fU',
  response: {
    authenticatorData: 'SZYN5YgOjGh0NBcPZHZgW4_krrmihjLHmVzzuoMdl...',
    clientDataJSON: 'eyJ0eXBlIjoid2ViYXV0aG4uZ2V0IiwiY2hhbGxlbmdlIjoiSnVLSHFUTHBVU3VkU21Bc05JLTRuSG8xQjZ4dXR0VGE0MUJCZ2VjMW9GYyIsIm9yaWdpbiI6Imh0dHA6Ly9sb2NhbGhvc3Q6MzAwMCJ9',
    signature: 'MEYCIQDOqFq_uYQXlvRbRBvPpIqkiy2R1TN45IHR2251oz-4cwIhAP2oGBnmdfyQNugnHaSbYXhOQGF1Z1a2WeC6l9WmNTa2',
    userHandle: 'c4d5de8fbec0f6b118e444cc165d4882fc2c97e703a1028ec91d5a73f58156d0'
  },
  type: 'public-key',
  clientExtensionResults: {},
  authenticatorAttachment: 'platform'
}
その他にも、authenticatorData を解析することで user verification の結果などを取得することができます。

Authenticator Data[3:3]
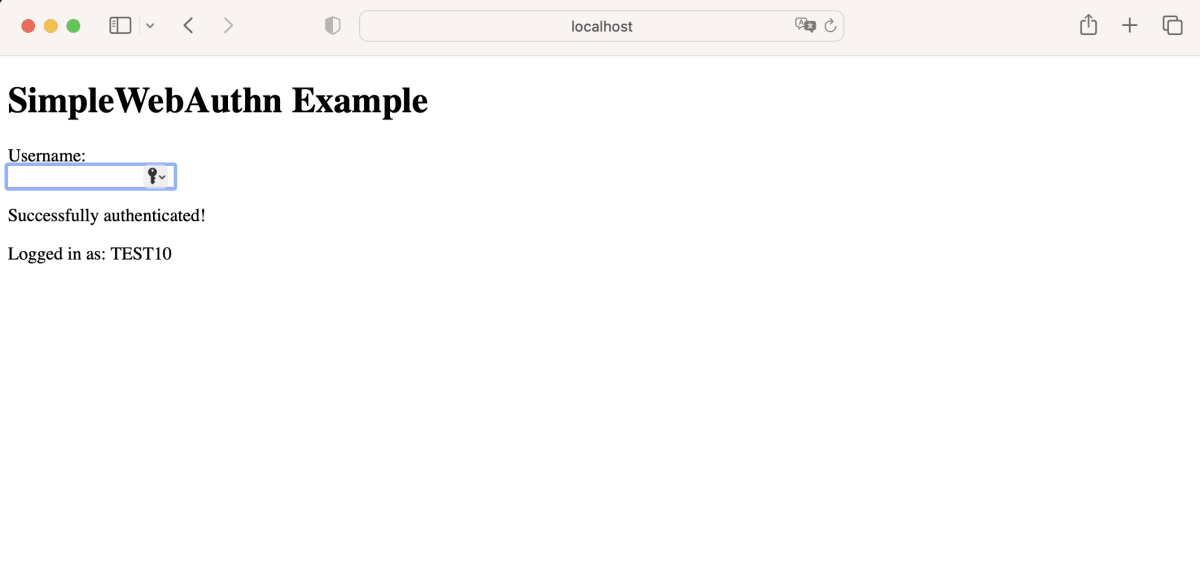
最終的に、次の通り TEST10 というユーザーとして認証することができました。
まとめ
本投稿では、SimpleWebAuthn を使用して実装した WebAuthn の RP で Passkeys をサポートする方法を試してみました。
Conditional UI を使用することまで考慮した場合、WebAuth のオプションなどだけでなく、Relying Party Server におけるデータの保管方法や、RP JavaScript Application における WebAuthn API の実行タイミングなども考慮する必要があると感じました。
なお、ライブラリを使用することで見落としがちな細かい仕様などを内部で補完してくれる箇所もあり、直接 WebAuthn API を呼び出すよりも実装が楽になる部分があるように見受けられました。このように、複雑なオプションの指定箇所などをライブラリ側でラップし、ユースケースに直結するような一部のオプションのみ開発者に明示的に指定させるようにすることで実装の負荷を下げることができるのではないかと思いました。
Passkeys は比較的最近登場した仕様であるためナレッジがまだ少ない状況ですが、WebAuthn のナレッジという観点においては日本語でも多くのものが存在しており、本投稿で登場した多くのパラメーターが解説されている記事も存在しています[5]。現時点では、こういったドキュメントも併せて参照して実装するのが良いかもしれません。
ではまた!
-
SimpleWebAuthn | Introduction https://simplewebauthn.dev/docs/ ↩︎ ↩︎
-
FIDO Alliance | Passkeys https://fidoalliance.org/passkeys/ ↩︎
-
Web Authentication: An API for accessing Public Key Credentials Level 3 | 5. Web Authentication API https://www.w3.org/TR/webauthn-3/#sctn-api ↩︎ ↩︎ ↩︎ ↩︎
-
passkeys.dev https://passkeys.dev/ ↩︎ ↩︎ ↩︎ ↩︎
-
Yahoo! JAPAN での生体認証の取り組み(FIDO2 サーバーの仕組みについて)https://techblog.yahoo.co.jp/advent-calendar-2018/webauthn/ ↩︎
Discussion