[Part3] TypeScript, PostgreSQL, Next.js, Prisma & GraphQLでApp作成

Part1はこちら
Part2はこちら
はじめに
このコースでは、ユーザーがキュレーションされたリンクのリストを閲覧し、お気に入りのリンクをブックマークできるフルスタックアプリ「awesome-links」を構築する方法を学びます。
パート2では、Apollo ServerとNexusを使用してGraphQL APIを構築しました。その後、Apollo Client を使用して、フロントエンドで GraphQL API を消費しました。
開発環境
このチュートリアルに沿って進めるには、Node.js と GraphQL 拡張がインストールされていることを確認してください。また、PostgreSQLデータベースが稼働している必要があります。
パート 2 から続いている場合は、プロジェクトのセットアップをスキップして、認証と Auth0 を使用した GraphQL API のセキュリティのセクションにジャンプすることができます。
レポジトリをクローンする
このコースの完全なソースコードはGitHubで見ることができます。
まず、任意のディレクトリに移動して、以下のコマンドを実行して、リポジトリをクローンします。
git clone -b part-3 https://github.com/prisma/awesome-links.git
クローンしたアプリケーションに移動し、依存関係をインストールします。
cd awesome-links npm install
データベースのシード
PostgreSQLのデータベースをセットアップしたら、env.exampleファイルを.envにリネームして、データベースの接続文字列を設定します。その後、以下のコマンドを実行し、データベースのテーブルを作成します。
接続文字列の形式については、「Part 1 - Add Prisma to your Project」を参照してください。
npx prisma db push
次に、以下のコマンドを実行して、データベースのシードを行います。
npx prisma db seed
このコマンドは、/prisma ディレクトリにある seed.ts ファイルを実行します。seed.ts は、Prisma Client を使用してデータベースに 4 つのリンクと 1 人のユーザーを作成します。
{
  "name": "awesome-links",
  "version": "0.1.0",
  "private": true,
  "scripts": {
    "dev": "next dev",
    "build": "next build",
    "start": "next start"
  },
  "dependencies": {
    "@apollo/client": "^3.5.10",
    "@prisma/client": "^3.12.0",
    "apollo-server-micro": "^3.6.7",
    "graphql": "^16.3.0",
    "micro-cors": "^0.1.1",
    "next": "11.0.1",
    "nexus": "^1.3.0",
    "react": "17.0.2",
    "react-dom": "17.0.2"
  },
  "devDependencies": {
    "@tailwindcss/forms": "^0.3.3",
    "@tailwindcss/typography": "^0.4.1",
    "@types/node": "^16.11.11",
    "@types/react": "^17.0.14",
    "autoprefixer": "^10.3.1",
    "postcss": "^8.3.5",
    "prisma": "^3.12.0",
    "tailwindcss": "^2.2.4",
    "ts-node": "^10.7.0",
    "typescript": "^4.5.2"
  },
  "prisma": {
    "seed": "ts-node --compiler-options {\"module\":\"CommonJS\"} prisma/seed.ts"
  }
}
これで、以下のコマンドを実行して、アプリケーションサーバーを起動することができます。
npm run dev
プロジェクトの構成と依存関係
プロジェクトのフォルダ構成は以下の通りです。
awesome-links/
┣ components/
┣ data/
┃ ┗ links.ts
┣ graphql/
┃ ┣ types/
┃ ┣ context.ts
┃ ┣ schema.graphql
┃ ┗ schema.ts
┣ lib/
┃ ┣ apollo.ts
┃ ┗ prisma.ts
┣ pages/
┃ ┣ api/
┃ ┃ ┗ graphql.ts
┃ ┣ _app.tsx
┃ ┗ index.tsx
┣ prisma/
┃ ┣ schema.prisma
┃ ┗ seed.ts
┣ public/
┣ styles/
┃ ┗ tailwind.css
┣ .babelrc
┣ .env.example
┣ .gitignore
┣ README.md
┣ next-env.d.ts
┣ package-lock.json
┣ package.json
┣ postcss.config.js
┣ tailwind.config.js
┗ tsconfig.json
このアプリケーションはNext.jsで、次のライブラリやツールを利用しています。
- データベースアクセス/CRUD操作のためのPrisma
- フルスタックのReactフレームワークであるNext.js
- スタイリングにTailwindCSS
- GraphQLスキーマ構築ライブラリ:Nexus
- GraphQLサーバー:Apollo Server
- GraphQLクライアントであるApollo Client
pagesディレクトリには、以下のファイルが含まれています。
- index.tsx: APIからリンクを取得し、ページ上に表示します。結果はページングされ、さらにリンクを取得することができます。
- _app.tsx: ルートコンポーネントで、ページ間を移動するときにレイアウトと状態を持続させることができます。
- /api/graphql.ts: Next.jsのAPIルートを使用したGraphQLエンドポイントです。
Auth0を使ったGraphQL APIの認証と安全性確保
Auth0を設定する
アプリを保護するために、認証と認可のドロップインソリューションである Auth0 を使用します。
アカウントを作成した後、左サイドバーの[アプリケーション]ドロップダウンに移動し、サブメニューから[アプリケーション]を選択します。

次に、「+ Create application」ボタンをクリックして、新しいアプリケーションを作成します。アプリの名前を付け、Regular Web Applicationを選択し、ダイアログの右下にあるCreateボタンを選択してアプリの作成を確定します。
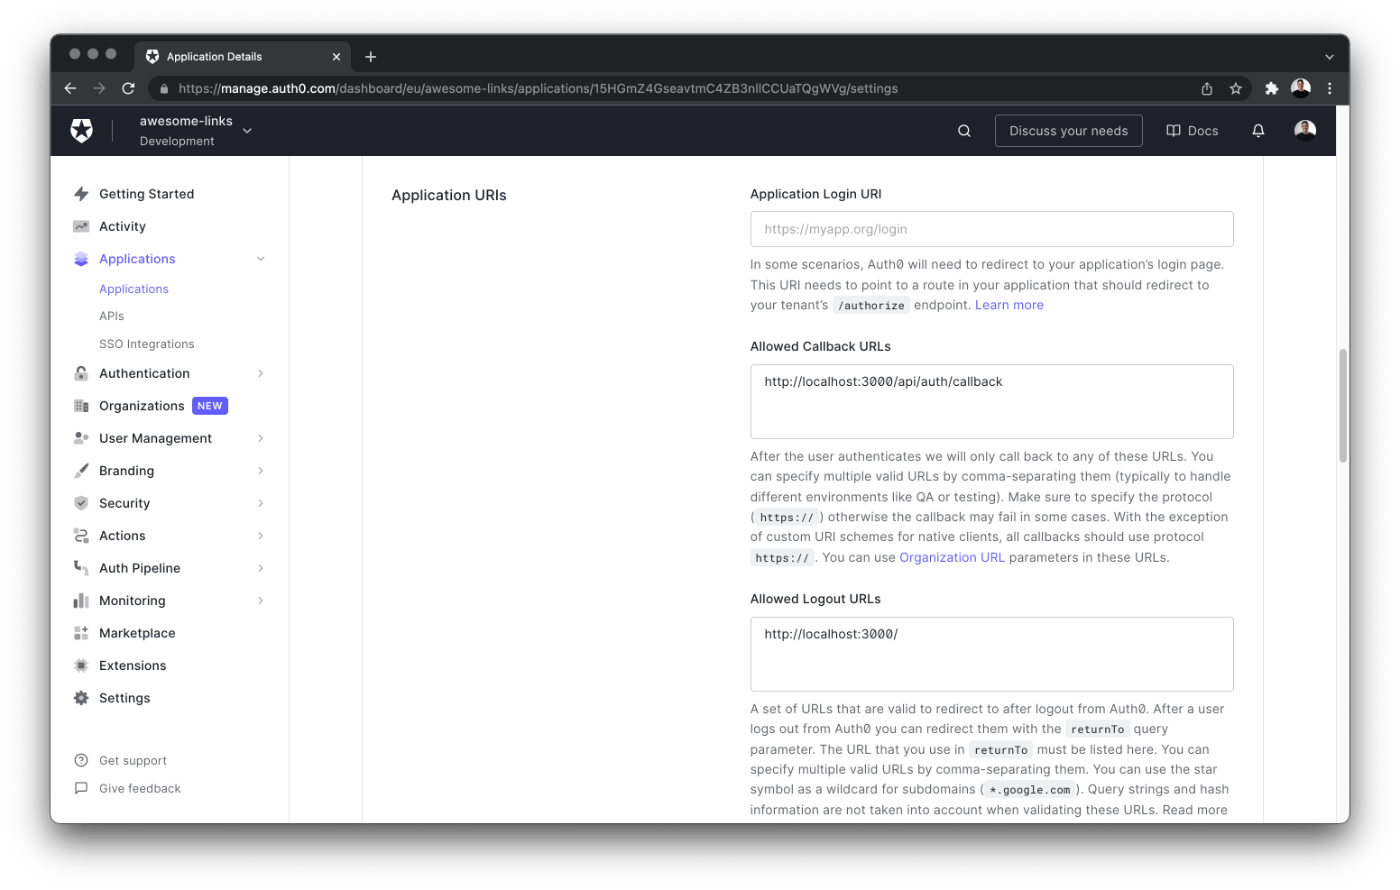
アプリケーションが正常に作成されたら、「設定」タブに移動し、以下の情報をプロジェクトの .env ファイルにコピーしてください。
- ドメイン
- クライアントID
- クライアントシークレット
# .env
AUTH0_SECRET='...' # run `openssl rand -hex 32` to generate a 32 bytes value
AUTH0_BASE_URL='http://localhost:3000'
AUTH0_ISSUER_BASE_URL='https://YOUR_APP_DOMAIN'
AUTH0_CLIENT_ID='YOUR_CLIENT_ID'
AUTH0_CLIENT_SECRET='YOUR_CLIENT_SECRET'
- AUTH0_SECRET: セッションクッキーを暗号化するために使用される長い秘密値。ターミナルで
openssl rand -hex 32を実行すると、適切な文字列を生成することができます。 - AUTH0_BASE_URL: アプリケーションのベースURL。
- auth0_issuer_base_url: アプリケーションのベースURL。Auth0 のテナントドメインの URL。
- AUTH0_CLIENT_ID:あなたのAuth0アプリケーションのクライアントID。
- AUTH0_CLIENT_SECRET: Auth0アプリケーションのクライアントシークレット。
最後に、Auth0 ダッシュボードでアプリケーションの URI をいくつか設定する必要があります。Allowed Callback URLs にhttp://localhost:3000/api/auth/callbackを追加し、Allowed Logout URLsリストにhttp://localhost:3000を追加します。
これらの設定変更を保存するには、ページ下部の Save Changes ボタンをクリックします。
アプリを本番環境にデプロイする場合、localhost をデプロイされたアプリのドメインに置き換えることができます。Auth0 では複数の URL を使用できるため、localhost と本番用 URL の両方をカンマで区切って含めることができます。
Auth0 SDKの追加
Auth0 Next.js SDKをインストールすることにより、プロジェクトにAuth0を追加することができます。
npm install @auth0/nextjs-auth0
次に、pages/api ディレクトリ内に auth/[...auth0].ts ファイルを作成し、以下のコードを追加してください。
// pages/api/auth/[...auth0].ts
import { handleAuth } from '@auth0/nextjs-auth0'

export default handleAuth()
このNext.jsの動的APIルートは、以下のエンドポイントを自動的に作成します。
- /api/auth/login: Auth0のログインルートになります。
- /api/auth/logout。ユーザーをログアウトさせるためのルート。
- /api/auth/callback。Auth0がログイン成功後にユーザーをリダイレクトするルート。
- /api/auth/me: Auth0からユーザープロファイルを取得するためのルートです。
最後に、pages/_app.tsx ファイルに移動し、以下のコードで更新します。このコードは、Auth0 の UserProvider コンポーネントでアプリをラップします。
// pages/_app.tsx
import '../styles/tailwind.css'
import { UserProvider } from '@auth0/nextjs-auth0'
import Layout from '../components/Layout'
import { ApolloProvider } from '@apollo/client'
import { client } from '../lib/apollo'

function MyApp({ Component, pageProps }) {
  return (
    <UserProvider>
      <ApolloProvider client={client}>
        <Layout>
          <Component {...pageProps} />
        </Layout>
      </ApolloProvider>
    </UserProvider>
  )
}

export default MyApp
MyAppコンポーネントをUserProviderコンポーネントでラッピングすることで、すべてのページでユーザーの認証状態にアクセスできるようになります。
GraphQL APIのセキュリティ確保
API にクエリーやミューテーションを送信する際、ユーザー情報を含めることでリクエストを認証することができます。これを行うには、ユーザーオブジェクト(Auth0から)をGraphQLコンテキストにアタッチします。
graphql/context.ts ファイルを以下のコードで更新してください。
// graphql/context.ts
import { PrismaClient } from '@prisma/client'
import prisma from '../lib/prisma';
import { Claims, getSession } from '@auth0/nextjs-auth0'

export type Context = {
  user?: Claims
  accessToken?: string
  prisma: PrismaClient
}

export async function createContext({ req, res }): Promise<Context> {
  const session = getSession(req, res)

  // if the user is not logged in, omit returning the user and accessToken
  if (!session) return { prisma }

  const { user, accessToken } = session

  return {
    user,
    accessToken,
    prisma,
  }
}
Auth0のgetSession()関数は、ログインしているユーザーとアクセストークンの情報を返します。このデータは GraphQL コンテキストに含まれます。これで、クエリーやミューテーションが認証状態にアクセスできるようになります。
最後に、アプリのナビバーにはユーザーの認証状態に応じてログイン/ログアウトボタンが表示されるはずです。components/Layout/Header.tsx にある Header コンポーネントを次のコードで更新します。
// components/Layout/Header.tsx
import React from 'react'
import Link from 'next/link'
import { useUser } from '@auth0/nextjs-auth0'

const Header = () => {
  const { user } = useUser()
  return (
    <header className="text-gray-600 body-font">
      <div className="container mx-auto flex flex-wrap p-5 flex-col md:flex-row items-center">
        <Link href="/">
          <a className="flex title-font font-medium items-center text-gray-900 mb-4 md:mb-0">
            <svg
              className="w-10 h-10 text-white p-2 bg-blue-500 rounded-full"
              fill="none"
              stroke="currentColor"
              viewBox="0 0 24 24"
              xmlns="http://www.w3.org/2000/svg"
            >
              <path
                strokeLinecap="round"
                strokeLinejoin="round"
                strokeWidth="2"
                d="M13.828 10.172a4 4 0 00-5.656 0l-4 4a4 4 0 105.656 5.656l1.102-1.101m-.758-4.899a4 4 0 005.656 0l4-4a4 4 0 00-5.656-5.656l-1.1 1.1"
              ></path>
            </svg>
          </a>
        </Link>
        <nav className="md:ml-auto flex flex-wrap items-center text-base justify-center">
          {user ? (
            <div className="flex items-center space-x-5">
              <Link href="/api/auth/logout">
                <a className="inline-flex items-center bg-gray-100 border-0 py-1 px-3 focus:outline-none hover:bg-gray-200 rounded text-base mt-4 md:mt-0">
                  Logout
                </a>
              </Link>
              <img alt="profile" className="rounded-full w-12 h-12" src={user.picture} />
            </div>
          ) : (
            <Link href="/api/auth/login">
              <a className="inline-flex items-center bg-gray-100 border-0 py-1 px-3 focus:outline-none hover:bg-gray-200 rounded text-base mt-4 md:mt-0">
                Login
              </a>
            </Link>
          )}
        </nav>
      </div>
    </header>
  )
}

export default Header
Auth0 の useUser フックは、ユーザが認証されているかどうかをチェックします。このフックはクライアントサイドで実行されます。
これまでの手順がすべて正しく行われていれば、アプリへのサインアップとログインができるはずです

Auth0ユーザーとアプリのデータベースを同期させる
Auth0はユーザーの管理を代行するだけであり、ユーザーの認証情報以外のデータを保存することはできません。そのため、ユーザーが初めてアプリケーションにログインするたびに、データベースにユーザー情報を含む新しいレコードを作成する必要があります。
これを実現するために、Auth0 Actionsを活用します。Auth0 Actionsは、Auth0ランタイム中の特定のポイントで実行できるサーバーレス関数です。
ログイン時にAuth0 Actionから送信された情報を受け取り、データベースに保存するAPIルートを定義します。このように、サードパーティーのサービスからのイベントをリッスンするAPIエンドポイントを作成するパターンを、webhookと呼びます。
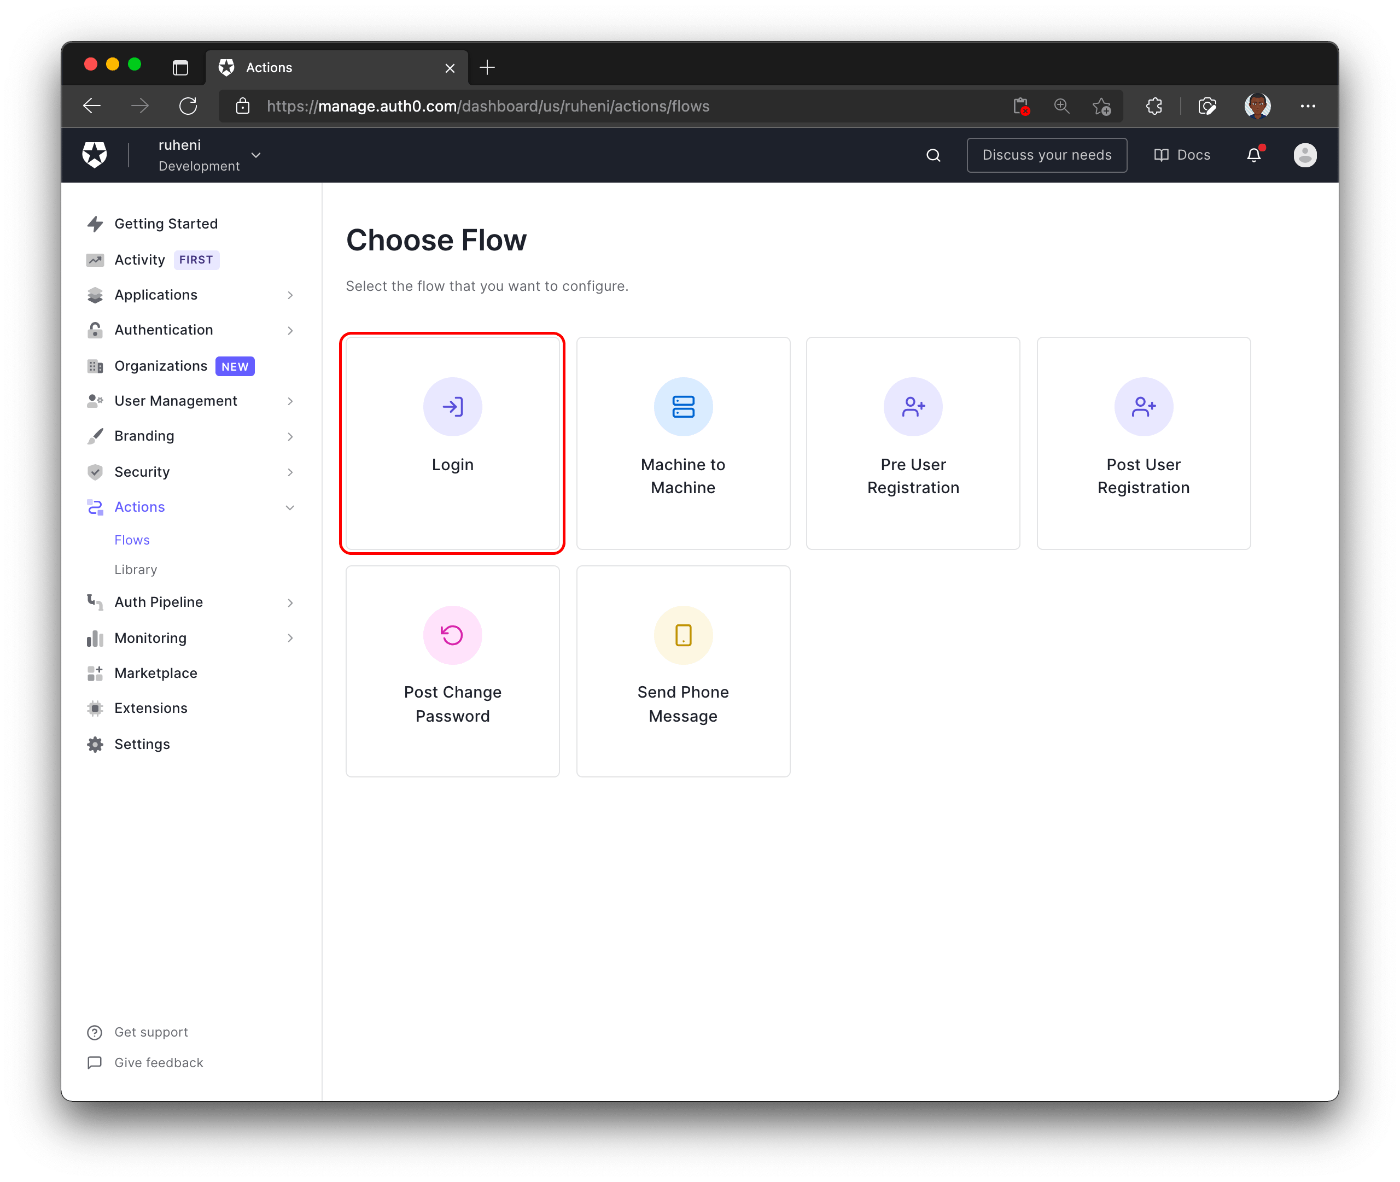
Auth0 Action を使い始めるには、左サイドバーにある Actions ドロップダウンに移動し、Flows を選択して Login を選択します。
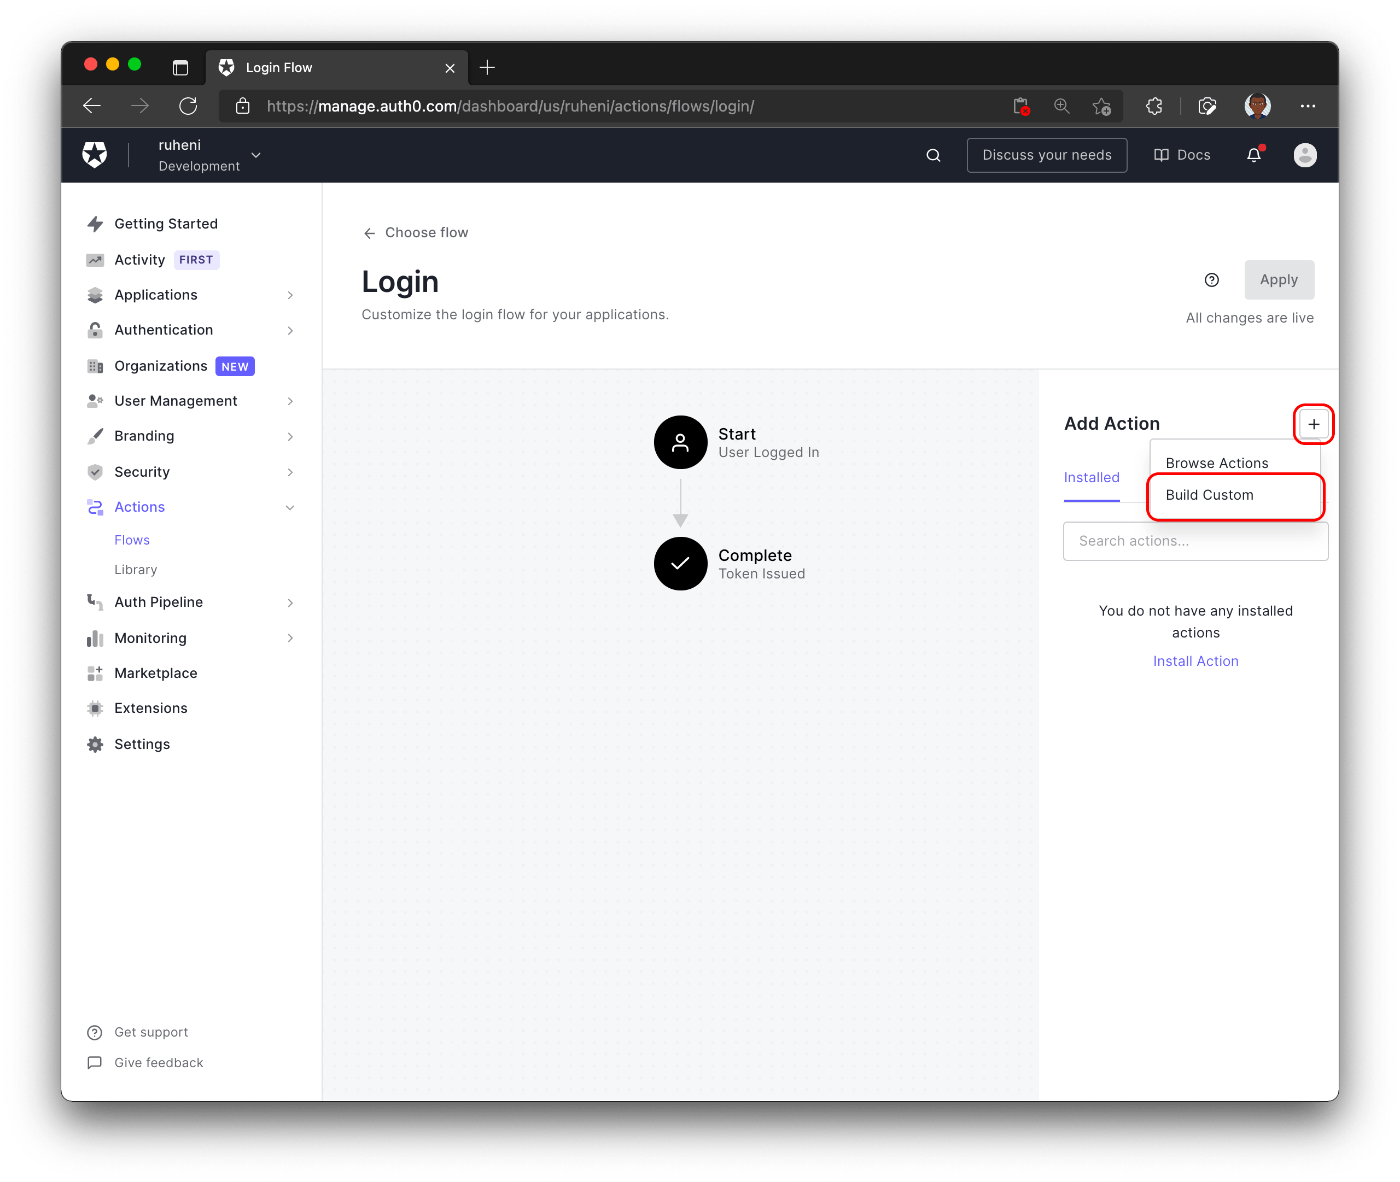
次に、新しいActionを作成するために、+アイコンをクリックし、Build customを選択します。
カスタムアクションの名前(例:「Create DB User」)を決め、Createを選択して完了です。
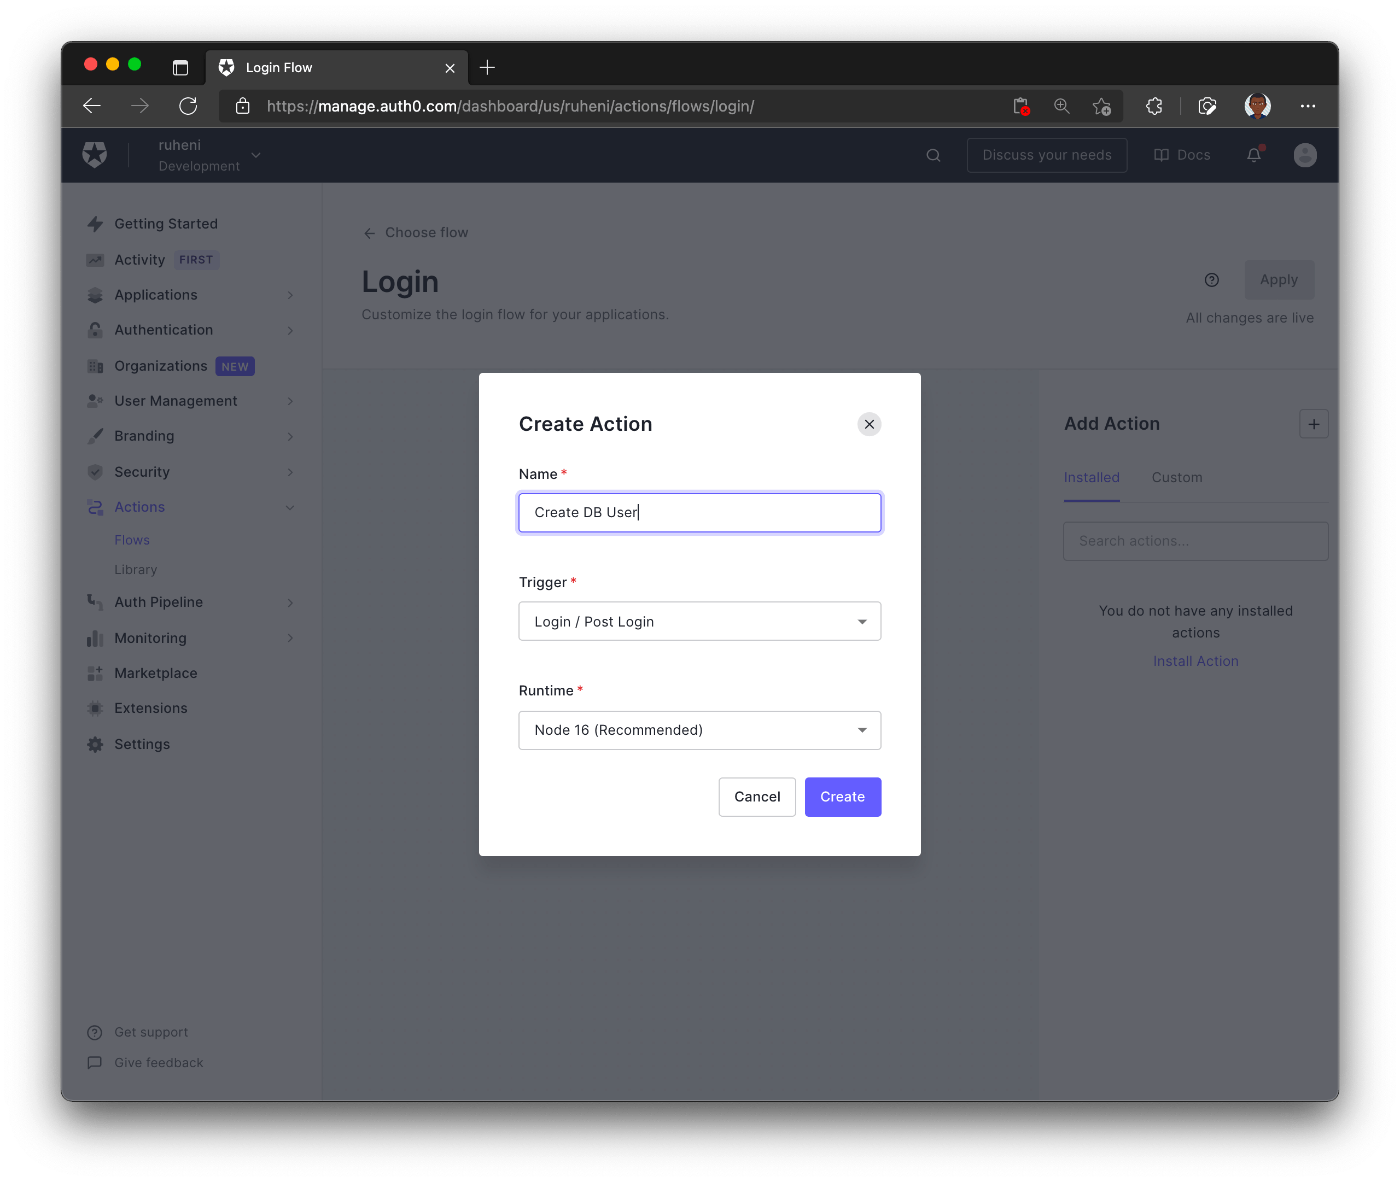
前の手順が完了すると、新しく作成したアクションを管理できるようになります。

ここでは、Auth0 ActionsのUIを分解して説明します。
- 1 - アクションのテスト
- 2 - コードで使用される環境変数/秘密鍵を定義する。
- 3 - アクションのコードで使用されるモジュールをインクルードする
最初のステップは、node-fetchモジュール(バージョン2.6.1)をインクルードすることです。APIエンドポイントにリクエストを送るために、Actionでこれを使用することになります。このエンドポイントは、データベースにユーザーレコードを作成するロジックを処理します。

次に、Action がエンドポイントに送信するすべてのリクエストに含まれる秘密を定義します。この秘密は、リクエストが他の信頼できないサードパーティからではなく、Auth0 Action から送られてきたものであることを保証するものです。
端末で次のコマンドを実行すると、ランダムな秘密が生成されます。
openssl rand -hex 32
まず、このシークレットをAuth0ダッシュボードにAUTH0_HOOK_SECRETというキーで保存します。

ここで、.envファイルに秘密も保存して、アプリケーションを再起動してください。
AUTH0_HOOK_SECRET= "" # same secret goes here
最後に、以下のコードでActionを更新します。
const fetch = require('node-fetch')

exports.onExecutePostLogin = async (event, api) => {
  // 1.
  const SECRET = event.secrets.AUTH0_HOOK_SECRET

  // 2.
  if (event.user.app_metadata.localUserCreated) {
    return
  }

  // 3.
  const email = event.user.email

  // 4.
  const request = await fetch('http://localhost:3000/api/auth/hook', {   // "localhost:3000" will be replaced before deploying this Action
    method: 'post',
    body: JSON.stringify({ email, secret: SECRET }),
    headers: { 'Content-Type': 'application/json' },
  })
  const response = await request.json()

  // 5.
  api.user.setAppMetadata('localUserCreated', true)
}
-
環境変数AUTH0_HOOK_SECRETを取得する
-
ユーザーのapp_metadataにlocalUserCreatedプロパティがあるかどうかをチェックします。
-
ログインイベントからユーザのメールアドレスを取得します - Auth0が提供します
-
API ルートに POST リクエストを送信 - http://localhost:3000/api/auth/hook
-
ユーザーの app_metadata に localUserCreated プロパティを追加します。
-
api.user.setAppMetadata 関数を使用すると、ユーザーのプロファイルに追加のプロパティを追加することができます。
このアクションをデプロイする前に、もう1つやるべきことが残っています。
Ngrokを使ってlocalhost:3000を公開する
作成したActionはAuth0のサーバ上で動作します。あなたのコンピューターで動作しているlocalhost:3000に接続することはできません。しかし、Ngrok というツールを使って localhost:3000 をインターネットに公開し、Auth0 のサーバーからリクエストを受け取れるようにすることができます。
Ngrok は、Auth0 Action で使用可能な localhost サーバーへの URL を生成します。
アプリの実行中に、以下のコマンドを実行して localhost:3000 を公開します。
npx ngrok http 3000
転送先URLをコピーし、アクションの転送先URLをlocalhost:3000に置き換えて、[デプロイ]をクリックします。
アクションがデプロイされたので、[Back to flow]ボタンを押して、Loginフローに戻ります。
最後に、新しく作成したアクションをLoginフローに追加する必要があります。アクションは、[Custom]タブの下に表示されます。アクションをフローに追加するには、「Start」と「Complete」の間にアクションをそして、[Apply]をクリックして変更を保存します。

新規ユーザー作成用の API ルートを定義する
pages/api/auth/フォルダにhook.tsファイルを作成し、以下のコードを追加してください。
// pages/api/auth/hook
import  prisma from '../../../lib/prisma';
import type { NextApiRequest, NextApiResponse } from 'next';

const handler = async (req: NextApiRequest, res: NextApiResponse) => {
  const { email, secret } = req.body;
  // 1
  if (req.method !== 'POST') {
    return res.status(403).json({ message: 'Method not allowed' });
  }
  // 2
  if (secret !== process.env.AUTH0_HOOK_SECRET) {
    return res.status(403).json({ message: `You must provide the secret 🤫` });
  }
  // 3
  if (email) {
    // 4
    await prisma.user.create({
      data: { email },
    });
    return res.status(200).json({
      message: `User with email: ${email} has been created successfully!`,
    });
  }
};

export default handler;
このエンドポイントは、以下のことを行います。
- リクエストが POST リクエストであることを検証します。
- リクエストボディにある AUTH0_HOOK_SECRET が正しいかどうかを検証します。
- リクエストボディで提供された電子メールが正しいかどうか検証する
- 新しいユーザーレコードを作成する
ユーザーがアプリケーションにサインアップすると、そのユーザーの情報はデータベースに同期されます。新しく作成されたユーザーは、Prisma Studioでデータベースに表示することができます。

リンクの作成 - 認証保護されたページ
graphql/types/Link.tsを更新し、リンクを作成する機能を追加する以下のミューテーションを行います。
// graphql/types/Link.ts
export const CreateLinkMutation = extendType({
  type: 'Mutation',
  definition(t) {
    t.nonNull.field('createLink', {
      type: Link,
      args: {
        title: nonNull(stringArg()),
        url: nonNull(stringArg()),
        imageUrl: nonNull(stringArg()),
        category: nonNull(stringArg()),
        description: nonNull(stringArg()),
      },
      async resolve(_parent, args, ctx) {

        if (!ctx.user) {
          throw new Error(`You need to be logged in to perform an action`)
        }

        const newLink = {
          title: args.title,
          url: args.url,
          imageUrl: args.imageUrl,
          category: args.category,
          description: args.description,
        }

        return await ctx.prisma.link.create({
          data: newLink,
        })
      },
    })
  },
})
args プロパティは、新しいリンクを作成するために必要な入力を定義します。また、ミューテーションはユーザがログインしているかどうかをチェックするので、認証されたユーザのみがリンクを作成することができます。最後に、Prismaのcreate()関数が新しいデータベースレコードを作成します。
次に、pages/admin.tsxページを作成し、以下のコードを追加します。このコードにより、新しいリンクの作成が可能になります。
// pages/admin.tsx
import React from 'react'
import { useForm } from 'react-hook-form'
import { gql, useMutation } from '@apollo/client'
import toast, { Toaster } from 'react-hot-toast'
import { getSession } from '@auth0/nextjs-auth0'
import prisma from '../lib/prisma'

const CreateLinkMutation = gql`
  mutation($title: String!, $url: String!, $imageUrl: String!, $category: String!, $description: String!) {
    createLink(title: $title, url: $url, imageUrl: $imageUrl, category: $category, description: $description) {
      title
      url
      imageUrl
      category
      description
    }
  }
`

const Admin = () => {
  const {
    register,
    handleSubmit,
    formState: { errors },
    reset,
  } = useForm()

  const [createLink, { loading, error }] = useMutation(CreateLinkMutation, {
    onCompleted: () => reset()
  })

  const onSubmit = async data => {
    const { title, url, category, description } = data
    const imageUrl = `https://via.placeholder.com/300`
    const variables = { title, url, category, description, imageUrl }
    try {
      toast.promise(createLink({ variables }), {
        loading: 'Creating new link..',
        success: 'Link successfully created!🎉',
        error: `Something went wrong 😥 Please try again -  ${error}`,
      })

    } catch (error) {
      console.error(error)
    }
  }

  return (
    <div className="container mx-auto max-w-md py-12">
      <Toaster />
      <h1 className="text-3xl font-medium my-5">Create a new link</h1>
      <form className="grid grid-cols-1 gap-y-6 shadow-lg p-8 rounded-lg" onSubmit={handleSubmit(onSubmit)}>
        <label className="block">
          <span className="text-gray-700">Title</span>
          <input
            placeholder="Title"
            name="title"
            type="text"
            {...register('title', { required: true })}
            className="mt-1 block w-full rounded-md border-gray-300 shadow-sm focus:border-indigo-300 focus:ring focus:ring-indigo-200 focus:ring-opacity-50"
          />
        </label>
        <label className="block">
          <span className="text-gray-700">Description</span>
          <input
            placeholder="Description"
            {...register('description', { required: true })}
            name="description"
            type="text"
            className="mt-1 block w-full rounded-md border-gray-300 shadow-sm focus:border-indigo-300 focus:ring focus:ring-indigo-200 focus:ring-opacity-50"
          />
        </label>
        <label className="block">
          <span className="text-gray-700">Url</span>
          <input
            placeholder="https://example.com"
            {...register('url', { required: true })}
            name="url"
            type="text"
            className="mt-1 block w-full rounded-md border-gray-300 shadow-sm focus:border-indigo-300 focus:ring focus:ring-indigo-200 focus:ring-opacity-50"
          />
        </label>
        <label className="block">
          <span className="text-gray-700">Category</span>
          <input
            placeholder="Name"
            {...register('category', { required: true })}
            name="category"
            type="text"
            className="mt-1 block w-full rounded-md border-gray-300 shadow-sm focus:border-indigo-300 focus:ring focus:ring-indigo-200 focus:ring-opacity-50"
          />
        </label>

        <button
          disabled={loading}
          type="submit"
          className="my-4 capitalize bg-blue-500 text-white font-medium py-2 px-4 rounded-md hover:bg-blue-600"
        >
          {loading ? (
            <span className="flex items-center justify-center">
              <svg
                className="w-6 h-6 animate-spin mr-1"
                fill="currentColor"
                viewBox="0 0 20 20"
                xmlns="http://www.w3.org/2000/svg"
              >
                <path d="M11 17a1 1 0 001.447.894l4-2A1 1 0 0017 15V9.236a1 1 0 00-1.447-.894l-4 2a1 1 0 00-.553.894V17zM15.211 6.276a1 1 0 000-1.788l-4.764-2.382a1 1 0 00-.894 0L4.789 4.488a1 1 0 000 1.788l4.764 2.382a1 1 0 00.894 0l4.764-2.382zM4.447 8.342A1 1 0 003 9.236V15a1 1 0 00.553.894l4 2A1 1 0 009 17v-5.764a1 1 0 00-.553-.894l-4-2z" />
              </svg>
              Creating...
            </span>
          ) : (
            <span>Create Link</span>
          )}
        </button>
      </form>
    </div>
  )
}

export default Admin

export const getServerSideProps = async ({ req, res }) => {
  const session = getSession(req, res)

  if (!session) {
    return {
      redirect: {
        permanent: false,
        destination: '/api/auth/login',
      },
      props: {},
    }
  }

  return {
    props: {},
  }
}
onSubmit 関数は、フォームの値を createLink ミューテーションに渡します。ミューテーションが実行されると、成功、ロード、エラーのいずれかのトーストが表示されます。
getServerSidePropsでは、セッションがない場合、ユーザをログインページにリダイレクトしています。ログインしたユーザーの電子メールと一致するユーザーレコードが見つかった場合、/admin ページがレンダリングされます。
認証されたユーザーがリンクを作成するために使用できる+作成ボタンを追加して、Header.tsxファイルを更新します。
// components/Layout/Header.tsx
/** imports */

const Header = () => {
  const { user } = useUser()
  return (
    <header className="text-gray-600 body-font">
         {/* the rest of the header... */}
        <nav className="...">
          {user && (
            <div className="flex itemx-center justify-center mr-5 capitalize bg-blue-500 py-1 px-3 rounded-md text-white">
              <Link href="/admin">
                <a>
                  + Create
                </a>
              </Link>
            </div>
          )}
           {/* Login/ Logout button... */}
        </nav>
      </div>
    </header>
  )
}

export default Header
これで、リンクの作成ができるようになるはずです 🚀
ボーナス:ユーザーの役割に応じたページの保護
管理者ユーザのみがリンクを作成できるようにすることで、認証を強化することができます。
まず、ユーザーのロールをチェックするために、createLinkミューテーションを更新してください。
// graphql/types/Link.ts
export const CreateLinkMutation = extendType({
  type: 'Mutation',
  definition(t) {
    t.nonNull.field('createLink', {
      type: Link,
      args: {
        title: nonNull(stringArg()),
        url: nonNull(stringArg()),
        imageUrl: nonNull(stringArg()),
        category: nonNull(stringArg()),
        description: nonNull(stringArg()),
      },
      async resolve(_parent, args, ctx) {
        if (!ctx.user) {
          throw new Error(`You need to be logged in to perform an action`)
        }

        const user = await ctx.prisma.user.findUnique({
          where: {
            email: ctx.user.email,
          },
        });

         if (user.role !== 'ADMIN') {
          throw new Error(`You do not have permission to perform action`);
        }

        const newLink = {
          title: args.title,
          url: args.url,
          imageUrl: args.imageUrl,
          category: args.category,
          description: args.description,
        };

        return await ctx.prisma.link.create({
          data: newLink,
        });
      },
    });
  },
});
admin.tsxページを更新し、getServerSidePropsにロールチェックを追加して、adminsでないユーザをリダイレクトします。ADMINロールを持たないユーザーは、/404ページにリダイレクトされます。
// pages/admin.tsx
export const getServerSideProps = async ({ req, res }) => {
  const session = getSession(req, res);

  if (!session) {
    return {
      redirect: {
        permanent: false,
        destination: '/api/auth/login',
      },
      props: {},
    };
  }

  const user = await prisma.user.findUnique({
    select: {
      email: true,
      role: true,
    },
    where: {
      email: session.user.email,
    },
  });

  if (user.role !== 'ADMIN') {
    return {
      redirect: {
        permanent: false,
        destination: '/404',
      },
      props: {},
    };
  }

  return {
    props: {},
  };
};
サインアップ時にユーザーに割り当てられるデフォルトのロールはUSERです。そのため、/adminページに移動しようとしても、もはや機能しません。
これを変更するには、データベース内のユーザーのロールフィールドを変更します。これはPrisma Studioで非常に簡単に行えます。
まず、ターミナルでnpx prisma studioを実行し、Prisma Studioを起動します。次に、ユーザーモデルをクリックし、現在のユーザーと一致するレコードを探します。ここで、ユーザーのロールをUSERからADMINに更新してください。Save 1 change ボタンを押して、変更を保存します。

アプリケーションの /admin ページに移動して、出来上がりです。これで、再びリンクを作成することができます。
まとめと次のステップ
このパートでは、Auth0を使用してNext.jsアプリに認証と認可を追加する方法と、Auth0 Actionsを使用してデータベースにユーザーを追加する方法について学びました。
次回は、AWS S3を使った画像アップロードの方法を学びますので、お楽しみに。
Discussion