Qtをソースからビルドする
主に以下のサイトを参考にする。
- Qt for Windows - Building from Source | Qt 6.5
- Building Qt 6 from Git - Qt Wiki
- Building Qt Sources | Qt 6.5
- Qt のソースコードを取得してビルドをする方法について - Qiita
ビルド環境・バージョン
- Windows11
- MSVC
- Microsoft(R) C/C++ Optimizing Compiler Version 19.42.34436 for x64
- CMake
- 3.29.2
- Python
- 3.11.9
- Node.js
- 22.12.0
- Perl
- 5.40.0 built for MSWin32-x64-multi-thread
- GnuWin32ツール群
- gperf 3.0.1
- flex 2.5.4
- bison 2.4.1
- ビルド対象のQt: 6.5.3
必要な外部ツールの準備
Python
Microsoft Store版だとPATHに入れても認識しない場合があるため、必ず以下のサイトからインストールする。バージョンは3.11以上を推奨。
また、QtWebEngineと QtPdfのビルドのためには Python ライブラリである html5libが必要。
以下のコマンドを実行してInstallしておく。
pip install html5lib
GnuWin32ツール群

Setupをクリックしてインストーラをダウンロードする。
インストールが完了すると、C:\Program Files (x86)\GnuWin32\bin に実行ファイルが配置される。
自分は昔Installしてあったが、gperfをインストールするとBison, Flexもインストールされるかは未確認。
Node.js
公式サイトなどからインストールする。バージョンはLTSなら何でも良いはず。
自分は https://scoop.sh/ でインストールした。
また、本来はNVM(Node Version Manager)経由で特定のバージョンのNode.jsをインストールするのが推奨されるが、ここでは簡略化のためにネイティブ環境へインストールしても良いとする。
Perl
後述のinit-repository というPerlスクリプトを実行するために必要。
自分は https://scoop.sh/ でインストールした。
ソースコードの取得
フォルダ作成。以下 ROOT_DIRと呼ぶ。
D:/Qt/qt-6.5.3
以下のコマンドを実行していく。ROOT_DIR/src にソースがCloneされる。事前にsrcフォルダを作成しておく必要は無い。
cd D:/Qt/qt-6.5.3
git clone git://code.qt.io/qt/qt5.git src

cd src
git switch 6.5.3
- ここまでの実行結果:

srcフォルダ内に init-repository というファイルがある。以下のコマンドで実行する。サブモジュールをCloneしていくので、完了までにはかなりの時間がかかる。
cd D:/Qt/qt-6.5.3/src
perl init-repository
- perlの場所:

ConfigureとBuild
以下のフォルダ構造を作成する。
-
ROOT_DIR/- log/
- src/
- build/
- debug/
- release/
- install/
- debug/
- release/
x64 Native Tools Command Prompt for VS 2022 を管理者権限で開く。
以下はすべて上記コマンドプロンプト上で実行する。
ビルド実行の前に、以下のコマンドを実行してGnuツールへのPATHを通しておく。
set PATH=%PATH%;C:\Program Files (x86)\GnuWin32\bin
以下のコマンドを実行していく。まずはデバッグビルドを実行する。
D:
cd D:/Qt/qt-6.5.3/build/debug
..\..\src\configure.bat -debug -prefix D:/Qt/qt-6.5.3/install/debug -- -D Python3_EXECUTABLE="C:\Python\Python311\python.exe" -D GPerf_EXECUTABLE="C:\Program Files (x86)\GnuWin32\bin\gperf.exe" -D BISON_EXECUTABLE="C:\Program Files (x86)\GnuWin32\bin\bison.exe" -D FLEX_EXECUTABLE="C:\Program Files (x86)\GnuWin32\bin\flex.exe"
buildフォルダのconfig.summary にConfigの結果が出力されている。
この中で、QtWebEngine と QtPdf 関連モジュールのビルドが yes になっていることを確認する。
-
参考:configure.batに与えられる引数リスト
https://github.com/qt/qtbase/blob/dev/cmake/configure-cmake-mapping.md
-
Warning: CMakeのポリシーの警告が出ている。今回は無視して問題なかった。
CMake Warning (dev) at qtbase/cmake/QtInstallHelpers.cmake:21 (install): Policy CMP0177 is not set: install() DESTINATION paths are normalized. Run "cmake --help-policy CMP0177" for policy details. Use the cmake_policy command to set the policy and suppress this warning. Call Stack (most recent call first): qtbase/cmake/QtInstallHelpers.cmake:94 (qt_install) qtbase/doc/CMakeLists.txt:10 (qt_copy_or_install) This warning is for project developers. Use -Wno-dev to suppress it. WARNING: QDoc will not be compiled, probably because libclang could not be located. This means that you cannot build the Qt documentation. Either set CMAKE_PREFIX_PATH or LLVM_INSTALL_DIR to the location of your llvm installation. On Linux systems, you may be able to install libclang by installing the libclang-dev or libclang-devel package, depending on your distribution. On macOS, you can use Homebrew's llvm package. You will also need to set the FEATURE_clang CMake variable to ON to re-evaluate this check. WARNING: Clang-based lupdate parser will not be available. LLVM and Clang C++ libraries have not been found. You will need to set the FEATURE_clangcpp CMake variable to ON to re-evaluate this check. -
Error: configureでPythonが見つからない
CMakeCache.txtを見ると PythonのEXEがNot Found となっている。
MicrosoftStoreからインストールしたことがあるせい?C:\Windows\py.exe が見られている?
D:\Qt\qt-6.5.3\build>py --version
Python 3.12.6

D:\Qt\qt-6.5.3\build>python --version
Python 3.11.9
→ configure.batの引数に、Python.exeのPathを直接指定したら解決した。
以下のコマンドでビルド・インストールを実行する
cd D:/Qt/qt-6.5.3/build/debug
# デバッグ用:cmake --build . --parallel > ../log/output.txt 2>&1
cmake --build . --parallel
cmake --install .
以下のビルドエラーが出ると思うので、適宜修正して再度ビルドを実行する。
-
Error1: std::stringが見つからない
D:\Qt\qt-6.5.3\src\qtwebengine\src\3rdparty\gn\src\gn\escape.h(76): error C2039: 'string': 'std' のメンバーではありません C:\Program Files\Microsoft Visual Studio\2022\Professional\VC\Tools\MSVC\14.42.34433\include\__msvc_string_view.hpp(22): note: 'std' の宣言を確認してください D:\Qt\qt-6.5.3\src\qtwebengine\src\3rdparty\gn\src\gn\escape.h(76): error C4430: 型指定子がありません - int と仮定しました。メモ: C++ は int を既定値としてサポートしていません D:\Qt\qt-6.5.3\src\qtwebengine\src\3rdparty\gn\src\gn\escape.h(76): error C2146: 構文エラー: ';' が、識別子 'EscapeString' の前に必要です。-
D:\Qt\qt-6.5.3\src\qtwebengine\src\3rdparty\gn\src\gn\escape.hにIncludeを追加して修正#include <string>
-
-
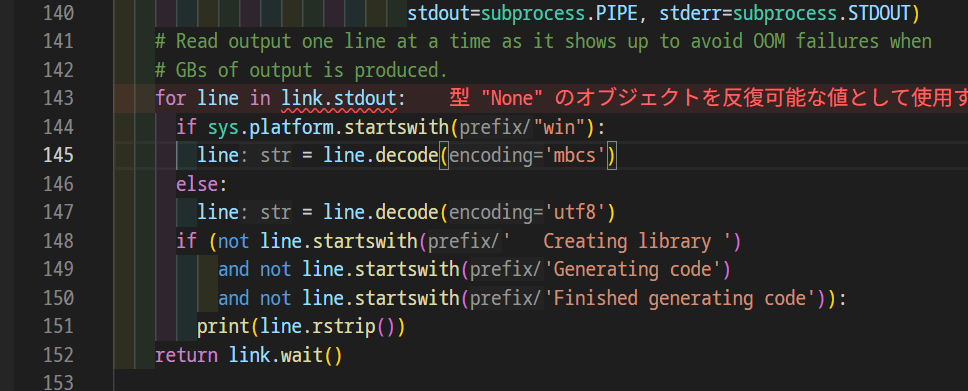
Error2: Pythonスクリプト上での文字列Decode処理エラー
[33/20854] LINK(DLL) vulkan-1.dll vulkan-1.dll.lib vulkan-1.dll.pdb FAILED: vulkan-1.dll vulkan-1.dll.lib vulkan-1.dll.pdb C:/Python/Python311/python.exe ../../../../../../src/qtwebengine/src/3rdparty/chromium/build/toolchain/win/tool_wrapper.py link-wrapper environment.x64 False link.exe /OUT:./vulkan-1.dll /nologo /IMPLIB:./vulkan-1.dll.lib /DLL /PDB:./vulkan-1.dll.pdb @./vulkan-1.dll.rsp Traceback (most recent call last): File "D:\Qt\qt-6.5.3\src\qtwebengine\src\3rdparty\chromium\build\toolchain\win\tool_wrapper.py", line 199, in <module> sys.exit(main(sys.argv[1:])) ^^^^^^^^^^^^^^^^^^ File "D:\Qt\qt-6.5.3\src\qtwebengine\src\3rdparty\chromium\build\toolchain\win\tool_wrapper.py", line 28, in main exit_code = WinTool().Dispatch(args) ^^^^^^^^^^^^^^^^^^^^^^^^ File "D:\Qt\qt-6.5.3\src\qtwebengine\src\3rdparty\chromium\build\toolchain\win\tool_wrapper.py", line 70, in Dispatch return getattr(self, method)(*args[1:]) ^^^^^^^^^^^^^^^^^^^^^^^^^^^^^^^^ File "D:\Qt\qt-6.5.3\src\qtwebengine\src\3rdparty\chromium\build\toolchain\win\tool_wrapper.py", line 144, in ExecLinkWrapper line = line.decode('utf8') ^^^^^^^^^^^^^^^^^^^ UnicodeDecodeError: 'utf-8' codec can't decode byte 0x83 in position 3: invalid start byte[38/20854] LINK(DLL) VkLayer_khronos_validation.dll VkLayer_khronos_validation.dll.lib VkLayer_khronos_validation.dll.pdb FAILED: VkLayer_khronos_validation.dll VkLayer_khronos_validation.dll.lib VkLayer_khronos_validation.dll.pdb C:/Python/Python311/python.exe ../../../../../../src/qtwebengine/src/3rdparty/chromium/build/toolchain/win/tool_wrapper.py link-wrapper environment.x64 False link.exe /OUT:./VkLayer_khronos_validation.dll /nologo /IMPLIB:./VkLayer_khronos_validation.dll.lib /DLL /PDB:./VkLayer_khronos_validation.dll.pdb @./VkLayer_khronos_validation.dll.rsp Traceback (most recent call last): File "D:\Qt\qt-6.5.3\src\qtwebengine\src\3rdparty\chromium\build\toolchain\win\tool_wrapper.py", line 199, in <module> sys.exit(main(sys.argv[1:])) ^^^^^^^^^^^^^^^^^^ File "D:\Qt\qt-6.5.3\src\qtwebengine\src\3rdparty\chromium\build\toolchain\win\tool_wrapper.py", line 28, in main exit_code = WinTool().Dispatch(args) ^^^^^^^^^^^^^^^^^^^^^^^^ File "D:\Qt\qt-6.5.3\src\qtwebengine\src\3rdparty\chromium\build\toolchain\win\tool_wrapper.py", line 70, in Dispatch return getattr(self, method)(*args[1:]) ^^^^^^^^^^^^^^^^^^^^^^^^^^^^^^^^ File "D:\Qt\qt-6.5.3\src\qtwebengine\src\3rdparty\chromium\build\toolchain\win\tool_wrapper.py", line 144, in ExecLinkWrapper line = line.decode('utf8') ^^^^^^^^^^^^^^^^^^^ UnicodeDecodeError: 'utf-8' codec can't decode byte 0x83 in position 3: invalid start byteChatGPTの回答:このエラーは、Chromium のビルドプロセスで使われる Python スクリプト(tool_wrapper.py)が、リンク(link.exe)などのツールから出力された文字列を UTF-8 としてデコードしようとした際に、実際にはその文字列が UTF-8 ではなく、Windows のローカルエンコーディング(例えば CP932 など)でエンコードされているために発生しています。
tool_wrapper.pyの以下の行を修正し、windowsの際にはmbcsでdecodeするようにした。
-
Error3: gperf.exeが見つからない
[37/11103] ACTION //third_party/blink/renderer/platform:color_data(//build/toolchain/win:x64) FAILED: gen/third_party/blink/renderer/platform/color_data.cc C:/Python/Python311/python.exe ../../../../../../src/qtwebengine/src/3rdparty/chromium/third_party/blink/renderer/build/scripts/run_with_pythonpath.py -I ../../../../../../src/qtwebengine/src/3rdparty/chromium/third_party/blink/renderer/build/scripts -I ../../../../../../src/qtwebengine/src/3rdparty/chromium/third_party -I ../../../../../../src/qtwebengine/src/3rdparty/chromium/tools ../../../../../../src/qtwebengine/src/3rdparty/chromium/third_party/blink/renderer/build/scripts/gperf.py gperf.exe --key-positions=* -D -s 2 ../../../../../../src/qtwebengine/src/3rdparty/chromium/third_party/blink/renderer/platform/color_data.gperf --output-file=gen/third_party/blink/renderer/platform/color_data.cc Traceback (most recent call last): File "D:\Qt\qt-6.5.3\src\qtwebengine\src\3rdparty\chromium\third_party\blink\renderer\build\scripts\gperf.py", line 25, in generate_gperf gperf = subprocess.Popen( ^^^^^^^^^^^^^^^^^ File "C:\Python\Python311\Lib\subprocess.py", line 1026, in __init__ self._execute_child(args, executable, preexec_fn, close_fds, File "C:\Python\Python311\Lib\subprocess.py", line 1538, in _execute_child hp, ht, pid, tid = _winapi.CreateProcess(executable, args, ^^^^^^^^^^^^^^^^^^^^^^^^^^^^^^^^^^^^^^^ FileNotFoundError: [WinError 2] 指定されたファイルが見つかりません。 During handling of the above exception, another exception occurred: Traceback (most recent call last): File "D:\Qt\qt-6.5.3\src\qtwebengine\src\3rdparty\chromium\third_party\blink\renderer\build\scripts\gperf.py", line 101, in <module> main() File "D:\Qt\qt-6.5.3\src\qtwebengine\src\3rdparty\chromium\third_party\blink\renderer\build\scripts\gperf.py", line 96, in main generate_gperf(gperf_path, File "D:\Qt\qt-6.5.3\src\qtwebengine\src\3rdparty\chromium\third_party\blink\renderer\build\scripts\gperf.py", line 52, in generate_gperf raise subprocess.CalledProcessError( subprocess.CalledProcessError: Command '['gperf.exe', '--key-positions=*', '-D', '-s', '2']' returned non-zero exit status 127.- gperf.exeがあるフォルダをPATHに追加して再度ビルド実行して解決
set PATH=%PATH%;C:\Program Files (x86)\GnuWin32\bin -
Error4: chromium関連のヘッダが見つからない
D:\Qt\qt-6.5.3\src\qtwebengine\src\3rdparty\chromium\content/public/browser/browser_context.h(20): fatal error C1083: include ファイルを開けません。'components/spellcheck/spellcheck_buildflags.h':No such file or directory一度ビルドを実行すると、ビルドフォルダ内にヘッダが生成されている。
D:\Qt\Qt_6.5.3\build\qtwebengine\src\core\Debug\AMD64\gen\components\spellcheck\spellcheck_buildflags.hきれいな方法ではないが、ヘッダを次のソースフォルダにコピーして解決。
D:\Qt\qt-6.5.3\src\qtwebengine\src\3rdparty\chromium\components\spellcheck
インストール完了後、D:/Qt/qt-6.5.3/install/debugフォルダにライブラリが配置されていることを確認する。
同様にしてリリースビルドを実行する。
cd D:/Qt/qt-6.5.3/build/release
..\..\src\configure.bat -release -prefix D:/Qt/qt-6.5.3/install/release -- -D Python3_EXECUTABLE="C:\Python\Python311\python.exe" -D GPerf_EXECUTABLE="C:\Program Files (x86)\GnuWin32\bin\gperf.exe" -D BISON_EXECUTABLE="C:\Program Files (x86)\GnuWin32\bin\bison.exe" -D FLEX_EXECUTABLE="C:\Program Files (x86)\GnuWin32\bin\flex.exe"
# cmake --build . --parallel > ../log/output.txt 2>&1 [for DEBUG]
cmake --build . --parallel
cmake --install .
Discussion