Amazon CodeCatalystのCI/CDでpytestを実行する
1.はじめに
今回はCodeCatalystのCI/CD機能を使ってPythonの単体テスト(pytest)を実行してみました。
CodeCatalystの概要や利用までの初期設定は以下参考にしてもらえればと思います。
2.CodeCatalystのワークフローの作成
はじめに、CodeCatalystの画面を操作しワークフローを作成していきます。
■ CodeCatalystでの画面操作
「CI/CD」→「Workflow」画面に遷移し、「Create workflow」をクリックする。

対象のリポジトリ・ブランチを選択し「Create」をクリックする。

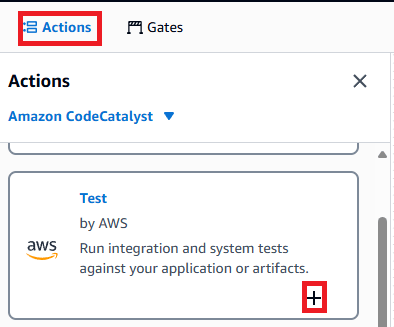
「Actions」から「Test」を選択し「+」をクリックする。

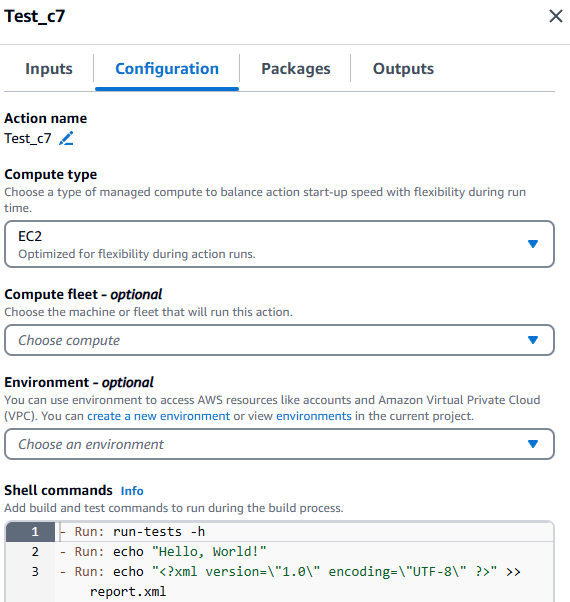
「Configuration」タブを開き、以下項目を設定する。
- Action name:アクションに任意の名称を付ける
- Compute type:EC2
- Shell commands:pytest実行のためのシェル

■ パイプラインで実行するShell commandsについて
ここではパイプライン上の仮想サーバで実行する以下シェルについて説明します。
- バージョンを指定したPythonのインストール方法
- 必要なライブラリのインストール方法
- pytestの実行方法
ステップ1.指定のPythonのバージョンをインストールする
パイプライン上の仮想サーバには、pyenvがデフォルトで導入済みです。
そのため「pyenv install --list」でインストール可能なPythonのバージョンを確認し、テスト実行のためのバージョンを指定してインストールできます。
以下シェルの例となります。
# Install Python3.12.0
- Run: pyenv install --list
- Run: pyenv install 3.12.0
- Run: pyenv global 3.12.0
- Run: PYTHONPATH=.
ステップ2.必要なライブラリをインストールする
次に以下のようにpipコマンドでテスト実行に必要なパッケージをインストールします。
# Install Packages
- Run: pip install -r ./requirements.txt
- Run: pip install hoge==X.X.X
ステップ3.pytestを実行する
最後にpytestを実行します。
# Execute pytest
- Run: pytest --cov=src/ test --cov-report=xml
- Run: pytest --junitxml=./unit_test.xml
全文
上記をまとめて今回は以下のように「Shell commands」を設定しました。
# Install Python3.12.0
- Run: pyenv install 3.12.0
- Run: pyenv global 3.12.0
- Run: PYTHONPATH=.
# Install Packages
- Run: pip install -r ./requirements.txt
- Run: pip install hoge==X.X.X
# Execute pytest
- Run: pytest --cov=src/ test --cov-report=xml
- Run: pytest --junitxml=./unit_test.xml
3.ワークフローを動かしてみる
それでは作成したワークフローを動かしてみます。
ここまでの設定が完了したら「Commit」をクリックし設定を反映させます。
デフォルトでは、設定反映と同時にワークフローが実行されます。
また、手動実行の場合は対象ワークフローの画面に遷移し「Run」をクリックします。

■ 実行結果を確認する
ワークフローの実行結果を確認します。
CodeCatalystの「Workflow」画面から対象ワークフローを確認します。
以下「Recent runs」の赤枠部分からワークフローの実行ログや結果を確認できます。

確認したいActionをクリックすると、「Logs」タブが展開されます。
「Logs」タブでは、ワークフロー実行時のログが出力されます。

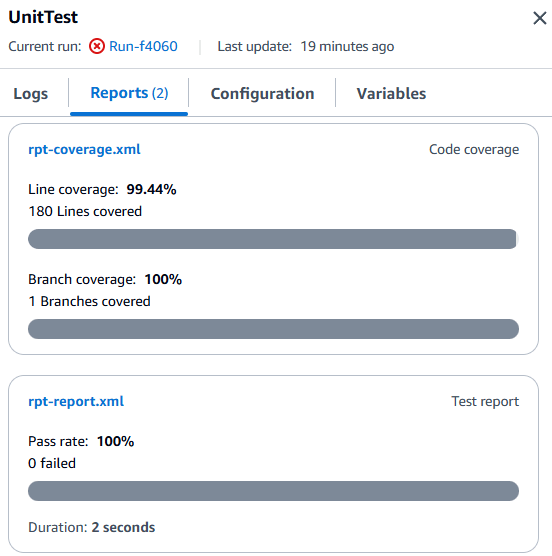
「Report」タブを開くと以下のようにテスト結果を確認することができます。

付録
■ ワークフローの設定ファイルについて
CodeCatalystのワークフローの設定ファイルは
以下のような「.codecatalyst/workflow/ワークフロー名.yaml」として定義されます。
そのため、yamlファイルを直接編集することでもワークフローの設定内容を変更できます。
Name: UnitTest
SchemaVersion: "1.0"

# Optional - Set automatic triggers.
Triggers:
  - Type: Push
    Branches:
      - ブランチ名

# Required - Define action configurations.
Actions:
  UnitTest:
    # Identifies the action. Do not modify this value.
    Identifier: aws/managed-test@v1.0.0
    # Specifies the source and/or artifacts to pass to the action as input.
    Inputs:
      # Optional
      Sources:
        - WorkflowSource # This specifies that the action requires this Workflow as a source
    Outputs:
      # Optional; Automatically discover reports for popular test frameworks
      AutoDiscoverReports:
        Enabled: true
        # Use as prefix for the report files
        ReportNamePrefix: rpt
    # Defines the action's properties.
    Configuration:
      # Required - Steps are sequential instructions that run shell commands
      Steps:
        - Run: pyenv install 3.12.0
        - Run: pyenv global 3.12.0
        - Run: PYTHONPATH=.
        - Run: pip install -r ./requirements.txt
        - Run: pytest --cov=src/ test --cov-report=xml
        - Run: pytest --junitxml=./unit_test.xml
    Compute:
      Type: EC2
■ ワークフローの実行タイミングについて
デフォルトではワークフローはプッシュしたタイミングで実行されます。
タイミングを変更する場合は以下が参考になります。
Discussion