PIP環境でStable Diffusionを動作させる
Stable Diffusionがリリースされました。手元にある環境で動かしたいと思いましたが、venvを使いたかったのでPIPだけで環境を構築していきます。
こちらの記事を参考に作業を進めました。
環境
GTX 1050Ti(VRAM 4GB)
CUDA Toolkit 11.4
Python 3.10.4
CPU Core i7-8700
本体メモリ DDR4-2666 12GB(8+4GB)
環境構築
まずは普通にクローンをしていきます。
git clone https://github.com/CompVis/stable-diffusion
# 私はVRAMが少ないのでこっち
git clone https://github.com/basujindal/stable-diffusion

cd stable-diffusion
モデルはhttps://huggingface.co/CompVis/stable-diffusion-v-1-4-originalからダウンロードします。
ユーザー登録、規約の同意をしたらクローンします。
git clone https://huggingface.co/CompVis/stable-diffusion-v-1-4-original
あとは参考記事のようにリネームして移動させておきます。
次はライブラリのインストールです。
conda enviroment.yamlは今回はしません。
まずはこのファイルの中身を見てみます。
name: ldm
channels:
  - pytorch
  - defaults
dependencies:
  - python=3.8.5
  - pip=20.3
  - cudatoolkit=11.3
  - pytorch=1.11.0
  - torchvision=0.12.0
  - numpy=1.19.2
  - pip:
    - albumentations==0.4.3
    - opencv-python==4.1.2.30
    - pudb==2019.2
    - imageio==2.9.0
    - imageio-ffmpeg==0.4.2
    - pytorch-lightning==1.4.2
    - omegaconf==2.1.1
    - test-tube>=0.7.5
    - streamlit>=0.73.1
    - einops==0.3.0
    - torch-fidelity==0.3.0
    - transformers==4.19.2
    - torchmetrics==0.6.0
    - kornia==0.6
    - -e git+https://github.com/CompVis/taming-transformers.git@master#egg=taming-transformers
    - -e git+https://github.com/openai/CLIP.git@main#egg=clip
    - -e .
PyTorchでPIPで使用するコマンドを作ります。
私の環境ではpip3 install torch torchvision torchaudio --extra-index-url https://download.pytorch.org/whl/cu113となりました。
それでは仮想環境の構築とライブラリのインストールを行います。
python -m venv env
env\Scripts\activate
# 後で必要になるので入れておきます
pip install wheel
# 先ほど作成したコマンドです
pip3 install torch torchvision torchaudio --extra-index-url https://download.pytorch.org/whl/cu113
私のPython3.10ではopencv-pythonの4.1.2.30は対応していなかったため4.6.0.66をインストールします。
pip install albumentations==0.4.3 opencv-python==4.6.0.66 pudb==2019.2 imageio==2.9.0 imageio-ffmpeg==0.4.2 pytorch-lightning==1.4.2 omegaconf==2.1.1 test-tube>=0.7.5 streamlit>=0.73.1 einops==0.3.0 torch-fidelity==0.3.0 transformers==4.19.2 torchmetrics==0.6.0 kornia==0.6 -e git+https://github.com/CompVis/taming-transformers.git@master#egg=taming-transformers -e git+https://github.com/openai/CLIP.git@main#egg=clip -e .
しばらくしたらインストールが終わるのでそのままconda版と同じようにご使用いただけます。
遊んでみる
https://togetter.com/li/1927061よりテキストをお借りしました
python optimizedSD/optimized_txt2img.py --H 512 --W 512 --seed 27 --n_iter 2 --n_samples 10 --ddim_steps 50 --prompt "Venetian masquerade bell, Dark blue night, mysterious, casanova, romantic, cinematic, light coming through the celling dome. Piazza San"
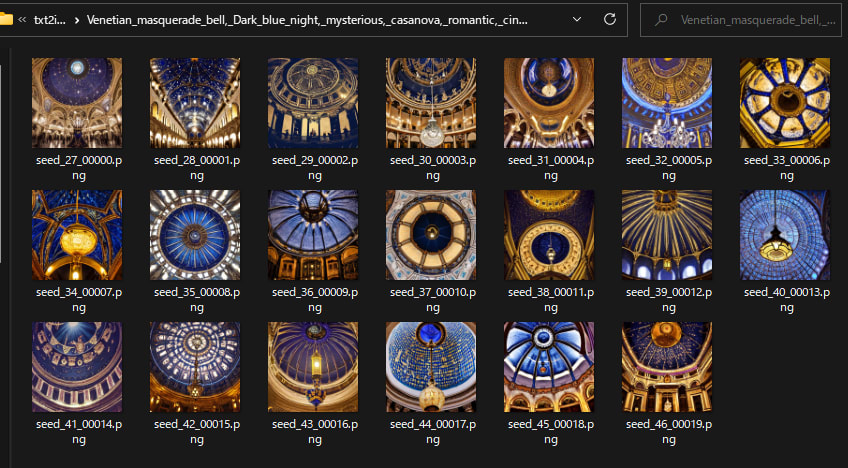
結構難しいですね
よきStable Diffusionライフを...
追記
2022/09/30 環境の項目にメモリとCPUを追加しました。
Discussion
はじめまして。
パソコン本体のメモリも、記載されると親切だと思います。
別の記事でローカルのパソコンにインストールする場合、本体のメモリが8GBで足りないとあります。
仮想環境で使う人も居るので、本体メモリの参考になるように、情報提供していただけると幸いです。
私が読んだ記事では、最低10GB必要のようです。
コメントありがとうございます。
メモリと一応CPUも追記いたしました。