Stable Diffusionをローカルマシンで実行する(VSCodeとDevcontainerを使用)
最近流行りのテキストから画像を生成する機械学習モデルが一般公開されたとのことで、興味本位で触ってみました。ざっと書いちゃったので、後で見直すかも。
目的
GPUアクセラレーションを活かしつつコンテナ内でStable Diffusionのモデルを動かしたい。メインPCなのでLinuxじゃなくWindowsを使いたい。
前提条件
以下のスペックのPCで、本記事の内容を実行しました。
- OS: Microsoft Windows 11 Pro
- CPU: AMD Ryzen7 3700X
- メモリ: 32GB
- ストレージ: 1TB
- GPU: nVidia Geforce RTX 3080(10GB)
とりあえず、OSとGPUベンダーだけそろっていれば本記事の内容は実行できると思います。
ちなみに、Windows 10の場合はInsider版を使えばCUDA on WSL2が可能です。(つまり、本記事の内容が動作する。)。言わずもがなWindows11は通常版でOK。
使用したアプリケーション
()内のバージョンは、本記事で使用したバージョンです。
完成物
完成物は以下のgitリポジトリとしてアップしました。
devcontainer_stable_diffusion(github)
とりあえず試す場合は、上記をCloneしてVSCodeで開き、コマンドパレットから「Remote-Containers: Rebuild and Reopen in Container」を実行すればOK。
手順
Stable Diffusionのモデルを動かすまでの実施手順を記載します。
VSCodeのプロジェクト作成
適当な名前でディレクトリを作成し、作成したディレクトリをVSCodeで開きます。
Devcontainer関連のファイル作成
プロジェクト直下にDockerfileを作成
プロジェクト直下にDockerfileという名称のファイルを作成し、以下の内容を記載し保存します。今回は、NVIDIA GPU Cloudのコンテナイメージをベースイメージに使用しています。
FROM nvcr.io/nvidia/cuda:11.7.1-cudnn8-runtime-ubuntu20.04

ARG DEBIAN_FRONTEND=noninteractive
ENV TZ=Asia/Tokyo

RUN apt-get update && apt-get install -y wget git git-lfs libglib2.0-0 libsm6 libxrender1 libxext-dev

RUN wget https://repo.anaconda.com/miniconda/Miniconda3-latest-Linux-x86_64.sh && \
    sh Miniconda3-latest-Linux-x86_64.sh -b -p /opt/miniconda3 && \
    rm -r Miniconda3-latest-Linux-x86_64.sh

ENV PATH /opt/miniconda3/bin:$PATH

RUN git clone https://github.com/CompVis/stable-diffusion && \
    cd stable-diffusion && \
    conda init bash && \
    conda env create -f environment.yaml && \
    echo "conda activate ldm" >> ~/.bashrc
devcontainer.jsonを作成
- コマンドパレット(Shift+Ctrl+P)から「Remote-Containers: Add Development Container Configuration Files...」を実行します。
- 表示される質問には「From 'Dockerfile'」を選択します。
- 生成されたdevcontainer.jsonを以下のように編集します。(キー名runArgsの箇所)
// For format details, see https://aka.ms/devcontainer.json. For config options, see the README at:
// https://github.com/microsoft/vscode-dev-containers/tree/v0.245.0/containers/docker-existing-dockerfile
{
	"name": "Existing Dockerfile",

	// Sets the run context to one level up instead of the .devcontainer folder.
	"context": "..",

	// Update the 'dockerFile' property if you aren't using the standard 'Dockerfile' filename.
	"dockerFile": "../Dockerfile",

	// 追記ここから。GPU利用可のコンテナ起動オプション
	"runArgs":[
		"--gpus",
		"all"
	],
	// 追記ここまで。
	"customizations": {
		"vscode": {
			"extensions": [
				"ms-python.python"
			]
		}
	}

	// Use 'forwardPorts' to make a list of ports inside the container available locally.
	// "forwardPorts": [],

	// Uncomment the next line to run commands after the container is created - for example installing curl.
	// "postCreateCommand": "apt-get update && apt-get install -y curl",

	// Uncomment when using a ptrace-based debugger like C++, Go, and Rust
	// "runArgs": [ "--cap-add=SYS_PTRACE", "--security-opt", "seccomp=unconfined" ],

	// Uncomment to use the Docker CLI from inside the container. See https://aka.ms/vscode-remote/samples/docker-from-docker.
	// "mounts": [ "source=/var/run/docker.sock,target=/var/run/docker.sock,type=bind" ],

	// Uncomment to connect as a non-root user if you've added one. See https://aka.ms/vscode-remote/containers/non-root.
	// "remoteUser": "vscode"
}
コンテナ内でプロジェクトオープン
コマンドパレットから「Remote-Containers: Rebuild and Reopen in Container」を実行すると、コンテナイメージのビルドが開始します。正常にビルドが完了すれば、コンテナ内でプロジェクトがオープンします。
モデルの格納されたリポジトリへのアクセス申請
以下のリンクにアクセスし、アクセス申請を行います。申請自体はボタン「Access Repository」ボタンを押すだけで完了します。(だったかな?スクショ取ってないけど、たぶんそんな感じだったはず)
Huggingfaceのアカウントが必要になりますので、持っていなければ作成しログイン後、アクセス申請を行いましょう。
サンプルプログラムの実行
サンプルプログラム内で、先ほどアクセス申請したリポジトリからモデルをダウンロードするため、サンプルプログラム実行前にhuggingface-cliでログインを行っておきます。
$ huggingface-cli login
アクセストークンを聞かれるため、ここでトークンを作成し、作成したトークンを張り付ければOKです。
VSCodeのターミナルから、test.pyを実行します。
# make sure you're logged in with `huggingface-cli login`
from torch import autocast
import torch
from diffusers import StableDiffusionPipeline
pipe = StableDiffusionPipeline.from_pretrained(
"CompVis/stable-diffusion-v1-4",
revision="fp16",
torch_dtype=torch.float16,
use_auth_token=True
).to("cuda")
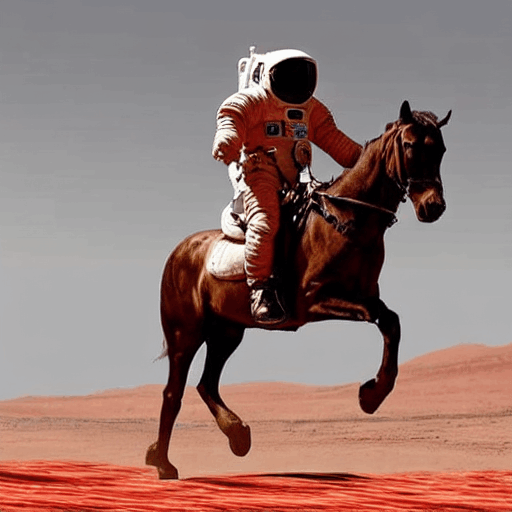
prompt = "a photo of an astronaut riding a horse on mars"
with autocast("cuda"):
image = pipe(prompt)["sample"][0]
image.save("astronaut_rides_horse.png")
$ python test.py
以下のような画像(astronaut_rides_horse.png)が生成されたら正しく動作しています。promptの文章をいじって遊んでみたいと思います。
ちなみに、test.pyでは、以下のようなコードでモデルをロードしていますが、VRAMが潤沢(10GBより大きい)な場合は、revision, torch_dtypeの指定は削ってよいです。私のGPUだとVRAMがOut of Memoryとなってしまったため、重みが半精度のモデルをロードしています。
pipe = StableDiffusionPipeline.from_pretrained(
    "CompVis/stable-diffusion-v1-4",
    revision="fp16",
    torch_dtype=torch.float16,
    use_auth_token=True
).to("cuda")
関連リンク
CompVis/stable-diffusion
Stable Diffusion with 🧨 Diffusers
話題のStable Diffusionがオープンソース化されたのでローカルで動かしてみる
diffusers v0.2.4: Patch release
変更履歴
- 2022/8/26 GPUドライバについて書いてなかったので追記。
Discussion