JSON や CSV で SELECT * FROM したいときは columnq-cli が便利
techfeed 経由で下記のスレッドを見かけたのですが、タイトルだけでも既に面白そうです。
また、ちょっと前から Notion のデータベースを各種コンテンツへ変換するツールを作っていまして、これを組み合わせるといろいろ楽できそうな予感がします。
そのようなわけで、スレッドで紹介されていた columnq-cli についての記事です。
columnq-cli とは?
README を読むと「各種データをテーブルとして SELECT できるようにする CLI ツール」で、テーブルソースには JSON などの他に ROAPI でサポートされているものを扱えるとのこと。 (SELECT のみで更新はできない)
ここで ROAPI とはなんぞやとなりますが、こちらは「ローカルのファイルシステムや各種サービスのデータを統合的に扱える(SELECT できる)サーバー」を構築できるそうです。
図 1-1 ROAPI 概要図(ドキュメントより引用)

概要図を見ると ROAPI もめっちゃ面白そうすが、まずは columnq-cli を試してみます。
インストール
README の手順でとくに問題なくインストールできました。cargo install でソースからビルドすると少し時間がかかったので、 pip を使うかリリースページからダウンロードするのが簡単かと思います。
図 2-1 リリースページからダウンロード
$ curl -sL https://github.com/roapi/roapi/releases/download/columnq-cli-v0.3.0/columnq-cli-x86_64-unknown-linux-musl.tar.gz | tar zxvf -
$ ./columnq -V
Columnq 0.3.0
基本的な機能
まずは基本的な機能を試してみます。
テストデータとして以下のような JSON ファイルを作成しておきます。
リスト 3-1 user.json
[
  { "id": 1, "name": "Raymond", "tags": ["tag1", "tag2"] },
  { "id": 2, "name": "Elizabeth", "tags": ["tag1"] },
  { "id": 3, "name": "Donald", "tags": ["tag1"] }
]
columnq コマンドで --table に上記ファイルを指定すると配列の各要素を行として SELECT できます。
図 3-1 全件 SELECT
$ columnq sql --table test.json "SELECT * FROM test;"
+----+-----------+--------------+
| id | name      | tags         |
+----+-----------+--------------+
| 1  | Raymond   | [tag1, tag2] |
| 2  | Elizabeth | [tag1]       |
| 3  | Donald    | [tag1]       |
+----+-----------+--------------+
図 3-2 カラムや条件を指定して SELECT
$ columnq sql --table test.json "SELECT id, name FROM test WHERE id = 3;"
+----+--------+
| id | name   |
+----+--------+
| 3  | Donald |
+----+--------+
カラムの配列も認識するのですが ANY などは使えないようです。
図 3-3 配列の要素を指定
$ columnq sql --table test.json "SELECT name, tags[1] FROM test WHERE tags[1]='tag1';"
+-----------+--------------+
| name      | test.tags[1] |
+-----------+--------------+
| Raymond   | tag1         |
| Elizabeth | tag1         |
| Donald    | tag1         |
+-----------+--------------+
図 3-4 ANY はエラー
$ columnq sql --table test.json "SELECT name, tags[1] FROM test WHERE 'tag1' = ANY(tags);"
Error: plan_sql: Failed to plan execution from SQL query: This feature is not implemented: Unsupported ast node in sqltorel: AnyOp(Identifier(Ident { value: "tags", quote_style: None }))
テーブルのオプション指定
テーブルの指定は roapi コマンドの --table と互換があり、各種設定をカンマ区切りで指定できます。
以下は JSON で配列の階層を指定している例です。
リスト 4-1 配列が階層の中にある JSON
{
  "id": 123,
  "user": [
    { "id": 1, "name": "Raymond", "tags": ["tag1", "tag2"] },
    { "id": 2, "name": "Elizabeth", "tags": ["tag1"] },
    { "id": 3, "name": "Donald", "tags": ["tag1"] }
  ]
}
図 4-1 --table で階層を指定して実行
$ columnq sql --table "user=test.json,format=json,pointer=/user" "SELECT * FROM user;"
+----+-----------+--------------+
| id | name      | tags         |
+----+-----------+--------------+
| 1  | Raymond   | [tag1, tag2] |
| 2  | Elizabeth | [tag1]       |
| 3  | Donald    | [tag1]       |
+----+-----------+--------------+
JSON Lines をテーブルとして利用
JSON でテーブルというと JSON Linse も利用したくなります。
JSON Linse 自体はサポートされいないのですが、同じようなフォーマットの ndjson はサポートされているので拡張子を .ndjson にすると利用できます。
リスト 5-1 user.ndjson
{ "id": 1, "name": "Raymond", "tags": ["tag1", "tag2"] }
{ "id": 2, "name": "Elizabeth", "tags": ["tag1"] }
{ "id": 3, "name": "Donald", "tags": ["tag1"] }
図 5-1 .nsjson をテーブルとして利用
$ columnq sql --table user.ndjson "SELECT * FROM user;"
+----+-----------+--------------+
| id | name      | tags         |
+----+-----------+--------------+
| 1  | Raymond   | [tag1, tag2] |
| 2  | Elizabeth | [tag1]       |
| 3  | Donald    | [tag1]       |
+----+-----------+--------------+
.jsonl を .ndjson にしてもよいのかはちょっと微妙なところですが、現状では拡張子と MIME タイプ以外での決定的な差は無さそうかなと[1]。
JSON と CSV を JOIN
columnq-cli では複数のテーブルを利用できるので、SQL らしい?使い方ができます。
ここでは JSON と CSV のファイルを JOIN してみます。
リスト 6-1 user.json
[
  { "id": 1, "name": "Raymond", "tags": ["tag1", "tag2"] },
  { "id": 2, "name": "Elizabeth", "tags": ["tag1"] },
  { "id": 3, "name": "Donald", "tags": ["tag1"] }
]
リスト 6-2 usage.csv
id,size
1,300
2,300
2,200
1,200
3,200
1,200
ファイルを用意したら --table でそれぞれを指定して実行します。
図 6-1 JSON と CSV のテーブルを JOIN
$ columnq sql --table user.json --table usage.csv \
   "SELECT id, name, SUM(usage.size) FROM user JOIN usage ON id = usage.id GROUP BY id, name ORDER BY id;"
+----+-----------+-----------------+
| id | name      | SUM(usage.size) |
+----+-----------+-----------------+
| 1  | Raymond   | 700             |
| 2  | Elizabeth | 500             |
| 3  | Donald    | 200             |
+----+-----------+-----------------+
ON で user.idとするとエラーになったりで少し戸惑いましたが[2]、そこそこお手軽に JOIN できました。JSON と CSV 以外もデータソースにできるので、各種サービスのデータをお手軽に JOIN できそうかなという感じです。
複数ファイルを 1 テーブルとして利用
上記の例では各ファイルをそれぞれテーブルとして利用しましたが、逆に各ファイルを 1 つのテーブルとしても利用できます。
ディレクトリーを作成して JSON ファイルを 2 つ作成してみます。
リスト 7-1 ./blob/sub/user1.json
[
  { "id": 1, "name": "Raymond", "tags": ["tag1", "tag2"] },
  { "id": 2, "name": "Elizabeth", "tags": ["tag1"] },
  { "id": 3, "name": "Donald", "tags": ["tag1"] }
]
リスト 7-2 ./blob/user2.json
[
  { "id": 1, "name": "Nathan", "tags": ["tag1", "tag2"] },
  { "id": 2, "name": "Sophie", "tags": ["tag1"] },
  { "id": 3, "name": "Eliot", "tags": ["tag1"] },
  { "id": 4, "name": "Alec", "tags": ["tag1"] },
  { "id": 5, "name": "Parker", "tags": ["tag1"] }
]
図 7-1 ディレクトリー内の .json をテーブルとして利用
$ find ./blob/ -type f
./blob/sub1/user1.json
./blob/user2.json

$ columnq sql --table "t=blob,format=json" "SELECT * FROM t;"
+----+-----------+--------------+
| id | name      | tags         |
+----+-----------+--------------+
| 1  | Raymond   | [tag1, tag2] |
| 2  | Elizabeth | [tag1]       |
| 3  | Donald    | [tag1]       |
| 1  | Nathan    | [tag1, tag2] |
| 2  | Sophie    | [tag1]       |
| 3  | Eliot     | [tag1]       |
| 4  | Alec      | [tag1]       |
| 5  | Parker    | [tag1]       |
+----+-----------+--------------+
ちょっと試してみたところでは以下のような感じです。
-
サブディレクトリーも再帰的に対象となる
-
フォーマットを指定することで対象となる拡張子が決定される
- フォーマットの混在はできない
-
JSON は各ファイル内で配列になっている必要がある
- 「JSON ファイル = 行」の関係にするなら「JSON を 1 行で記述し
.ndjsonで保存する」ことになる
- 「JSON ファイル = 行」の関係にするなら「JSON を 1 行で記述し
いろいろ使いどころはありそうですが、Markdown(の Frontmatter)に対応してくれると Hugo や Nuxt Content のコンテンツ管理に便利そうかなと思ってみたりしています[3]。
dim と組み合わせて使う
ここからは少し趣向を変えてツールを組み合わせてみます。
少し前に「dim(オープンデータパッケージマネージャ)」の存在を知ったのですが、columnq-cli を組み合わせると便利そうな感じです。
dim をインストールした後にプロジェクトを作成してデータをインストールします。
図 8-1 データをインストール
$ dim init
Initialized the project for the dim.

$ dim search -i レンタル
<sinp...>
  - Catalog License    : クリエイティブ・コモンズ 表示 4.0 国際
    3. 会津若松市内のレンタルサイクル
      * Resource URL        : https://data.data4citizen.jp/dataset/02dca120-1c81-46f1-82c7-c5398e95bd22/resource/6ad4e624-3379-4cf9-a21d-1
5e644cba3ea/download/orentalcycle.csv
      * Resource Description:
      * Created             : 2019-12-13T14:38:09.120436
      * Format              : CSV
<sinp...>
 ? Enter the number of data to install › 3
 ? Enter the name. Enter blank if want to use CKAN resource name. › test1
 ? Enter the post-processing you want to add. Enter blank if not required. ›
Installed to ./data_files/test1/orentalcycle.csv
./data_files/test1/orentalcycle.csv にファイルが保存されたので利用してみます。
図 8-2 カラムを確認
$ columnq sql --table data_files/test1/orentalcycle.csv \
   "SHOW COLUMNS FROM orentalcycle;"
+---------------+--------------+--------------+-------------+-----------+-------------+
| table_catalog | table_schema | table_name   | column_name | data_type | is_nullable |
+---------------+--------------+--------------+-------------+-----------+-------------+
| datafusion    | public       | orentalcycle | ID          | Int64     | NO          |
| datafusion    | public       | orentalcycle | location    | Utf8      | NO          |
| datafusion    | public       | orentalcycle | latitude    | Float64   | NO          |
| datafusion    | public       | orentalcycle | longitude   | Float64   | NO          |
| datafusion    | public       | orentalcycle | holiday     | Utf8      | NO          |
| datafusion    | public       | orentalcycle | use_time    | Utf8      | NO          |
| datafusion    | public       | orentalcycle | fee         | Utf8      | NO          |
| datafusion    | public       | orentalcycle | parking     | Utf8      | NO          |
| datafusion    | public       | orentalcycle | tel         | Utf8      | NO          |
| datafusion    | public       | orentalcycle | note        | Utf8      | NO          |
+---------------+--------------+--------------+-------------+-----------+-------------+
図 8-3 カラムを指定した SELECT
$ columnq sql --table data_files/test1/orentalcycle.csv \
   "SELECT location, use_time FROM orentalcycle"
+----------------------------+-------------+
| location                   | use_time    |
+----------------------------+-------------+
| 鶴ヶ城観光案内所           | 9:00〜16:30 |
| 御薬園                     | 9:00〜16:30 |
| 町方伝承館                 | 9:00〜16:30 |
| 飯盛山市営観光客専用駐車場 | 9:00〜16:30 |
+----------------------------+-------------+
use_time の内容が機械的に扱いにくそうなので、open と close に分割してみます。
図 8-4 カラムを分割
$ columnq sql --table data_files/test1/orentalcycle.csv \
   "SELECT location,
           REGEXP_REPLACE(use_time,'〜.+','') as open,
           REGEXP_REPLACE(use_time,'.+〜','') as close
    FROM orentalcycle;"
+----------------------------+------+-------+
| location                   | open | close |
+----------------------------+------+-------+
| 鶴ヶ城観光案内所           | 9:00 | 16:30 |
| 御薬園                     | 9:00 | 16:30 |
| 町方伝承館                 | 9:00 | 16:30 |
| 飯盛山市営観光客専用駐車場 | 9:00 | 16:30 |
+----------------------------+------+-------+
機械的に扱いやすくなったので、出力のフォーマットを JSON にしてみます(実際の出力は 1 行にまとめられています)。
図 8-5 -o json を指定し JSON で出力
$ columnq sql --table data_files/test1/orentalcycle.csv \
   "SELECT location,
           REGEXP_REPLACE(use_time,'〜.+','') as open,
           REGEXP_REPLACE(use_time,'.+〜','') as close
    FROM orentalcycle;" \
  -o json
[
  {
    "close": "16:30",
    "location": "鶴ヶ城観光案内所",
    "open": "9:00"
  },
  {
    "close": "16:30",
    "location": "御薬園",
    "open": "9:00"
  },
  {
    "close": "16:30",
    "location": "町方伝承館",
    "open": "9:00"
  },
  {
    "close": "16:30",
    "location": "飯盛山市営観光客専用駐車場",
    "open": "9:00"
  }
]
今度は逆に dim から columnq-cli を利用してみます。
これは dim の想定された使い方から外れるのかもしれませんが、「データをインストールした時点でカラムの分割などを適用」した状態にしてみます。
まず、変形用のスクリプトを作成します(出力フォーマットは CSV にしています)。
リスト 8-1 transform.sh
#!/bin/bash

TEMP_DIR="$(mktemp -d)"
TEMP_OUT="${TEMP_DIR}/out.csv"
trap 'rm -rf -- "${TEMP_DIR}"' EXIT

columnq sql -o csv --table "${1}" \
   "SELECT location,
           REGEXP_REPLACE(use_time,'〜.+','') as open,
           REGEXP_REPLACE(use_time,'.+〜','') as close
    FROM orentalcycle;" > "${TEMP_OUT}"

cp "${TEMP_OUT}" "${1}"
dim search -i で「後処理にスクリプト実行を指定」します。
図 8-6 データインストール時に ./transform.sh を実行させる
$ dim search -i レンタル
<sinp...>
 ? Enter the number of data to install › 3
 ? Enter the name. Enter blank if want to use CKAN resource name. › test1
 ? Enter the post-processing you want to add. Enter blank if not required. › cmd ./transform.sh
 ? Is there a post-processing you would like to add next? (Y/n) › No
Execute Command:  [ "./transform.sh" ] ./data_files/test1/orentalcycle.csv

Installed to ./data_files/test1/orentalcycle.csv
インストールされた時点で変換が適用されています。
図 8-7 変形が適用されたテーブル
$ columnq sql --table data_files/test1/orentalcycle.csv "SHOW COLUMNS FROM orentalcycle;"
+---------------+--------------+--------------+-------------+-----------+-------------+
| table_catalog | table_schema | table_name   | column_name | data_type | is_nullable |
+---------------+--------------+--------------+-------------+-----------+-------------+
| datafusion    | public       | orentalcycle | location    | Utf8      | NO          |
| datafusion    | public       | orentalcycle | open        | Utf8      | NO          |
| datafusion    | public       | orentalcycle | close       | Utf8      | NO          |
+---------------+--------------+--------------+-------------+-----------+-------------+

$ columnq sql --table data_files/test1/orentalcycle.csv "SELECT * FROM orentalcycle;"
+----------------------------+------+-------+
| location                   | open | close |
+----------------------------+------+-------+
| 鶴ヶ城観光案内所           | 9:00 | 16:30 |
| 御薬園                     | 9:00 | 16:30 |
| 町方伝承館                 | 9:00 | 16:30 |
| 飯盛山市営観光客専用駐車場 | 9:00 | 16:30 |
+----------------------------+------+-------+
少し試しただけですが、この組み合わせは各ツールを補完的に利用できて良さげな感じです。
Notion のリレーション
冒頭でも少し触れましたが、Notion のデータベースをコンテンツとしてダウンロードするツールを作ろうとしています。
これに columnq-cli を組み合わせるとリレーション設定を扱いやすくなりそうなので試してみます。
通常のデータベースの Property は以下のような感じで取得できます。
図 9-1 Notion 上の User データベース
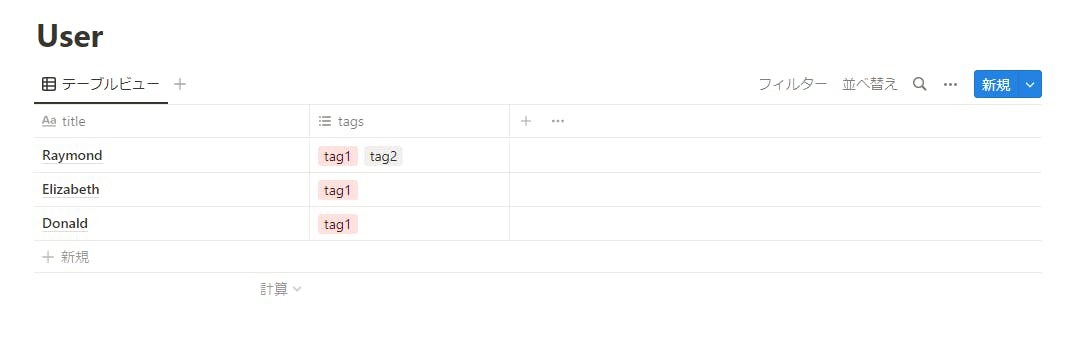
図 9-2 props を JSON Lines で取得
$ node dist/main.js --database-id ***** --output-target props
{"id":"242b2fdc-e57b-4c5d-a2c4-c39c9b88fc7e","props":{"tags":["tag1"],"title":"Elizabeth"}}
{"id":"9cfcdf49-ab2e-4ab6-8d02-2dd28fd0e619","props":{"tags":["tag1"],"title":"Donald"}}
{"id":"db1462ec-fc59-4433-956b-3e8db4181549","props":{"tags":["tag1","tag2"],"title":"Raymond"}}
id と props で階層が分かれているため jq で変形させます。
図 9-3 階層を jq で変形し pipe で渡す
$ node dist/main.js --database-id ***** --output-target props | \
   jq -rc '{"id": .id} + .props' | \
   columnq sql --table "user=stdin,format=ndjson" "SELECT * FROM user;"
+--------------------------------------+--------------+-----------+
| id                                   | tags         | title     |
+--------------------------------------+--------------+-----------+
| 242b2fdc-e57b-4c5d-a2c4-c39c9b88fc7e | [tag1]       | Elizabeth |
| 9cfcdf49-ab2e-4ab6-8d02-2dd28fd0e619 | [tag1]       | Donald    |
| db1462ec-fc59-4433-956b-3e8db4181549 | [tag1, tag2] | Raymond   |
+--------------------------------------+--------------+-----------+
Notion のデータベースをフラットなテーブルとして扱えるようになりました。
続いて「リレーション」を設定しているデータベースの Property を取得してみます。
図 9-4 User データベースへリレーション設定しているデータベース
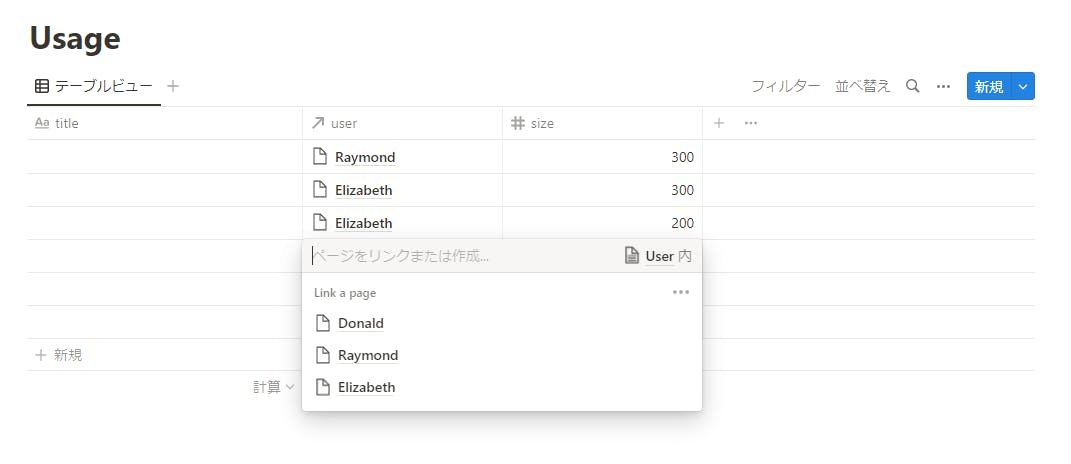
図 9-5 変換するとリレーションは id の文字列になる[4]
$ node dist/main.js --database-id ***** --output-target props | \
   jq -rc '{"id": .id} + .props' | \
   columnq sql --table "usage=stdin,format=ndjson" "SELECT * FROM usage;"
+--------------------------------------+------+-------+----------------------------------------+
| id                                   | size | title | user                                   |
+--------------------------------------+------+-------+----------------------------------------+
| 31883945-b914-4e7e-8674-320bd9af2fb8 | 200  |       | [db1462ec-fc59-4433-956b-3e8db4181549] |
| 4acf18ea-f1fe-4221-99ef-f547f3e436e6 | 200  |       | [db1462ec-fc59-4433-956b-3e8db4181549] |
| 6000f481-1015-4f44-aa7a-08f060e1b2c6 | 200  |       | [242b2fdc-e57b-4c5d-a2c4-c39c9b88fc7e] |
| a67cd5b9-2255-440b-950d-59a0a962d404 | 300  |       | [242b2fdc-e57b-4c5d-a2c4-c39c9b88fc7e] |
| 309b2d79-5582-4f84-8edf-88e6a6e9bbd1 | 200  |       | [9cfcdf49-ab2e-4ab6-8d02-2dd28fd0e619] |
| 951c2c3e-6922-4de8-a319-635c0839e059 | 300  |       | [db1462ec-fc59-4433-956b-3e8db4181549] |
+--------------------------------------+------+-------+----------------------------------------+
JSON に変換するとリレーション(user カラム)はリンク先の id となってしまいます。これを columnq-cli を使って JOIN してみます (以下、各コマンドの実行結果をファイルに保存してから実行しています)。
**:num{#fig-notion-join} リレーション設定しているプロパティで JOIN**
$ columnq sql --table user.ndjson --table usage.ndjson \
   "SELECT id, title, SUM(usage.size) FROM user JOIN usage ON id = usage.user[1] GROUP BY id, title ORDER BY id;"
+--------------------------------------+-----------+-----------------+
| id                                   | title     | SUM(usage.size) |
+--------------------------------------+-----------+-----------------+
| 242b2fdc-e57b-4c5d-a2c4-c39c9b88fc7e | Elizabeth | 500             |
| 9cfcdf49-ab2e-4ab6-8d02-2dd28fd0e619 | Donald    | 200             |
| db1462ec-fc59-4433-956b-3e8db4181549 | Raymond   | 700             |
+--------------------------------------+-----------+-----------------+
リレーション設定はエクスポート系ツールの悩み所ですが、ちょっとした処理なら対応できそうな感じです。
日本語は?
日常生活で使うデータの場合、どうしてもカラム名に日本語がまざってしまいます。また、いわゆるマルチバイト文字が正しく扱われているかは気になるところです。
以下、簡単に試してみました。
リスト 10-1 テスト用のファイル
[
  { "id": 1, "タイトル": "あいうえお" },
  { "id": 2, "タイトル": "ふつうの文字のテスト" },
  { "id": 3, "タイトル": "絵文字😊❤️のテスト" }
]
日本語のカラム名は " でクオートすることで普通に使えました。ただし(問題というほどではないですが)コマンドラインでの記述が少し面倒です。
図 10-1 日本語ありのJSONで SELECT
$ columnq sql --table test.json "SELECT * FROM test;"
+----+----------------------+
| id | タイトル             |
+----+----------------------+
| 1  | あいうえお           |
| 2  | ふつうの文字のテスト |
| 3  | 絵文字😊❤️のテスト    |
+----+----------------------+
図 10-2 カラム名のクオート
$ columnq sql --table test.json "SELECT "'"タイトル"'" FROM test;"
+----------------------+
| タイトル             |
+----------------------+
| あいうえお           |
| ふつうの文字のテスト |
| 絵文字😊❤️のテスト    |
+----------------------+
一方でデータ内の日本語は挙動が少し不安定そうです。
文字列の長さを求める関数は LENGTH と CHAR_LENGTH がありましたが、どちらも絵文字のある行を正しくカウントしませんでした。
図 10-3 絵文字を正しくカウントしない
$ columnq sql --table test.json "SELECT id, LENGTH("'"タイトル"'") FROM test;"
+----+--------------------------------+
| id | characterlength(test.タイトル) |
+----+--------------------------------+
| 1  | 5                              |
| 2  | 10                             |
| 3  | 10                             |
+----+--------------------------------+

$ columnq sql --table test.json "SELECT id, CHAR_LENGTH("'"タイトル"'") FROM test;"
+----+--------------------------------+
| id | characterlength(test.タイトル) |
+----+--------------------------------+
| 1  | 5                              |
| 2  | 10                             |
| 3  | 10                             |
+----+--------------------------------+
もう少し切り分けてみると ❤️ を 2 とカウントしています。
+----+----------------------------+
| ch | characterlength(chklen.ch) |
+----+----------------------------+
| あ | 1                          |
| 😊 | 1                          |
| ❤️ | 2                          |
+----+----------------------------+
実は ❤️ は emojipedia からコピーしたのですが、異体字セレクター(Variation Selector-16)が使われていてコードポイントが 2 つあります。これを正しく扱えないのだと思われます。
上記のような結果なので、「単純に出力する分にはよさそうだけど、文字列の長さを扱う場合は用心が必要そう」といったところでしょうか。
おわりに
columnq-cli で JSON や CSV を SQL テーブルのように SELECT * FROM してみました。
少し触ってみただけですが「いろいろなデータを CLI で統合的にSELECT * FROM できる」というのはやはり面白かったです。また、フィルターのように各種ツールと組み合わせることでさらに便利になることも実感できました。
いろいろ活躍してくれそうなので、普段使いのコマンドとして利用していきたいと思っています。
-
ndjson については下記も参考になるかと。
↩︎ -
エラー出まくりだったのであわてて「[超入門] ド素人でも理解できる!世界一丁寧なデータベース/SQLの教科書」を見に行きました。 ↩︎
-
FUSE でラッパー的なものを作ると対応できそうな気もしています。しているだけですが。 ↩︎
-
Notion の機能でエクスポートするとページの URL になります。 ↩︎
Discussion