【NextAuth.js/認証】Cognitoのサインアップの状態遷移をXStateで楽に管理する
はじめに
本記事では、Next.jsでNextAuth.js(auth.js)を使ってサインアップ画面を作っていきます。
Next.jsはSSR(Server-side Rendering, or Dynamic Rendering)が基本だと思っているのですが、フォームを扱う場合にはCSR(Client-side Rendering)で行う必要があります。Next.jsでユーザーのインタラクティブな操作を伴う場合、どうしてもサーバー側でのレンダリングではなく、クライアントサイドでのレンダリングが必要なためです。
Cognitoでメールログインを扱う場合、メールとパスワードを入力する画面・メールを認証する確認コードを入力する画面・登録完了画面・エラー画面など扱うべき状態があります。useContextやjotai、Reduxでも状態そのものの管理はできるのですが、状態遷移を含めた管理は結局のところユーザーにゆだねられるので難しくコードが煩雑になりがちです。
そこで、状態遷移をシンプルにするXStateを使って楽に管理していきます。
やりたいこと
状態遷移を管理する部分をXStateに則り、状態管理が独自実装にならないことを目指します。
UI部分にはMantineを使っています。@mantine/formのuseFormはXStateのcontextを使ったら不要な気もするのですが、バリデーションが便利なので使っています。
本記事ではサインアップの処理に@aws-sdk/client-cognito-identity-providerを利用していますが、以下の記事のようにAmplifyを利用しても良いかと思います。
ちなみに、サインインは以下の拙作をご覧ください(ほぼ同じ構成で作成できます)。
どうして単一のCSRで管理するのか
Next.jsだとSSRを多く使い、単一責任の原則からも1ページ1要素の方が良いかと思います。本記事では、以下の2つの理由からそれに反してサインアップ処理に関しては1つのページでCSRっぽく画面を動かすようにしました。
1つ目の理由は、ユーザーが前のページに実装側の意図に反して戻れてしまうためです。rewriteで回避できますが、ページへの直アクセスを許可するかなども追加で考慮する必要があります。
2つ目の理由は、SSRだとページの状態を引き継ぐのが難しく、別のページに飛ぶとユーザーの状態を保持できなくなってしまいます。基本的に困ることはないのですが、サインアップの処理においてconfirmを実行するときにユーザーのメールアドレスが必要です。この時CookieやLocalStorageに保存してもいいのですが、永続化はあまりしたくないのでJavaScriptの変数として持たせるようにしています。
逆にCSRを使うことで、デメリットも存在します。
今回でいうと、サインアップ時にServerActionsを利用しているのですが、その時にredirectでは画面を変えられず、ServerActionsの返り値をuseEffectで監視しているという構成をとっています。これはこれで、コード量も多くなり声高におすすめしたい実装ではないなと思います。
XStateとは
XState is a state management and orchestration solution for JavaScript and TypeScript apps.
https://stately.ai/docs/xstate
XStateは、JavaScriptおよびTypeScriptアプリケーション向けの状態管理および設定自動化の解決策です。
XStateはイベント駆動プログラミングであり、伝統的な有限オートマトン(finite state machines)を拡張した状態遷移とアクターモデルを利用して複雑なロジックを扱うことができるみたいです。このライブラリを利用すると以下の図のような状態遷移図を自動で作成してくれる上に、ユーザーの操作に合わせて状態が遷移します。そのため、デバックが非常にしやすく扱いやすいです。

XStateで自動生成された状態遷移図(後述するサインアップ時の遷移図になっています)
Cognitoのサインアップの状態遷移
Cognitoのユーザーの確認の状態遷移は以下のようになります。
Cognitoのユーザー確認プロセス(公式サイトより)
そのうちサインアップは左側の一部のみなので、本記事では以下の遷移のみ考えます。状態をわかりやすくするために、登録中(Registering)・確認中(Confirming)の状態を追加します。
この状態遷移図を元にXState、およびサインアップの処理を作っていきます。
コード
全体含めたサンプルコードは以下のリポジトリに置いてあります。適宜確認してください。
ディレクトリ構成
ディレクトリ構成は以下のようになっています。👈がついているファイルが今回のサインアップで重要なファイルになっています。なお今回説明するファイルのみの表示となっている点に注意してください。
frontend/zenn-app-router
├── app
│  ├── _common
│  │  └── api
│  │     └── cognito
│  │        ├── cognitoConfirmSignUp.ts 👈CognitoSDKの`SignUpCommand`をラップした関数
│  │        └── cognitoSignUp.ts 👈CognitoSDKの`ConfirmSignUpCommand`をラップした関数
│  └── sign-up
│     ├── actions
│     │  └── signUpAction.ts 👈ServerActionsをまとめている
│     ├── page.tsx 👈
│     ├── page.xstate.tsx 👈XStateを利用して、表示切り替えしているCSRのファイル
│     └── stateMachine.ts 👈XStateを定義しているファイル
└── README.md
準備
XStateを次のコマンドでインストールします。
$ npm install xstate @xstate/react
状態遷移をみたい場合は以下のパッケージもインストールします。
$ npm install -D @statelyai/inspect
なお、今回はUIの部分にMantineを使っています。設定は以下のページをご覧ください。
Cognitoのサインアップ処理
Cognitoへのサインアップを2つのフォルダに分けて実装していきます。
app/_common/api/cognitoフォルダ内
SignUpの処理は以下のSDKを利用します。InputとOutputで型が付与されているので楽に実装できます。特段変わった処理などはしていないです。
importと型。
"use server";

import {
  CognitoIdentityProviderClient,
  SignUpCommand,
  type SignUpCommandInput,
  type SignUpCommandOutput,
} from "@aws-sdk/client-cognito-identity-provider";
import { genSecretHash } from "./utils";

interface CognitoAuthSignUpProps {
  email: string;
  password: string;
}
export const cognitoSignUp = async (props: CognitoAuthSignUpProps): Promise<SignUpCommandOutput> => {
  const { email, password } = props;
  const { secretHash } = genSecretHash({ email });

  const client = new CognitoIdentityProviderClient({
    region: process.env.COGNITO_REGION,
  });
  const signUpCommandInput: SignUpCommandInput = {
    ClientId: process.env.COGNITO_CLIENT_ID,
    SecretHash: secretHash,
    Username: email,
    Password: password,
    UserAttributes: [
      {
        Name: "email",
        Value: email,
      },
    ],
  };
  const command = new SignUpCommand(signUpCommandInput);
  return await client.send(command);
};
Confirmの処理は以下のSDKを利用します。こちらも変わった処理はしていないです。
importと型。
"use server";
import {
  CognitoIdentityProviderClient,
  ConfirmSignUpCommand,
  type ConfirmSignUpCommandInput,
  type ConfirmSignUpCommandOutput,
} from "@aws-sdk/client-cognito-identity-provider";
import { genSecretHash } from "./utils";

interface OnAuthConfirmSignUpRequest {
  email: string;
  confirmationCode: string;
}
export const cognitoConfirmSignUp = async (props: OnAuthConfirmSignUpRequest): Promise<ConfirmSignUpCommandOutput> => {
  const { email, confirmationCode } = props;
  const { secretHash } = genSecretHash({ email });

  const client = new CognitoIdentityProviderClient({
    region: process.env.COGNITO_REGION,
  });
  const confirmSignUpCommandInput: ConfirmSignUpCommandInput = {
    ClientId: process.env.COGNITO_CLIENT_ID,
    SecretHash: secretHash,
    Username: email,
    ConfirmationCode: confirmationCode,
  };
  const command = new ConfirmSignUpCommand(confirmSignUpCommandInput);
  return await client.send(command);
};
app/sign-up/actionsフォルダ内
Server Actionsを使ってクライアントサイドから実行できるようにします。上で定義したapp/_common/api/cognito内の関数を利用して、Server Actionsとして利用できるようにしています。
全てクライアントサイドで閉じていることから各関数で文字列を返しています。こうすることで、useEffectで状態を監視して次の状態に移るタイミングを確認しています。サーバーサイドで閉じている場合にはnext/navigationのredirect関数で遷移しても良いかと思います。
importと型。
"use server";
import { cognitoSignUp, cognitoConfirmSignUp } from "@/common/api/cognito";
import { UsernameExistsException, CodeMismatchException, ExpiredCodeException, InvalidParameterException } from "@aws-sdk/client-cognito-identity-provider";

interface OnAuthSignUpRequest {
  email: string;
  password: string;
}

interface OnAuthConfirmSignUpRequest {
  email: string;
  confirmationCode: string;
}
export const onCognitoSignUp = async (_: string | null, formData: OnAuthSignUpRequest) => {
  const { email, password } = formData;

  try {
    await cognitoSignUp({ email, password });
  } catch (err) {
    if (err instanceof UsernameExistsException) {
      return "UsernameExistsException";
    }
    return "Unknown";
  }

  return "Success";
};

export const onCognitoConfirmSignUp = async (_: string | null, formData: OnAuthConfirmSignUpRequest) => {
  const { email, confirmationCode } = formData;

  try {
    await cognitoConfirmSignUp({ email, confirmationCode });
  } catch (err) {
    if (err instanceof ExpiredCodeException) {
      return "ExpiredCodeException";
    } else if (err instanceof CodeMismatchException) {
      return "CodeMismatchException";
    } else if (err instanceof InvalidParameterException) {
      return "InvalidParameterException";
    }
    return "Unknown";
  }

  return "Success";
};
ステートマシン
上述したサインアップの状態遷移をXStateにコードとして起こしていきます。
まずはSignUpEvent・ConfirmViaEmailEventなど、イベントを定義します。
import { setup, assign } from "xstate";

type SignUpEvent = { type: "signUp" };
type PostSignUpEvent = { type: "postSignUp"; signUpState: string | null };
type ConfirmViaEmailEvent = { type: "confirmViaEmail" };
type PostConfirmViaEmailEvent = { type: "postConfirmViaEmail"; confirmState: string | null };

type SignUpFlowEvent = SignUpEvent | PostSignUpEvent | ConfirmViaEmailEvent | PostConfirmViaEmailEvent;
強引に遷移図として表すと以下のように、イベントだけ定義した状態と言えます。
次に、状態遷移図で共有する内部状態をContextとして定義します。加えて、Eventが発火した時に更新するsignUpActionやconfirmActionのActionを定義します。
type SignUpFlowContext = {
  signUpState: string | null;
  confirmState: string | null;
};

// 現状は assign 関数のジェネリクスに型引数を5つ渡さないとちゃんと型補完が効かなさそうです。
const signUpAction = assign<SignUpFlowContext, SignUpEvent, any, SignUpFlowEvent, any>({
  signUpState: ({ event }) => event.signUpState,
});

const confirmAction = assign<SignUpFlowContext, ConfirmViaEmailEvent, any, SignUpFlowEvent, any>({
  confirmState: ({ event }) => event.confirmState,
});
上記のコードは、XStateでの内部状態を更新する関数です。エラーメッセージなどを保存するために内部状態の更新をしています。
最後に、initialやregisteringやregisteredなど状態を定義します。そして状態から次の状態に遷移するイベントをonで定義します。この時のtype="signUp"は上で定義したイベントを参照しています。
export const signUpFlowMachine = setup({
  types: {
    context: {} as SignUpFlowContext,
    events: {} as SignUpFlowEvent,
  },
}).createMachine({
  id: "signUpMachine",
  initial: "initial",
  context: {
    signUpState: null,
    confirmState: null,
  },
  states: {
    /**
     * 例えば initial(初期表示) 状態のときに
     * signUp(=SignUpEventで定義している`type`) イベントが発生した場合、
     * registered 状態に遷移する
     **/
    initial: {
      on: {
        signUp: {
          target: "registering",
        },
      },
    },
    registering: {
      on: {
        postSignUp: [
          {
            target: "registered",
            guard: ({ event }) => event.signUpState === "Success",
          },
          {
            target: "initial",
            actions: [signUpAction],
          },
        ],
      },
    },
    registered: {
      on: {
        confirmViaEmail: {
          target: "confirming",
        },
      },
    },
    confirming: {
      on: {
        postConfirmViaEmail: [
          {
            target: "confirmed",
            guard: ({ event }) => event.confirmState === "Success",
          },
          {
            target: "registered",
            actions: [confirmAction],
          },
        ],
      },
    },
    confirmed: {},
  },
});
すでに定義したイベント・アクションと状態を合わせた状態遷移図は以下のようになります。
状態遷移図の文字が多くてわかりづらいですが、「SignUpEvent: onClickはボタンなどを押した時にSignUpEventが実行される」、「PostSignUpEvent: useEffectはuseEffectで監視しているServerActionsでの結果を元に関数を実行」という意味を表しています。
(再掲)イベント定義の図。
(再掲)Contextの更新の図。
そして、XStateが自動生成したサインアップの状態遷移図は以下のようになります。アクションが以下の図だとassignとして書かれいるのと、状態遷移のguard節の書き方が少し異なりますがやっていることは同じです。

(再掲)XStateが自動生成したサインアップの状態遷移図
上記の状態遷移のコードを使って、クライアントサイド(CSR)のコードを書いていきます。
まずは、ServerActionsやMantineのformを以下のように定義します。
importなど。
"use client";
import { useEffect } from "react";
import {
  Center,
  TextInput,
  PasswordInput,
  Checkbox,
  Paper,
  Title,
  Text,
  Container,
  Group,
  Button,
  Anchor,
} from "@mantine/core";
import { useFormState } from "react-dom";
import { useForm } from "@mantine/form";
import { onCognitoSignUp, onCognitoConfirmSignUp } from "./actions";
import { useMachine } from "@xstate/react";
import { createBrowserInspector } from "@statelyai/inspect";
import { signUpFlowMachine } from "./stateMachine";
const { inspect } = createBrowserInspector();
// see: https://ui.mantine.dev/category/authentication
export const SignUpXState = () => {
  // 第二引数に inspect 関数を渡すことで、ブラウザ上でステートマシーンを GUI で表示できます。
  const [current, send] = useMachine(signUpFlowMachine, { inspect });
  const [signUpState, signUpAction] = useFormState(onCognitoSignUp, null);
  const [confirmState, confirmAction] = useFormState(onCognitoConfirmSignUp, null);

  const form = useForm({
    initialValues: {
      email: "",
      password: "",
      check: false,
      confirmationCode: "",
    },
    // validateInputOnChange: true,
    validateInputOnBlur: true,
    validate: (values) => {
      if (current.matches("initial")) {
        return {
          email: /^\S+@\S+$/.test(values.email) ? null : "不正なメールアドレスです。",
          password:
            values.password.length < 8
              ? "パスワードは8文字以上入力してください。"
              : !values.password.match(/[0-9]/)
                ? "数字を含めてください"
                : !values.password.match(/[a-z]/)
                  ? "英語の小文字を含めてください"
                  : !values.password.match(/[A-Z]/)
                    ? "英語の大文字を含めてください"
                    : !values.password.match(/[$&+,:;=?@#|'<>.^*()%!-]/)
                      ? "記号を含めてください"
                      : null,
          check: !values.check ? "同意が必要です" : null,
        };
      } else if (current.matches("registered")) {
        return {
          confirmationCode:
            values.confirmationCode === ""
              ? "入力は必須です"
              : values.confirmationCode.length !== 6
                ? "コードの長さが違います。"
                : null,
        };
      }

      return {};
    },
  });
次にXStateでのイベント発火をuseEffectとButtonでのonClick関数を次のように定義します。
  useEffect(() => {
    const updateSignUpState = () => {
      if (signUpState) {
        send({ type: "signUp", signUpState });
      }
    };
    updateSignUpState();
  }, [signUpState]);

  useEffect(() => {
    const updateConfirmationState = () => {
      if (confirmState) {
        send({ type: "confirmViaEmail", confirmState });
      }
    };
    updateConfirmationState();
  }, [confirmState]);

  const onSignUp = () => {
    signUpAction({
      email: form.values.email,
      password: form.values.password,
    });
  };

  const onConfirmViaEmail = () => {
    confirmAction({
      email: form.values.email,
      confirmationCode: form.values.confirmationCode,
    });
    form.setValues({ confirmationCode: "" });
  };
ここからはユーザーが操作する画面で、まずはサインアップの画面を作成します。
  return (
    <Container size={420} my={40}>
      {(current.matches("initial") || current.matches("registering")) && (
        <>
          <Center>
            <Title c={"#333"}>Welcome!</Title>
          </Center>
          <Center>
            <Text c={"dimmed"} size={"sm"} mt={5}>
              You are to create an account, or{" "}
              <Anchor size="sm" href={"/"}>
                Already have an account
              </Anchor>
            </Text>
          </Center>

          <Box pos="relative">
            <LoadingOverlay
              visible={current.matches("registering")}
              zIndex={1000}
              overlayProps={{ radius: "sm", blur: 2 }}
            />
            <Paper withBorder shadow="md" p={30} mt={30} radius="md">
              <TextInput label="Email" placeholder="you@mantine.dev" required {...form.getInputProps("email")} />
              <PasswordInput
                label="Password"
                placeholder="Your password"
                required
                mt="md"
                {...form.getInputProps("password")}
              />
              <Text c={"red"} size={"xs"}>
                {current.context.signUpState === "UsernameExistsException" && form.values.password === "" && (
                  <>すでに存在するユーザーです</>
                )}
              </Text>
              <Group justify={"space-between"} mt="lg">
                <Checkbox label="利用規約に同意する" {...form.getInputProps("check")} />
              </Group>
              <Button fullWidth mt="xl" onClick={onSignUp} disabled={!form.isValid()}>
                Sign up
              </Button>
            </Paper>
          </Box>
        </>
      )}
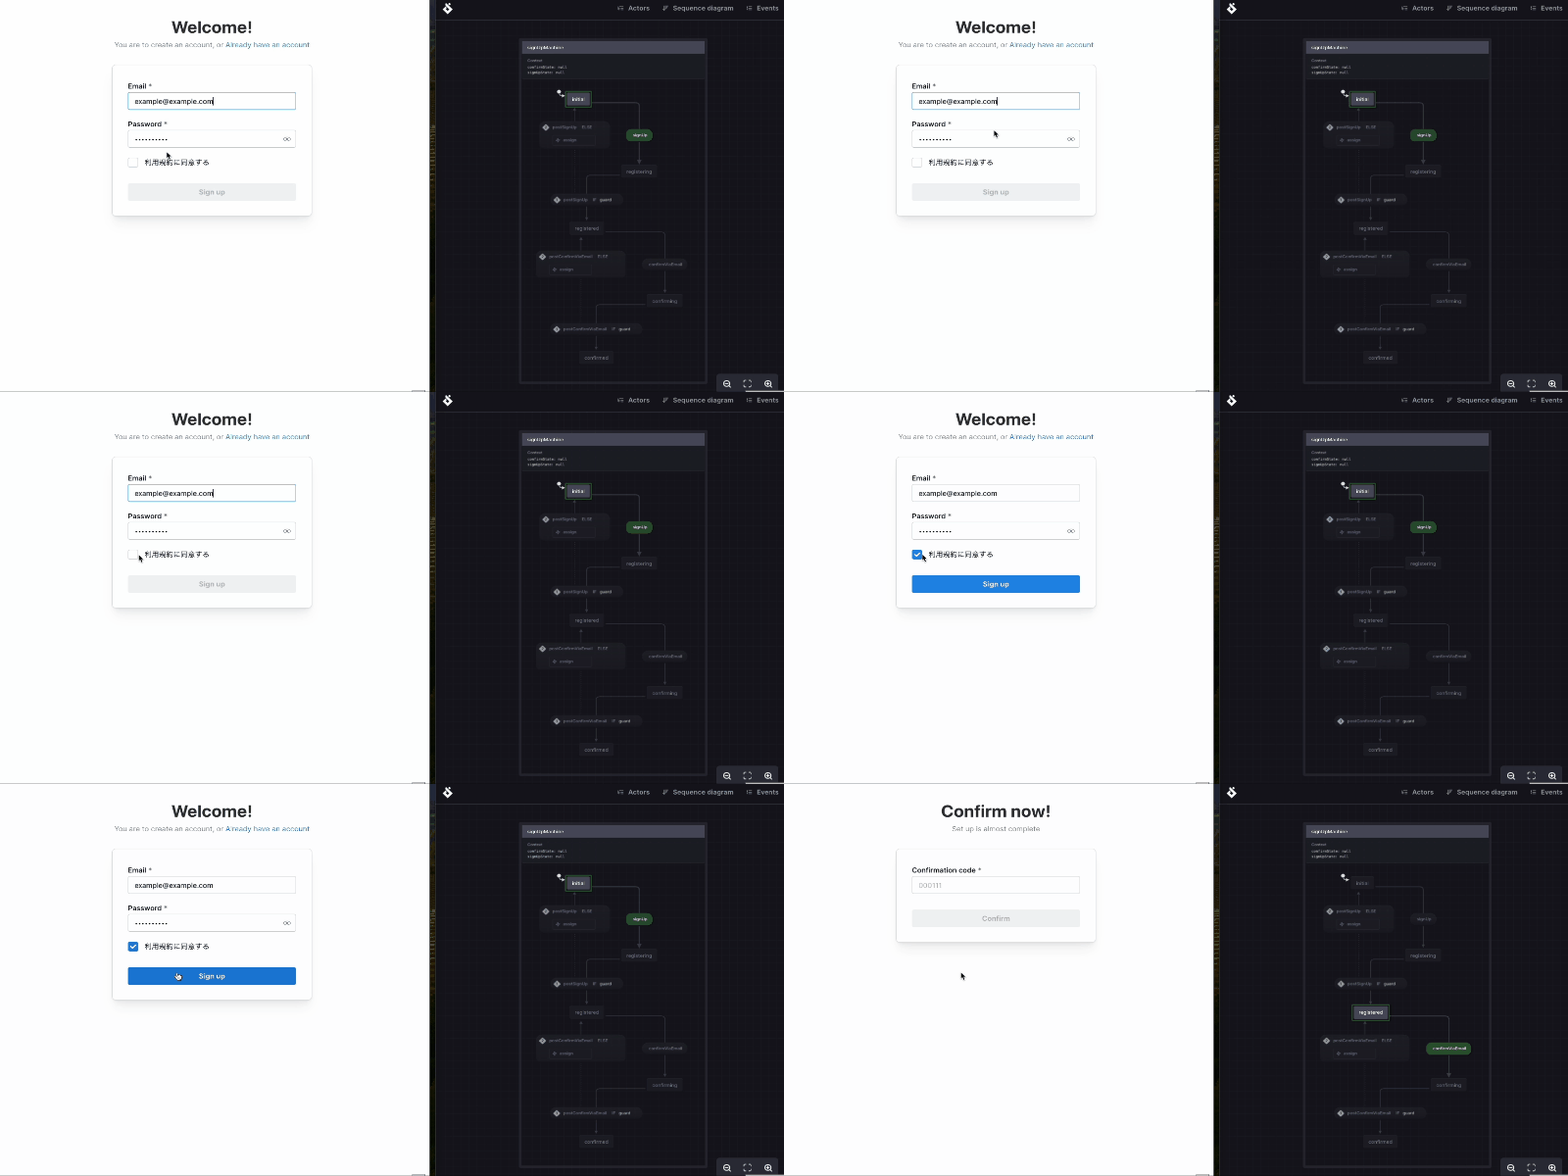
上記のコードによって、サインアップの初回入力画面とローディングが出るようになります。右に表示しているのがXStateでの状態遷移図で、ユーザーの行動に合わせて遷移します。

サインアップの初期入力画面とローディング
次は確認コードを入力する画面です。
      {(current.matches("registered") || current.matches("confirming")) && (
        <>
          <Center>
            <Title c={"#333"}>Confirm now!</Title>
          </Center>
          <Center>
            <Text c={"dimmed"} size={"sm"} mt={5}>
              Set up is almost complete
            </Text>
          </Center>

          <Box pos="relative">
            <LoadingOverlay
              visible={current.matches("confirming")}
              zIndex={1000}
              overlayProps={{ radius: "sm", blur: 2 }}
            />
            <Paper withBorder shadow="md" p={30} mt={30} radius="md">
              <TextInput
                label="Confirmation code"
                placeholder="000111"
                required
                {...form.getInputProps("confirmationCode")}
              />
              {current.context.confirmState}
              <Text c={"red"} size={"xs"}>
                {current.context.confirmState === "CodeMismatchException" && form.values.confirmationCode === "" && (
                  <>コードが一致しません</>
                )}
                {current.context.confirmState === "InvalidParameterException" &&
                  form.values.confirmationCode === "" && <>不正なパラメーターです</>}
              </Text>

              <Button fullWidth mt="xl" onClick={onConfirmViaEmail} disabled={!form.isValid()}>
                Confirm
              </Button>
            </Paper>
          </Box>
        </>
      )}
      {current.matches("confirmed") && (
        <>
          <Center>
            <Title c={"#333"}>Sign Up Complete!</Title>
          </Center>
          <Center>
            <Text c={"dimmed"} size={"sm"} mt={5}>
              Welcome to our Site.
            </Text>
          </Center>
          <Button fullWidth mt="xl" component={"a"} href={"/"}>
            Back home to Sign-in
          </Button>
        </>
      )}
    </Container>
  );
};
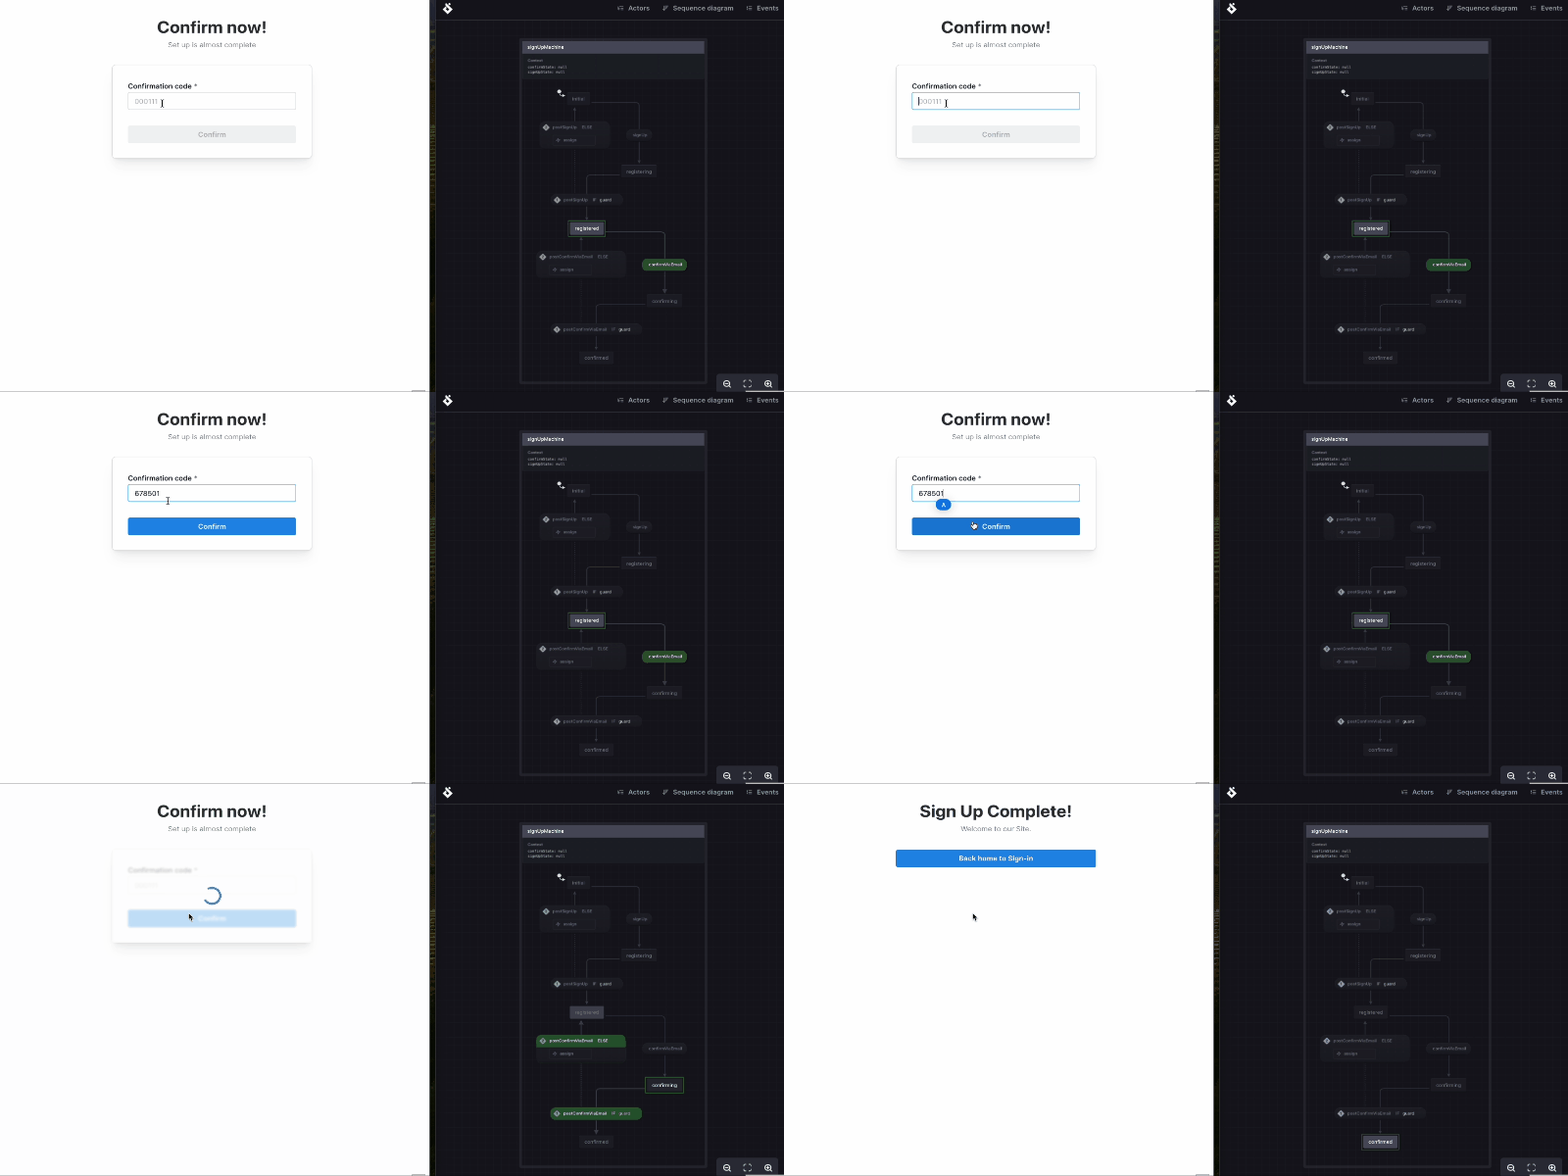
これで以下のように、確認コードの入力画面とローディング、および最後のサインアップ完了画面が出るようになります。

確認コードの入力画面とローディングとサインアップ完了画面
これで、サインアップの一連の流れの実装と確認が完了しました。
やっていないこと
ファイル分割
ファイル分割をもう少ししたかったのですが、XStateをuseContextなどで扱う方法がわからなかったのと、XStateのActor利用した場合にinspectをどう扱うのかが見えなかったので一旦単一のファイルで扱うようにしています。ファイルの命名規則なども悩みそうなのでこの形でもいいかなと思います。
Mantineの方は、createFormContextを利用するとファイル分割をしやすくなります。
useActionStateの利用
本記事ではuseFormStateを利用しています。ただ今後は、もうすぐリリースされるReact 19に含まれる新機能のuseActionStateを使ったほうが良いかと思います。
おわりに
本記事では、サインアップ画面をXStateを利用して状態遷移を意識して作成しました。Next.jsを利用している場合だとURLごとにページを作成した方がいいかと思うのですが、Pages Routerを利用しているみたいにCSR側で全てまとめました。useEffectを使って状態を監視しているところが微妙だなと思うので、そこは今後の改善としたいなと思います。
とりあえずサインアップ画面だけなので、他の画面も合わせて作成していきたいです。

Discussion