【NextAuth.js/認証】Cognitoでカスタムサインインページを作成する
はじめに
みなさん、Cognitoは使っていますか?Cognitoは便利なのですが、サインイン画面周りがちょっと大変ですよね…。特にCognitoの「ホストされたのUI」の見た目よくないので、カスタムしたいですよね。
以前、Amplifyを使った同じような記事を書いたのですが、今後標準になりそうなNextAuth.jsを使いたくなりました。
前作からの変更点は次の通りです。
- UIライブラリ
- 前作:
MUI - 今作:
Mantine
- 前作:
- Cognitoサインインに利用するライブラリ
- 前作:
Amplify.js - 今作:
AWS SDK V3+NextAuth.js
- 前作:
やりたいこと
デフォルトのUIを使ったサインイン方法は色々な記事でも紹介されていますが、カスタムしてNextAuth.jsのCredentialsProviderを使ってサインインすることをします。この時、サインイン処理はフロントでしています。
対象読者
-
NextAuth.js(orAuth.js)を使っている - Cognitoを使っている
- 「ホストされたUI」ではなく、サインイン画面をカスタマイズしたい
- Mantineを使っている
- サインインの機能はバックエンドではなくフロントエンド側で実施する
-
Amplify.jsではなく、AWS SDKを利用する
-
-
AWS CDKを使っている
デプロイ環境
- macOS: 13.5
- Next.js: 13.4
- NextAuth.js: 4.23
- AWS SDK: 3.413
- Mantine: 6.0.20
- AWS CDK: 2.96.2
動作イメージ
ローカルで起動すると以下のサインイン画面が出てきます。

サインイン画面
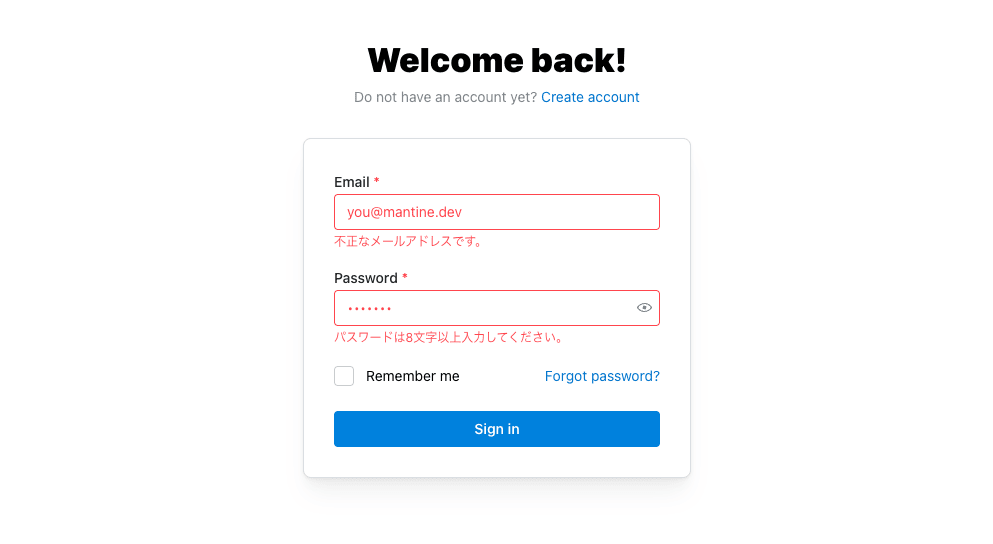
サインイン画面(バリデーションもあり)
サインインが成功すると、idTokenが見えるようになっています。

画面に表示されたidToken
コード
コードは以下のリポジトリに置いてあります。適宜参考にしてください。
インフラ
Cognitoを作成します。すでにCognitoが存在している場合はスキップしてもらって大丈夫です。
Cognitoのデプロイ
以下のコードでCognitoを設定します。ポイントとして、アプリクライアントはprivate-clientのみを作成している点です。
import {
  Duration,
  Stack,
  StackProps,
  RemovalPolicy,
  aws_cognito,
} from "aws-cdk-lib";
import { Construct } from "constructs";
import { prefix } from "./constants";

interface ICognitoStack {
  domainPrefix: string;
  callbackUrls: string[];
  logoutUrls: string[];
}
export const paramsCognito: ICognitoStack = {
  domainPrefix: "gsy0911-zenn-example",
  callbackUrls: ["http://localhost:3000"],
  logoutUrls: ["http://localhost:3000"],
};

export class Cognito extends Stack {
  constructor(
    scope: Construct,
    id: string,
    params: ICognitoStack,
    props?: StackProps,
  ) {
    super(scope, id, props);

    /** USER POOL */
    const userPool = new aws_cognito.UserPool(this, "user-pool", {
      userPoolName: `${prefix}-user-pool`,
      // sign-up
      selfSignUpEnabled: false,
      // sign-in
      signInAliases: {
        username: true,
        email: true,
      },
      // user attributes
      standardAttributes: {
        email: {
          required: true,
          mutable: true,
        },
      },
      mfa: aws_cognito.Mfa.OPTIONAL,
      mfaSecondFactor: {
        sms: true,
        otp: true,
      },
      passwordPolicy: {
        minLength: 8,
        requireLowercase: true,
        requireUppercase: true,
        requireDigits: true,
        requireSymbols: true,
        tempPasswordValidity: Duration.days(3),
      },
      // emails, by default `no-reply@verificationemail.com` used
      accountRecovery: aws_cognito.AccountRecovery.EMAIL_ONLY,
      removalPolicy: RemovalPolicy.DESTROY,
    });

    // App Clients
    userPool.addClient("private-client", {
      userPoolClientName: "private-client",
      generateSecret: true,
      authFlows: {
        userPassword: true,
        userSrp: true,
        adminUserPassword: true,
      },
      oAuth: {
        callbackUrls: params.callbackUrls,
        logoutUrls: params.logoutUrls,
        flows: {
          authorizationCodeGrant: true,
        },
        scopes: [aws_cognito.OAuthScope.OPENID, aws_cognito.OAuthScope.EMAIL],
      },
    });

    userPool.addDomain("cognito-domain", {
      cognitoDomain: {
        domainPrefix: params.domainPrefix,
      },
    });
  }
}
Cognitoを以下のコマンドでデプロイします。5分もかからずにCognitoがデプロイされると思います。
# at ./infrastructure
$ cdk deploy
これでインフラ側の設定は完了しました。
フロントエンド
次にフロントエンドの説明をします。必要に応じて次のパッケージをインストールしてください。
# cognitoの認証に必要
$ npm install @aws-sdk/client-cognito-identity-provider \
  jwt-decode \
  next-auth
# 必須ではないです。Mantineを利用する場合のみインストールしてください。
$ npm install @mantine/core \
  @mantine/form \
  @mantine/hooks \
  @mantine/next
環境変数
環境変数を参照した際、string | nullとはならないように以下のファイルを作成します。
declare namespace NodeJS {
  interface ProcessEnv {
    // next-auth.js
    readonly NEXTAUTH_SECRET: string;
    readonly NEXTAUTH_URL: string;
    // cognito
    readonly COGNITO_REGION: string;
    readonly COGNITO_USER_POOL_ID: string;
    readonly COGNITO_CLIENT_ID: string;
    readonly COGNITO_CLIENT_SECRET: string;
    readonly COGNITO_ISSUER: string;
  }
}
そして、.env.localファイルを作成して先ほどデプロイしたCognitoの値を設定していきます。
# common
NEXTAUTH_SECRET=$(openssl rand -base64 32)
NEXTAUTH_URL=http://localhost:3000

# common in cognito
COGNITO_REGION=ap-northeast-1
COGNITO_USER_POOL_ID=none
COGNITO_ISSUER=https://cognito-idp.ap-northeast-1.amazonaws.com/none
# private-client
COGNITO_CLIENT_ID=none
COGNITO_CLIENT_SECRET=none
next-authの型の拡張
NextAuth.jsで既に定義されているUserやSessionの型を拡張します。こうすることで、安全にidTokenやaccessTokenを保持・参照できます。
import { NextPage } from "next";
import { DefaultSession } from "next-auth";

interface UserWithId extends DefaultSession["user"] {
  idToken?: string;
  id?: string;
  email: string;
}

declare module "next-auth/jwt" {
  interface JWT {
    idToken?: string;
    accessToken?: string;
    accessTokenExpires?: number;
    refreshToken?: string;
    error?: string;
  }
}

declare module "next-auth" {
  interface Session {
    accessToken?: string;
    user: UserWithId;
    error?: string;
  }

  interface User {
    idToken?: string;
    refreshToken?: string;
    accessToken?: string;
    accessTokenExpires?: number;
  }

  interface Account {
    expires_at;
  }
}
[...nextauth].tsについて
NextAuth.jsで大事なファイルについて説明します。全てのコードを一度に載せるのは難しいので適宜切り取りつつ説明していきます。コード全体を見たい場合には、GitHubを参照してください。
以下のパッケージをインポートしています。
import NextAuth, { Session, AuthOptions, User } from "next-auth";
import { JWT } from "next-auth/jwt";
import CognitoProvider from "next-auth/providers/cognito";
import CredentialsProvider from "next-auth/providers/credentials";
import { Issuer } from "openid-client";
import * as crypto from "crypto";
import {
  AdminInitiateAuthCommandInput,
  AdminInitiateAuthCommand,
  CognitoIdentityProviderClient,
} from "@aws-sdk/client-cognito-identity-provider";
import jwt_decode from "jwt-decode";
cognitoProviderは正確には作成しなくても良いのですが、作成しておくと、後続の処理が少し楽になるので作成しています。
const cognitoProvider = CognitoProvider({
  id: "cognito",
  clientId: process.env.COGNITO_CLIENT_ID,
  clientSecret: process.env.COGNITO_CLIENT_SECRET,
  issuer: process.env.COGNITO_ISSUER,
  checks: "nonce",
});
アクセストークンの更新には、以下の記事を参考に実装しています。
async function refreshAccessToken(token: any): Promise<JWT> {
  (省略)
}
以下のsignIn関数が本記事で大事なコードになります。
AWS SDKを利用して、Cognitoへのサインインを実行しています。
const signIn = async (username: string, password: string) => {
  const client = new CognitoIdentityProviderClient({
    region: process.env.COGNITO_REGION,
  });
  const secretHash = crypto
    .createHmac("sha256", process.env.COGNITO_CLIENT_SECRET)
    .update(username + process.env.COGNITO_CLIENT_ID)
    .digest("base64");
  try {
    const adminInput: AdminInitiateAuthCommandInput = {
      ClientId: process.env.COGNITO_CLIENT_ID,
      UserPoolId: process.env.COGNITO_USER_POOL_ID,
      AuthFlow: "ADMIN_USER_PASSWORD_AUTH",
      AuthParameters: {
        USERNAME: username,
        PASSWORD: password,
        SECRET_HASH: secretHash,
      },
    };

    const user = await client.send(new AdminInitiateAuthCommand(adminInput));
    const expiresIn = user.AuthenticationResult?.ExpiresIn || 3600;
    const accessTokenExpires = Math.floor(Date.now() / 1000) + expiresIn;
    if (user.AuthenticationResult?.IdToken) {
      const decodedIdToken = get_jwt_decoded(
        user.AuthenticationResult?.IdToken,
      );
      return {
        id: decodedIdToken.sub || "",
        name: decodedIdToken.email || "",
        email: decodedIdToken.email || "",
        idToken: user.AuthenticationResult?.IdToken,
        refreshToken: user.AuthenticationResult?.RefreshToken,
        accessToken: user.AuthenticationResult?.AccessToken,
        accessTokenExpires: accessTokenExpires,
      };
    }
  } catch (err) {
    console.log(JSON.stringify(err));
  }
};
authrizeの処理で、上で定義したsignIn関数を利用してサインインを実装しています。
redirectで書かれているのはサインアウトの処理で、以下の記事を参考にしました。
async sessionやasync jwtのところで、idTokenを保持しています。
export const authOptions: AuthOptions = {
  providers: [
    // usernameでのサインイン
    CredentialsProvider({
      credentials: {
        username: {
          label: "ユーザー名",
          type: "text",
          placeholder: "ユーザー名",
        },
        password: { label: "パスワード", type: "password" },
      },
      authorize: async (credentials, req) => {
        const user = await signIn(
          credentials?.username || "",
          credentials?.password || "",
        );

        if (user) {
          // 返されたオブジェクトはすべて、JWTの `user` プロパティに保存されます。
          return user;
        } else {
          // もし、NULLを返した場合は、ユーザーに詳細を確認するよう促すエラーが表示されます。
          return null;
          // また、このコールバックをエラーで拒否もできます。この場合、ユーザーはエラーメッセージをクエリパラメータとして持つエラーページに送られます。
        }
      },
    }),
  ],
  secret: process.env.NEXTAUTH_SECRET,
  session: {
    strategy: "jwt",
    maxAge: 30 * 24 * 60 * 60,
  },
  callbacks: {
    redirect({ url, baseUrl }) {
      (中略:サインアウトの参考記事の内容のため)
    },
    async session({
      session,
      token,
    }: {
      session: Session;
      token: JWT;
      user: User;
    }): Promise<Session> {
      if (token.idToken) {
        session.user.idToken = token.idToken;
      }
      return session;
    },
    async jwt({ token, user, account }) {
      // Credentialsサインインの場合: userに情報が付与されている
      if (account && user) {
        console.log(`user: ${JSON.stringify(user)}`);
        console.log(`account: ${JSON.stringify(account)}`);
        token.idToken = account.id_token || user.idToken;
        token.accessToken = account.access_token || user.accessToken;
        token.accessTokenExpires =
          account.expires_at || user.accessTokenExpires;
        token.refreshToken = account.refresh_token || user.refreshToken;
        return token;
      }
      (中略:トークンのリフレッシュの参考記事の内容のため)
    },
  },
  pages: {
    signIn: "/auth/signin",
    signOut: "/auth/signin",
  },
};

export default NextAuth(authOptions);
これで認証まわりの作成が完了しました。
Mantineの設定
次にサインイン画面を以下を参考に作成します。Mantineを利用しない場合はスキップしてもらって大丈夫です。
にある内容をベースに、@mantine/hookでバリデーションを付与しています。以下のように、初期値とバリデーションをInputに対して設定できます。
(前略)
import { useForm } from "@mantine/form";
// see: https://ui.mantine.dev/category/authentication

export const SignInPage = () => {
  const form = useForm({
    initialValues: {
      email: "",
      password: "",
    },
    // validateInputOnChange: true,
    validateInputOnBlur: true,
    validate: {
      email: (value) =>
        /^\S+@\S+$/.test(value) ? null : "不正なメールアドレスです。",
      password: (value) =>
        value.length < 8
          ? "パスワードは8文字以上入力してください。"
          : !value.match(/[0-9]/)
          ? "数字を含めてください"
          : !value.match(/[a-z]/)
          ? "英語の小文字を含めてください"
          : !value.match(/[A-Z]/)
          ? "英語の大文字を含めてください"
          : !value.match(/[$&+,:;=?@#|'<>.^*()%!-]/)
          ? "記号を含めてください"
          : null,
    },
  });
(後略)
バリデーションを付与した画面は次のようになります。
再掲:サインイン画面
サインイン画面で入力した際に、以下のような画面にできます。他のカスタマイズなどもあるので公式サイトを見ることをお勧めします。
再掲:サインイン画面(バリデーションもあり)
動作確認
動作確認をするために、まずはCognitoでユーザーを作成します。

コンソールからユーザーを作成

アプリケーションクライアントからホストされたUIを使って初期サインイン

ホストされたUIを使ってパスワードの再設定
この「Send」ボタンを押下すると、ローカルのNext.jsアプリにコールバックされます。

作成したユーザーでサインイン
サインインが成功すると、画面にidTokenが表示されます。
再掲:画面に表示されたidToken
これでCognitoのCredentialProviderを使ったサインインができました。
おわりに
NextAuth.js + AWS SDK V3でCognitoサインイン画面をカスタマイズしました。まだ、足りていないページはあるので今後作っていきたいです。
誰かの参考になれば嬉しいです。
そのほかの参考記事
Discussion