【Amazon Linux 2023】初心者がSFTP接続&ファイル送信するシェルスクリプトを/etc/crontabで定期実行した備忘録
どうも!前歯すきっ歯です🦷
Webサーバのconfigを自動でSFTP接続&ファイル送信するクライアントサーバとその接続先のSFTPサーバを構築する案件に関わるので、その予習として今回はタイトルの勉強をしました!
その時の備忘録を以下書いていきます…。
1.本記事について
1.1💪勉強のゴール💪
今回のゴールは以下4点です。
▼ゴール詳細---------------------------------------------------------------------------
- SFTP接続元のサーバ(クライアントサーバ)…①からSFTP接続先のサーバ(SFTPサーバ)…②へ
SSH接続できる環境を準備する - 上記①から②へSFTP接続しファイル送信する
- 2を実行するシェルスクリプトを書く
- 3のシェルスクリプトを/etc/crontabを用いて定期実行する
1.2 前提条件
以下3点を前提条件とします。
▼前提条件---------------------------------------------------------------------------
- 後述する手順開始時点の各PCやサーバの配置は以下構成図の通りです。
※EC2インスタンスはデプロイ済みです。 - ルーティングやセキュリティグループ等通信に必要なクラウド上の設定は
後述する手順の前に行われているものとします。
※SFTP接続のみなのでインバウンド通信でSSH 22ポートが空いてればOKです - クライアントサーバ、SFTPサーバ共にOSはAmazon Linux 2023です。
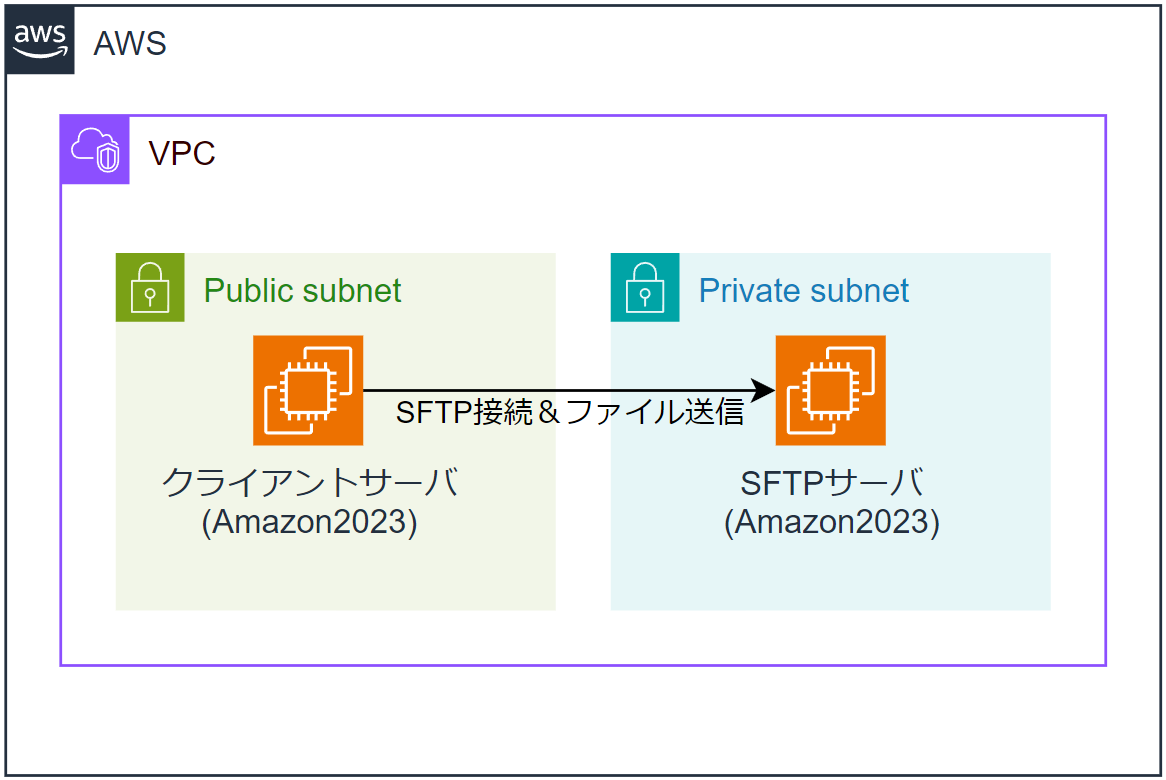
構成図
1.3 大まかな流れ
以下が今回の流れです。
後述する手順ではSFTPサーバ側から紹介していきます。
▼SFTPサーバ側------------------------------------------------------------------
- SFTP接続してログインするためのユーザーを作成する。
▼クライアントサーバ側-----------------------------------------------------------
- SFTP接続に用いるキーペアを作成して、SFTPサーバに公開鍵を送付する。
- SFTPサーバへSFTP接続してファイル送信できることを確認する。
- 3の内容を記載したシェルスクリプトを作成する。
- 4で作成したシェルスクリプトを/etc/crontabに書き込み、
2の内容が自動で定期的に実行できるように設定する。
2.SFTP接続の前にSSH接続を理解する
SFTP接続はSSH接続の通信経路を活用して行うものなので、SSH接続についての理解が浅いとSFTP接続について理解することが難しいです。具体的に言えば、[1.3大まかな流れ]で紹介した流れ1~2はSSH接続をするために準備する時と同じ手順です。
個人的に分かりやすいと感じるSSH接続の紹介動画は下記リンクだったので、
もしよければご覧ください。「SSH接続は知っているよ」という方は読み飛ばしてください~
3. SFTPサーバ内のSFTP接続設定
3.1 SFTP接続に使用するユーザー作成
SSH接続を用いるので、SSH接続同様にログインするユーザーを作成します。
今回はそのユーザの名前をsftpuserとします。
###ユーザーを作成し、1次グループをwheelグループに所属させる。------------
[ec2-user@[SFTPサーバのIP] ~]$ sudo useradd sftpseupuser -g wheel

###sftpuserのパスワードを設定する。------------------------------------
[ec2-user@[SFTPサーバIP] ~]$ passwd sftpuser
Changing password for user sftpuser.
New password:
Retype new password:
passwd: all authentication tokens updated successfully.

###パスワードが設定されているか確認する。 -------------------------------
[ec2-user@[SFTPサーバIP] ~]$ cat /etc/passwd
 (中略)…
sftpuser:x:1002:10::/home/sftpuser:/bin/bash

###wheelグループに所属していることを確認する。---------------------------
[ec2-user@[SFTPサーバIP] ~]$ id sftpuser
uid=1002(sftpuser) gid=10(wheel) groups=10(wheel)
3.2 SSH接続設定ファイル(=/etc/ssh/sshd_config)の編集
先にお伝えした通り、SSH接続を使用するので引き続きSSHの設定ファイルを操作していきます。
3.2.1 /etc/ssh/sshd_configの設定
下記2点を変更します。
###ルートユーザーでのログインを拒否する###
>PermitRootLogin no                  #変更後
<#PermitRootLogin prohibit-password  #変更前

###公開鍵での認証を許可する(#を外す)###
>PubkeyAuthentication yes           #変更後
<#PubkeyAuthentication yes           #変更前
【SFTPサーバ】/etc/ssh/sshd_config 変更後全文
#$OpenBSD: sshd_config,v 1.104 2021/07/02 05:11:21 dtucker Exp $

# This is the sshd server system-wide configuration file.  See
# sshd_config(5) for more information.

# This sshd was compiled with PATH=/usr/local/bin:/usr/bin:/usr/local/sbin:/usr/                                                       sbin

# The strategy used for options in the default sshd_config shipped with
# OpenSSH is to specify options with their default value where
# possible, but leave them commented.  Uncommented options override the
# default value.

# To modify the system-wide sshd configuration, create a  *.conf  file under
#  /etc/ssh/sshd_config.d/  which will be automatically included below
Include /etc/ssh/sshd_config.d/*.conf

# If you want to change the port on a SELinux system, you have to tell
# SELinux about this change.
# semanage port -a -t ssh_port_t -p tcp #PORTNUMBER
#
#Port 22
#AddressFamily any
#ListenAddress 0.0.0.0
#ListenAddress ::

#HostKey /etc/ssh/ssh_host_rsa_key
#HostKey /etc/ssh/ssh_host_ecdsa_key
#HostKey /etc/ssh/ssh_host_ed25519_key

# Ciphers and keying
#RekeyLimit default none

# Logging
#SyslogFacility AUTH
#LogLevel INFO

# Authentication:

#LoginGraceTime 2m
PermitRootLogin no ###変更箇所###
#StrictModes yes
#MaxAuthTries 6
#MaxSessions 10

PubkeyAuthentication yes ###変更箇所###

# The default is to check both .ssh/authorized_keys and .ssh/authorized_keys2
# but this is overridden so installations will only check .ssh/authorized_keys
AuthorizedKeysFile      .ssh/authorized_keys

#AuthorizedPrincipalsFile none


# For this to work you will also need host keys in /etc/ssh/ssh_known_hosts
#HostbasedAuthentication no
# Change to yes if you don't trust ~/.ssh/known_hosts for
# HostbasedAuthentication
#IgnoreUserKnownHosts no
# Don't read the user's ~/.rhosts and ~/.shosts files
#IgnoreRhosts yes

# Explicitly disable PasswordAuthentication. By presetting it, we
# avoid the cloud-init set_passwords module modifying sshd_config and
# restarting sshd in the default instance launch configuration.
PasswordAuthentication yes ###変更しない###
PermitEmptyPasswords no

# Change to no to disable s/key passwords
#KbdInteractiveAuthentication yes

# Kerberos options
#KerberosAuthentication no
#KerberosOrLocalPasswd yes
#KerberosTicketCleanup yes
#KerberosGetAFSToken no
#KerberosUseKuserok yes

# GSSAPI options
#GSSAPIAuthentication no
#GSSAPICleanupCredentials yes
#GSSAPIStrictAcceptorCheck yes
#GSSAPIKeyExchange no
#GSSAPIEnablek5users no

# Set this to 'yes' to enable PAM authentication, account processing,
# and session processing. If this is enabled, PAM authentication will
# be allowed through the KbdInteractiveAuthentication and
# PasswordAuthentication.  Depending on your PAM configuration,
# PAM authentication via KbdInteractiveAuthentication may bypass
# the setting of "PermitRootLogin without-password".
# If you just want the PAM account and session checks to run without
# PAM authentication, then enable this but set PasswordAuthentication
# and KbdInteractiveAuthentication to 'no'.
# WARNING: 'UsePAM no' is not supported in Fedora and may cause several
# problems.
#UsePAM no

#AllowAgentForwarding yes
#AllowTcpForwarding yes
#GatewayPorts no
#X11Forwarding no
#X11DisplayOffset 10
#X11UseLocalhost yes
#PermitTTY yes
#PrintMotd yes
#PrintLastLog yes
#TCPKeepAlive yes
#PermitUserEnvironment no
#Compression delayed
#ClientAliveInterval 0
#ClientAliveCountMax 3
#UseDNS no
#PidFile /var/run/sshd.pid
#MaxStartups 10:30:100
#PermitTunnel no
#ChrootDirectory none
#VersionAddendum none

# no default banner path
#Banner none

# override default of no subsystems
Subsystem       sftp    /usr/libexec/openssh/sftp-server

# Example of overriding settings on a per-user basis
#Match User anoncvs
#       X11Forwarding no
#       AllowTcpForwarding no
#       PermitTTY no
#       ForceCommand cvs server

AuthorizedKeysCommand /opt/aws/bin/eic_run_authorized_keys %u %f
AuthorizedKeysCommandUser ec2-instance-connect
3.2.2 設定ファイルの読み込み
設定ファイル変更後は必ずsshdを再起動して、設定ファイルの変更を適用させましょう!
###設定ファイルに問題がないことを確認する(何も表示されなければOK)###
[ec2-user@[SFTPサーバIP] ssh]$ sudo /usr/sbin/sshd -t

###sshdの再起動をする###
[ec2-user@[SFTPサーバIP] ssh]$ sudo systemctl restart sshd
4. SFTP接続に用いるキーペアを作成し、SFTPサーバに公開鍵を送付する。
4.1 4章の前提知識
4.1.1 SSHキーペアの作成方法(=ssh-keygenコマンドの使い方)
4.1.2 クライアントサーバからSFTPサーバへの公開鍵の登録方法(=ssh-copy-idの使い方)
※2章で「SSH接続までの設定準備詳細」としてご紹介済み記事の一部です。
4.2 SSHキーペアの作成
前提として、4.2~4.3.1内の作業はクライアントサーバ側の作業なのでご注意ください。
SSHキーを設定するために以下コマンドを実行します。本記事では鍵の名前をTransferTestとします。
###SSHキーペアを作成する###
[ec2-user@[クライアントサーバIP] .ssh]$ ssh-keygen -b 2048 -t rsa -f TransferTest
Generating public/private rsa key pair.
Enter passphrase (empty for no passphrase):
Enter same passphrase again:
Your identification has been saved in TransferTest
Your public key has been saved in TransferTest.pub
The key fingerprint is:
SHA256:************************************** ec2-user@[クライアントサーバホスト名]
The key's randomart image is:
+---[RSA 2048]----+
|       .+oo+o+   |
|       o.. oBo   |
|      .   ..+o   |
|       . .  .o   |
|   . o  S . =    |
| . .+ o  + + .   |
|  oo.o  o .      |
|  E..==o*o .     |
|   .+o+==O=.     |
+----[SHA256]-----+
【参考】`ssh-keygen`コマンド`-b`オプションがないとき
[ec2-user@[クライアントサーバのIP] ~]$ ssh-keygen -t rsa -f TransferKey
Generating public/private rsa key pair.
Enter passphrase (empty for no passphrase):
Enter same passphrase again:
Your identification has been saved in TransferKey
Your public key has been saved in TransferKey.pub
The key fingerprint is:
SHA256:*************************** ec2-user@[クライアントサーバホスト名]
The key's randomart image is:
+---[RSA 3072]----+
|    ..*.         |
|   o O o         |
|    @ B .        |
|  .= B + o   .   |
| E. * o S . . o  |
|+. o + o . + . . |
| =. . ..  . o    |
|..+  .+. . .     |
|oo   .+=+..      |
4.3 SFTPサーバへSSH公開鍵を送付する
4.3.1 SSH公開鍵の送付
クライアントサーバで以下コマンドを実行して、SFTPサーバへSSH公開鍵を送付します。
コマンド実行中の入力事項やエラー時の対処法は後述します。
[ec2-user@[クライアントサーバのIP] .ssh]$ ssh-copy-id -i TransferTest.pub sftpuser@[SFTPサーバのIP]
/usr/bin/ssh-copy-id: INFO: Source of key(s) to be installed: "TransferTest.pub"
The authenticity of host '[SFTPサーバのIP] ([SFTPサーバのIP])' can't be established.
ED25519 key fingerprint is SHA256:*****************************************.
Are you sure you want to continue connecting (yes/no/[fingerprint])? yes
/usr/bin/ssh-copy-id: INFO: attempting to log in with the new key(s), to filter out any that are already installed
/usr/bin/ssh-copy-id: INFO: 1 key(s) remain to be installed -- if you are prompted now it is to install the new keys
sftpuser@[SFTPサーバのIP]'s password:

Number of key(s) added: 1

Now try logging into the machine, with:   "ssh 'sftpuser@[SFTPサーバのIP]'"
and check to make sure that only the key(s) you wanted were added.
【参考】`ssh-copy-id`コマンドのエラー
[ec2-user@[クライアントサーバのIP] ~]$ sudo ssh-copy-id -i .ssh/TransferKey.pub sftpuser@[SFTPサーバのIP]
/usr/bin/ssh-copy-id: INFO: Source of key(s) to be installed: ".ssh/TransferKey.pub"
/usr/bin/ssh-copy-id: INFO: attempting to log in with the new key(s), to filter out any that are already installed
/usr/bin/ssh-copy-id: INFO: 1 key(s) remain to be installed -- if you are prompted now it is to install the new keys
sftpuser@[SFTPサーバのIP]: Permission denied (publickey,gssapi-keyex,gssapi-with-mic).
4.4 /etc/ssh/sshd_configの変更
4.4.1 PasswordAuthenticationをnoに変更する
4.4はSFTPサーバ側の作業なのでご注意ください。
先に記述したように、PasswordAuthentication yes⇒PasswordAuthentication noの変更を行います。
###パスワード認証を拒否する###
>PasswordAuthentication no       #変更後
<PasswordAuthentication yes      #変更前
4.4.2 sshdの再起動
3.2.2 設定ファイルの読み込みでご紹介した方法でsshdを再起動して、設定ファイルの変更を読み込ませてください。
5. SFTPサーバへSFTP接続できることを確認する
5.1 5章の前提知識
SFTPコマンドの使い方をご確認ください!
5.2 SFTP接続ができることを確認する
この後シェルスクリプト内では1つのファイルが送信できるスクリプトを書きますが、ディレクトリごと全てSFTP接続で送信することを試してみたいだけのために以下のようにテストしました。
(皆さんは/home/ec2-user配下にtestなんて名前のファイルを作成してやってみてください。)
[ec2-user@[クライアントサーバのIP] .ssh]$ sftp -i TransferTest sftpuser@[SFTPサーバのIP]
Connected to [SFTPサーバのIP].
sftp>
sftp> put -r /var/www
…(中略)…

wp-mail.php                                        100% 8543     3.5MB/s   00:00
wp-settings.php                                    100%   28KB  14.8MB/s   00:00
wp-signup.php                                      100%   34KB  11.8MB/s   00:00
wp-trackback.php                                   100% 5102     2.1MB/s   00:00
xmlrpc.php                                         100% 3246     1.3MB/s   00:00
sftp>
sftp> ^D
[ec2-user@[クライアントサーバのIP] .ssh]$
6. シェルスクリプトを作成する
6.1 6章の前提知識
6.1.1 シェルスクリプトの基本
「有料のものを読んでるんじゃないか」と思うほど丁寧に書かれている記事で勉強になります…。
6.1.2 SFTP接続をシェルスクリプトに書く時の見本
6.1.3 ヒアドキュメントとは
6.1.2の中で出てくるEOFの意味が以下記事にあります!
6.2 シェルスクリプトの作成
以下の手順で作成を進めていきます。今回は使用するシェルスクリプトの名前はTransfer.shとします。ここでは「SFTP接続して/home/ec2-user/testを送信する」シェルスクリプトを作成します。
###ファイル名をTransfer.shとしてシェルスクリプトを作成する###
[ec2-user@[クライアントサーバのIP] ~]$ vi Transfer.sh

###Transfer.shの中身を記述する(以下はシェルスクリプトの中身の記載)###
#!/bin/bash
sftp -i /home/ec2-user/.ssh/TransferTest sftpuser@[SFTPサーバのIP] <<EOF
put /home/ec2-user/test
bye
EOF

###Transfer.shに実行権限を付ける###
[ec2-user@[クライアントサーバのIP] ~]$ chmod +x Transfer.sh

###Transfer.shに実行権限が付いたことを確認する###
[ec2-user@[クライアントサーバのIP] ~]$ ll
-rwxr-xr-x  1 ec2-user ec2-user    74 Apr  4 03:54 Transfer.sh
6.3 シェルスクリプトの実行確認
6.2で作成したシェルスクリプトを実行します。
[ec2-user@[クライアントサーバのIP] ~]$ ./Transfer.sh
Connected to [SFTPサーバのIP].
sftp> put /home/ec2-user/test
Uploading /home/ec2-user/test to /home/sftpuser/test
test                                              100%    5     2.3KB/s   00:00
sftp> bye
[ec2-user@[クライアントサーバのIP] ~]$
7. シェルスクリプトを定期実行できるように設定する
7.1 7章の前提知識
7.1.1 Amazonlinux2023へcrontabをインストールする
ちょっとびっくりしたのですが、/etc/crontabがAmazonLinux2023にはデフォルトでインストールされていないので、インストールする必要があります。7.2以降の手順は以下の記事実施済みの想定で手順をご紹介するので、みなさんcrontabインストールよろしくお願いします。
7.1.2 /etc/crontabの編集方法
7.2 /etc/crontabの編集
ここでは毎分Transfer.shを実行する設定をします。(すなわち、毎分SFTP接続をしてTestファイルを送信します)
###/etc/crontabの編集###
[ec2-user@[クライアントサーバのIP] ~]$ crontab -e

###/etc/crontab内に以下を記載###
*/1 * * * * /home/ec2-user/Transfer.sh

###/etc/crontabが更新された旨表示される###
[ec2-user@[クライアントサーバのIP] ~]$ crontab -e
crontab: installing new crontab

###/etc/crontabの中身の確認###
[ec2-user@[クライアントサーバのIP] ~]$ crontab -l
*/1 * * * * /home/ec2-user/Transfer.sh
7.3 ファイル送信されていることを確認する
今回はSFTPサーバのSSH接続時のディレクトリ設定を行っていないので、
/home/sftpuser配下にtestファイルが送信されているはずです。
以下のように無事に/etc/crontabの実行を確認できました!(タイムスタンプが更新されています)
[sftpuser@[SFTPサーバのIP] ~]$ ll
total 4
-rw-r--r-- 1 sftpuser wheel 5 Apr  4 18:48 test
[sftpuser@[SFTPサーバのIP] ~]$
[sftpuser@[SFTPサーバのIP] ~]$ ll
total 4
-rw-r--r-- 1 sftpuser wheel 5 Apr  4 18:49 test
おわりに
最後までご覧いただきありがとうございました!
技術面での誤りや気になる点はご指摘お願いいたします。
Discussion