minipc を用意して misskey を家庭内で動かす
minipc (bmax) を購入した
この pc に ubuntu をクリーンインストールして misskey を動かすことを目的とする
- ubuntu から ubuntu-server に変更した
ufw を設定して 22 と 80/tcp のみを許可した
ubuntu の起動がやけに遅かった。
原因としては、 有線 LAN 側のイーサネット NIC が有効になっているが、イーサネット LAN ケーブルを接続していなかったため(2分間イーサネット LAN ケーブルの設定を待ち続けていた。)
対応策として、 optional:true を設定した。
# This is the network config written by 'subiquity'
network:
  ethernets:
    enp2s0:
      dhcp4: true
      optional: true
  version: 2
powertop. tlp をいれる
sensors もいれてみた
kubeadm を install してみた
下記のエラーが出たため issue を頼りに
❯ sudo kubeadm init
[init] Using Kubernetes version: v1.29.2
[preflight] Running pre-flight checks
error execution phase preflight: [preflight] Some fatal errors occurred:
        [ERROR CRI]: container runtime is not running: output: time="2024-02-25T01:08:31Z" level=fatal msg="validate service connection: validate CRI v1 runtime API for endpoint \"unix:///var/run/containerd/containerd.sock\": rpc error: code = Unimplemented desc = unknown service runtime.v1.RuntimeService"
, error: exit status 1
[preflight] If you know what you are doing, you can make a check non-fatal with `--ignore-preflight-errors=...`
To see the stack trace of this error execute with --v=5 or higher
をしたらなおった
$ rm /etc/containerd/config.toml
$ systemctl restart containerd
$ kubeadm init
k8s クラスタに新しくノードを追加したい場合は以下コマンドを実行するらしい
kubeadm join 192.168.11.100:6443 --token xxxxxxxxxxxx \
        --discovery-token-ca-cert-hash sha256:xxxxxxxxx
free コマンドで「これから使える空いているメモリは available」。
available には buff/cache (どこからのプロセスで使われたことがあるが、リセットすることで他プロセスにmわせる)も含まれる
kubectl で何をしても動かなかったが、原因を調べると kubectl の service が動いていなかった。
journalctl で確認してみると、 swap でエラーが出ていたので off にした
❯ kubectl get pod
E0225 01:48:56.267234    2040 memcache.go:265] couldn't get current server API group list: Get "https://192.168.11.100:6443/api?timeout=32s": dial tcp 192.168.11.100:6443: connect: connection refused
E0225 01:48:56.267554    2040 memcache.go:265] couldn't get current server API group list: Get "https://192.168.11.100:6443/api?timeout=32s": dial tcp 192.168.11.100:6443: connect: connection refused
E0225 01:48:56.268888    2040 memcache.go:265] couldn't get current server API group list: Get "https://192.168.11.100:6443/api?timeout=32s": dial tcp 192.168.11.100:6443: connect: connection refused
E0225 01:48:56.269045    2040 memcache.go:265] couldn't get current server API group list: Get "https://192.168.11.100:6443/api?timeout=32s": dial tcp 192.168.11.100:6443: connect: connection refused
E0225 01:48:56.270347    2040 memcache.go:265] couldn't get current server API group list: Get "https://192.168.11.100:6443/api?timeout=32s": dial tcp 192.168.11.100:6443: connect: connection refused
The connection to the server 192.168.11.100:6443 was refused - did you specify the right host or port?

❯ sudo systemctl status kubelet
● kubelet.service - kubelet: The Kubernetes Node Agent
     Loaded: loaded (/lib/systemd/system/kubelet.service; enabled; vendor preset: enabled)
    Drop-In: /usr/lib/systemd/system/kubelet.service.d
             └─10-kubeadm.conf
     Active: activating (auto-restart) (Result: exit-code) since Sun 2024-02-25 01:51:19 UTC; 8s ago
       Docs: https://kubernetes.io/docs/
    Process: 2273 ExecStart=/usr/bin/kubelet $KUBELET_KUBECONFIG_ARGS $KUBELET_CONFIG_ARGS $KUBELET_KUBEADM_ARGS $KUBELET_>
   Main PID: 2273 (code=exited, status=1/FAILURE)
        CPU: 82ms


ganyariya in 🌐 ganyariya-ubuntu in ~
❯ journalctl -xe | grep kubelet


sudo swapoff -a
pod & node のネットワーク通信アドオンとして flannel をつかってみる(名前がかっこよかった)
クラスタを作り直して、特定の pod range と ip を指定する
sudo kubeadm init --pod-network-cidr=10.244.0.0/16 --apiserver-advertise-address=192.168.11.100
コントロールプレーンのあるノードでも pod を実行できるようにする
kubectl taint nodes --all node-role.kubernetes.io/master-
kubeadm がうまく動かなかったのでいったん k3s や minikube にする
sudo cat /etc/rancher/k3s/k3s.yaml > ~/.kube/config
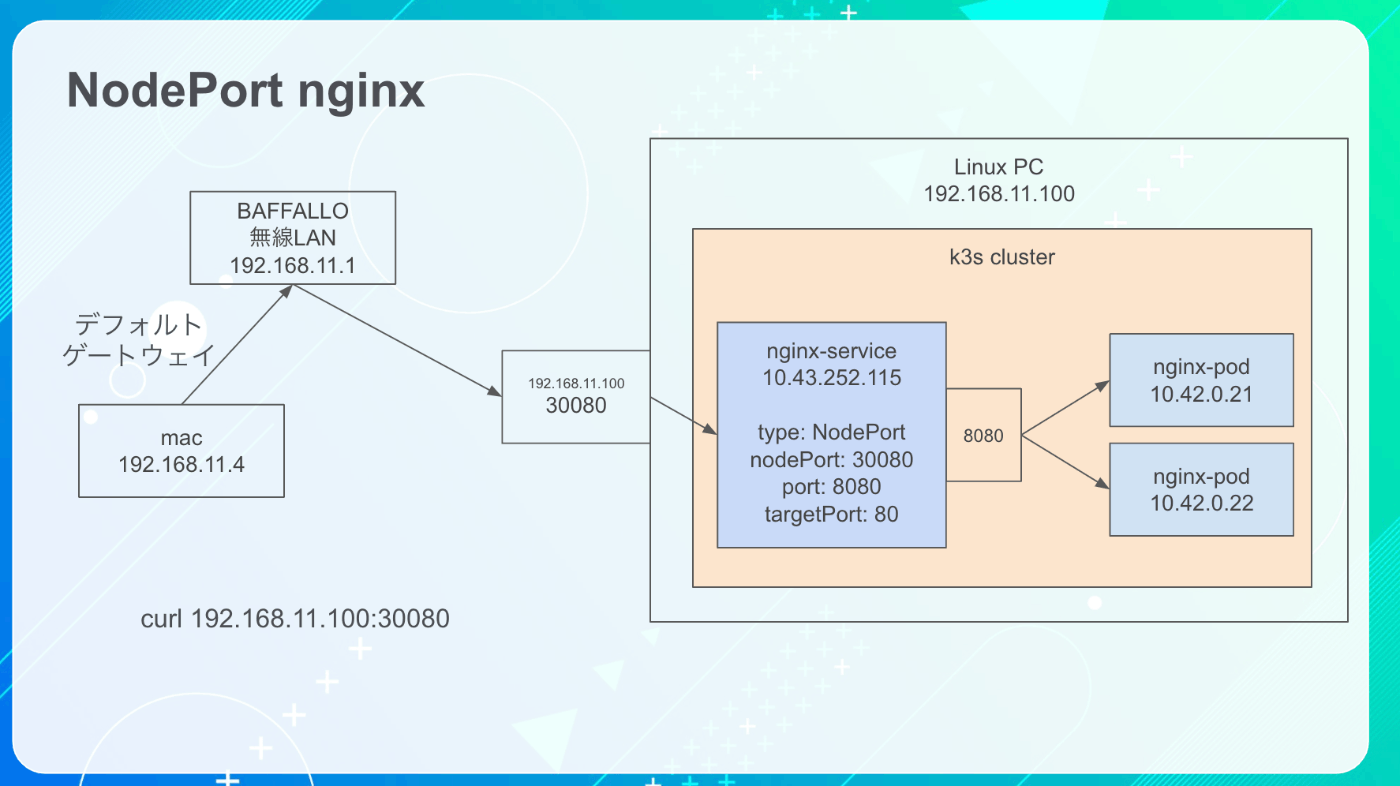
NodePort は、 Linux PC(物理マシン) の 30080 で通信を受け付ける、というもの。
物理マシンの実際の port 30080 で通信を受け付けたら、kube-proxy (funnel) が service 8080 port に通信を流す。
その後、 service 8080 port から、 nginx pod 80 port に向かって通信をおくる。

apiVersion: apps/v1
kind: Deployment
metadata:
  name: nginx-deployment
spec:
  selector:
    matchLabels:
      app: nginx
  replicas: 2
  template:
    metadata:
      labels:
        app: nginx
    spec:
      containers:
      - name: nginx
        image: nginx:1.14.2
        ports:
        - containerPort: 80
---
apiVersion: v1
kind: Service
metadata:
  name: nginx-service
  labels:
    app: nginx
spec:
  type: NodePort
  ports:
  - port: 8080
    targetPort: 80
    nodePort: 30080
    protocol: TCP
  selector:
    app: nginx
argocd を建てた。
その後、 argocd-server を NodePoet 30080 に変更した。
これによって、 https://192.168.11.100:30080 にアクセスすれば、 NodePort を利用してアクセスできるようになった
kubectl create namespace argocd
kubectl apply -n argocd -f https://raw.githubusercontent.com/argoproj/argo-cd/stable/manifests/core-install.yaml

kubectl patch svc argocd-server -n argocd --type='json' -p '[{"op": "replace", "path": "/spec/ports/0/nodePort", "value": 30080}]'
NodePort と volume について勉強した
PV でボリュームを定義して、実際に pod が使う分を pvc で要求する
apiVersion: apps/v1
kind: Deployment
metadata:
  name: nginx-deployment
spec:
  selector:
    matchLabels:
      app: nginx
  replicas: 2
  template:
    metadata:
      labels:
        app: nginx
    spec:
      containers:
        - name: nginx
          image: nginx:1.14.2
          ports:
            - containerPort: 80
          volumeMounts:
            - mountPath: /cache
              name: empty-dir-sample-volume
            - mountPath: /hostPathTest
              name: sample-host-path-volume
              # /home/ganyariya/k8s/hostPath/nginx/nyann が
              # nginx pod の /hostPathTest に mount される
              subPath: nyann
            - mountPath: /pvcdayo
              # /pvcdayo 以下に local-storage-pvc-volume を mount
              name: local-storage-pvc-volume
        - name: redis
          image: redis:latest
          volumeMounts:
            - mountPath: /hoge
              # {} が redis の /hoge と
              # nginx の /cache 両方に共通してマウントされる
              name: empty-dir-sample-volume
      volumes:
        # 一時的な volume emptydir を生成する
        # pod を消したら一緒に消える
        - name: empty-dir-sample-volume
          emptyDir: {}
        # pod のいるノード (ホストマシンのパス)にボリュームをつくる
        - name: sample-host-path-volume
          hostPath:
            type: DirectoryOrCreate
            path: /home/ganyariya/k8s/hostPath/nginx
        # nginx-pvc を nginx pod のボリュームとして利用する
        # nginx-pvc が pvc 名
        # local-storage-pvc-volume が pod から認識する実際のボリューム名
        - name: local-storage-pvc-volume
          persistentVolumeClaim:
            claimName: nginx-pvc
---
apiVersion: v1
kind: Service
metadata:
  name: nginx-service
  labels:
    app: nginx
spec:
  type: NodePort
  ports:
    # ノード (linux) 192.168.11.100:30001 に通信をおくると
    # 仮想 service LB 8080 port に転送される。
    # その後 仮想 service LB 8080 port から、 nginx pod の port 80 に転送される
    - port: 8080
      targetPort: 80
      nodePort: 30001
      protocol: TCP
  selector:
    app: nginx
---
apiVersion: v1
kind: PersistentVolume
metadata:
  name: nginx-pv
  labels:
    app: nginx-volume-pv
spec:
  capacity:
    storage: 100Mi
  volumeMode: Filesystem
  accessModes:
    - ReadWriteMany
  persistentVolumeReclaimPolicy: Delete
  # local-storage なので、ホストマシンにボリュームを確保する
  storageClassName: local-storage
  local:
    # どうやら事前に mkdir しておかないとだめっぽい
    path: /home/ganyariya/k8s2
  nodeAffinity:
    required:
      nodeSelectorTerms:
        - matchExpressions:
            # node の label として kubernetes.io/hostname=ganyariya-ubuntu が入っている node において
            # volume /home/ganyariya/k8s2 を作成する
            - key: kubernetes.io/hostname
              operator: In
              values:
                - ganyariya-ubuntu
---
apiVersion: v1
kind: PersistentVolumeClaim
metadata:
  name: nginx-pvc
  labels:
    app: hoge
spec:
  # accessModes & volumeMode & resources がすべて一致する
  # pv を要求する
  accessModes:
    - ReadWriteMany
  volumeMode: Filesystem
  resources:
    requests:
      storage: 80Mi
  storageClassName: local-storage
  selector:
    matchLabels:
      # app: nginx-volume-pv を label としてもっている
      # pv を要求する
      app: nginx-volume-pv
local-storage という StorageClass は動的な確保は行えない
ローカル PC k8s で argocd を動かす
単一の Application で複数の子 Application を管理する
MountVolume.SetUp failed for volume "nfs-pv" : mount failed: exit status 32 Mounting command: mount Mounting arguments: -t nfs 192.168.11.100:/nfs /var/lib/kubelet/pods/875e3d28-089d-482f-ab42-89d063e1c600/volumes/kubernetes.io~nfs/nfs-pv Output: mount.nfs: access denied by server while mounting 192.168.11.100:/nfs
自分には Twitter のほうがあっていた(情報収集という意味でも)
かわりに Twitter のやる時間を減らす
買ってきた miniPC は別の用途で利用しようかな