はじめに
Fusicのレオナです。本ブログでは、2025年7月にバージョン1.0がリリースされたStrands AgentsでAgent to Agent(以下、A2A)プロトコルを使用し、マルチエージェントシステムを試してみます。
Strands Agentsとは
Strands Agentsは、AWSが2025年5月に公開したオープンソースのAIエージェント構築SDKで、2025年7月にバージョン1.0がリリースされました。数行のPythonコードでAIエージェントを作成できるモデル駆動型のフレームワークです。
ベータ版のStrands Agentsについて執筆した以下の記事も参考にしてください。
A2Aとは
A2A (Agent to Agent) は、異なるAIエージェント間の相互運用性を実現する通信プロトコル仕様です。技術的には JSON-RPC 2.0 over HTTP(S) を採用し、AIエージェントのメタデータは Agent Card という構造化JSONで定義されます。
なぜA2Aが必要か
現在のAIエージェント環境では、異なるフレームワークや実装言語で構築されたAIエージェントが混在しています。GoogleのAgent Development Kit(ADK)、Manus、LangChainなどが例として挙げられます。これらの異なるAIエージェント同士が直接会話できないという問題があります。
A2Aの登場により、異なるフレームワークのAIエージェント同士が標準的な方法で会話できるようになりました。
またA2Aは、Googleが2025年4月に立ち上げたプロジェクトで、100社以上の大手テクノロジー企業が参加しています。2025年6月にはLinux Foundation管理のオープンソースプロジェクトになりました。
Agent Cardとは
Agent Cardは、AIエージェントの「名刺」のような役割を果たすJSON形式の情報です。人間が初めて会う人と名刺交換をするように、AIエージェント同士も最初にAgent Cardを交換して、お互いの能力や連絡方法を知ることができます。

他のAIエージェントは、このAgent Cardを見て「このエージェントはWeb検索ができるんだな」「このURLにリクエストを送ればいいんだな」と理解し、正確なHTTPエンドポイントとパラメータを使って連携できるようになります。
そして、Agent Cardには次のような要素が含まれています。
- エージェントの基本情報(名称、説明、バージョン)
- 接続情報(HTTPエンドポイントURL)
- 利用可能な機能(Skills)と実行できる具体的なタスク一覧
- 対応する入出力モード(テキスト、音声、画像など)
- サポートしている技術仕様(ストリーミング対応など)
Strands Agentsでは、A2AServerクラスのpublic_agent_cardプロパティでAgent Cardが自動生成され、AIエージェントが持つツール(tools)の情報から機能リストも自動的に抽出されます。
実際に試してみた
環境設定
今回はローカルでA2A対応のStrands Agentsを立ち上げます。
- Python 3.10以上
- Strands Agents SDK 1.0をインストール
pip install "strands-agents[a2a]" "strands-agents-tools[a2a]" - モデルプロバイダ:Amazon Bedrockでモデルの有効化が必要です。今回はAnthropicのモデルを使用します
- AWSの認証情報が必要
実装
A2Aプロトコル対応のStrands Agentsを立ち上げる
Strands Agentsではnameとdescriptionは必須パラメータです。どちらかが欠けているとValueErrorが発生します。
from strands import Agent
from strands.multiagent.a2a import A2AServer

agent1 = Agent(name="agent_1", description="Agent 1")
server = A2AServer(
    agent=agent1,
    port=9000
)
server.serve()
2つ目以降のAIエージェントを立ち上げる際は、port番号が重複しないよう注意しましょう。
from strands import Agent
from strands.multiagent.a2a import A2AServer

agent2 = Agent(name="agent_2", description="Agent 2")
server = A2AServer(
    agent=agent2,
    port=9001,
)
server.serve()
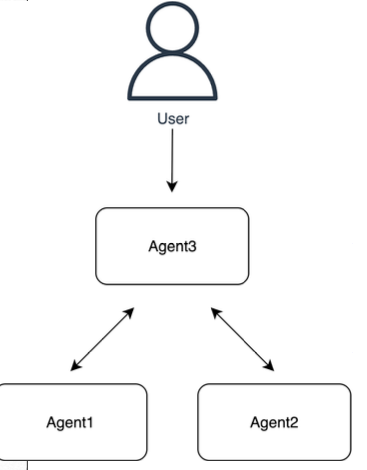
A2Aプロトコル対応のStrands Agentsを使ってAgent3からプロンプトを投げる
今回はA2A対応のエージェント名を取得するAgent3をローカルで実行させます。
from strands import Agent
from strands_tools.a2a_client import A2AClientToolProvider
import logging

logging.basicConfig(level=logging.INFO)

agent_urls = [
    "http://localhost:9000",  # Agent 1
    "http://localhost:9001"   # Agent 2
]

a2a_tool_provider = A2AClientToolProvider(known_agent_urls=agent_urls)

agent3 = Agent(tools=a2a_tool_provider.tools)

agent3("A2A Serverにあるすべてのエージェント名を教えて")
実行結果は以下の通りです。
発見済みのA2Aエージェントの一覧を取得します。
Tool #1: a2a_list_discovered_agents
INFO:strands_tools.a2a_client:A2ACardResolver created for http://localhost:9000
INFO:strands_tools.a2a_client:A2ACardResolver created for http://localhost:9001
INFO:httpx:HTTP Request: GET http://localhost:9001/.well-known/agent.json "HTTP/1.1 200 OK"
INFO:a2a.client.client:Successfully fetched agent card data from http://localhost:9001/.well-known/agent.json: {'capabilities': {'streaming': True}, 'defaultInputModes': ['text'], 'defaultOutputModes': ['text'], 'description': 'Agent 2', 'name': 'agent_2', 'protocolVersion': '0.2.6', 'skills': [], 'url': 'http://0.0.0.0:9001/', 'version': '0.0.1'}
INFO:strands_tools.a2a_client:Successfully discovered and cached agent card for http://localhost:9001
INFO:httpx:HTTP Request: GET http://localhost:9000/.well-known/agent.json "HTTP/1.1 200 OK"
INFO:a2a.client.client:Successfully fetched agent card data from http://localhost:9000/.well-known/agent.json: {'capabilities': {'streaming': True}, 'defaultInputModes': ['text'], 'defaultOutputModes': ['text'], 'description': 'Agent 1', 'name': 'agent_1', 'protocolVersion': '0.2.6', 'skills': [], 'url': 'http://0.0.0.0:9000/', 'version': '0.0.1'}
INFO:strands_tools.a2a_client:Successfully discovered and cached agent card for http://localhost:9000
A2Aサーバーにある発見済みエージェントは以下の2つです:

1. **agent_1** (Agent 1)
   - URL: http://0.0.0.0:9000/
   - 説明: Agent 1

2. **agent_2** (Agent 2)
   - URL: http://0.0.0.0:9001/
   - 説明: Agent 2
解説
1. A2AClientToolProviderでA2Aサーバーをツール化
A2AClientToolProvider は、ローカル/リモートで動作するA2Aサーバーを自動で“ツール”として生成し、まとめてAIエージェントに渡せるようにしてくれるクラスになります。
from strands_tools.a2a_client import A2AClientToolProvider

agent_urls = [
    "http://localhost:9000",  # Agent 1
    "http://localhost:9001",  # Agent 2
]

a2a_tool_provider = A2AClientToolProvider(known_agent_urls=agent_urls)
2. まとめたツールをエージェントに渡す
生成されたツール群を Agent の tools 引数にそのまま指定します。
from strands import Agent

agent3 = Agent(tools=a2a_tool_provider.tools)
これによって、Agent1と2のAIエージェントタスクがAgent3から指示できるようになります。
3. ユーザープロンプトを投げる
あとは通常どおりプロンプトでAIエージェントが実行されます。
agent3("A2A Serverにあるすべてのエージェント名を教えて")
4. 実行ログで挙動を確認
実行時ログを見ると、以下のように HTTP/1.1 200 OK が両エージェントから返り、Agent Card(名前・説明・機能など)が取得・キャッシュされていることが確認でき、エージェントの作業結果が出力されました。
最後に
今回はStrands AgentsでA2Aプロトコルを試してみました。数行のコードで異なるAIエージェント間の通信が簡単に実現できることがわかりました。A2Aプロトコルの導入により、AIエージェント間の連携が標準化され、マルチエージェントシステムの構築が簡素化されました。Amazon Bedrock AgentCoreを加え、本番運用を想定したマルチエージェントシステムの構築が容易になったのではないでしょうか。

Discussion