SingularityでQIIME2の実行環境を作成する
はじめに
前回の記事では、解析環境の保守性の高さと、構築した環境をコンテナファイルとしてHPC等に持ち込めるという移植性の高さに魅力を感じ、Singularityをインストールしました。
Singularityでソフトウェアを実行するには、.sif形式のコンテナファイルが必要です。
本記事では、例としてQIIME 2および関連ツールを対象に、Singularityの定義ファイル(.def)の作成から.sifファイルのビルドまでの手順を紹介します。
1. .defファイル
Singularity CEは、柔軟なカスタマイズが可能なコンテナ構築ツールであり、.defファイルにはベースとなるOSの指定やソフトウェアのインストール手順、環境変数、メタデータなど、さまざまな情報を記述できます。
.defファイルは主に「ヘッダー」と「セクション」の2つのパートから構成されます。
1.1 Header(ヘッダー)
ヘッダーでは、コンテナ構築に使用するベースOSの情報を定義します。
必須キーワードであるBootstrapは、定義ファイルの冒頭に記載します。これは、どのソースからベースイメージを取得するかを指定するための設定です。
代表的なBootstrapエージェントには以下のようなものがあります:
- library: Sylabs社の公式イメージレジストリ
- docker: Docker Hubなどから取得
- shub: Singularity Hub
- localimage: ローカルに保存されているイメージを利用
- yum: CentOSやScientific LinuxなどのYUMベースのシステム向け
今回は、DockerベースのUbuntu 22.04イメージを使用するため、以下のように指定します。
Bootstrap: docker
From: ubuntu:22.04
このようにすることで、特定のOS環境でしか動作しないツール(例:CentOS 7が必要な BCL Convert など)も、手元の異なる環境上で実行可能になります。
1.2 Section(セクション)
セクションでは、%に続けてセクション名を記述し、それぞれに対応する内容を記述します。
なお、セクションの記述順はBuildの実行順序に影響しませんが、実行順は以下の通りに定められています:
テンプレート変数のサポート
Singularity CE v4以降ではテンプレート変数のような記法が可能です。定義ファイル内に {{ 変数名 }} と記載し、Build時に --build-arg 変数名="値" を指定することで、柔軟なバージョン指定などが可能になります。
詳細は以下を参照してください:
%post
このセクションでは、ソフトウェアのインストールやディレクトリの作成、設定ファイルの編集など、コンテナ構築時の操作を記述します。
実行内容:
-
wgetやaptでのパッケージインストール - Condaのインストールと環境構築
- 仮想環境の作成とアクティベート
環境変数は基本的にホスト側の値を引き継ぎません。ビルド時に必要な変数があれば、テンプレート変数を用いて渡す必要があります。
%post
	apt update && apt upgrade -y
	apt install -y \
        wget

    mkdir -p /opt

    wget "https://github.com/conda-forge/miniforge/releases/latest/download/Miniforge3-$(uname)-$(uname -m).sh"
    bash Miniforge3-$(uname)-$(uname -m).sh -b -p /opt/miniforge3

    export MAMBA_ROOT_PREFIX="/opt/miniforge3"
    . ${MAMBA_ROOT_PREFIX}/etc/profile.d/conda.sh

    conda activate base
    conda update --yes --all

    mamba env create -n qiime2-amplicon-{{ qiime2_version }} --file https://raw.githubusercontent.com/qiime2/distributions/refs/heads/dev/{{ qiime2_version }}/amplicon/released/qiime2-amplicon-ubuntu-latest-conda.yml
    mamba activate qiime2-amplicon-{{ qiime2_version }}
%environment
このセクションでは、コンテナ実行時に有効となる環境変数を定義します。仮想環境のPATHを明示的に設定することで、常に同じ環境が有効になります。
%environment
    export PATH=/opt:/opt/miniforge3/bin:/opt/miniforge3/envs/qiime2-amplicon-{{ qiime2_version }}/bin:${PATH}
    export LC_ALL=C.UTF-8
    . /opt/miniforge3/etc/profile.d/conda.sh
    conda activate qiime2-amplicon-{{ qiime2_version }}
%labels
コンテナにメタ情報(ラベル)を付与できます。
%labels
    Author Author
    Build_date 2025.05.31
    Version v1.0
作成後、以下のコマンドで確認可能です:
singularity inspect my_container.sif
Author: Author
Build_date: 2025.05.31
Version: v1.0
org.label-schema.build-arch: amd64
org.label-schema.build-date: Saturday_31_May_2025_23:27:31_JST
org.label-schema.schema-version: 1.0
org.label-schema.usage: /.singularity.d/runscript.help
org.label-schema.usage.singularity.deffile.bootstrap: docker
org.label-schema.usage.singularity.deffile.from: ubuntu:22.04
org.label-schema.usage.singularity.runscript.help: /.singularity.d/runscript.help
org.label-schema.usage.singularity.version: 4.1.2
org.opencontainers.image.ref.name: ubuntu
org.opencontainers.image.version: 22.04
%help
singularity run-help 実行時に表示されるヘルプ文を記述します。
%help
    This container is for 16S amplicon sequence analysis using QIIME 2 version 2025.4.
次はコンテナをbuildする。
2. Singularityコンテナのビルド
ここまで紹介してきた.defファイルをまとめると以下のようになります:
Bootstrap: docker
From: ubuntu:22.04

%post
    apt update && apt upgrade -y
    apt install -y wget

    mkdir -p /opt

    wget "https://github.com/conda-forge/miniforge/releases/latest/download/Miniforge3-$(uname)-$(uname -m).sh"
    bash Miniforge3-$(uname)-$(uname -m).sh -b -p /opt/miniforge3

    . /opt/miniforge3/etc/profile.d/conda.sh
    export MAMBA_ROOT_PREFIX="/opt/miniforge3"

    conda activate base
    mamba env create -n qiime2-amplicon-{{ qiime2_version }} --file https://raw.githubusercontent.com/qiime2/distributions/refs/heads/dev/{{ qiime2_version }}/amplicon/released/qiime2-amplicon-ubuntu-latest-conda.yml
    conda clean -a

%environment
    export PATH=/opt:/opt/miniforge3/bin:/opt/miniforge3/envs/qiime2-amplicon-{{ qiime2_version }}/bin:${PATH}
    export LC_ALL=C.UTF-8
    . /opt/miniforge3/etc/profile.d/conda.sh
    conda activate qiime2-amplicon-{{ qiime2_version }}

%labels
    Author Author
    Build_date 2025.05.31
    Version v1.0

%help
    This container is for 16S amplicon sequence analysis using QIIME 2 version 2025.4.
上記の .def ファイルから Singularity コンテナをビルドするには、以下のように singularity build コマンドを実行します。
singularity build --fakeroot --build-arg qiime2_version="2025.4" qiime2-2025-4.sif qiime2-2025-4.def
よく使用する補助ツール用のコンテナ
QIIME2の解析と併用される周辺ツールをまとめた .def ファイルも以下に示します。後で使用するため、こちらもビルドしておきます。
Bootstrap: docker
From: ubuntu:22.04

%post
	apt update && apt upgrade -y
	apt install -y wget

    mkdir -p /opt

    wget "https://github.com/conda-forge/miniforge/releases/latest/download/Miniforge3-$(uname)-$(uname -m).sh"
    bash Miniforge3-$(uname)-$(uname -m).sh -b -p /opt/miniforge3

    . /opt/miniforge3/etc/profile.d/conda.sh
    export MAMBA_ROOT_PREFIX="/opt/miniforge3"

    conda activate base

    # Install informatics tools
    mamba create -n info-tools python=3.10 fastp=0.23.4 multiqc=1.21 seqkit=2.8.1 parallel aria2 pigz sra-tools=3.0 parallel-fastq-dump seqfu

%environment
    # Setting variable for run
    export PATH=/opt:/opt/miniforge3/bin:/opt/miniforge3/envs/info-tools/bin:${PATH}
    export LC_ALL=C.UTF-8

%labels
    Author Author
    Build_date 2025.05.31
    Version v2.0

%help
	This container provides common informatics tools for use with 16S amplicon sequence analysis using QIIME2 version 2025.4.
ビルドは以下のコマンドで実行します。
singularity build --fakeroot qiime2_othertools.sif qiime2_othertools.def
3. Qiime2を使った簡単なデータ解析
せっかくなので作成したコンテナを使って解析してみます。
以下の論文の 16S rRNA シーケンスデータを使用します。
メタデータをダウンロードし、Assay Type が "AMPLICON" の Accession 番号を抽出します。フィルタリング後のファイルはこちらからもダウンロードできるようにしておきました(SraRunTable.txt)。
3.1 配列データの取得
SraRunTable.txtのうち必要な情報をフィルタリングし、ファイルの1列目の2行目以降を抽出して、arrayとして`data_arrayに代入します。
Accession 番号は全部で 298 サンプルあり、そのまま全てをダウンロードすると SRA ファイルだけで約 2 GB になります。ストレージを節約したい場合は、shuf を使ってランダムにサンプルを選び、新しい配列として random_data_array を作成します。
# Accession Numnberのarray化
mapfile -t data_array < <(awk -F '[,]' 'NR > 1 {print $1}' "SraRunTable.txt")

# 元の配列からランダムに10個の要素を選択して新しい配列に代入する場合は以下を使う
# random_data_array=($(shuf -e "${data_array[@]}" -n 10))
次に、コンテナ内にあらかじめインストールされている parallel-fastq-dump と pigz を使用して、SRA 形式から Paired-End の fastq.gz ファイルを生成します。
# SRA用のフォルダ作成
mkdir 00sra

# sraファイルのダウンロード
for i in ${data_array[@]}; do
    singularity exec qiime2_othertools.sif aria2c \
    -x 16 \
    -ctrue \
    --dir=00sra \
    https://sra-pub-run-odp.s3.amazonaws.com/sra/${i}/${i}
done

# Fastqフォルダの作成
mkdir 00fq

# sra形式 -> fastq -> fastq.gz
printf "%s\n" "${data_array[@]}" | xargs -I {} -P 4 singularity exec qiime2_othertools.sif sh -c "
parallel-fastq-dump \
--sra-id 00sra/{} \
--threads 8 \
--outdir 00fq/ \
--split-files;

pigz -p 8 00fq/{}*fastq
"
Accession Numberをxargsに渡し、並列でコマンドを実行しています。
-
printf "%s\n" "${data_array[@]}"- 配列の要素を改行で区切って出力します。これにより、各行が xargs によって個別のコマンドとして扱われるます。
-
xargs -I {} -P 4- -I {} は置換文字列 {} を使用して、入力行をコマンドの任意の位置に挿入できるようにします。
- -P 4 は同時に実行するプロセスの最大数を4に設定します。この数はシステムのリソースに応じて調整可能です。
-
singularity exec qiime2_othertools.sif sh -c "...":- singularity exec でコンテナ内部でシェルコマンドを実行します。sh -c は複数のコマンドを含む一連のシェルコマンドを扱うために使用されます。
これでfastq.gzファイルが生成できました。
3.2 Manifestファイルの作成とQiime2へのデータのインポート
以降の手順はやや古い情報も含みますが、以下の記事を参考に進めていきます。
まずはじめにseqfuのmetadataオプションでManifestファイルを作成します。
singularity exec qiime2_othertools.sif \
seqfu metadata \
--format manifest \
-1 "_1" \
-2 "_2" \
--threads 32 \
00fq > Manifest.tsv
続いて、qiime tools importで解析対象のfastqファイル群をqza形式に変換します。--input-pathにはさきほど作成した、Fastqファイルまでのフルパスが記載されたManifestファイルを指定します。
--typeと--iput-formatはこちらを参考にして選択してください。
mkdir -p 01output/qza 01output/qzv log

singularity exec qiime2-2025-4.sif \
qiime tools import \
--type 'SampleData[PairedEndSequencesWithQuality]' \
--input-format PairedEndFastqManifestPhred33V2 \
--input-path Manifest.tsv \
--output-path 01output/qza/00demux.qza \
2>&1 | tee log/qiime_demux.log
3.3 DADA2によるデノイジング、エラー配列の修正
論文には、MiSeq による 250 bp ペアエンド(250PE)シーケンスが行われたと記載されています。しかし、編集前の SraRunTable.txt には、配列長が 600 bp との情報がありました。
そこで、Fastq ファイルを seqkit で確認したところ、R1 および R2 のいずれも配列長が 300 bp であることがわかりました。このことから、論文中の記載は誤りであり、実際には 300 bp ペアエンド(300PE)でシーケンスが実施されたと考えられます。
また、DADA2 の処理においては、pooling method に pseudo-pooling が使用されたと記載されていたため、--p-pooling-method オプションには pseudo を指定しました。
--p-pooling-method で選択可能なオプションには independent と pseudo があり、pseudo を選択すると実行時間は長くなるものの、検出感度が向上するとされています。
さらに、過去のissue において議論されているように、pooling method に pseudo を用いる場合、chimera-method も pooled に設定するのが望ましいとされています。ただし、これは将来的に実装が予定されている機能であり、現時点では未対応のため、今回はデフォルト設定のままとしました。
singularity exec qiime2-2025-4.sif \
qiime dada2 denoise-paired \
--i-demultiplexed-seqs ./01output/qza/00demux.qza \
--p-trim-left-f 0 \
--p-trim-left-r 0 \
--p-trunc-len-f 250 \
--p-trunc-len-r 180 \
--p-pooling-method pseudo \
--o-representative-sequences ./01output/qza/02rep-seqs-dada2_f250_r180.qza \
--o-table ./01output/qza/02table-dada2_f250_r180.qza \
--o-denoising-stats ./01output/qza/02stats-dada2_f250_r180.qza \
--p-n-threads 0 \
--verbose 2>&1 | tee log/qiime_dada2.log
3.4 read filtering
論文の情報に従いリード数でテーブルデータに対してフィルタリングを実施します。
singularity exec qiime2-2025-4.sif \
qiime feature-table filter-features \
--i-table 01output/qza/02table-dada2_f250_r180.qza \
--p-min-frequency 2500 \
--o-filtered-table 01output/qza/03frequency-filtered-table.qza
また、あわせてフィルタリング後に残った情報に対応する配列データを抽出します。この作業をしないとテーブルデータと齟齬が出ます。
singularity exec qiime2-2025-4.sif \
qiime feature-table filter-seqs \
--i-data 01output/qza/02rep-seqs-dada2_f250_r180.qza \
--i-table 01output/qza/03frequency-filtered-table.qza \
--o-filtered-data 01output/qza/03filtered-rep-seqs.qza
フィルタリング後のデータをqiimeのアーティファクトファイルから抽出したい場合は、tools exportで取得することが可能です。
singularity exec qiime2-2025-4.sif \
qiime tools export \
--input-path 01output/qza/02rep-seqs-dada2_f250_r180.qza \
--output-path 01output/other1/

singularity exec qiime2-2025-4.sif \
qiime tools export \
--input-path 01output/qza/03filtered-rep-seqs.qza \
--output-path 01output/other2/
seqkit statsで配列データのサマリーを取得してみます。
singularity exec qiime2_othertools.sif \
seqkit stats -a -T \
01output/other1/dna-sequences.fasta > 01output/other1/dna-sequences.tsv

singularity exec qiime2_othertools.sif \
seqkit stats -a -T \
01output/other2/dna-sequences.fasta > 01output/other2/dna-sequences.tsv
| format | type | num_seqs | sum_len | min_len | avg_len | max_len | Q1 | Q2 | Q3 | sum_gap | N50 | N50_num | Q20(%) | Q30(%) | AvgQual | GC(%) | |
|---|---|---|---|---|---|---|---|---|---|---|---|---|---|---|---|---|---|
| Before | FASTA | DNA | 1921 | 485669 | 250 | 252.8 | 255 | 253.0 | 253.0 | 253.0 | 0 | 253 | 3 | 0.00 | 0.00 | 0.00 | 52.74 |
| After | FASTA | DNA | 225 | 56894 | 252 | 252.9 | 254 | 253.0 | 253.0 | 253.0 | 0 | 253 | 2 | 0.00 | 0.00 | 0.00 | 52.83 |
フィルタリングにより配列数が大幅に減少したことが分かりますね。
3.5 α多様性の視覚化: レアファクションカーブの描画
多様度指数を算出して、まとめてレアファクションカーブを描画します。まずは、phylogeny align-to-tree-mafft-fasttreeで系統樹を作成します。
singularity exec qiime2-2025-4.sif \
qiime phylogeny align-to-tree-mafft-fasttree \
--i-sequences 01output/qza/03filtered-rep-seqs.qza \
--output-dir 01output/other/phylogeny-align-to-tree-mafft-fasttree
次に、有根系統樹を使って算出した多様度指数のレアファクションカーブを描画します。
singularity exec qiime2-2025-4.sif \
qiime diversity alpha-rarefaction \
--i-table 01output/qza/03frequency-filtered-table.qza \
--i-phylogeny 01output/other/phylogeny-align-to-tree-mafft-fasttree/rooted_tree.qza \
--m-metadata-file metadata.tsv \
--p-max-depth 20000 \
--o-visualization  01output/qzv/05alpha-rarefaction-plot.qzv \
--verbose 2>&1 | tee log/qiime_rarefaction.log

singularity exec qiime2-2025-4.sif \
qiime tools export \
--input-path 01output/qzv/05alpha-rarefaction-plot.qzv \
--output-path 01output/other/alpha-rarefaction-plot

observed_features, sample_setの表示
3.6 α多様性の視覚化: カテゴリごとのα多様性の比較
metadata.tsvで指定したカテゴリごとにα多様性を比較することが可能です。
core metricsの算出:
singularity exec qiime2-2025-4.sif \
qiime diversity core-metrics-phylogenetic \
--i-phylogeny 01output/other/phylogeny-align-to-tree-mafft-fasttree/rooted_tree.qza \
--i-table 01output/qza/03frequency-filtered-table.qza \
--p-sampling-depth 10000 \
--p-n-jobs-or-threads 32 \
--m-metadata-file metadata.tsv \
--output-dir 01output/other/diversity-core-metrics-phylogenetic \
--verbose 2>&1 | tee log/qiime_core-metrics-phylogenetic.log
Kruskal-Wallis検定によるグループ間の多用度の中央値の差の検定:
singularity exec qiime2-2025-4.sif \
qiime diversity alpha-group-significance \
--i-alpha-diversity 01output/other/diversity-core-metrics-phylogenetic/observed_features_vector.qza \
--m-metadata-file metadata.tsv \
--o-visualization 01output/qzv/06alpha-group-sig-obs-feats.qzv \
--verbose 2>&1  | tee log/qiime_alpha-group-significance.log

singularity exec qiime2-2025-4.sif \
qiime tools export \
--input-path 01output/qzv/06alpha-group-sig-obs-feats.qzv \
--output-path 01output/other/alpha-group-sig-obs-feats

カテゴリごとに確認されたASV数のbox plot

Kruskal-Wallis検定結果
3.7 β多様性解析: PERMANOVA
PERMANOVA は、群間の多変量的な差異を評価する統計手法です。細菌叢解析のように、多次元で構成されるデータ(例:微生物の相対存在量)では、「群間(例:健康 vs 病気)で細菌叢の構成が統計的に異なるか?」をといったことを評価するために用います。
通常の分散分析(ANOVA)は、平均の差を単変量で評価します。一方、PERMANOVA は、距離行列(例:Bray-Curtis 距離や UniFrac 距離など)に基づき、群間の分散の差を検定します。
つまり、PERMANOVA は「サンプル間の距離(多様性)」を使って、「群内のばらつきと群間のばらつき」を比較し、群間に有意な差があるかどうかを調べます。PERMANOVA は分布の仮定を必要とせず、「並び替え検定(permutation test)」で有意性を評価できるため群集解析で頻繁に使用されています。
comp_set=(host_sex sample_type)
for comp in ${comp_set[@]}; do
    singularity exec qiime2-2025-4.sif \
    qiime diversity beta-group-significance \
    --i-distance-matrix 01output/other/diversity-core-metrics-phylogenetic/unweighted_unifrac_distance_matrix.qza \
    --m-metadata-file metadata.tsv \
    --m-metadata-column ${comp} \
    --p-pairwise \
    --p-method 'permanova' \
    --o-visualization 01output/qzv/09uw_unifrac-${comp}-significance.qzv \
    --verbose

    singularity exec qiime2-2025-4.sif \
    qiime tools export \
    --input-path 01output/qzv/09uw_unifrac-${comp}-significance.qzv \
    --output-path 01output/other/uw_unifrac-${comp}-significance
done
for comp in ${comp_set[@]}; do
    singularity exec qiime2-2025-4.sif \
    qiime diversity beta-group-significance \
    --i-distance-matrix 01output/other/diversity-core-metrics-phylogenetic/weighted_unifrac_distance_matrix.qza \
    --m-metadata-file metadata.tsv \
    --m-metadata-column ${comp} \
    --p-pairwise \
    --p-method 'permanova' \
    --o-visualization 01output/qzv/09w_unifrac-${comp}-significance.qzv \
    --verbose

    singularity exec qiime2-2025-4.sif \
    qiime tools export \
    --input-path 01output/qzv/09w_unifrac-${comp}-significance.qzv \
    --output-path 01output/other/w_unifrac-${comp}-significance
done
PERMANOVA は「群間の違い」だけでなく、「群内の分散の違い(群内ばらつき)」にも敏感です。したがって、等分散性(homogeneity of dispersion) が崩れていると、誤検出(偽陽性)が起こることがあります。
この点を評価するには PERMDISP(permutational test for homogeneity of multivariate dispersions) が使われます。
comp_set=(host_sex sample_type)
for comp in ${comp_set[@]}; do
    singularity exec qiime2-2025-4.sif \
    qiime diversity beta-group-significance \
    --i-distance-matrix 01output/other/diversity-core-metrics-phylogenetic/unweighted_unifrac_distance_matrix.qza \
    --m-metadata-file metadata.tsv \
    --m-metadata-column ${comp} \
    --p-pairwise \
    --p-method 'permdisp' \
    --o-visualization 01output/qzv/09uw_unifrac-${comp}-significance_permdisp.qzv \
    --verbose

    singularity exec qiime2-2025-4.sif \
    qiime tools export \
    --input-path 01output/qzv/09uw_unifrac-${comp}-significance_permdisp.qzv \
    --output-path 01output/other/uw_unifrac-${comp}-significance_permdisp
done
for comp in ${comp_set[@]}; do
    singularity exec qiime2-2025-4.sif \
    qiime diversity beta-group-significance \
    --i-distance-matrix 01output/other/diversity-core-metrics-phylogenetic/weighted_unifrac_distance_matrix.qza \
    --m-metadata-file metadata.tsv \
    --m-metadata-column ${comp} \
    --p-pairwise \
    --p-method 'permdisp' \
    --o-visualization 01output/qzv/09w_unifrac-${comp}-significance_permdisp.qzv \
    --verbose

    singularity exec qiime2-2025-4.sif \
    qiime tools export \
    --input-path 01output/qzv/09w_unifrac-${comp}-significance_permdisp.qzv \
    --output-path 01output/other/w_unifrac-${comp}-significance_permdisp
done

左: PERMDISP, 右: PERMANOVA, カテゴリ: Sample_type
PERMANOVAとPERMDISPはセットで使われることが多いです。結果の捉え方については、以下の和文が参考になります。
3.8 β多様性の視覚化: PCoA (主座標分析)
PCoAはデータセット内のオブジェクト間の距離を視覚化するために使用されます。一般的にBray-Cutis, Jaccardなどの距離指数の行列データから作成します。
下記スクリプトでは、--p-metricで指定できる値をloopで指定して、qiime2で指定可能なすべての距離指数の結果を取得できるようにしています。
# 指定できるmetricsについてすべてのplotを生成
metrics_array=(aitchison braycurtis canberra canberra_adkins chebyshev cityblock correlation cosine dice euclidean generalized_unifrac hamming jaccard jensenshannon kulsinski matching minkowski rogerstanimoto russellrao seuclidean sokalmichener sokalsneath sqeuclidean unweighted_unifrac weighted_normalized_unifrac weighted_unifrac yule)

for met in ${metrics_array[@]};do
    singularity exec qiime2-2025-4.sif \
    qiime diversity beta-rarefaction \
    --i-table 01output/qza/03frequency-filtered-table.qza \
    --p-metric ${met} \
    --p-clustering-method nj \
    --p-sampling-depth 15000 \
    --m-metadata-file metadata.tsv \
    --o-visualization 01output/qzv/07${met}-rarefaction-plot.qzv \
    --verbose 2>&1 | tee log/qiime_beta-rarefaction_${met}.log

    singularity exec qiime2-2025-4.sif \
    qiime tools export \
    --input-path 01output/qzv/07${met}-rarefaction-plot.qzv \
    --output-path 01output/other/${met}-rarefaction-plot
done
unweighted_unifrac, weighted_unifrac, jaccard, bray_curtisのhtmlファイルの作成:
singularity exec qiime2-2025-4.sif \
qiime tools export \
--input-path 01output/other/diversity-core-metrics-phylogenetic/unweighted_unifrac_emperor.qzv \
--output-path 01output/other/unweighted_unifrac_emperor

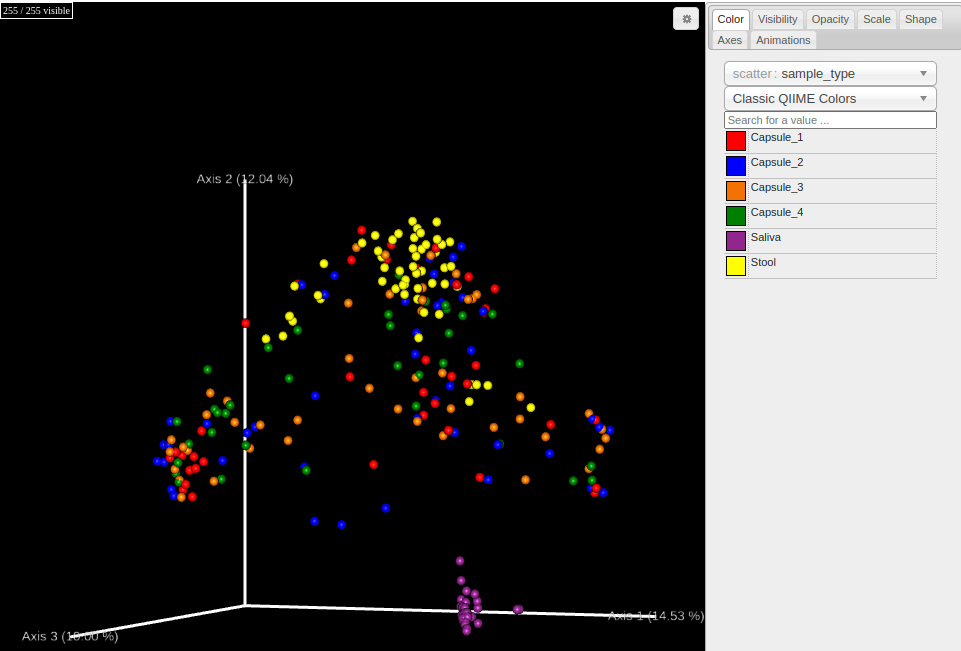
unweighted_unifrac_emperor
singularity exec qiime2-2025-4.sif \
qiime tools export \
--input-path 01output/other/diversity-core-metrics-phylogenetic/weighted_unifrac_emperor.qzv \
--output-path 01output/other/weighted_unifrac_emperor

weighted_unifrac_emperor
singularity exec qiime2-2025-4.sif \
qiime tools export \
--input-path 01output/other/diversity-core-metrics-phylogenetic/jaccard_emperor.qzv \
--output-path 01output/other/jaccard_emperor

jaccard_emperor
singularity exec qiime2-2025-4.sif \
qiime tools export \
--input-path 01output/other/diversity-core-metrics-phylogenetic/bray_curtis_emperor.qzv \
--output-path 01output/other/bray_curtis_emperor
bray_curtis_emperor
選択する指数によって、PCoAの結果が変わっていることがわかります。weighted unifrac distanceはリードボリュームの情報も加味した距離指標になります。それ以外は確か0/1データに対する距離計算で求められる指標のはずです。
3.9 系統分類
qiime2 2025.4のq2-feature-classifierで可能な事前学習済の分類器とSilva 138.2の99%未クラスタリング・配列長フィルタリングされていないデータベースより作成した分類器を使用します。
rescriptを用いた分類機の作成
まず、qiime rescriptを使用して、Silva 138.2のデータベースファイルをダウンロードします。
singularity exec qiime2-2025-4.sif \
qiime rescript get-silva-data \
  --p-version '138.2' \
  --p-target 'SSURef_NR99' \
  --p-include-species-labels \
  --o-silva-sequences 00ref/silva-138.2-ssu-rna-seqs.qza \
  --o-silva-taxonomy 00ref/silva-138.2-ssu-tax.qza
  --verbose
データタイプがFeatureData[RNASequence]なのでFeatureData[Sequence]に変換します。
singularity exec qiime2-2025-4.sif \
qiime rescript reverse-transcribe \
  --i-rna-sequences 00ref/silva-138.2-ssu-rna-seqs.qza \
  --o-dna-sequences 00ref/silva-138.2-ssu-seqs.qza
5塩基以上縮合塩基(IUPAC標準)を含む配列、と8塩基以上のホモポリマーを持つ配列を削除します。
singularity exec qiime2-2025-4.sif \
qiime rescript cull-seqs \
  --i-sequences 00ref/silva-138.2-ssu-seqs.qza \
  --o-clean-sequences 00ref/silva-138.2-ssu-seqs-cleaned.qza
次に異なる分類結果を持つ同一シーケンスの重複を削除します。
singularity exec qiime2-2025-4.sif \
qiime rescript dereplicate \
  --i-sequences 00ref/silva-138.2-ssu-seqs-cleaned.qza \
  --i-taxa 00ref/silva-138.2-ssu-tax.qza \
  --p-mode 'uniq' \
  --o-dereplicated-sequences 00ref/silva-138.2-ssu-seqs-derep-uniq.qza \
  --o-dereplicated-taxa 00ref/silva-138.2-ssu-tax-derep-uniq.qza
最後に分類器を作成します。
singularity exec qiime2-2025-4.sif \
qiime feature-classifier fit-classifier-naive-bayes \
  --i-reference-reads 00ref/silva-138.2-ssu-seqs-derep-uniq.qza \
  --i-reference-taxonomy 00ref/silva-138.2-ssu-tax-derep-uniq.qza \
  --o-classifier 00ref/silva_138.2-nb-classifier.qza \
  --verbose
これでSilva 138.2の未クラスタリング、配列長フィルタリング分類器が取得できました。
事前に用意された分類器ファイルの取得
- Silva 138 99% OTUs full-length squences
- GTDB r220 full-length sequences
- Greengenes2 2024.09 full length sequences
上記URLの情報より、事前作成済の各分類器ファイルをダウンロードします。
singularity exec qiime2_othertools.sif \
aria2c -x 16 -ctrue https://data.qiime2.org/classifiers/sklearn-1.4.2/silva/silva-138-99-nb-classifier.qza -d 00ref/
singularity exec qiime2_othertools.sif \
aria2c -x 16 -ctrue https://data.qiime2.org/classifiers/sklearn-1.4.2/gtdb/gtdb_classifier_r220.qza -d 00ref/
singularity exec qiime2_othertools.sif \
aria2c -x 16 -ctrue https://data.qiime2.org/classifiers/sklearn-1.4.2/greengenes2/2024.09.backbone.full-length.nb.sklearn-1.4.2.qza -d 00ref/
feature-classifier classify-sklearnによる系統分類
次にfeature-classifier classify-sklearnで系統分類を実行します。
singularity exec qiime2-2025-4.sif \
qiime feature-classifier classify-sklearn \
--i-classifier 00ref/silva-138-99-nb-classifier.qza \
--i-reads 01output/qza/03filtered-rep-seqs.qza \
--o-classification 01output/qza/04taxonomy_silva_138_99.qza \
--p-n-jobs 10 \
--verbose 2>&1 | tee log/qiime_taxonomy-from-table_silva_138_99-sklearn.log
singularity exec qiime2-2025-4.sif \
qiime feature-classifier classify-sklearn \
--i-classifier 00ref/gtdb_classifier_r220.qza \
--i-reads 01output/qza/03filtered-rep-seqs.qza \
--o-classification 01output/qza/04taxonomy_gtdb_r220.qza \
--p-n-jobs 10 \
--verbose 2>&1 | tee log/qiime_taxonomy-from-table_gtdb_r220-sklearn.log
singularity exec qiime2-2025-4.sif \
qiime feature-classifier classify-sklearn \
--i-classifier 00ref/2024.09.backbone.full-length.nb.sklearn-1.4.2.qza \
--i-reads 01output/qza/03filtered-rep-seqs.qza \
--o-classification 01output/qza/04taxonomy_greengenes2_2024.09.qza \
--p-n-jobs 10 \
--verbose 2>&1 | tee log/qiime_taxonomy-from-table_greengenes2_2024.09-sklearn.log
singularity exec qiime2-2025-4.sif \
qiime feature-classifier classify-sklearn \
--i-classifier 00ref/silva_138.2-nb-classifier.qza \
--i-reads 01output/qza/03filtered-rep-seqs.qza \
--o-classification 01output/qza/04taxonomy_silva_138.2.qza \
--p-n-jobs 10 \
--verbose 2>&1 | tee log/qiime_taxonomy-from-table_silva_138.2-sklearn.log
10job指定でSlivaはRAMを最大20GB程度、GTDBは最大60GB程度、Greengenes2は最大40GB程度使用していることが確認できました。もし、使用するRAMを減らす場合は、--p-n-jobsの値を減らしてください。
3.10 Barplotの描画
SraRunTable.txtの情報を整理して適切な形式に変換したmetadata.tsvをメタデータファイルとして与えてBarplotを描画します。
metadata.tsvは以下を参照して下さい。
singularity exec qiime2-2025-4.sif \
qiime taxa barplot \
--i-table 01output/qza/03frequency-filtered-table.qza \
--i-taxonomy 01output/qza/04taxonomy_silva_138_99.qza \
--m-metadata-file metadata.tsv \
--o-visualization 01output/qzv/silva_138_99-taxa-bar-plots.qzv

singularity exec qiime2-2025-4.sif \
qiime tools export \
--input-path 01output/qzv/silva_138_99-taxa-bar-plots.qzv \
--output-path 01output/other/silva_138_99-taxa-bar-plots

Level6: Genusでsample typeごとに並び替えたSilva 138 99% OTUs full-length squencesのbarplot
singularity exec qiime2-2025-4.sif \
qiime taxa barplot \
--i-table 01output/qza/03frequency-filtered-table.qza \
--i-taxonomy 01output/qza/04taxonomy_silva_138.2.qza \
--m-metadata-file metadata.tsv \
--o-visualization 01output/qzv/silva_138-taxa-bar-plots.qzv

singularity exec qiime2-2025-4.sif \
qiime tools export \
--input-path 01output/qzv/silva_138-taxa-bar-plots.qzv \
--output-path 01output/other/silva_138-taxa-bar-plots

Level6: Genusでsample typeごとに並び替えたSilva 138.2のbarplot
※ 分類器として提供されているSilva 138 NR99とLevel7の種のレベルで見てもそこまで大きく変わりませんでした。
singularity exec qiime2-2025-4.sif \
qiime taxa barplot \
--i-table 01output/qza/03frequency-filtered-table.qza \
--i-taxonomy 01output/qza/04taxonomy_gtdb_r220.qza \
--m-metadata-file metadata.tsv \
--o-visualization 01output/qzv/gtdb_r220-taxa-bar-plots.qzv

singularity exec qiime2-2025-4.sif \
qiime tools export \
--input-path 01output/qzv/gtdb_r220-taxa-bar-plots.qzv \
--output-path 01output/other/gtdb_r220-taxa-bar-plots

Level6: Genusでsample typeごとに並び替えたGTDB r220のbarplot
singularity exec qiime2-2025-4.sif \
qiime taxa barplot \
--i-table 01output/qza/03frequency-filtered-table.qza \
--i-taxonomy 01output/qza/04taxonomy_greengenes2_2024.09.qza \
--m-metadata-file metadata.tsv \
--o-visualization 01output/qzv/greengenes2_2024.09-taxa-bar-plots.qzv

singularity exec qiime2-2025-4.sif \
qiime tools export \
--input-path 01output/qzv/greengenes2_2024.09-taxa-bar-plots.qzv \
--output-path 01output/other/greengenes2_2024.09-taxa-bar-plots

Level6: Genusでsample typeごとに並び替えたGreengenes2 2024.09のbarplot
3.11 ANCOM-BCによる差分検定
ANCOM-BC(Analysis of Composition of Microbiomes with Bias Correction)は、微生物群集の組成データにおける差分解析のための統計手法です。主に16S rRNAシーケンシングやメタゲノム解析などで得られる相対的な存在量(relative abundance)データから、特定の分類群が群間で有意に変化しているかどうかを評価します。
使いどころとしては以下のようなものがあります。
- 健常者と疾患群で特定の微生物が増減しているかを調べたい
- 食事・薬剤・環境の影響で腸内細菌叢がどう変わったかを評価したい
類似手法との比較
| 手法 | 特徴 |
|---|---|
| DESeq2 | RNA-seq向け、構成比データ非対応 |
| edgeR | 同上 |
| ANCOM | ANCOM-BCの前身。保守的 |
| ALDEx2 | ベイズ的アプローチ |
| ANCOM-BC | 最もバイアス補正に優れ、感度も高い |
今回、metadata.tsvで設定した比較カテゴリのうち、性別を区別したsample_typeでANCOM-BCを実行します。また、分類階級はSilvaを使って系統分類した結果の属レベルとします。
singularity exec qiime2-2025-4.sif \
qiime taxa collapse \
  --i-table 01output/qza/03frequency-filtered-table.qza \
  --i-taxonomy 01output/qza/04taxonomy_silva_138_99.qza \
  --p-level 6 \
  --o-collapsed-table 01output/qza/03frequency-filtered-table-l6.qza

singularity exec qiime2-2025-4.sif \
qiime feature-table filter-samples \
--i-table 01output/qza/03frequency-filtered-table-l6.qza \
--m-metadata-file metadata.tsv \
--p-where "[host_sex] = 'female'" \
--o-filtered-table 01output/qza/03frequency-filtered-table-l6-female.qza \
--verbose

singularity exec qiime2-2025-4.sif \
qiime feature-table filter-samples \
--i-table 01output/qza/03frequency-filtered-table-l6.qza \
--m-metadata-file metadata.tsv \
--p-where "[host_sex] = 'male'" \
--o-filtered-table 01output/qza/03frequency-filtered-table-l6-male.qza \
--verbose
sex_set=(female male)
comp_set=(sample_type)
for sex in ${sex_set[@]}; do
    for comp in ${comp_set[@]}; do
        singularity exec qiime2-2025-4.sif \
        qiime composition ancombc \
        --i-table 01output/qza/03frequency-filtered-table-l6-${sex}.qza \
        --m-metadata-file metadata.tsv \
        --p-formula ${comp} \
        --o-differentials 01output/qza/ancombc-${sex}-${comp}.qza

        singularity exec qiime2-2025-4.sif \
        qiime composition da-barplot \
        --i-data 01output/qza/ancombc-${sex}-${comp}.qza \
        --p-significance-threshold 0.001 \
        --o-visualization 01output/qzv/ancom-bc-${comp}-${sex}.qzv \
        --verbose

        singularity exec qiime2-2025-4.sif \
        qiime tools export \
        --input-path 01output/qzv/ancom-bc-${comp}-${sex}.qzv \
        --output-path 01output/other/ancom-bc-${comp}-${sex}
    done
done

SalivaサンプルのANCOM-BCの結果

StoolサンプルのANCOM-BCの結果
最後に
今回でsingularityコンテナの作成とそれを使った解析が出来るようなりました。解析環境の再現性や保守性、移行の簡易さはデータ解析には重要な要素です。例えば、defファイルをgithubで管理することで、再現可能な環境構築方法が示されたファイルのバージョン管理が可能です。また、ビルドしたsifファイルは移動可能なので、別PCやスパコンへ環境をそのまま移行することで、すぐに解析ができるようになります。
また、qiime2も年々更新されて知らないプラグインが増えてきました。この記事では簡単にqiime2の解析を実施しましたが、はじめは以下のプロトコル論文などを参考に進めるのがいいと思います。
次は、workflow言語としてNextflowでも触ろうかな。
↓
触り始めました。
出典
- https://docs.sylabs.io/guides/4.1/user-guide/definition_files.html#templating-how-to-pass-values-into-definition-files
- https://geniac.readthedocs.io/en/latest/conda.html
- https://telatin.github.io/singularities/containers/qiime.html
- https://github.com/apptainer/singularity
- https://github.com/sylabs/singularity
- https://github.com/jianhong/16S_pipeline/blob/main/singularity.def
- https://bioinformatics.ccr.cancer.gov/docs/qiime2/Lesson5/
- https://bioinformatics.ccr.cancer.gov/docs/qiime2/Lesson6/
- https://currentprotocols.onlinelibrary.wiley.com/doi/10.1002/cpbi.100
- https://www.jstage.jst.go.jp/article/seitai/66/1/66_1/_pdf
- https://www.arb-silva.de/no_cache/download/archive/release_138.2/Exports
- https://forum.qiime2.org/t/processing-filtering-and-evaluating-the-silva-database-and-other-reference-sequence-data-with-rescript/15494
Discussion