小ネタ : parallelにfastpを実行する

fastpを使っていて思ったのは、スレッド数を指定する-wオプションに最大の16を与えていたとしても、実行中のCPU%を見てみると500 ~ 1000%くらいしか使っていません。
余っている部分をジョブ間で共有できるかは置いておいても、1 ジョブで要は5~10スレッドしか使っていないようです。となると、例えば32スレッドのPCを使っているのでああれば、
こうではなくて
こんな感じにすることで、処理できるサンプル数を1stepごとに3倍かそれ以上にできるのではないかと思いました。
環境依存はあるとしても、逐次実行ではなく並列実行で早くなるのであればするに越したことはありません。
どれくらい詰めて実行してもスピードが落ちないのか比較してみました。
環境
自作PC1を使います。1TBのHDDにあるRaw fastqをfastpで解析して、4TB M.2 SSDに書き出します(多分書き込まれる側に律速は出ていないはず)。
使用するRaw fastqファイルは以下の研究のデータを150サンプル分、適当にダウンロードして使用しました。
16sのデータとショットガンのデータが混ざっています。00fqフォルダにfastqファイルを配置しておきます。
fastp
mamba install -c bioconda fastp -y
バージョンは0.23.4を使用しています。
USAGE fastp
usage: fastp [options] ...
options:
  -i, --in1                            read1 input file name (string [=])
  -o, --out1                           read1 output file name (string [=])
  -I, --in2                            read2 input file name (string [=])
  -O, --out2                           read2 output file name (string [=])
      --unpaired1                      for PE input, if read1 passed QC but read2 not, it will be written to unpaired1. Default is to discard it. (string [=])
      --unpaired2                      for PE input, if read2 passed QC but read1 not, it will be written to unpaired2. If --unpaired2 is same as --unpaired1 (default mode), both unpaired reads will be written to this same file. (string [=])
      --overlapped_out                 for each read pair, output the overlapped region if it has no any mismatched base. (string [=])
      --failed_out                     specify the file to store reads that cannot pass the filters. (string [=])
  -m, --merge                          for paired-end input, merge each pair of reads into a single read if they are overlapped. The merged reads will be written to the file given by --merged_out, the unmerged reads will be written to the files specified by --out1 and --out2. The merging mode is disabled by default.
      --merged_out                     in the merging mode, specify the file name to store merged output, or specify --stdout to stream the merged output (string [=])
      --include_unmerged               in the merging mode, write the unmerged or unpaired reads to the file specified by --merge. Disabled by default.
  -6, --phred64                        indicate the input is using phred64 scoring (it'll be converted to phred33, so the output will still be phred33)
  -z, --compression                    compression level for gzip output (1 ~ 9). 1 is fastest, 9 is smallest, default is 4. (int [=4])
      --stdin                          input from STDIN. If the STDIN is interleaved paired-end FASTQ, please also add --interleaved_in.
      --stdout                         stream passing-filters reads to STDOUT. This option will result in interleaved FASTQ output for paired-end output. Disabled by default.
      --interleaved_in                 indicate that <in1> is an interleaved FASTQ which contains both read1 and read2. Disabled by default.
      --reads_to_process               specify how many reads/pairs to be processed. Default 0 means process all reads. (int [=0])
      --dont_overwrite                 don't overwrite existing files. Overwritting is allowed by default.
      --fix_mgi_id                     the MGI FASTQ ID format is not compatible with many BAM operation tools, enable this option to fix it.
  -V, --verbose                        output verbose log information (i.e. when every 1M reads are processed).
  -A, --disable_adapter_trimming       adapter trimming is enabled by default. If this option is specified, adapter trimming is disabled
  -a, --adapter_sequence               the adapter for read1. For SE data, if not specified, the adapter will be auto-detected. For PE data, this is used if R1/R2 are found not overlapped. (string [=auto])
      --adapter_sequence_r2            the adapter for read2 (PE data only). This is used if R1/R2 are found not overlapped. If not specified, it will be the same as <adapter_sequence> (string [=auto])
      --adapter_fasta                  specify a FASTA file to trim both read1 and read2 (if PE) by all the sequences in this FASTA file (string [=])
      --detect_adapter_for_pe          by default, the auto-detection for adapter is for SE data input only, turn on this option to enable it for PE data.
  -f, --trim_front1                    trimming how many bases in front for read1, default is 0 (int [=0])
  -t, --trim_tail1                     trimming how many bases in tail for read1, default is 0 (int [=0])
  -b, --max_len1                       if read1 is longer than max_len1, then trim read1 at its tail to make it as long as max_len1. Default 0 means no limitation (int [=0])
  -F, --trim_front2                    trimming how many bases in front for read2. If it's not specified, it will follow read1's settings (int [=0])
  -T, --trim_tail2                     trimming how many bases in tail for read2. If it's not specified, it will follow read1's settings (int [=0])
  -B, --max_len2                       if read2 is longer than max_len2, then trim read2 at its tail to make it as long as max_len2. Default 0 means no limitation. If it's not specified, it will follow read1's settings (int [=0])
  -D, --dedup                          enable deduplication to drop the duplicated reads/pairs
      --dup_calc_accuracy              accuracy level to calculate duplication (1~6), higher level uses more memory (1G, 2G, 4G, 8G, 16G, 24G). Default 1 for no-dedup mode, and 3 for dedup mode. (int [=0])
      --dont_eval_duplication          don't evaluate duplication rate to save time and use less memory.
  -g, --trim_poly_g                    force polyG tail trimming, by default trimming is automatically enabled for Illumina NextSeq/NovaSeq data
      --poly_g_min_len                 the minimum length to detect polyG in the read tail. 10 by default. (int [=10])
  -G, --disable_trim_poly_g            disable polyG tail trimming, by default trimming is automatically enabled for Illumina NextSeq/NovaSeq data
  -x, --trim_poly_x                    enable polyX trimming in 3' ends.
      --poly_x_min_len                 the minimum length to detect polyX in the read tail. 10 by default. (int [=10])
  -5, --cut_front                      move a sliding window from front (5') to tail, drop the bases in the window if its mean quality < threshold, stop otherwise.
  -3, --cut_tail                       move a sliding window from tail (3') to front, drop the bases in the window if its mean quality < threshold, stop otherwise.
  -r, --cut_right                      move a sliding window from front to tail, if meet one window with mean quality < threshold, drop the bases in the window and the right part, and then stop.
  -W, --cut_window_size                the window size option shared by cut_front, cut_tail or cut_sliding. Range: 1~1000, default: 4 (int [=4])
  -M, --cut_mean_quality               the mean quality requirement option shared by cut_front, cut_tail or cut_sliding. Range: 1~36 default: 20 (Q20) (int [=20])
      --cut_front_window_size          the window size option of cut_front, default to cut_window_size if not specified (int [=4])
      --cut_front_mean_quality         the mean quality requirement option for cut_front, default to cut_mean_quality if not specified (int [=20])
      --cut_tail_window_size           the window size option of cut_tail, default to cut_window_size if not specified (int [=4])
      --cut_tail_mean_quality          the mean quality requirement option for cut_tail, default to cut_mean_quality if not specified (int [=20])
      --cut_right_window_size          the window size option of cut_right, default to cut_window_size if not specified (int [=4])
      --cut_right_mean_quality         the mean quality requirement option for cut_right, default to cut_mean_quality if not specified (int [=20])
  -Q, --disable_quality_filtering      quality filtering is enabled by default. If this option is specified, quality filtering is disabled
  -q, --qualified_quality_phred        the quality value that a base is qualified. Default 15 means phred quality >=Q15 is qualified. (int [=15])
  -u, --unqualified_percent_limit      how many percents of bases are allowed to be unqualified (0~100). Default 40 means 40% (int [=40])
  -n, --n_base_limit                   if one read's number of N base is >n_base_limit, then this read/pair is discarded. Default is 5 (int [=5])
  -e, --average_qual                   if one read's average quality score <avg_qual, then this read/pair is discarded. Default 0 means no requirement (int [=0])
  -L, --disable_length_filtering       length filtering is enabled by default. If this option is specified, length filtering is disabled
  -l, --length_required                reads shorter than length_required will be discarded, default is 15. (int [=15])
      --length_limit                   reads longer than length_limit will be discarded, default 0 means no limitation. (int [=0])
  -y, --low_complexity_filter          enable low complexity filter. The complexity is defined as the percentage of base that is different from its next base (base[i] != base[i+1]).
  -Y, --complexity_threshold           the threshold for low complexity filter (0~100). Default is 30, which means 30% complexity is required. (int [=30])
      --filter_by_index1               specify a file contains a list of barcodes of index1 to be filtered out, one barcode per line (string [=])
      --filter_by_index2               specify a file contains a list of barcodes of index2 to be filtered out, one barcode per line (string [=])
      --filter_by_index_threshold      the allowed difference of index barcode for index filtering, default 0 means completely identical. (int [=0])
  -c, --correction                     enable base correction in overlapped regions (only for PE data), default is disabled
      --overlap_len_require            the minimum length to detect overlapped region of PE reads. This will affect overlap analysis based PE merge, adapter trimming and correction. 30 by default. (int [=30])
      --overlap_diff_limit             the maximum number of mismatched bases to detect overlapped region of PE reads. This will affect overlap analysis based PE merge, adapter trimming and correction. 5 by default. (int [=5])
      --overlap_diff_percent_limit     the maximum percentage of mismatched bases to detect overlapped region of PE reads. This will affect overlap analysis based PE merge, adapter trimming and correction. Default 20 means 20%. (int [=20])
  -U, --umi                            enable unique molecular identifier (UMI) preprocessing
      --umi_loc                        specify the location of UMI, can be (index1/index2/read1/read2/per_index/per_read, default is none (string [=])
      --umi_len                        if the UMI is in read1/read2, its length should be provided (int [=0])
      --umi_prefix                     if specified, an underline will be used to connect prefix and UMI (i.e. prefix=UMI, UMI=AATTCG, final=UMI_AATTCG). No prefix by default (string [=])
      --umi_skip                       if the UMI is in read1/read2, fastp can skip several bases following UMI, default is 0 (int [=0])
      --umi_delim                      delimiter to use between the read name and the UMI, default is : (string [=:])
  -p, --overrepresentation_analysis    enable overrepresented sequence analysis.
  -P, --overrepresentation_sampling    one in (--overrepresentation_sampling) reads will be computed for overrepresentation analysis (1~10000), smaller is slower, default is 20. (int [=20])
  -j, --json                           the json format report file name (string [=fastp.json])
  -h, --html                           the html format report file name (string [=fastp.html])
  -R, --report_title                   should be quoted with ' or ", default is "fastp report" (string [=fastp report])
  -w, --thread                         workerスレッド number, default is 3 (int [=3])
  -s, --split                          split output by limiting total split file number with this option (2~999), a sequential number prefix will be added to output name ( 0001.out.fq, 0002.out.fq...), disabled by default (int [=0])
  -S, --split_by_lines                 split output by limiting lines of each file with this option(>=1000), a sequential number prefix will be added to output name ( 0001.out.fq, 0002.out.fq...), disabled by default (long [=0])
  -d, --split_prefix_digits            the digits for the sequential number padding (1~10), default is 4, so the filename will be padded as 0001.xxx, 0 to disable padding (int [=4])
      --cut_by_quality5                DEPRECATED, use --cut_front instead.
      --cut_by_quality3                DEPRECATED, use --cut_tail instead.
      --cut_by_quality_aggressive      DEPRECATED, use --cut_right instead.
      --discard_unmerged               DEPRECATED, no effect now, see the introduction for merging.
GNU parallel
並列実行するならGNU parallelかxargsを使うことが多いと思いますが、私はGNU parallelをよく利用しているので、今回はこちらを使用します。
mamba install conda-forge::parallel
USAGE parallel
Usage:

parallel [options] [command [arguments]] < list_of_arguments
parallel [options] [command [arguments]] (::: arguments|:::: argfile(s))...
cat ... | parallel --pipe [options] [command [arguments]]

-j n            Run n jobs in parallel
-k              Keep same order
-X              Multiple arguments with context replace
--colsep regexp Split input on regexp for positional replacements
{} {.} {/} {/.} {#} {%} {= perl code =} Replacement strings
{3} {3.} {3/} {3/.} {=3 perl code =}    Positional replacement strings
With --plus:    {} = {+/}/{/} = {.}.{+.} = {+/}/{/.}.{+.} = {..}.{+..} =
                {+/}/{/..}.{+..} = {...}.{+...} = {+/}/{/...}.{+...}

-S sshlogin     Example: foo@server.example.com
--slf ..        Use ~/.parallel/sshloginfile as the list of sshlogins
--trc {}.bar    Shorthand for --transfer --return {}.bar --cleanup
--onall         Run the given command with argument on all sshlogins
--nonall        Run the given command with no arguments on all sshlogins

--pipe          Split stdin (standard input) to multiple jobs.
--recend str    Record end separator for --pipe.
--recstart str  Record start separator for --pipe.

GNU Parallel can do much more. See 'man parallel' for details

Academic tradition requires you to cite works you base your article on.
If you use programs that use GNU Parallel to process data for an article in a
scientific publication, please cite:

  Tange, O. (2023, January 22). GNU Parallel 20230122 ('Bolsonaristas').
  Zenodo. https://doi.org/10.5281/zenodo.7558957

This helps funding further development; AND IT WON'T COST YOU A CENT.
If you pay 10000 EUR you should feel free to use GNU Parallel without citing.
fastpの実行
base_path=$PWD # 00fqがあるディレクトリを指定
fq_folder='00fq'
fastp_fq_output='00fastp_fq'
fastp_html_output='00fastp_html'
fastp_json_output='00fastp_json'

# フォルダの作成
mkdir -p $fastp_fq_output $fastp_html_output $fastp_json_output log

# ファイル名の取得
eval array_R1=($(ls $base_path/$fq_folder/*_1.fastq.gz --quoting-style=shell))
# fastq file name array
array_tmp=("${array_R1[@]/_1.fastq.gz/}")
array=("${array_tmp[@]//${base_path}\/${fq_folder}\//}")
num_jobsパラメーターで並列実行数を指定できるようにしました。これを1,2,3,10と変えてtotalの実行時間などの数値情報をlogファイルから取得していきます。
fastpの-w オプションに16を与えています。
# Set the number of parallel jobs (adjust as needed)
num_jobs=3

process_sample() {
    fq_name=$1
    path1=$2
    path2=$3
    path3=$4
    path4=$5
    echo "Processing sample: ${fq_name}"

    fastp \
    --in1 ${path1}/${fq_name}_1.fastq.gz \
    --in2 ${path1}/${fq_name}_2.fastq.gz \
    --out1 ${path2}/${fq_name}_1.fastq.gz \
    --out2 ${path2}/${fq_name}_2.fastq.gz \
    --html ${path3}/${fq_name}_report.html \
    --json ${path4}/${fq_name}_report.json \
    --qualified_quality_phred 30 \
    --length_required 50 \
    --detect_adapter_for_pe \
    --trim_poly_g \
    --cut_tail  \
    --thread 16 \
    2>&1 | tee log/${fq_name}_fastp.log

    echo "Finished processing sample: ${fq_name}"
}

# Export the function for parallel execution
export -f process_sample

# Run fastp for each sample in parallel
parallel -j $num_jobs process_sample \
::: "${array[@]}" \
::: "${base_path}/${fq_folder}" \
::: "${fastp_fq_output}" \
::: "${fastp_html_output}" \
::: "${fastp_json_output}"
逐次実行

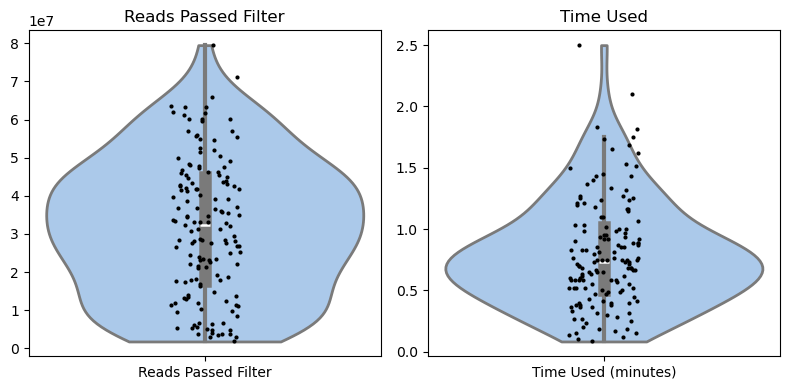
num_jobs=1で1並列で実行。全体でみるとおおよそ30%程度のスレッド使用量で実行されていました。

ジョブあたりのスレッドの使用%は800程度でしょうか。150検体の処理にかかった時間はtotalで約95分でした。

実行時間とpassしたリードの分布をviolin plotで描画したところ、逐次の場合、中央値が0.6分くらいのところにあります。
ただこの場合、32スレッドのPCリソースに対して、16スレッドが1 job投げられている状態なので、余った状態で実行していることになります。
parallelやqsubでArray jobなどを使わない場合、このような実行方法が一般的です。
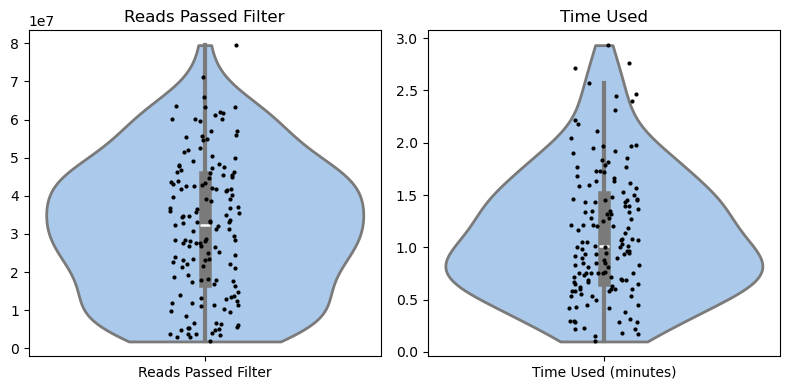
2並列実行
次に、16*2=32スレッドとなる2jobでの実行をしてみたいと思います。私のPCでが32スレッドなので、リソースを余すことなく使うイメージですね。

num_jobs=2で2並列で実行。全体でみるとおおよそ45%程度のスレッド使用量で実行されていました。

ジョブあたりのスレッドの使用%は800程度でしょうか。150検体の処理にかかった時間はtotalで約60分でした。逐次実行より35分早くなりました。
実行時間とpassしたリードの分布をviolin plotで描画したところ、逐次の場合、中央値が0.7分くらいのところにあります。
使用可能なスレッドに対して、余剰もないのでほぼ逐次実行の1 jobあたりのサンプル処理時間の中央値と変わりなさそうです。
実装されているスレッドを余らせずに使用するのであればこの選択肢になるでしょう。
3並列実行
一応、fastpには-w 16で16スレッドを使って処理するように指示を出している一方、3 jobでの実行なので、多分、1スレッドでの処理待ちが発生する気がします。ただ、CPU%が800くらいなので数値的には余っているような状態です。どうなるでしょうか。

num_jobs=3で3並列で実行。全体でみるとおおよそ50%程度のスレッド使用量で実行されていました。

1ジョブあたりのスレッドの使用%は500程度でしょうか。Totalの実行時間は約57分でした。
実行時間とpassしたリードの分布をviolin plotで描画。

3並列実行の場合、中央値が1分ちょっとくらいのところにあります。逐次実行より40分、2並列の実行から3分早くなりました。多分誤差です。
スレッド数にあまりが出るくらいジョブ数を増やしてもtotalの処理時間については効果がほぼなさそうです。
10並列実行
大過剰のjobで実行してみます。

num_jobs=10で10並列で実行。全体でみるとおおよそ60%程度のスレッド使用量で実行されていました。

それぞれ200%前後のスレッドの使用状況です。Totalの実行時間は約57分でした。

10並列実行の場合、中央値が3分くらいのところにあります。2並列実行より3分程度早く、3並列実行とほぼ同じ実行時間となりました。
与えたスレッド数で100%使っているわけではないので、数を減らしてジョブ数を増やして実行時間短縮を図ります。
スレッド数を落として余剰なく与えられるジョブ数を増やす
12スレッド 3ジョブで実行

num_jobs=3の-wオプションを12にして実行。全体でみるとおおよそ45%程度のスレッドの使用数付近で実行されていました。

それぞれ800%前後のスレッドの使用状況です。Totalの実行時間は約57分でした。
実行時間とpassしたリードの分布をviolin plotで描画。
12スレッドで3ジョブ並列実行の場合、中央値が1分くらいのところにあります。
残念ながら16スレッド×2 jobから向上がみられませんでした。
まとめ
- (1G前後のデータなら)fastpで最大速度出すならPCの最大スレッド/16のジョブ数で実行するのがいい
- 無理にジョブ数を増やしても実行速度は落ちなかった
- サーバーCPUのような低クロックCPUだと分かりませんが、少なくとも市販のCPUであれば12スレッド×3ジョブと16×2ジョブは変わらなさそう
- スレッドを余らせて1jobで実行しているなら、並列実行すると処理時間が短くなる
備考
plotに使用したpython script
violin plot
import os
import re
import matplotlib.pyplot as plt
import seaborn as sns
import pandas as pd

def extract_reads_passed_filter(log_file):
    with open(log_file, mode='r') as f:
        content = f.read()
        matches = re.findall(r'reads passed filter: (\d+)', content)
        return [int(match) for match in matches]


def process_log_files_reads_passed_filter(log_folder):
    data = []
    for file in os.listdir(log_folder):
        if file.endswith(".log"):
            file_path = os.path.join(log_folder, file)
            reads_passed_filter = extract_reads_passed_filter(file_path)
            data.extend(reads_passed_filter)

    return data


def extract_time_used(log_file):
    with open(log_file, mode='r') as f:
        content = f.read()
        matches = re.findall(r'fastp v0.23.4, time used: (\d+) seconds', content)
        return [int(match)/60 for match in matches]


def process_log_files_time_used(log_folder):
    data = []
    for file in os.listdir(log_folder):
        if file.endswith(".log"):
            file_path = os.path.join(log_folder, file)
            used_time = extract_time_used(file_path)
            data.extend(used_time)

    return data

if __name__ == "__main__":
    log_folder = "log"  # ログファイルが存在するディレクトリ

    # データの処理
    data_reads_passed_filter = process_log_files_reads_passed_filter(log_folder)
    data_time_used = process_log_files_time_used(log_folder)

    if data_reads_passed_filter and data_time_used:
        # データをDataFrameにまとめる
        df_reads_passed_filter = pd.DataFrame({
            'Reads Passed Filter': data_reads_passed_filter,
        })

        df_time_used = pd.DataFrame({
            'Time Used (minutes)': data_time_used
        })

        # グラフを描画
        fig, axes = plt.subplots(1, 2, figsize=(8, 4))

        # Reads Passed Filterのプロット
        sns.violinplot(data=df_reads_passed_filter, cut=0, inner='box', linewidth=2, width=0.9, palette='pastel', ax=axes[0])
        sns.stripplot(data=df_reads_passed_filter, color='k', size=3, ax=axes[0])
        axes[0].set_title('Reads Passed Filter')

        # Time Usedのプロット
        sns.violinplot(data=df_time_used, cut=0, inner='box', linewidth=2, width=0.9, palette='pastel', ax=axes[1])
        sns.stripplot(data=df_time_used, color='k', size=3, ax=axes[1])
        axes[1].set_title('Time Used')

        # レイアウトの調整
        plt.tight_layout()

        # プロットの表示
        plt.show()
    else:
        print("No data found.")
Information
- 自作PC1
Discussion