Vertex Pipelinesによる機械学習パイプラインの実行
はじめに
機械学習の成果を運用する際には、データの処理や学習、モデルのデプロイなどといった一連の作業をワークフロー化することが多くなっています。これを実現するために、多くのワークフローツールが公開、利用されています。
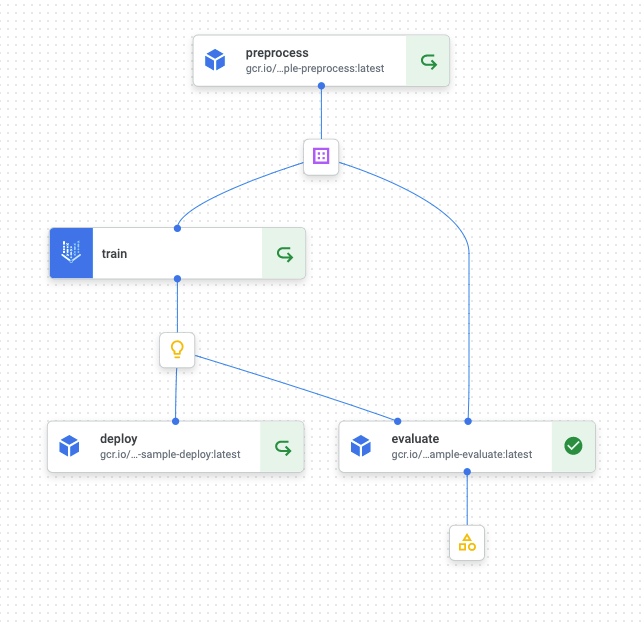
今回はGoogle Cloud Platformで機械学習ワークフローを実行するためのサービスであるVertex Pipelinesを用いて、機械学習パイプラインを構築、実行するまでを紹介します。サンプル実装では以下のようにデータの前処理、モデルの学習、評価、デプロイまでを行います。
コードは以下に配置しました。
Vertex Pipelinesとは
前述したように、Vertex Pipelinesは機械学習パイプラインを実行するためのGCPのサービスです。サーバーレスで稼働するため、費用は実行時に使用した分だけに抑えることができます。他に、実行時のパラメータやパイプラインによって生成されたモデルなどといった副産物(アーティファクト)を紐つけて保存できたり、各コンポーネントの実行結果をキャッシュしておけるなど、機械学習ワークフローを使っていくにあたって重要な機能を多く提供しています。
Vertex Pipelinesで実行するためのパイプラインは、Kubeflow Pipelines SDK、またはTensorFlow Extended(TFX)を用いて記述できます。公式ドキュメントには以下のように記載されています。
- テラバイト単位の構造化データまたはテキストデータを処理する MLワークフローでTensorFlowを使用する場合は、TFXを使用してパイプラインを構築することをおすすめします
- その他のユースケースでは、Kubeflow Pipelines SDK を使用してパイプラインを構築することをおすすめします
Kubeflow Pipelines SDKとTFXは2021/10/17の時点でそれぞれv1.7, v1.3が提供されており、一定の信頼性を持って利用できるかと思います。今回はKubeflow Pipelines SDKを用いますが、必要に応じて使い分けるのが良いでしょう。
サンプル実装
今回のサンプルでは、機械学習ワークフローにおける一般的な工程として、データの前処理、モデルの学習、モデルの評価、モデルのデプロイからなるパイプラインを構築します。
- データの前処理:元のCSVファイルを読み込み、簡単な前処理をした上で学習・評価データに分割し、それぞれ保存する
- モデルの学習:作成した学習・評価データに基づいてLightGBMを学習し、得られたモデルを保存する
- モデルの評価:学習したモデルと評価データを用いて性能指標を計算、JSONファイルとして保存する
- モデルのデプロイ:学習したモデルをVertex AIの予測エンドポイントにデプロイする
ディレクトリ構成は以下のようになります。
vertex-pipelines-sample
├── .env
├── README.md
├── components
│   ├── deploy
│   │   ├── Dockerfile
│   │   ├── component.yaml
│   │   ├── main.py
│   │   ├── poetry.lock
│   │   └── pyproject.toml
│   ├── evaluate
│   │   └── ...
│   ├── preprocess
│   │   └── ...
│   └── train
│       └── ...
├── docker
│   └── serving
│       ├── Dockerfile
│       ├── server.py
│       ├── poetry.lock
│       └── pyproject.toml
├── docker-compose.yaml
├── pipeline.py
└── requirements.txt
それぞれの処理内容はcomponents/(preprocess, train, evaluate, deploy)ディレクトリ以下に、コンテナアプリケーションとして定義しています。docker/servingは最終的にモデルをデプロイする際に、モデルを搭載し予測APIを提供するサーバーを実装しています。
実際にサンプルコードを動かす際にはGCPのアカウントが必要になるほか、Cloud Storageバケットの作成などいくつかの準備が必要になります。こちらの詳細に関してはサンプルのREADMEを参照してください。
クラウドサービスの利用には料金が発生しますが、私が試行錯誤(30回ほどパイプラインを実行しました)した限りでは数百円で済みました。サンプルを変更して大きなデータを用いる場合や、GPUなど高性能なマシンを利用する際などは費用が大きくなりやすいので注意しましょう。
Kubeflow Pipelines SDKによるコンポーネントの実装
各コンポーネントの内容を紹介する前に、Kubeflow Pipelines SDKによるコンポーネントの実装方法について触れます。
Kubeflow Pipelinesで稼働させるコンポーネントは、実装(implementation)と仕様(specification)によって定義します。実装とは処理の中身のことです。基本的にはコンテナアプリケーションとして構築しますが、Pythonの簡易的な処理であればPythonスクリプトと実行イメージを指定して作成することもできます。
仕様は以下の要素を定義します。
- コンポーネントの入出力
- コンポーネントのコードを実行するコンテナイメージ、実行時コマンドや実行時引数
- コンポーネントのメタデータ。名前や説明など
これらはYAMLファイルに定義します。以降で各処理の定義を見ていきます。
前処理
前処理の入出力は以下のようになります。
- 入力
-
src_csv: データの元となるCSVファイルのパス -
n_splits: 学習、評価データの分割比
-
- 出力
-
dataset: 分割後のデータを配置するディレクトリ。配下にtrain.csv, val.csvを配置する
-
今回はサンプルとしてPalmer Penguins datasetを用いており、これをCloud Storegeに配置した上で前処理の入力としています。
上記を含めた仕様はcomponents/preprocess/component.yamlで定義しています。
name: preprocess
description: Preprocess raw data
inputs:
  - {name: src_csv, type: String, description: 'Path to the raw csv file'}
  - {name: n_splits, type: Integer, default: 3, description: 'Number of train/val splits'}
outputs:
  - {name: dataset, type: Dataset, description: 'Processed dataset (train/val) URI'}
metadata:
  annotations:
    author: Daigo Hirooka <daigo.hirooka@example.com>
implementation:
  container:
    image: gcr.io/machine-learning-dhirooka/vp-sample-preprocess:latest
    command: [python, main.py]
    args: [
      --src-csv-path, {inputValue: src_csv},
      --n-splits, {inputValue: n_splits},
      --dataset-uri, {outputPath: dataset}
    ]
各入出力の形式としてtypeを設定でき、String, Integerなどの他にDataset, Modelなどといったアーティファクトの型も指定できます。これによってコンポーネント間で受け渡す生成物の形式があっているかどうかを、パイプラインのコンパイル時にチェックできます。
implementationでは、実行に用いるコンテナイメージや、コマンド、引数を設定できます。上記の例では、args(実行時引数)の{inputValue: src_csv}, {inputValue: n_splits}, {outputPath: dataset}を通じて、inputs, outputsで定義した入出力とアプリケーションを結びつけています。
outputPathは文字列としてコンテナアプリケーションに渡されますが、具体的な値はパイプラインの実行時にKubeflow Pipelinesによって自動的に設定されます。この文字列には拡張子などは設定できないため、今回はディレクトリとして扱うことで実装への影響を減らしています。
コンテナイメージやmain.pyは一般的な内容なので省略します。詳しくはサンプルコードを参照してください。
学習
学習コンポーネントの入出力とcomponent.yamlは以下のようになっています。
- 入力
-
dataset: 学習、評価データが格納されているディレクトリ。前処理コンポーネントの出力 -
learning_rate: LightGBMを学習する際の学習率 -
max_depth: LightGBMの木の深さの最大値
-
- 出力
-
artifact: 学習済みモデルを配置するディレクトリ
-
name: train
description: Train on LightGBM
inputs:
  - {name: dataset, type: Dataset, description: 'Processed dataset (train/val) URI'}
  - {name: learning_rate, type: Float, default: 0.1, description: 'Learning rate'}
  - {name: max_depth, type: Integer, default: 10, description: 'Max tree depth'}
outputs:
  - {name: artifact, type: Model, description: 'Directory of trained model'}
metadata:
  annotations:
    author: Daigo Hirooka <daigo.hirooka@example.com>
implementation:
  container:
    image: gcr.io/machine-learning-dhirooka/vp-sample-train:latest
    command: [python, main.py]
    args: [
      --dataset-uri, {inputPath: dataset},
      --learning-rate, {inputValue: learning_rate},
      --max-depth, {inputValue: max_depth},
      --artifact-uri, {outputPath: artifact}
    ]
評価
モデル評価の入出力とcomponent.yamlは以下になります。
- 入力
-
dataset: 評価データが格納されたディレクトリ。前処理コンポーネントの出力 -
artifact: 評価対象のモデルが格納されたディレクトリ。学習コンポーネントの出力
-
- 出力
-
metrics: 各種評価結果を格納するディレクトリ
-
name: evaluate
description: Evaluate the trained LightGBM
inputs:
  - {name: dataset, type: Dataset, description: 'Processed dataset (train/val) URI'}
  - {name: artifact, type: Model, description: 'Directory of trained model'}
outputs:
  - {name: metrics, type: Artifact, description: 'Path to the metrics file'}
metadata:
  annotations:
    author: Daigo Hirooka <daigo.hirooka@example.com>
implementation:
  container:
    image: gcr.io/machine-learning-dhirooka/vp-sample-evaluate:latest
    command: [python, main.py]
    args: [
      --dataset-uri, {inputPath: dataset},
      --artifact-uri, {inputPath: artifact},
      --metrics-uri, {outputPath: metrics}
    ]
出力のmetricsについては補足があります。実はKubeflow Pipelinesの入出力の方としてMetricsというものがあり、これを用いることでKubeflow PipelinesおよびVertex PipelinesのUI上にパイプライン実行時の指標を表示できるとされています。Python関数ベースのコンポーネントでは利用できるようなのですが、コンテナベースのコンポーネントで利用する方法がわからなかったため、今回は利用していません。サンプルコードの拡充に期待したいところです。
Python関数ベースコンポーネントでMetricsを使用している例。
デプロイ
モデルデプロイの入出力とcomponent.yamlは以下になります。
- 入力
-
artifact: デプロイ対象のモデルが格納されたディレクトリ。学習コンポーネントの出力 - その他パラメータ: デプロイに用いるコンテナイメージ、環境変数などの各種設定
-
- 出力:なし
name: deploy
description: Deploy the model
inputs:
  - {name: artifact, type: Model, description: 'Path to the trained LightGBM model'}
  # Vertex AI Model resource config
  - {name: model_name, type: String, description: 'Name of Model resource'}
  - {name: serving_container_image_uri, type: String, description: 'Service container URI'}
  - {name: serving_container_environment_variables, type: Dict, optional: true, description: 'Environment variables'}
  - {name: serving_container_ports, type: Integer, default: 80, description: 'Service container port'}
  # Endpoint config
  - {name: endpoint_name, type: String, description: 'Endpoint name'}
  # Model deployment config
  - {name: deploy_name, type: String, description: 'Deployed model name'}
  - {name: machine_type, type: String, description: 'Machine type'}
  - {name: min_replicas, type: Integer, default: 1, description: 'Minimum replica count'}
  - {name: max_replicas, type: Integer, default: 1, description: 'Maximum replica count'}
  # General config
  - {name: project, type: String, description: 'GCP project name'}
  - {name: location, type: String, description: 'Deployment location'}
metadata:
  annotations:
    author: Daigo Hirooka <daigo.hirooka@example.com>
implementation:
  container:
    # See details https://github.com/kubeflow/pipelines/blob/master/components/google-cloud/google_cloud_pipeline_components/container/aiplatform/Dockerfile
    image: gcr.io/machine-learning-dhirooka/vp-sample-deploy:latest
    command: [python, main.py]
    args: [
      --artifact-uri, {inputPath: artifact},
      --model-name, {inputValue: model_name},
      --serving-container-image-uri, {inputValue: serving_container_image_uri},
      --serving-container-environment-variables, {inputValue: serving_container_environment_variables},
      --serving-container-ports, {inputValue: serving_container_ports},
      --endpoint-name, {inputValue: endpoint_name},
      --deploy-name, {inputValue: deploy_name},
      --machine-type, {inputValue: machine_type},
      --min-replicas, {inputValue: min_replicas},
      --max-replicas, {inputValue: max_replicas},
      --project, {inputValue: project},
      --location, {inputValue: location}
    ]
このコンポーネントの内部では、Vertex AIのPython SDKによってモデルデプロイを行なっています。Vertex AIでモデルをサービングする方法については別で記事を作成したので、詳しくはそちらを参照してください。
パイプラインの構築とコンパイル
以上のコンポーネントを繋げて、パイプラインを構築します。パイプラインはKubeflow Pipelines SDKによって、@dsl.pipelineとして修飾することで定義できます。GCPのプロジェクトIDやリージョンなどは環境変数から読み込んでいます。サンプル実行の際には適宜設定してください。
環境変数
GCP_PROJECT_ID=<your GCP project id>
LOCATION=<bucket1, bucket2と同じリージョン>
SOURCE_CSV_URI=gs://<bucket1>/penguins.csv
ROOT_BUCKET=gs://<bucket2>
import os
from dotenv import load_dotenv
from kfp.v2 import dsl, compiler, components

load_dotenv('.env')
PROJECT_ID = os.environ.get('GCP_PROJECT_ID')
LOCATION = os.environ.get('LOCATION')
SOURCE_CSV_URI = os.environ.get('SOURCE_CSV_URI')
ROOT_BUCKET = os.environ.get('ROOT_BUCKET')


@dsl.pipeline(name='vertex-pipelines-sample',
              description='Vertex Piplines sample',
              pipeline_root=ROOT_BUCKET)
def pipeline(learning_rate: float = 0.1, max_depth: int = 10) -> None:
    preprocess_op = components.load_component_from_file(
        'components/preprocess/component.yaml')
    preprocess_task = preprocess_op(src_csv=SOURCE_CSV_URI, n_splits=3)

    train_op = components.load_component_from_file(
        'components/train/component.yaml')
    train_task = train_op(dataset=preprocess_task.outputs['dataset'],
                          learning_rate=learning_rate,
                          max_depth=max_depth)
    train_task.custom_job_spec = {
        'displayName': train_task.name,
        'jobSpec': {
            'workerPoolSpecs': [{
                'containerSpec': {
                    'imageUri': train_task.container.image,
                    'args': train_task.arguments,
                },
                'machineSpec': {
                    'machineType': 'c2-standard-4'
                },
                'replicaCount': 1
            }],
        }
    }

    evaluate_op = components.load_component_from_file(
        'components/evaluate/component.yaml')
    _ = evaluate_op(dataset=preprocess_task.outputs['dataset'],
                    artifact=train_task.outputs['artifact'])

    deploy_op = components.load_component_from_file(
        'components/deploy/component.yaml')
    _ = deploy_op(
        artifact=train_task.outputs['artifact'],
        model_name='vp-sample-lightgbm',
        serving_container_image_uri=f'gcr.io/{PROJECT_ID}/vp-sample-serving',
        serving_container_environment_variables='{"APP_MODULE": "server:app"}',
        serving_container_ports=80,
        endpoint_name='vp-sample-endpoint',
        deploy_name='vp-sample-deploy',
        machine_type='n1-standard-2',
        min_replicas=1,
        project=PROJECT_ID,
        location=LOCATION)


compiler.Compiler().compile(pipeline_func=pipeline,
                            package_path='vertex-pipelines-sample.json')
dsl.pipelineの引数である、pipeline_rootにCloud Storageのバケットを指定することで、各処理で生成されるアーティファクトを保持しておくことができます。このバケットはCloud Storage FUSEによって各ジョブのインスタンスにマウントされるため、ローカルファイルシステムとしてファイルの読み書きが可能です。
各コンポーネントはKubeflow Pipelines SDKを通じて、components.load_component_from_file('path/to/component.yaml')として読み込むことができます。これはcomponent.yamlで定義した引数を渡して関数として実行できるようになっており、これによってコンポーネントの実行が定義されます。
# コンポーネントの読み込み
preprocess_op = components.load_component_from_file('components/preprocess/component.yaml')

# コンポーネントの実行
preprocess_task = preprocess_op(src_csv=SOURCE_CSV_URI, n_splits=3)
学習コンポーネントなどでは、別のコンポーネントの生成物(出力)を入力として利用するものもありました。これは以下のように表現されます。
# コンポーネントの読み込み
train_op = components.load_component_from_file('components/train/component.yaml')

# 前処理の出力を用いた学習コンポーネントの実行
train_task = train_op(dataset=preprocess_task.outputs['dataset'],
                      learning_rate=learning_rate,
                      max_depth=max_depth)
処理内容によっては、マシンタイプやGPUの有無を設定したい場合もあります。Vertex Pipelinesでは、各コンポーネントはVertex Trainingのカスタムジョブとして実行されるようですが、今回は以下のようにカスタムジョブの実行時設定を行なっています。
train_task.custom_job_spec = {
    'displayName': train_task.name,
    'jobSpec': {
        'workerPoolSpecs': [{
            'containerSpec': {
                'imageUri': train_task.container.image,
                'args': train_task.arguments,
            },
            'machineSpec': {
                'machineType': 'c2-standard-4'
            },
            'replicaCount': 1
        }],
    }
}
この指定方法はあまり見かけませんが、一応下記の記事で利用されています。動作することも確認しましたが、個人的にはもう少しスマートに記述したいなあとも思います。
参考までに、Vertex Pipelinesの公式ドキュメントでもコンポーネント実行時のリソース指定方法は説明されています。
最後にパイプライン関数をコンパイルします。このスクリプトを実行することで、パイプラインの内容を記述したJSONファイルが出力されます。
compiler.Compiler().compile(pipeline_func=pipeline,
                            package_path='vertex-pipelines-sample.json')
python pipeline.py
# >> vertex-pipelines-sample.jsonが生成される
パイプラインの実行
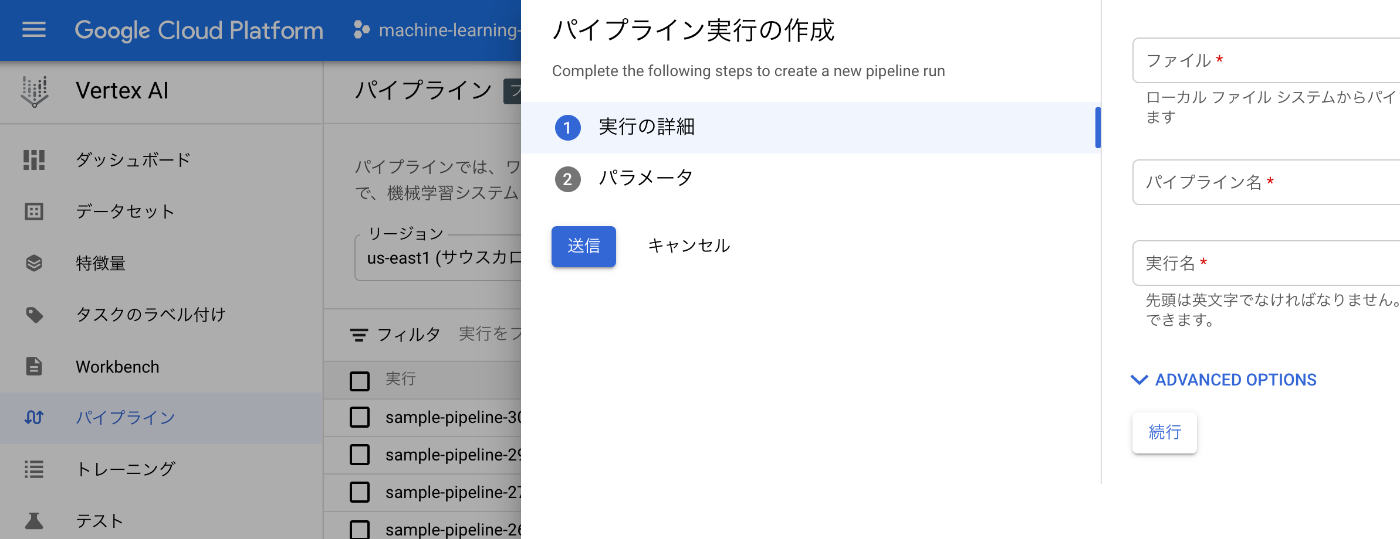
GCPのクラウドコンソールからパイプラインを実行します。「Vertex AI>パイプライン」の「+実行を作成」に進み、生成したJSONファイルのアップロード、パイプラインの名前、実行名の指定を行います。パイプラインのパラメータ(今回はLightGBMの学習率と木の深さ)もここで指定できます。最後に「送信」することで、パイプラインの実行が始まります。
実行結果
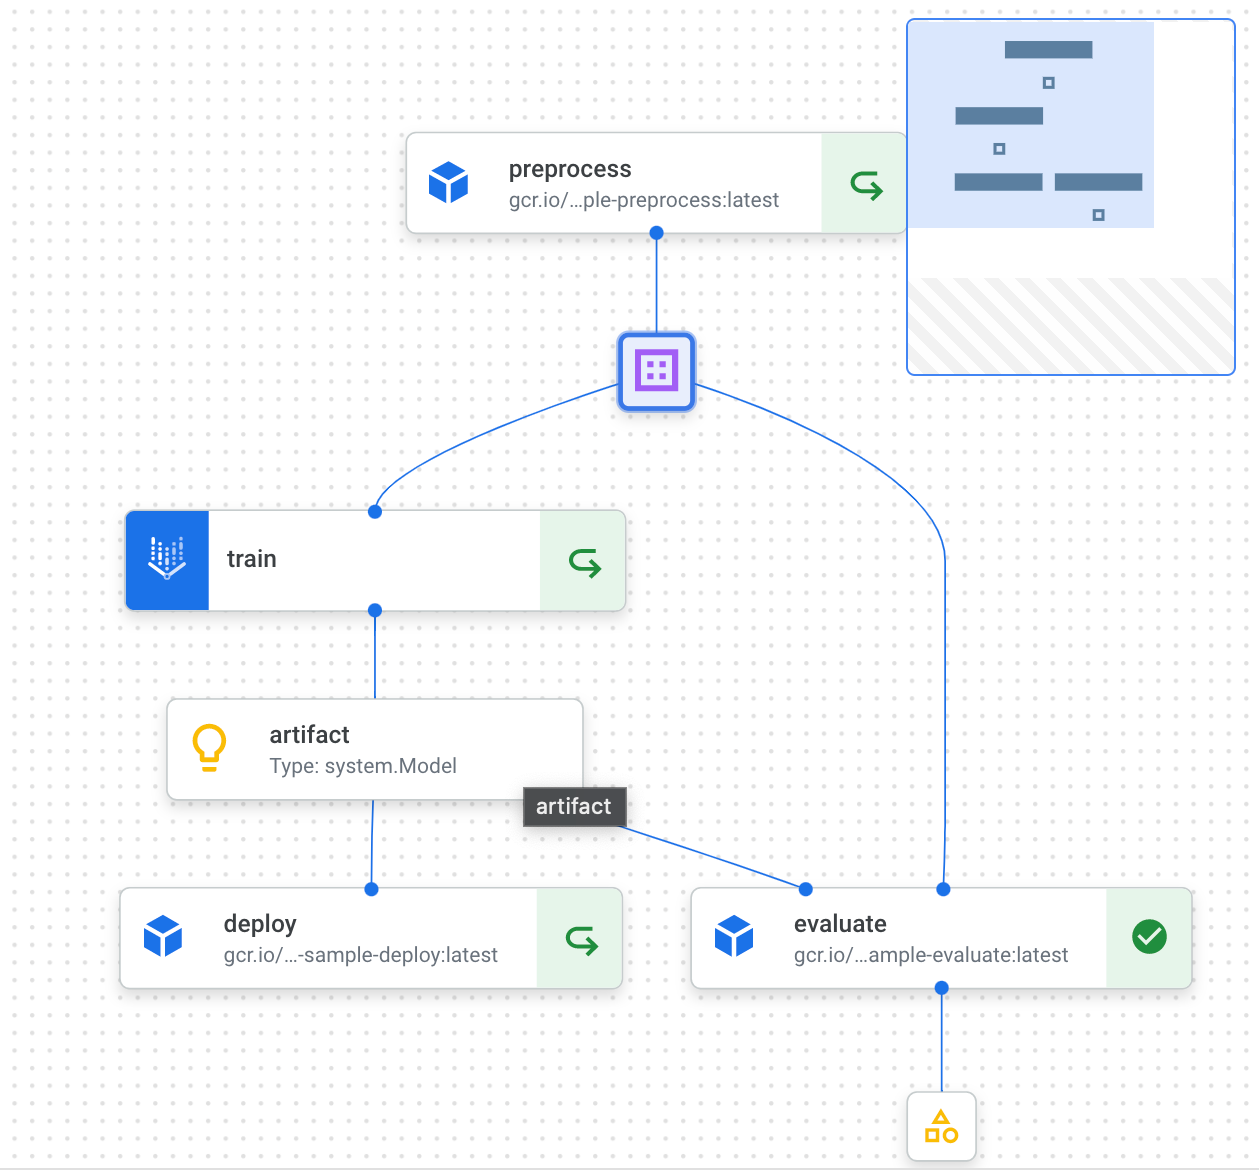
実行結果は以下のようになりました。↪️ マークが表示されているのは、前回実行時のキャッシュが利用されていることを表しています。各コンポーネントを選択すると、実行時のパラメータや処理時間、実行時のログなどを確認できます。
コンポーネントの各出力(リネージと呼ばれます)を選択するとCloud Storage上のURIが確認できます。
前述したMetricsをちゃんと使えば、パイプライン実行ごとの指標の比較などもできそうなのですが、今回はできていません。評価コンポーネントで生成したJSONファイルをPython関数コンポーネントで処理すれば、、とかも考えましたが、Hackyになりそうなので今回はやめておきました。また現実的にはVertex Pipelinesだけで無理に完結させなくても、ファイル確認用のダッシュボードサーバーを構築しておくといったアプローチもアリかなと思いました。
デプロイ済みモデルへの予測リクエスト
今回のパイプラインの実行が成功していれば、Vertex AI上に学習済みのLightGBMを用いた予測エンドポイントが作成されているはずです。クラウドコンソールからリクエストをテストできるほか、もちろんcURLなどからも予測のリクエストができます。ちなみに今回のモデルは、ペンギンのクチバシや羽の特徴量からペンギンの種類を予測しています。
PROJECT_ID=`gcloud config list --format 'value(core.project)'`
LOCATION=<endpoint-region>
ENDPOINT_ID=<deployed-endpoint-id>  # Check from [Vertex AI>Endpoints]
INPUT_DATA_FILE=sample-request.json

curl \
-X POST \
-H "Authorization: Bearer $(gcloud auth print-access-token)" \
-H "Content-Type: application/json" \
https://${LOCATION}-aiplatform.googleapis.com/v1/projects/${PROJECT_ID}/locations/${LOCATION}/endpoints/${ENDPOINT_ID}:predict \
-d "@${INPUT_DATA_FILE}"
レスポンス
{
  "predictions": [
    {
      "specie": "ADELIE",
      "confidence": 0.99291988380921126
    },
    {
      "specie": "CHINSTRAP",
      "confidence": 0.97967966921123462
    },
    {
      "confidence": 0.98773589814924911,
      "specie": "GENTOO"
    }
  ],
  "deployedModelId": "923836057936461824",
  "model": "projects/<project-id>/locations/us-east1/models/<model-id>",
  "modelDisplayName": "vp-sample-lightgbm"
}
まとめ
Kubeflow Pipelinesによって定義したパイプラインを、GCPのVertex Pipelines上で動作させることができました。メトリクスや可視化の扱いなど一部とっつきづらい点もありますが、コンポーネントに紐つくリネージやログなど、機械学習ワークフローに必要な機能が色々と搭載されているように感じました。
GCPでのサーバーレスなワークフローツールとしてはCloud Workflowsがあり、こちらも以前個人的に触れましたが、やはりVeretx Pipelinesの方が強くMLを意識していると思います。一方でCloud WorkflowsはHTTPリクエストベースで動作するため汎用で使いやすく、他のGCPサービスとの連携も容易な点は魅力的に感じます。
Vertex Pipelines含め、Vertex AIはGCPの中でも統合AIサービスとしてどんどん推されていくと思うので、今後もキャッチアップしていきたいと思います。
参考リンク
Discussion