Next+MongoDB+Prisma+GraphQLで自作ブログを作る
フロントエンド構成
React.js
- フロントエンド。UIを作る
Next.js - SSRする
Jotai - 状態管理をする
バックエンド構成
Node.js + Express.js
- バックエンド。APIエンドポイントを作成する
MongoDB or Notion API(Notion DataBase) - ノンリレーショナルデータベース or Notionをデータストアに使う
デプロイ構成
Vercel
- フロントエンド+バックエンドのデプロイ用
MongoDB Atlas - DBのデプロイ用
https://www.mongodb.com/ja-jp/atlas/database
認証・認可(Notion APIを使う場合)
Firebase Authentication
DB設計
Figmaの便利プラグイン
Notion
graphql-compose-mongodbでMongo DBからgraphQLを扱う
共通:MongoDB Atlas のセットアップ
# Install the Atlas CLI
% brew install mongodb-atlas
% atlas

# Update the Atlas CLI
% brew update
% brew upgrade mongodb-atlas
% atlas --version
# 1. Run the authentication command
% atlas auth login

# 2. Sign into Atlas.
# If you aren't signed in already, sign into your Atlas account in the browser.

# 3. Enter the authorization code.
# Paste your activation code into the browser and click Confirm Authorization.

# 4. Return to the Atlas CLI.
# Return to the terminal. If you connect successfully, you see a message:

# Successfully logged in as {Your Email Address}.
# 1. https://www.mongodb.com/docs/database-tools/installation/installation-macos/#install-homebrew
# 2. https://www.mongodb.com/docs/database-tools/installation/installation-macos/#tap-the-mongodb-formula
% brew tap mongodb/brew
# 3. https://www.mongodb.com/docs/database-tools/installation/installation-macos/#install-the-mongodb-database-tools
% brew install mongodb-database-tools
# 4. https://www.mongodb.com/docs/database-tools/installation/installation-macos/#run-the-installed-tools
DBクラスターへの接続
Connect to Cluster0 (シェルから接続する)
# Run your connection string in your command line
# Use this connection string in your application:
% mongosh "mongodb+srv://cluster0.tbegt85.mongodb.net/myFirstDatabase" --apiVersion 1 --username denham
Node.jsから接続する
mongodb+srv://denham:<password>@cluster0.tbegt85.mongodb.net/?retryWrites=true&w=majority
const { MongoClient, ServerApiVersion } = require('mongodb');
const uri = "mongodb+srv://denham:<password>@cluster0.tbegt85.mongodb.net/?retryWrites=true&w=majority";
const client = new MongoClient(uri, { useNewUrlParser: true, useUnifiedTopology: true, serverApi: ServerApiVersion.v1 });
client.connect(err => {
  const collection = client.db("test").collection("devices");
  // perform actions on the collection object
  client.close();
});
データベースの確認
% show dbs
補足
用語の説明
- MongoDBではデータの集まりをCollectionと呼ぶ
- RDBMSのtableとCollectionがほぼ=の概念
| RDBMS | MongoDB |
|---|---|
| database | database |
| table | collection |
| record(row) | document |
| column | field |
prismaとMongoDBでGraphQLを扱う
mongodbをローカルにセットアップ
install
% brew tap mongodb/brew
% brew update
% brew install mongodb-community@6.0
run
% brew services start mongodb-community@6.0
connext
% mongosh
Atlasで構築した prisma+MongoDBの実装はチュートリアル通りに進める
ハマりポイント
- Atlasで構築したDBのURLは コンソールの
Connect->Connect Using VS Codeに記載されているものを使う
mongodb+srv://<ユーザー名>:<password>@cluster0.tbegt85.mongodb.net/<データベース名>
- ドキュメントの初期データはInsert Documentからbson形式で挿入する
- ローカル(MOngoDB Compass)で立てる場合、データベースURLは
mongodb://localhost:27017/<データベース名>
とした
TODO(Mustではない)
dockerでmongoの環境を作る
Next Step
graphql-nextjsの構成を作る
下記を参考に進める
Prisma/TSでGraphQLを扱うためのライブラリを追加する
GraphQL server with TypeScript with the following stack:
GraphQL Yoga: GraphQL server
Pothos: Code-first GraphQL schema definition library
Prisma Client: Databases access (ORM)
Prisma Migrate: Database migrations
pothosについて(後述)
{
  ...
  "devDependencies": {
+    "@types/graphql": "14.5.0",
    "@types/node": "^18.15.11",
    "prisma": "^4.12.0",
    "ts-node": "^10.9.1",
    "typescript": "^5.0.2"
  },
  "dependencies": {
+    "@apollo/client": "3.7.10",
+    "@pothos/plugin-prisma": "3.47.2",
+    "@pothos/core": "3.29.0",
    "@prisma/client": "^4.12.0",
+    "graphql": "16.6.0",
+    "graphql-scalars": "1.21.3",
+    "graphql-yoga": "3.8.0"
  },
+  "prisma": {
+    "seed": "ts-node prisma/seed.ts"
+  }
}
{
  "name": "my-blog",
  "version": "1.0.0",
  "description": "",
  "keywords": [],
  "license": "MIT",
  "author": "",
  "devDependencies": {
    "@types/graphql": "14.5.0",
    "@types/node": "^18.15.11",
    "prisma": "^4.12.0",
    "ts-node": "^10.9.1",
    "typescript": "^5.0.2"
  },
  "dependencies": {
    "@apollo/client": "3.7.10",
    "@pothos/plugin-prisma": "3.47.2",
    "@pothos/core": "3.29.0",
    "@prisma/client": "^4.12.0",
    "graphql": "16.6.0",
    "graphql-scalars": "1.21.3",
    "graphql-yoga": "3.8.0"
  },
  "prisma": {
    "seed": "ts-node prisma/seed.ts"
  }
}
prisma
セットアップ(初回のみ)
npx prisma init
- 設定ファイル類(prisma/schema.prisma, .envなど)が自動的に生成される
スキーマファイルのフォーマット
npx prisma format
DBスキーマの同期
npx prisma db push
- マイグレーションファイルを生成せずスキーマを同期する
migrate dev コマンドはMongoDBではサポートされていないため、db push でマイグレーション(DBを更新)する
This command is not supported on MongoDB. Use db push instead.
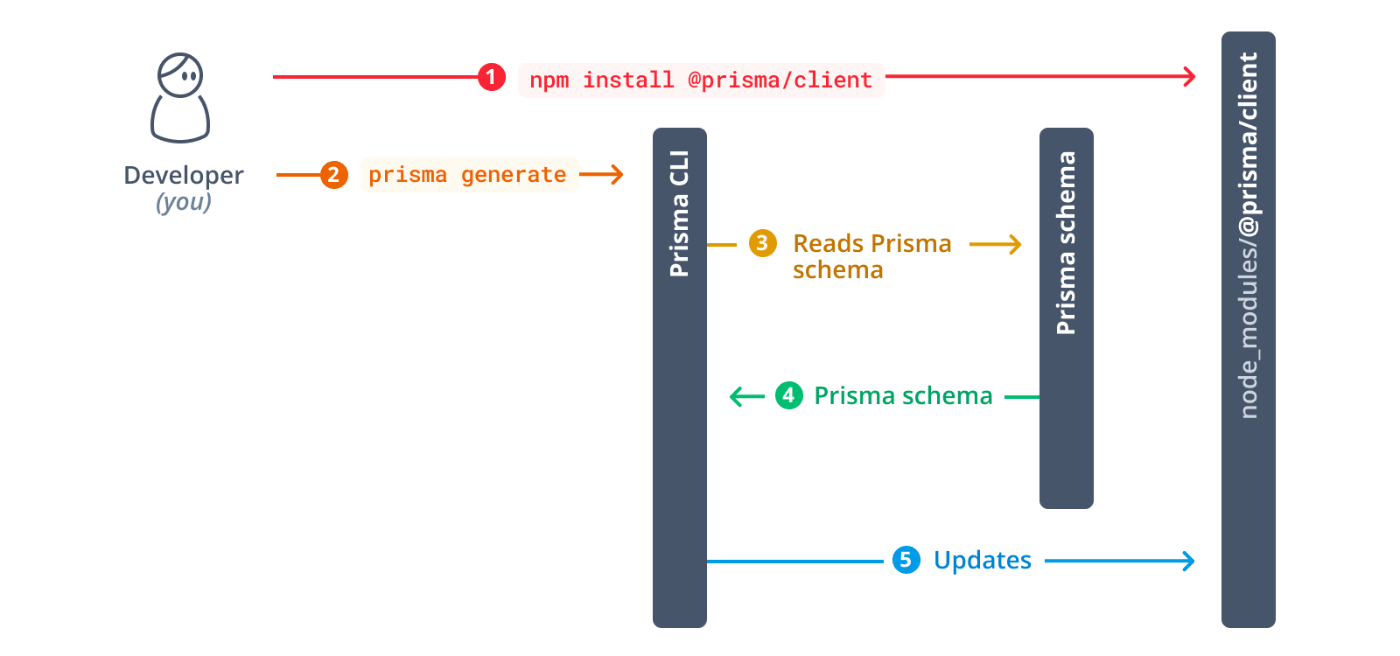
モデルの更新
npx prisma generate
- スキーマ(
prisma/schema.prisma)に定義したデータベースに変更が加わるたび、Prisma Clientを手動で再生成して、ディレクトリ内に生成されたコードを更新する
✔ Generated Prisma Client (4.12.0 | library) to ./node_modules/@prisma/client in 98ms

✔ Generated Pothos integration to ./node_modules/@pothos/plugin-prisma/generated.ts in 15ms
You can now start using Prisma Client in your code. Reference: https://pris.ly/d/client

import { PrismaClient } from '@prisma/client'
const prisma = new PrismaClient()
seedデータの投入
npx prisma db seed
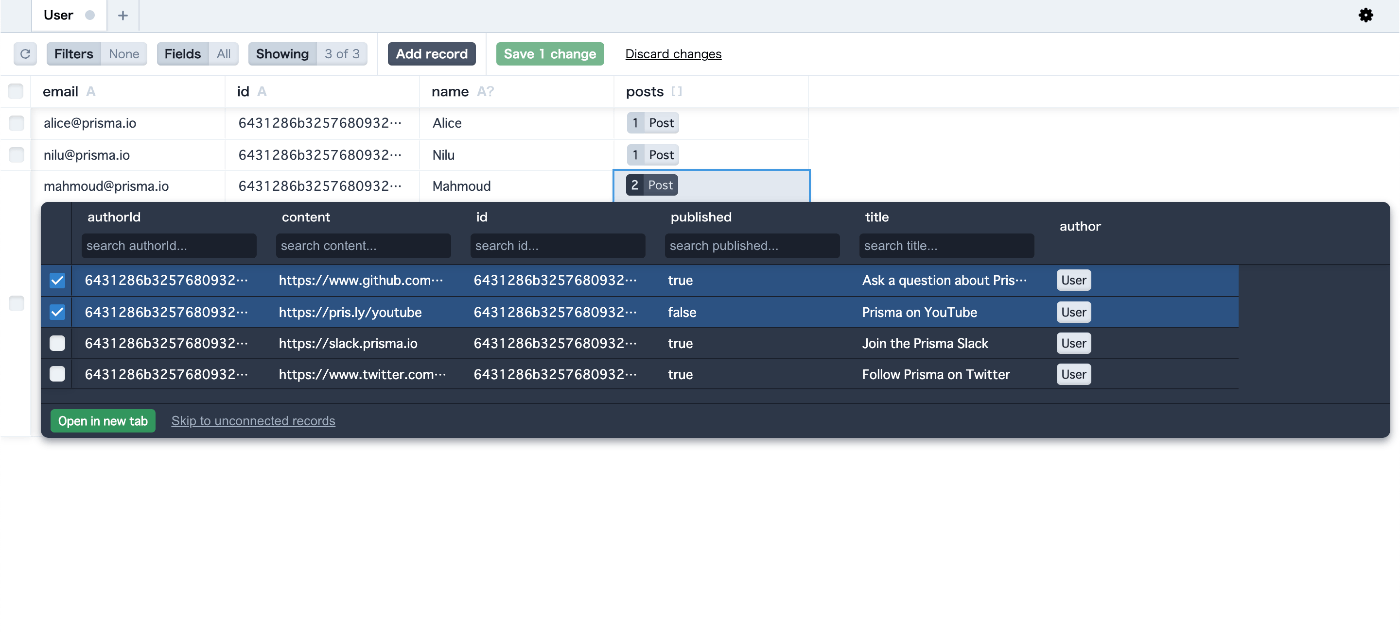
Prisma Studio
ブラウザからデータベースのデータを確認・操作できるツール
npx prisma studio
http://localhost:5555/で確認可能
Nexus vs Pothos
Pothos
TypeScriptのcode-first(言語固有のコードでPrisma modelsを書いてから、スキーマ定義ファイルgraphql.schema を生成する)でGraphQLのスキーマ定義ファイル生成するライブラリ
TODO: resolverを書く
Pothosでスキーマを定義する
prismaObject でオブジェクトを、prismaField でフィールドを定義する
import { createYoga } from "graphql-yoga";
import SchemaBuilder from "@pothos/core";
import PrismaPlugin from "@pothos/plugin-prisma";
import { DateTimeResolver } from "graphql-scalars";

import type PrismaTypes from "@pothos/plugin-prisma/generated";
import type { NextApiRequest, NextApiResponse } from "next";

import prisma from "../../lib/prisma";

const builder = new SchemaBuilder<{
  PrismaTypes: PrismaTypes;
}>({
  plugins: [PrismaPlugin],
  prisma: {
    client: prisma,
  },
});

builder.queryType({});

builder.mutationType({});

builder.prismaObject("User", {
  fields: (t) => ({
    id: t.exposeID("id"),
    email: t.exposeString("email"),
    name: t.exposeString("name", { nullable: true }),
    posts: t.relation("posts"),
  }),
});

builder.prismaObject("Post", {
  fields: (t) => ({
    id: t.exposeID("id"),
    title: t.exposeString("title"),
    content: t.exposeString("content", { nullable: true }),
    published: t.exposeBoolean("published"),
    author: t.relation("author"),
  }),
});

builder.queryField("feed", (t) =>
  t.prismaField({
    type: ["Post"],
    resolve: async (query, _parent, _args, _info) =>
      prisma.post.findMany({
        ...query,
        where: { published: true },
      }),
  })
);

builder.queryField("post", (t) =>
  t.prismaField({
    type: "Post",
    args: {
      id: t.arg.id({ required: true }),
    },
    nullable: true,
    resolve: async (query, _parent, args, _info) =>
      prisma.post.findUnique({
        ...query,
        where: {
          id: String(args.id),
        },
      }),
  })
);

builder.queryField("drafts", (t) =>
  t.prismaField({
    type: ["Post"],
    resolve: async (query, _parent, _args, _info) =>
      prisma.post.findMany({
        ...query,
        where: { published: false },
      }),
  })
);

builder.queryField("filterPosts", (t) =>
  t.prismaField({
    type: ["Post"],
    args: {
      searchString: t.arg.string({ required: false }),
    },
    resolve: async (query, _parent, args, _info) => {
      const or = args.searchString
        ? {
            OR: [
              { title: { contains: args.searchString } },
              { content: { contains: args.searchString } },
            ],
          }
        : {};
      return prisma.post.findMany({
        ...query,
        where: { ...or },
      });
    },
  })
);

builder.mutationField("signupUser", (t) =>
  t.prismaField({
    type: "User",
    args: {
      name: t.arg.string({ required: false }),
      email: t.arg.string({ required: true }),
    },
    resolve: async (query, _parent, args, _info) =>
      prisma.user.create({
        ...query,
        data: {
          email: args.email,
          name: args.name,
        },
      }),
  })
);

builder.mutationField("deletePost", (t) =>
  t.prismaField({
    type: "Post",
    args: {
      id: t.arg.id({ required: true }),
    },
    resolve: async (query, _parent, args, _info) =>
      prisma.post.delete({
        ...query,
        where: {
          id: String(args.id),
        },
      }),
  })
);

builder.mutationField("publish", (t) =>
  t.prismaField({
    type: "Post",
    args: {
      id: t.arg.id({ required: true }),
    },
    resolve: async (query, _parent, args, _info) =>
      prisma.post.update({
        ...query,
        where: {
          id: String(args.id),
        },
        data: {
          published: true,
        },
      }),
  })
);

builder.mutationField("createDraft", (t) =>
  t.prismaField({
    type: "Post",
    args: {
      title: t.arg.string({ required: true }),
      content: t.arg.string(),
      authorEmail: t.arg.string({ required: true }),
    },
    resolve: async (query, _parent, args, _info) =>
      prisma.post.create({
        ...query,
        data: {
          title: args.title,
          content: args.content,
          author: {
            connect: { email: args.authorEmail },
          },
        },
      }),
  })
);

const schema = builder.toSchema();

export default createYoga<{
  req: NextApiRequest;
  res: NextApiResponse;
}>({
  schema,
  graphqlEndpoint: "/api/graphql",
});

export const config = {
  api: {
    bodyParser: false,
  },
};
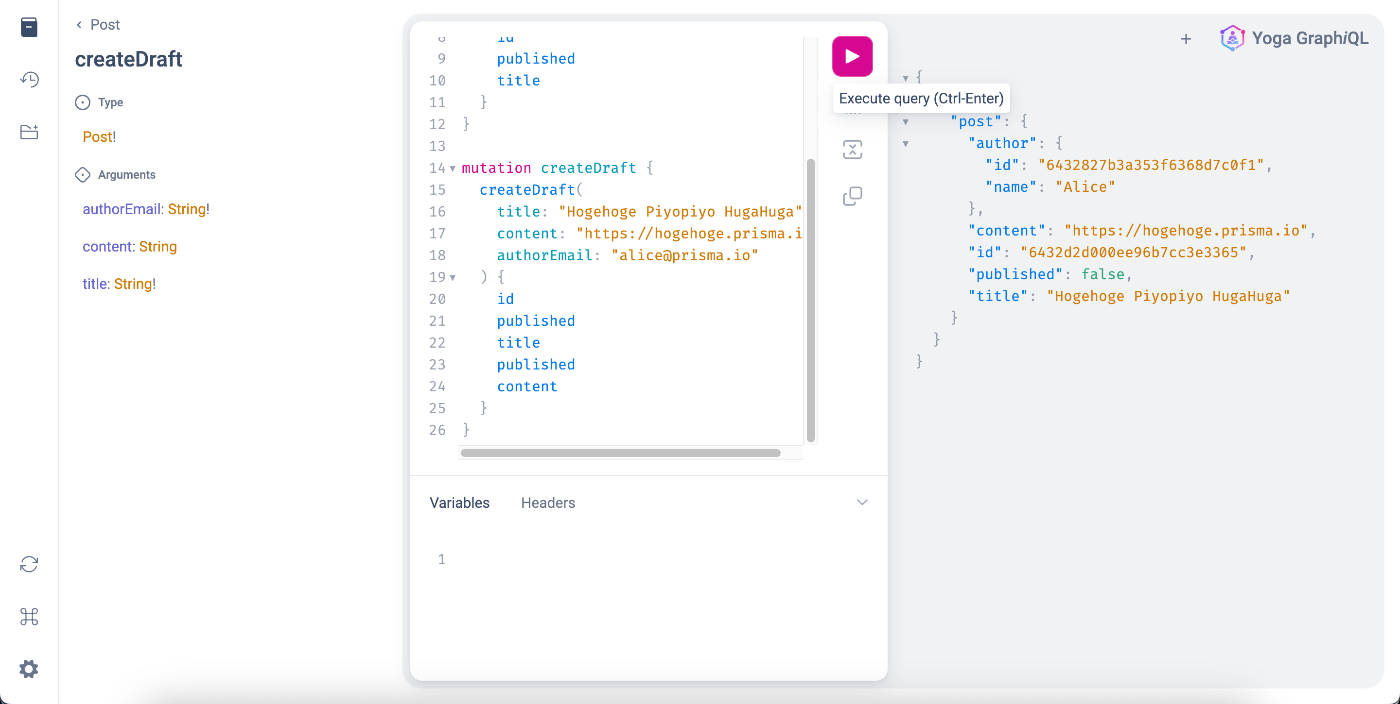
クエリを投げて、データが取得できることを確認する
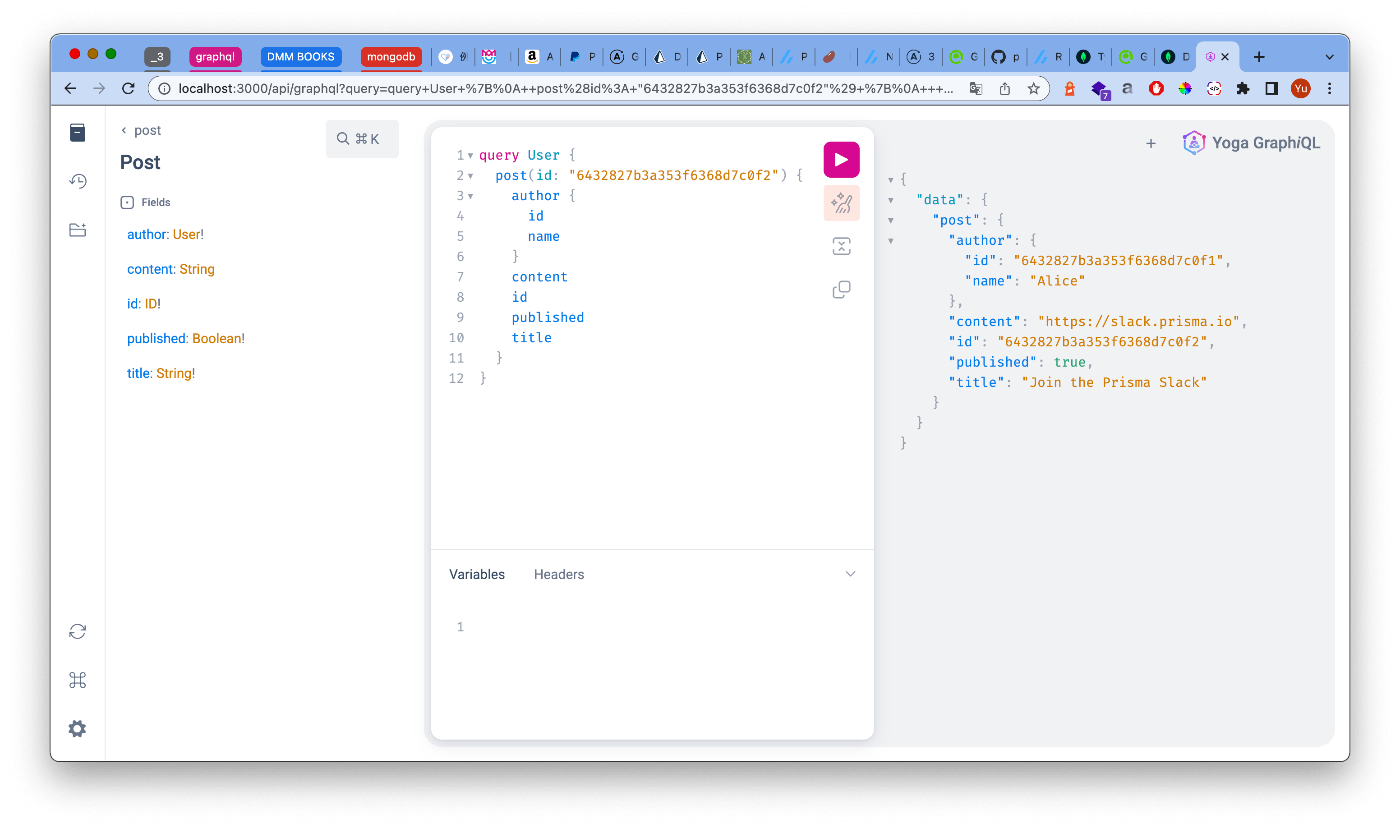
Query(Get)
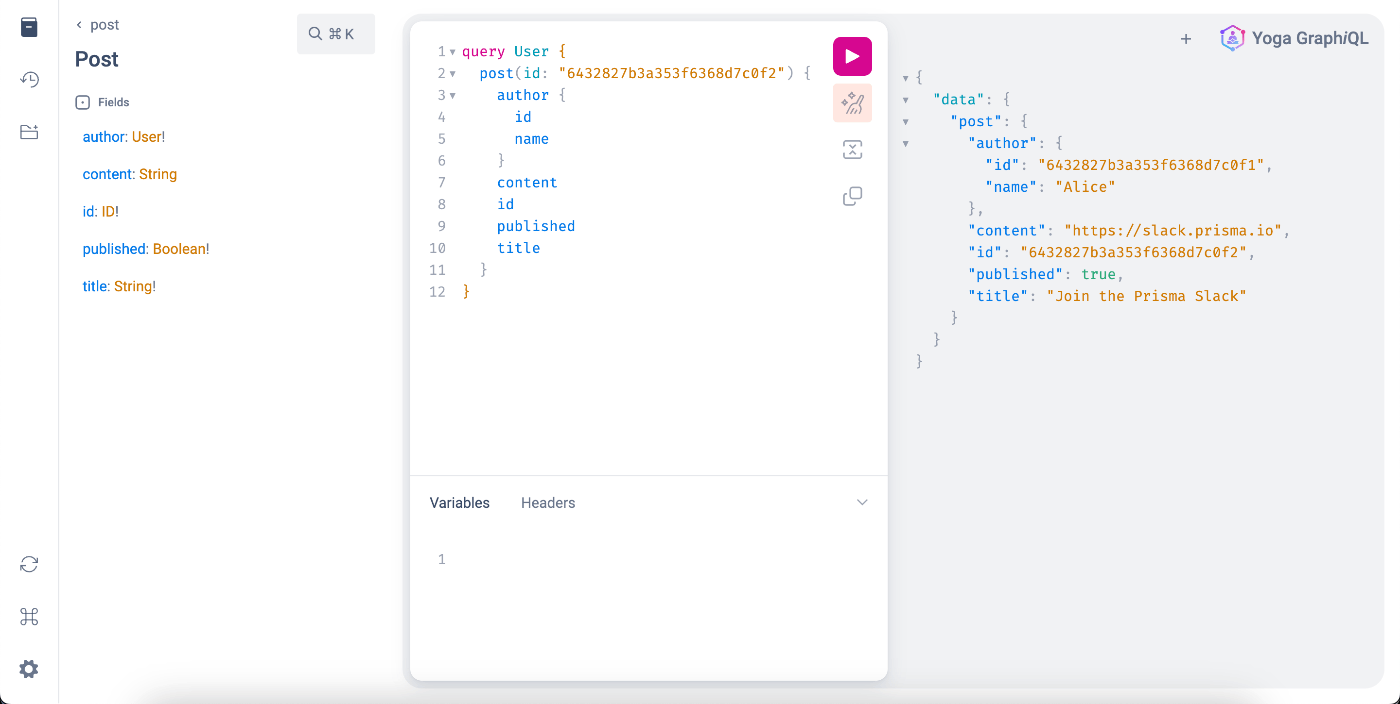
Mutation(Post)
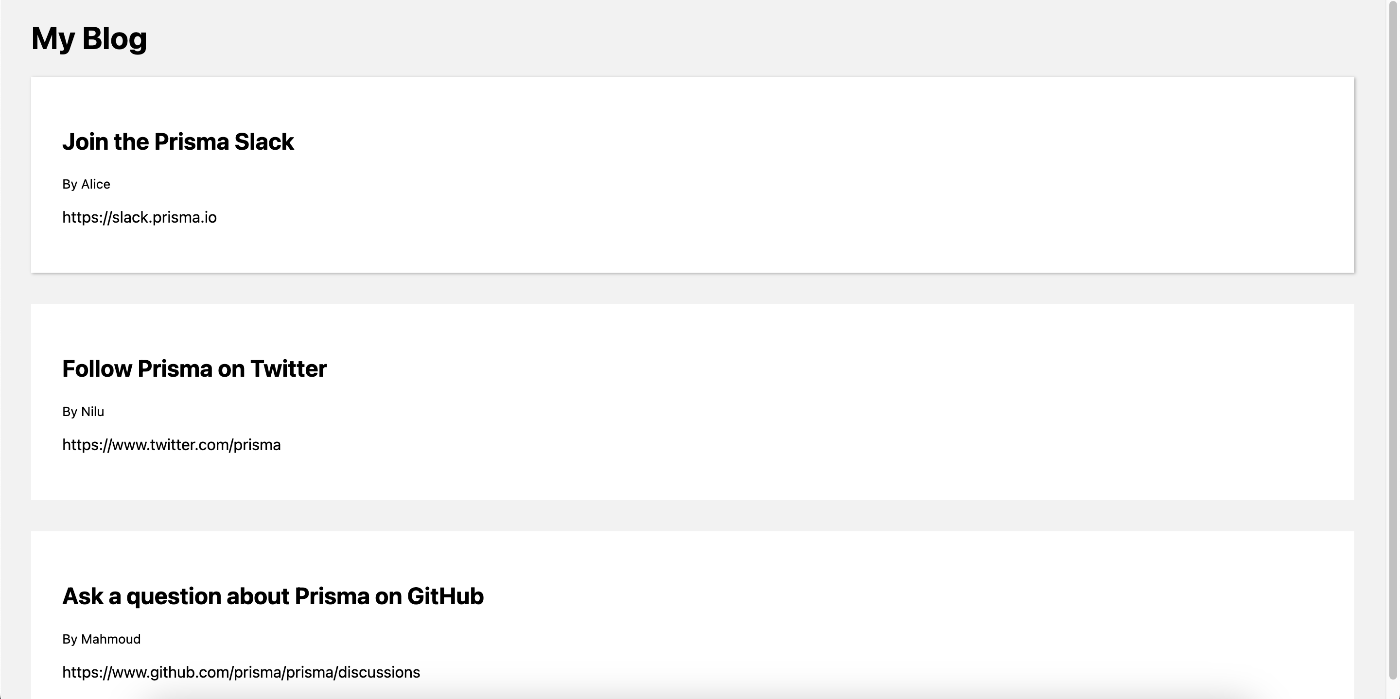
フロントエンドで記事のfeedを取得する
// データをUI上に表示する処理を書く
...
// GraphQLのクエリを叩いてデータを取得する
export async function getServerSideProps() {
  const { data } = await client.query({
    query: gql`
      query FeedQuery {
        feed {
          id
          title
          content
          published
          author {
            id
            name
          }
        }
      }
    `,
  });

  return {
    props: {
      data,
    },
  };
}
ハマりポイント
- MongoDBのIDはautoincrementをサポートしていない
エディタをWASM製のマークダウンパーサーに置き換える
submoduleで紐付けする
% cd markdown-parser
% wasmpask build
% cd ../
クライアントでWASMを扱えるように、next.config.jsでWebPackの設定を行う
/**
 * @type {import('next').NextConfig}
 */
module.exports = {
  webpack: (config, { isServer }) => {
    config.experiments = {
      asyncWebAssembly: true,
      layers: true,
    };
    config.output.webassemblyModuleFilename =
      (isServer ? "../" : "") + "static/wasm/[modulehash].wasm";
    return config;
  },
};
pkgをそのままimportして使う
import { text_to_token } from "../../markdown-parser/pkg";
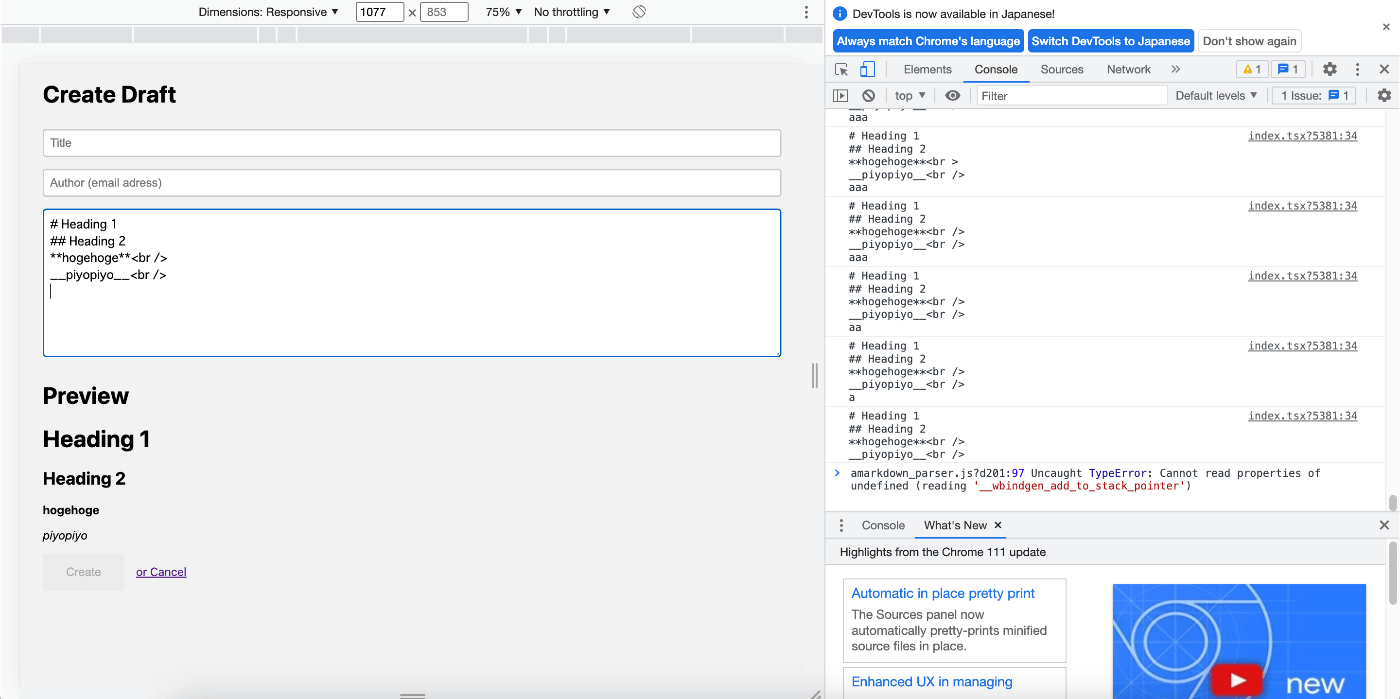
マークダウンエディタを埋め込む
import { text_to_token } from "../../markdown-parser/pkg";
でインポートしたtext_to_tokenに入力したマークダウンテキストを渡し、convertContentでインナーHTMLにコンバートする。
dangerouslySetInnerHTMLでインナーHTMLをコンバートする
<div
            dangerouslySetInnerHTML={{
              __html: markdownContent,
            }}
          />
import React, { use, useEffect, useState } from "react";
import Layout from "../../components/layout";
import Router from "next/router";
import gql from "graphql-tag";
import { useMutation } from "@apollo/client";
import { text_to_token } from "../../markdown-parser/pkg";

const CreateDraftMutation = gql`
  mutation CreateDraftMutation(
    $title: String!
    $content: String
    $authorEmail: String!
  ) {
    createDraft(title: $title, content: $content, authorEmail: $authorEmail) {
      id
      title
      content
      published
      author {
        id
        name
      }
    }
  }
`;

function Draft() {
  const [title, setTitle] = useState("");
  const [content, setContent] = useState("");
  const [markdownContent, setMarkdownContent] = useState("");
  const [authorEmail, setAuthorEmail] = useState("");

  const convertContent = (content: string) => {
    console.log(content);
    setContent(content);
    setMarkdownContent(text_to_token(content));
  };

  const [createDraft] = useMutation(CreateDraftMutation);

  return (
    <Layout>
      <div>
        <form
          onSubmit={async (e) => {
            e.preventDefault();

            await createDraft({
              variables: {
                title,
                content,
                authorEmail,
              },
            });
            Router.push("/drafts");
          }}
        >
          <h1>Create Draft</h1>
          <input
            autoFocus
            onChange={(e) => setTitle(e.target.value)}
            placeholder="Title"
            type="text"
            value={title}
          />
          <input
            onChange={(e) => setAuthorEmail(e.target.value)}
            placeholder="Author (email adress)"
            type="text"
            value={authorEmail}
          />
          <textarea
            cols={50}
            onChange={(e) => convertContent(e.target.value)}
            placeholder="Content"
            rows={8}
            value={content}
          />
          <h1>Preview</h1>
          <div
            dangerouslySetInnerHTML={{
              __html: markdownContent,
            }}
          />
          <input
            disabled={!content || !title || !authorEmail}
            type="submit"
            value="Create"
          />
          <a className="back" href="#" onClick={() => Router.push("/")}>
            or Cancel
          </a>
        </form>
      </div>
      <style jsx>{`
        .page {
          background: white;
          padding: 3rem;
          display: flex;
          justify-content: center;
          align-items: center;
        }

        input[type="text"],
        textarea {
          width: 100%;
          padding: 0.5rem;
          margin: 0.5rem 0;
          border-radius: 0.25rem;
          border: 0.125rem solid rgba(0, 0, 0, 0.2);
        }

        input[type="submit"] {
          background: #ececec;
          border: 0;
          padding: 1rem 2rem;
        }

        .back {
          margin-left: 1rem;
        }
      `}</style>
    </Layout>
  );
}

export default Draft;
ホスティング先をどうする?
-> AmplifyがSSRサポートしている ので試す
- submoduleをbackendとしてdeployするyamlを書く
- yamlでbackendのデプロイを同時にする
version: 1
backend:
  phases:
    preBuild:
      commands:
        - cd markdown-parser
        # install rust
        - curl --proto '=https' --tlsv1.2 -sSf https://sh.rustup.rs | sh -s -- -y
        - source ~/.cargo/env
        # add WASM target
        - rustup target add wasm32-unknown-unknown
        # install wasm-pack
        - cargo install wasm-pack
    build:
      commands:
        - wasm-pack build . --target web
frontend:
  phases:
    preBuild:
      commands:
        - npm ci
    build:
      commands:
        - npm run build
  artifacts:
    baseDirectory: .next
    files:
      - "**/*"
  cache:
    paths:
      - node_modules/**/*
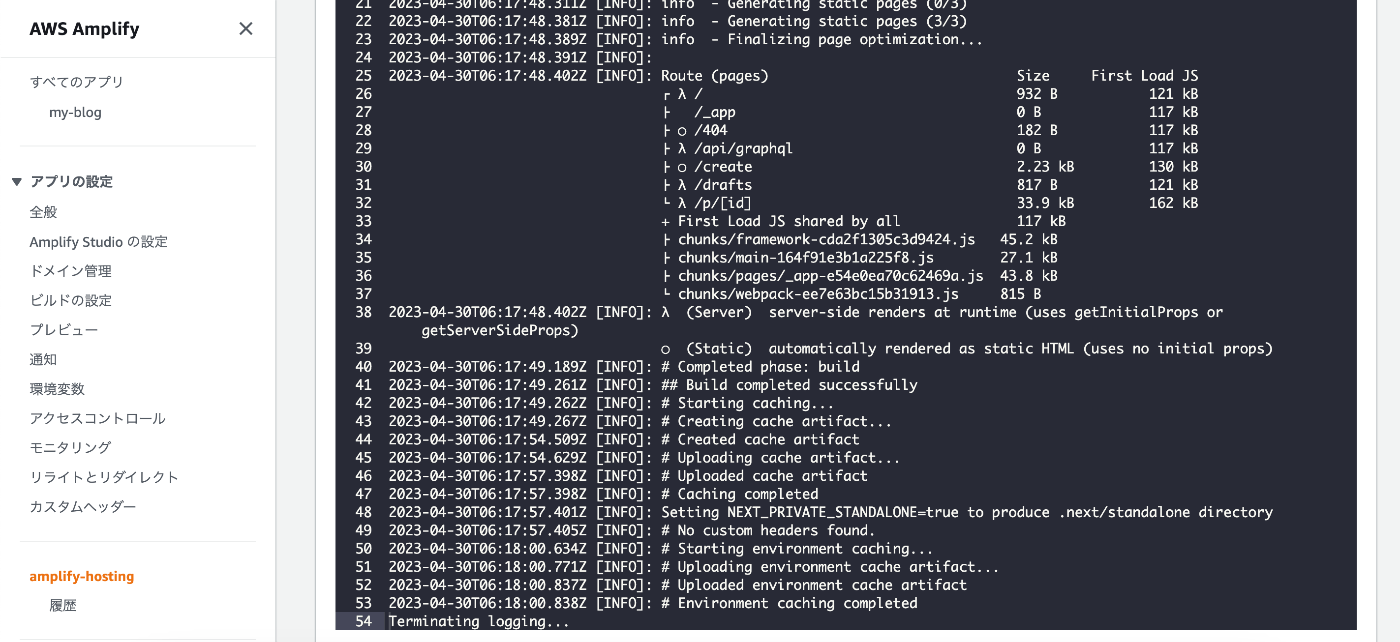
Amplify CLIからHostingする
Amplifyのインストール
npm install -g @aws-amplify/cli
amplify configure
- IAMユーザーを作成する
- regionはap-northeast-1(東京リージョン)
- IAM Pollicyは
AdministratorAccess-Amplifyをアタッチする
サイトを公開する
apmlify add hosting でS3の静的ホスティングを有効にする
バケット名に何も指定しない場合、ユニークなバケットが生成される
ビルド後はCloudFrontで公開される
amplify init # プロジェクトの初期化
amplify add hosting # hostingの有効化
amplify publish # アプリケーションのビルド
バックエンドのGraphQLを追加する
amplify add api
TIPS
mongodbが繋がらなくなった
Console > connect > Add Current IP Adressからipアドレスを割り当てる
参考資料
WASMビルド on Vercel
Hasura+Code Generator(移行用)
Style周り
マークダウン
非同期処理
SSR、CSR、キャッシュ関係
Mongo on Vercel
Prisma on Vercel
Vercel Serverless Function
Apollo Client
オーベーヘッドについて
Yoga
Pothos
ハマりポイント
- Data型の扱い
デザイン/CSS
GraphQL
デプロイしたもの
styled-comopnentsへの書き換え
Mantine
vercel postgressのhobby planの利用制限に引っかかった

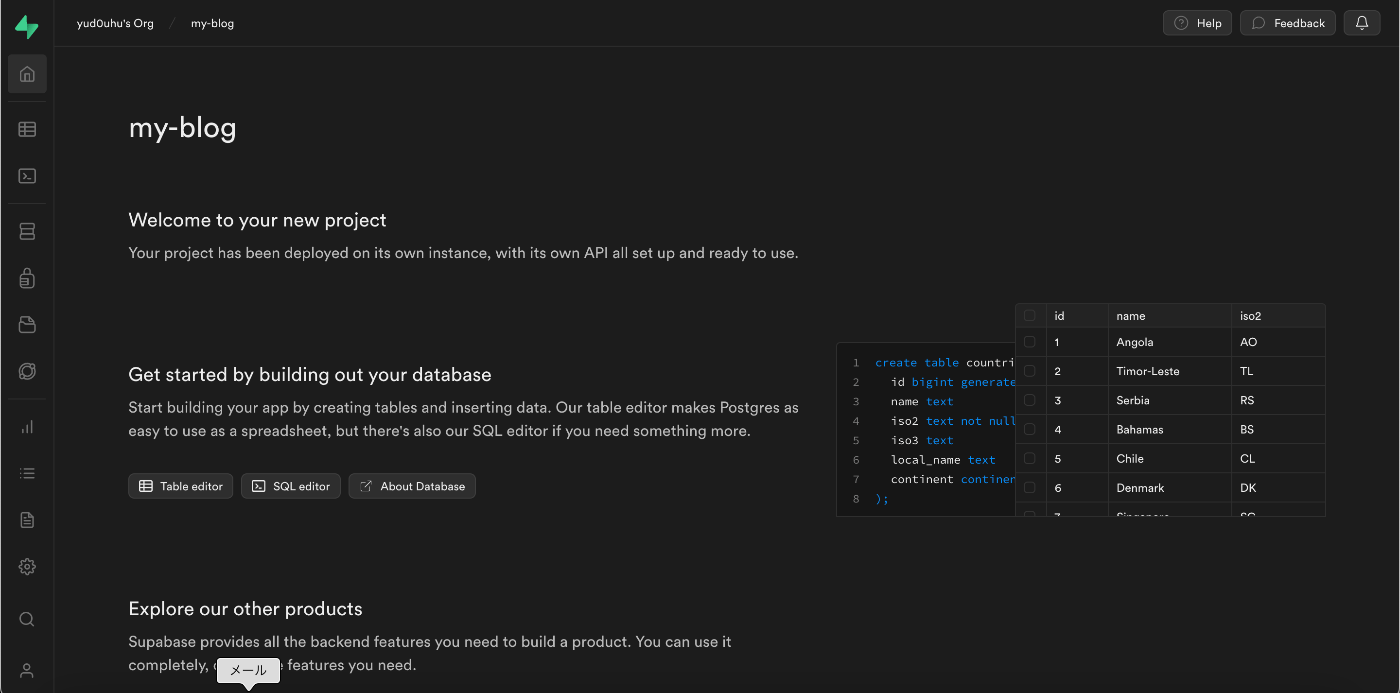
supabaseへの移行を試す
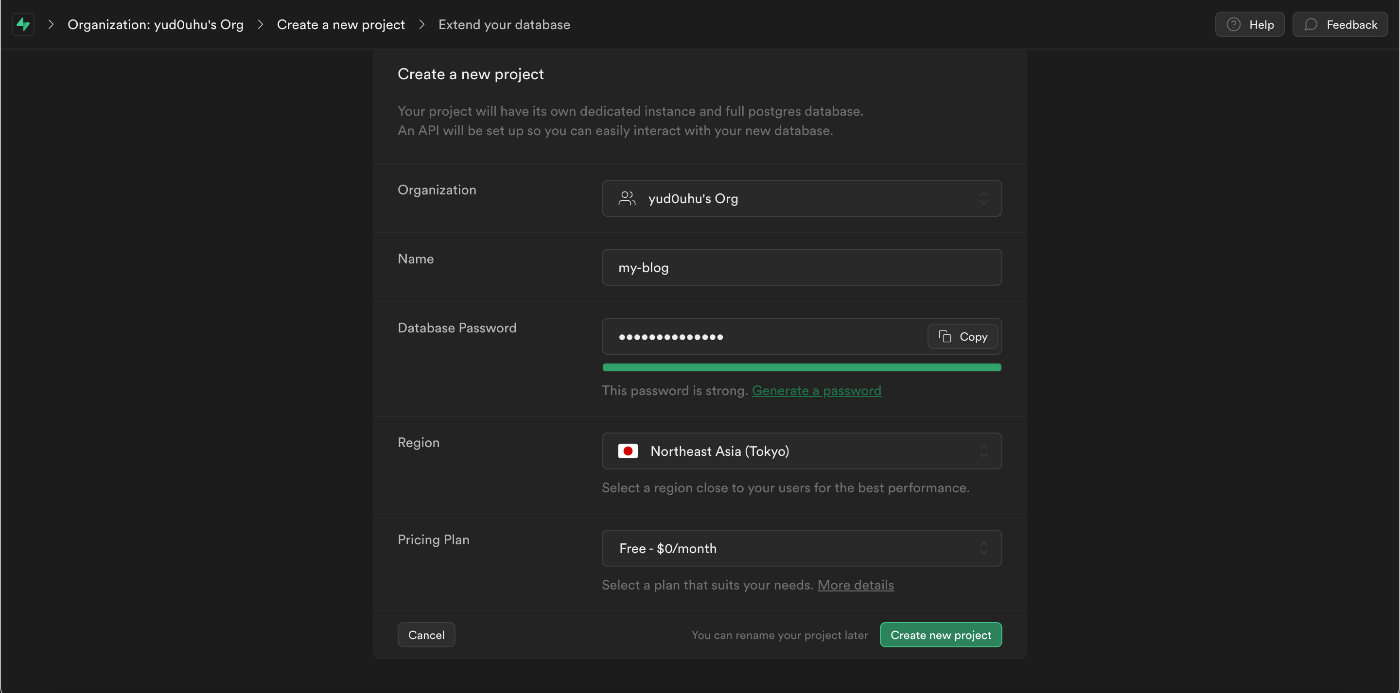
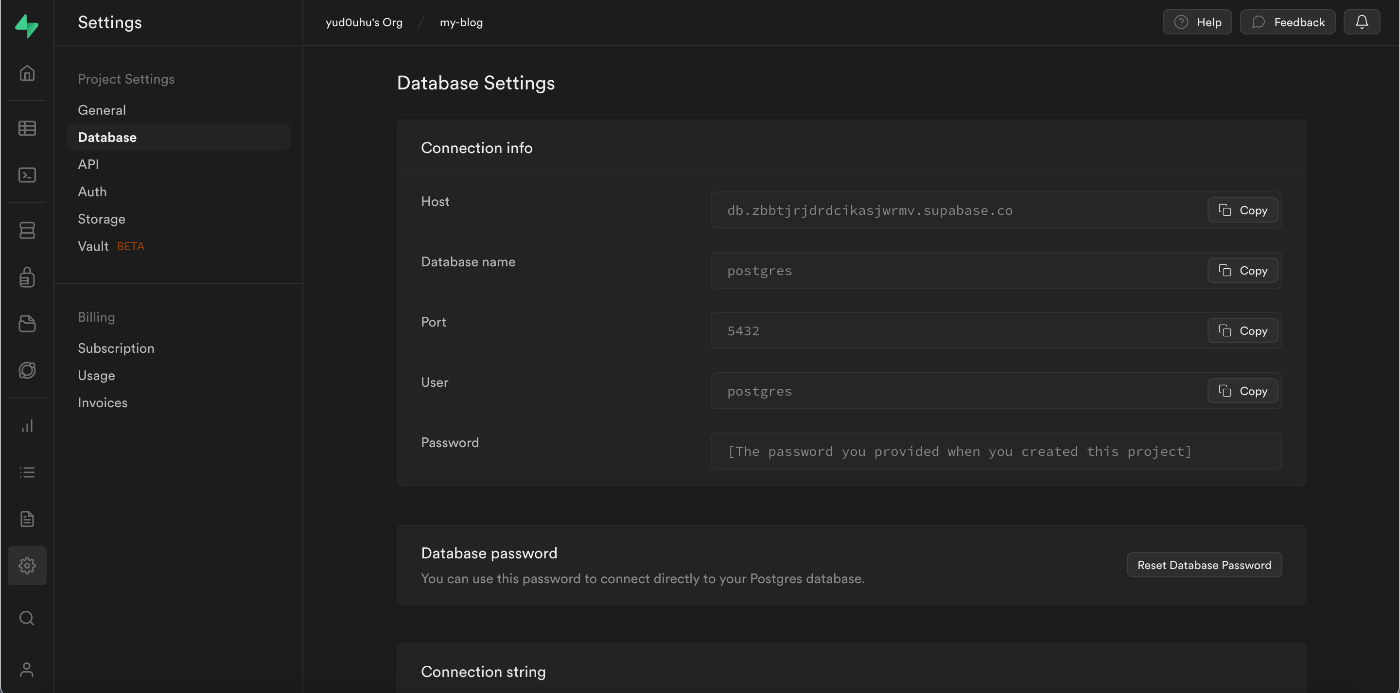
参考
DB情報はここから参照する
置き換え完了
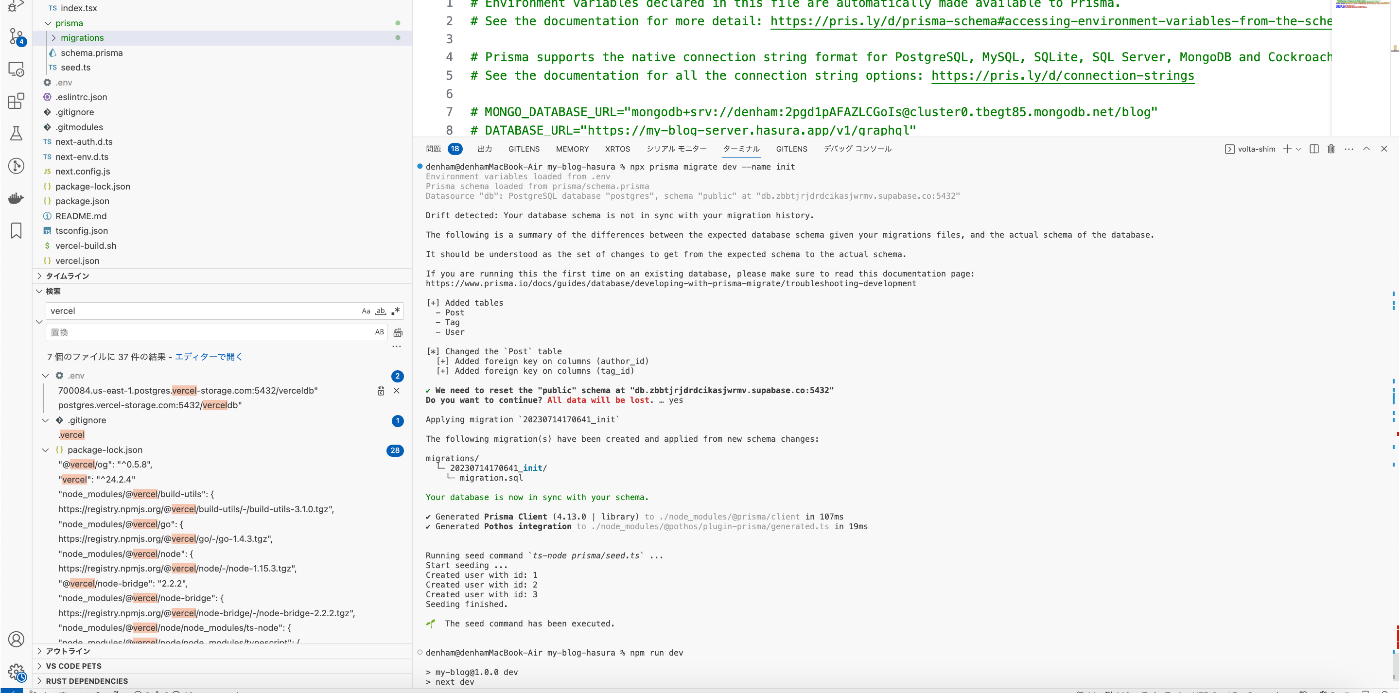
テーブル設計
CREATE TABLE "User" (
  "id" SERIAL PRIMARY KEY,
  "name" VARCHAR(255)
);

CREATE TABLE "Post" (
  "id" SERIAL PRIMARY KEY,
  "authorId" INT,
  "content" TEXT,
  "published" BOOLEAN DEFAULT FALSE,
  "title" VARCHAR(255) NOT NULL,
  "createdAt" TIMESTAMP DEFAULT NOW(),
  "updatedAt" TIMESTAMP,
  "viewCount" INT DEFAULT 0,
  "tagId" INT,
  FOREIGN KEY ("authorId") REFERENCES "User"("id") ON DELETE SET NULL,
  FOREIGN KEY ("tagId") REFERENCES "Tag"("id") ON DELETE SET NULL
);

CREATE TABLE "Tag" (
  "id" SERIAL PRIMARY KEY,
  "label" VARCHAR(255)
);
リレーションは以下のように作成
ALTER TABLE "Post" ADD CONSTRAINT "FK_Post_authorId_User_id" FOREIGN KEY ("authorId") REFERENCES "User"("id");
ALTER TABLE "Post" ADD CONSTRAINT "FK_Post_tagId_Tag_id" FOREIGN KEY ("tagId") REFERENCES "Tag"("id");
-
PostテーブルのauthorIdフィールドがUserテーブルのidフィールドを参照する -
tagIdフィールドがTagテーブルのidフィールドを参照する
Vercelで手動デプロイ
Vercel Consoleから、Settings > GitのDeploy Hooksで適当なフック名とブランチを指定
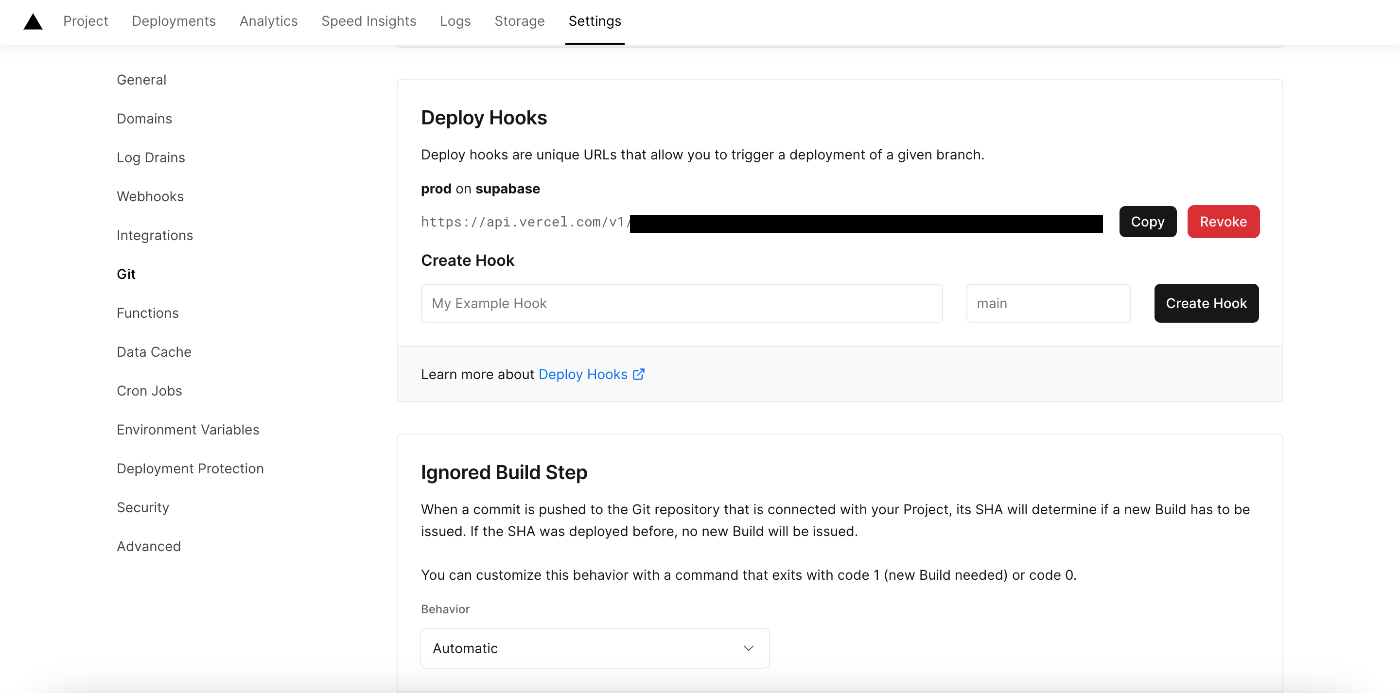
ターミナルからcurlでフックを呼び出す
curl -X POST
https://api.vercel.com/v1/XXXXX
パフォーマンス改善
LightHouseで計測
初期(Score:75)
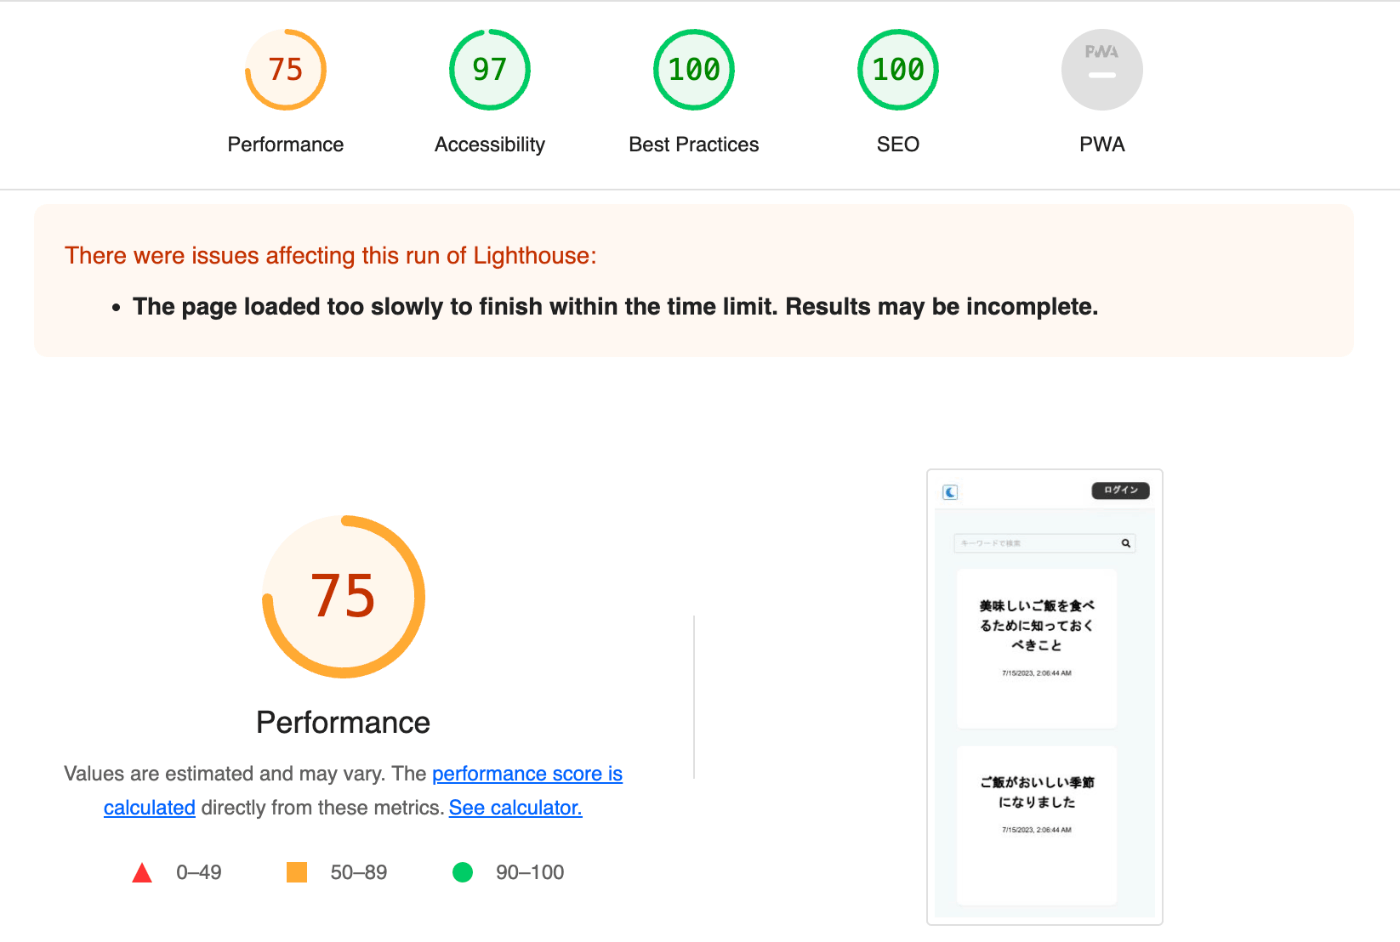
ここから以下のように修正
-
useQueryが500msごとにクエリを発行するようになっていた(pollInterval: 500) - optionでfetchPolicy: "cache-and-network" を指定
修正後(Score:78)
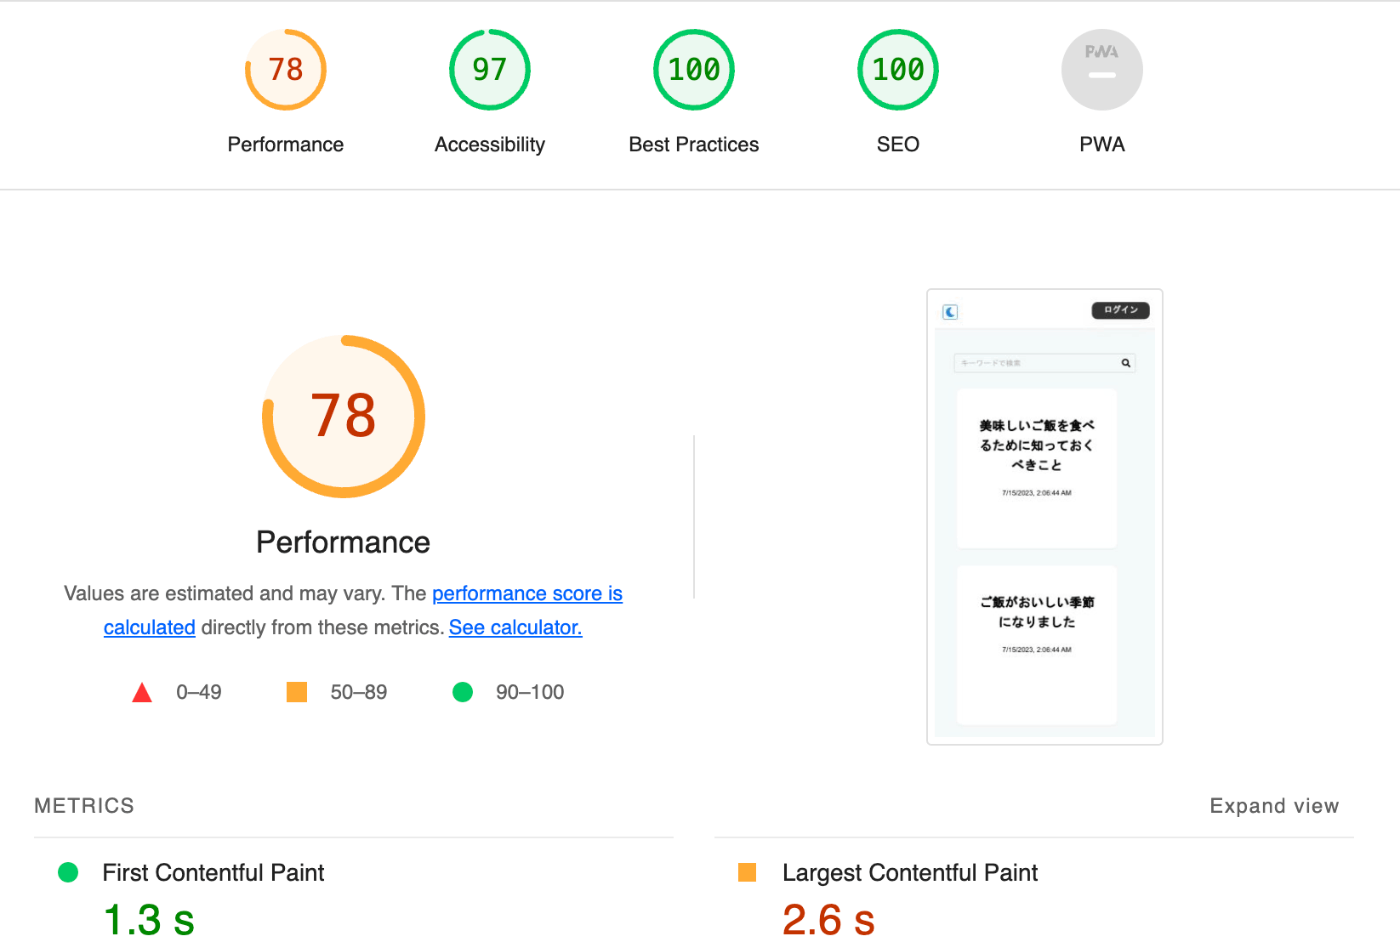
さらに以下のように修正
- キャッシュ制御ヘッダーを追加
public, max-age=31536000, immutableで1年間ブラウザがキャッシュからリソースを取得するように設定
  async headers() {
    return [
      {
        source: "/(.*)",
        headers: [
          {
            key: "Cache-Control",
            value: "public, max-age=31536000, immutable",
          },
        ],
      },
    ];
  },
- index.tsxの使われていないコードを削除
修正後(Score: 90)
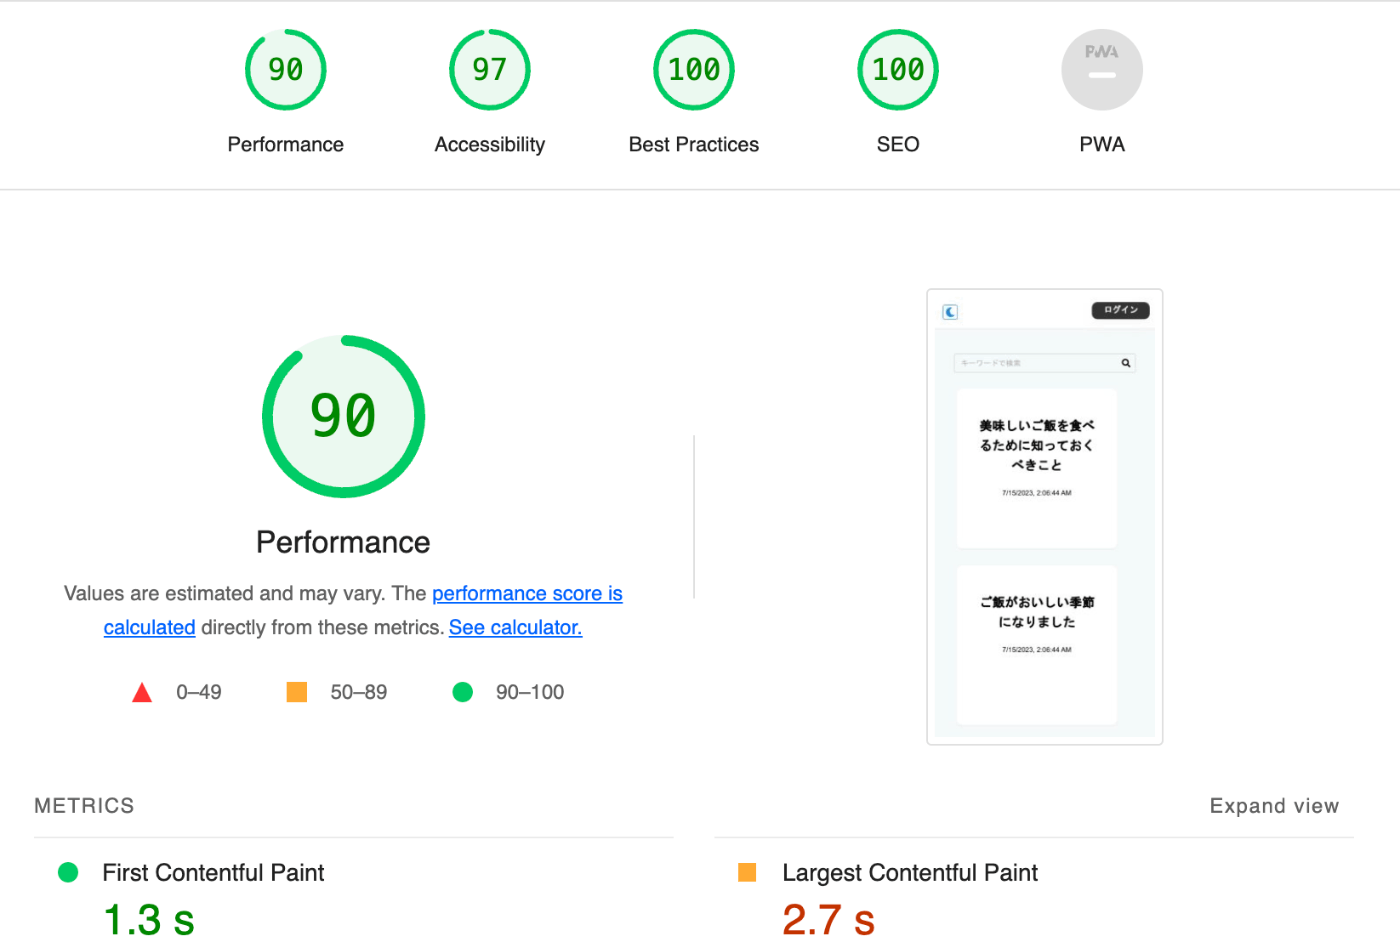
キャッシュは以下のフローチャートをもとに設定してみる
参考
アクセシビリティスコアを100点にしたい
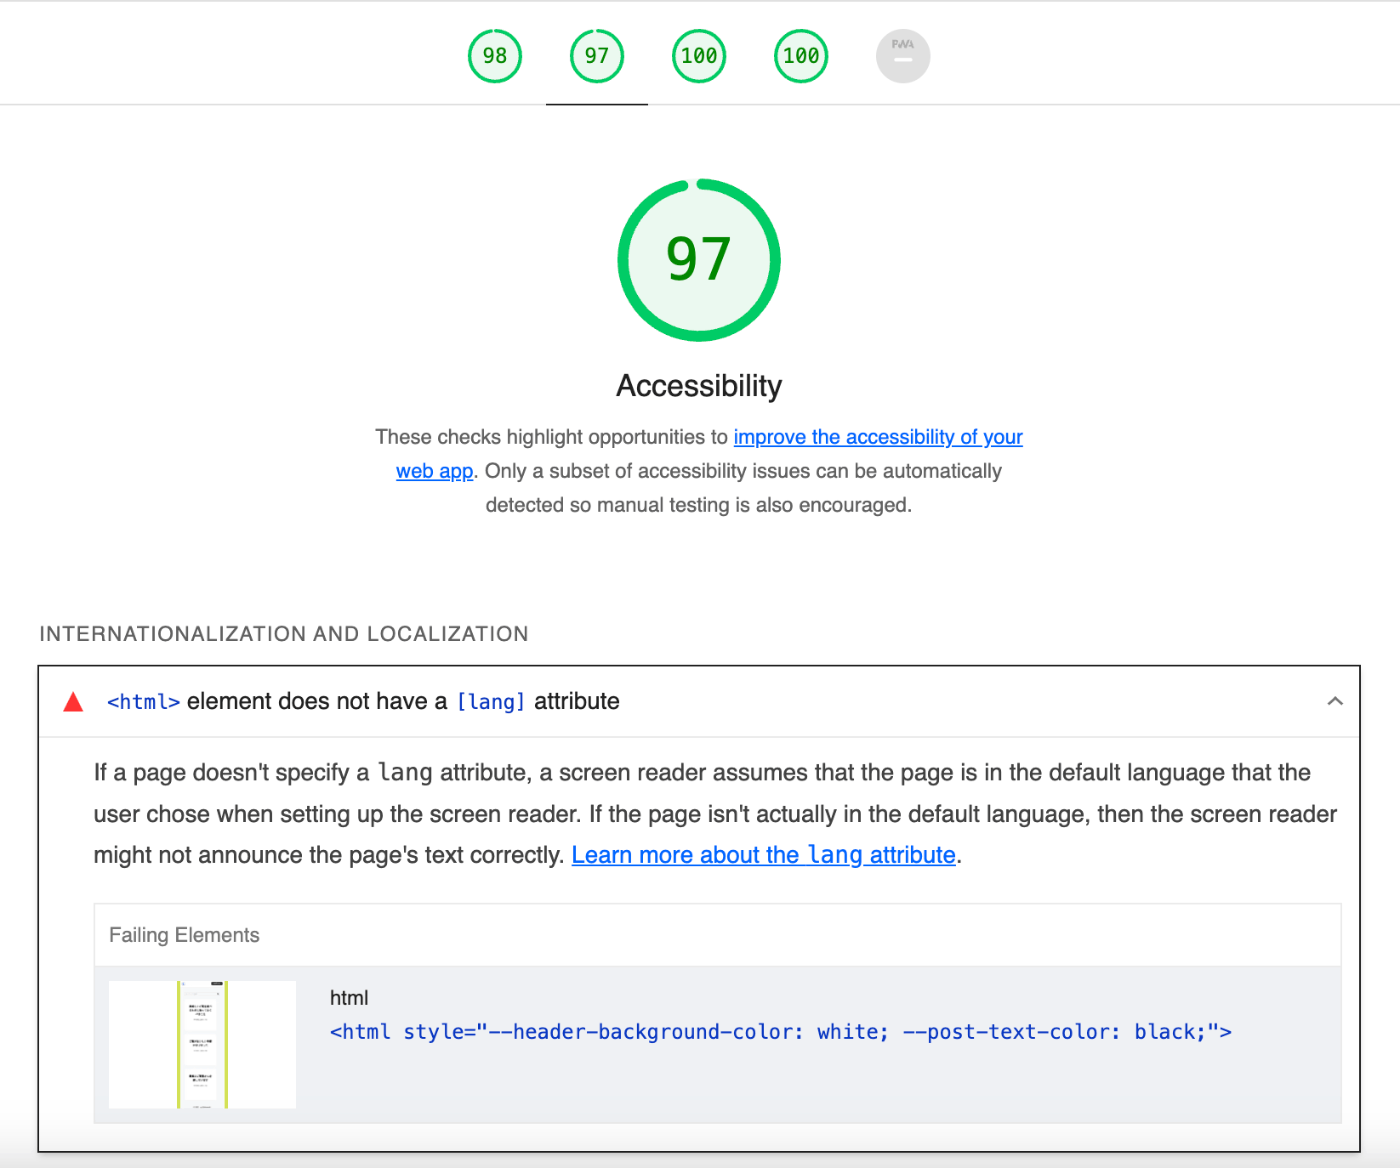
lang="ja"を設定する
参考
知見置場
TS/バンドル周り
React
Mongo
GraphQL・API設計
Vercelビルド設定周り
Prisma
Styled-components
NextAuth
マークダウンパーサー
ディレクトリ設計
TIPS
ダークモード
- TextInputで詰まった
https://mantine.dev/styles/styled/
https://mantine.dev/core/text-input/?t=styles-api
https://zenn.dev/lilac/articles/7c235a1841a8da
https://styled-components.com/
https://software.pitang1965.com/2021/10/03/dark-mode-using-styled-components/
cloudflareでカスタムドメインを買って、Vercelで設定する
404ページ
メモ
Google Analytics入れたい
チューニング/Lighthouseのスコアを上げる
チューニング
https://developers.google.com/speed/docs/insights/Server?hl=ja によると、TTFBは200ミリ秒以下が推奨らしい
参考記事
@next/font
Next13で追加された新機能
npm install @next/font
import { Inter } from 'next/font/google'
import styles from '../styles/component.module.css'

const inter = Inter({
  variable: '--font-inter',
})
実行すると以下のエラーが出る
`next/font` error:
Preload is enabled but no subsets were specified for font `Inter`. Please specify subsets or disable preloading if your intended subset can't be preloaded.
Available subsets: `cyrillic`, `cyrillic-ext`, `greek`, `greek-ext`, `latin`, `latin-ext`, `vietnamese`

Read more: https://nextjs.org/docs/messages/google-fonts-missing-subsets
デフォルトでは preload が true となっており、その場合は subsets 指定が必須
サブセットを指定
import { Inter } from "next/font/google";

const inter = Inter({
  variable: "--font-inter",
  subsets: ["latin"],
});
以下で適用
  return (
      <main style={inter.style}>
      </main>
  );
バージョン 13.2 以降では、next/fontNext.js に組み込まれており、@next/fontパッケージが冗長になっています。この@next/fontパッケージは Next.js 14 で完全に削除されます。
以下でアンインストール
npx @next/codemod built-in-next-font
SSRでstyled-componentsが崩れる
- 本来styled-componentsはクライアントサイドで実行されるため、SSRのページでラグで崩れる
_document.tsxにこれを適用する
import Document, {
  Html,
  Head,
  Main,
  NextScript,
  DocumentContext,
  DocumentInitialProps,
} from 'next/document'
import { ServerStyleSheet } from 'styled-components'
class MyDocument extends Document {
  static async getInitialProps(
    ctx: DocumentContext
  ): Promise<DocumentInitialProps> {
    const sheet = new ServerStyleSheet()
    const originalRenderPage = ctx.renderPage

    try {
      ctx.renderPage = () =>
        originalRenderPage({
          enhanceApp: (App) => (props) =>
            sheet.collectStyles(<App {...props} />),
        })

      const initialProps = await Document.getInitialProps(ctx)
      return {
        ...initialProps,
        styles: (
          <>
            {initialProps.styles}
            {sheet.getStyleElement()}
          </>
        ),
      }
    } finally {
      sheet.seal()
    }
  }
  render() {
    return (
      <Html lang="en">
        <Head />
        <body>
          <Main />
          <NextScript />
        </body>
      </Html>
    )
  }
}

export default MyDocument
ハマりポイント
以下のエラーで弾かれた
- error Error [TypeError]: Cannot read properties of undefined (reading 'Symbol(Pothos.contextCache)')
    at file:///Users/denham/Documents/my-blog-hasura/node_modules/@pothos/core/esm/utils/context-cache.js:10:33
    at SchemaBuilder.prismaObject (file:///Users/denham/Documents/my-blog-hasura/node_modules/@pothos/plugin-prisma/esm/schema-builder.js:18:22)
    at eval (webpack-internal:///(api)/./pages/api/graphql.ts:27:9) {
  digest: undefined
}
- wait compiling /_error (client and server)...
- event compiled client and server successfully in 2.4s (1476 modules)
- warn Fast Refresh had to perform a full reload due to a runtime error.
npx prisma generate のときの以下の警告がにおう
warn Versions of prisma@4.13.0 and @prisma/client@4.16.2 don't match.
This might lead to unexpected behavior.
Please make sure they have the same version.
【解決】
@prisma/clientのバージョンは明示的に@prismaに合わせる
"@prisma/client": "4.13.0",
テキストコンテンツがサーバーでレンダリングされた HTMLと一致しない
https://nextjs.org/do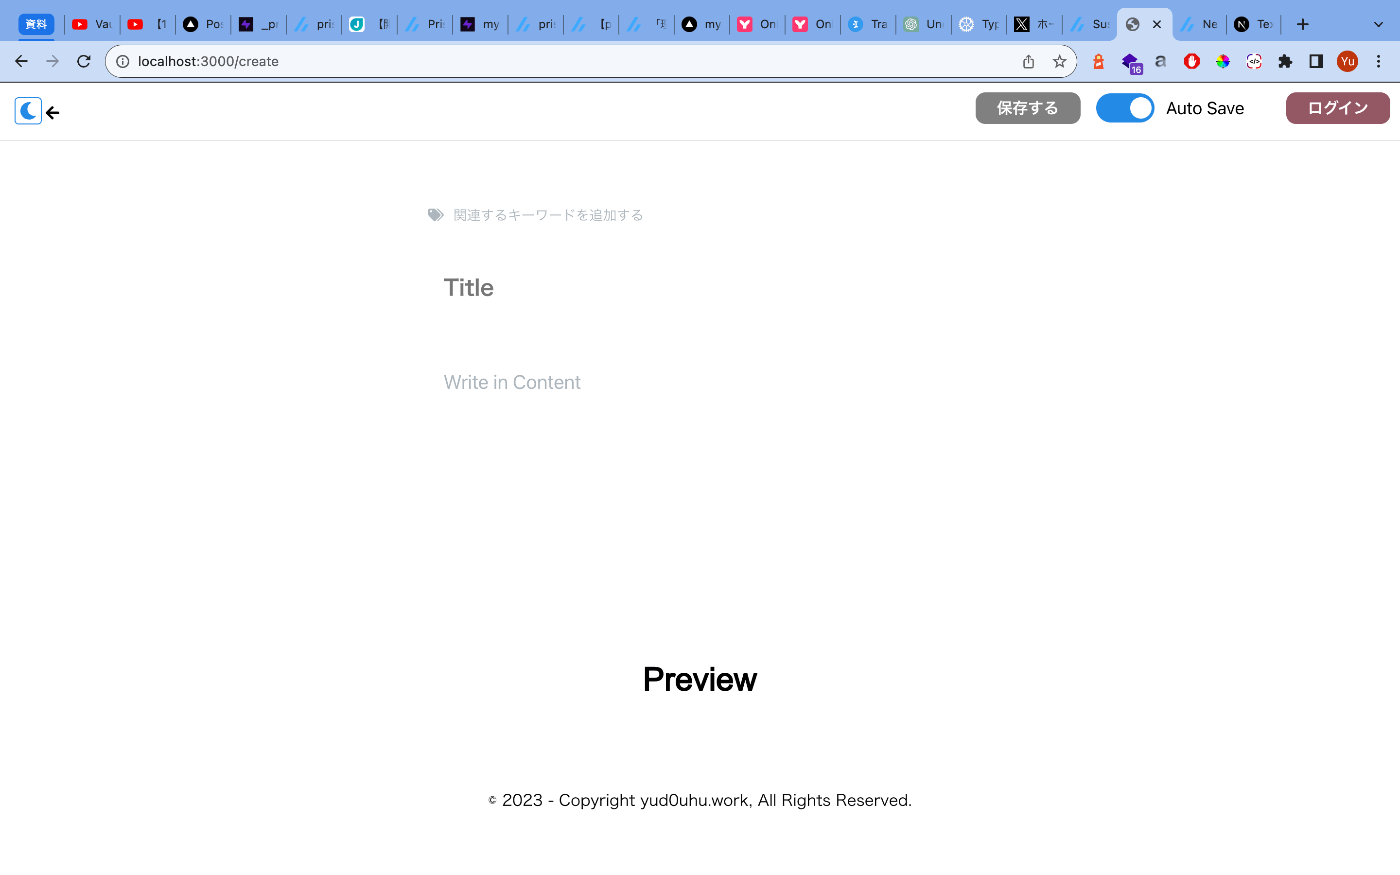
cs/messages/react-hydration-error
以下のようにして解決
Solution 1: Using useEffect to run on the client only
Ensure that the component renders the same content server-side as it does during the initial client-side render to prevent a hydration mismatch. You can intentionally render different content on the client with the useEffect hook.
import { useState, useEffect } from 'react'

export default function App() {
  const [isClient, setIsClient] = useState(false)

  useEffect(() => {
    setIsClient(true)
  }, [])

  return <h1>{isClient ? 'This is never prerendered' : 'Prerendered'}</h1>
}
import React, { Suspense, useEffect, useState } from 'react'
import Layout from '../../components/layout'
import init from '../../markdown-parser/pkg/markdown_parser'
import Create from '../../features/create/components/Create'

function CreatePage() {
  const [isClient, setIsClient] = useState(false)
  // init関数は、コンポーネントのマウント時ではなく、外部のebAssemblyモジュールを非同期でロードするため、useEffectフックを使用する
  useEffect(() => {
    const loadWasm = async () => {
      await init()
    }
    setIsClient(true)
    loadWasm()
  }, [])

  return (
    <>
      {isClient ? (
        <Layout>
          <Create />
        </Layout>
      ) : (
        <Suspense fallback={<p>Loading feed...</p>}> </Suspense>
      )}
    </>
  )
}

export default CreatePage
Vercelのホスティングフック

Motion
カラースタイル参考
FOCS
Hydrogen Error
タグ入力のUI
Mermaid
チューニング・バンドルサイズ最適化
サーバーコンポーネント