【無料】GPUがなくてもStable Diffusionで遊びたい!
まえがき
「GPUを持ってないけどAI絵を描いてみたい!」というお悩みを抱えている皆さん、Google Colabで満足していませんか?この記事ではModalを使うことでGoogle Colabより(きっと)優れたAI絵生成体験をGETする方法をご紹介します。
What is Modal?

イケメンなランディングページだね
みんなが良く知るあの「モーダル」ではありません。名前の由来は謎ですが、「Your end-to-end stack for cloud compute」という謳い文句の通りクラウドコンピューティングツール(?)です。Colabみたいにリモートでプログラムを実行する環境を用意してくれるというわけですね。Colabとは違って対話的ではないのであまり初心者には優しくないですが、Pythonの関数の一部だけをリモートで実行するというような柔軟性があるので汎用性はそこそこ高いと思います。
PRICINGのところを見ると、秒単位(時間単位)のお値段が書いてあるのですが、かなりお安いのがお分かり頂けるかと。しかもアイドル中(サーバーがアクセスされていない時間など)の料金はかからないってんだから素晴らしいですね。使うしかない。

これを見て「あれ?無料やないやんけ」と思ったかもしれません。しかし(少なくとも今は)月30ドル分を無料で使わせてくれるのでありがたく無料で動かさせて頂きましょう。
ちなみにPRICINGのところにStable Diffusionを動かすときのお値段の一例が書いてあり、それによれば30ドルで51000枚の画像が生成できるらしいので十分ですね。(実際は画像の生成だけにお金がかかるわけではないのでもう少し減っちゃいますが)
You run stable diffusion on an A10G GPU. This will run for about 1.5 seconds to generate each image, while using 4GB RAM and 1 CPU.
This will cost $0.000458333/image in GPU charges, $0.00008/image in CPU charges, and $0.00004/image in memory charges, adding up to $0.000578333/image in total charges, i.e. $0.587333 per 1,000 images.
2023/05/13追記
コメントで教えてもらったんですが、Shared volume storageに$2/GiB/monthかかるらしいです。ただ別に何も起動してなければかかってる感じしないので使っている間だけ消費するのかな...? (要検証)
使ってみよう
1. ModalのアカウントをGETする
Modalのサイトにアクセスして「Sign up」のところからアカウント登録をします。
2023/02/05現在はBeta版らしいのでアカウント登録してもすぐには使えず、Waitlistに入れられるっぽいです。ボクが登録した時は1日経たないぐらいで承認されたんですが、今はもう少し遅いかもしれません。ぼっち・ざ・ろっくでも見ながら気長に待ちましょう。
2. Modalを動かしてみる
公式のGetting Startedに沿ってModalを動かしてみます。
1) ModalのPythonクライアントをダウンロード
まずはpipを使ってクライアントソフトをダウンロードしてきます。
pip install modal-client
ダウンロードできたら次のコマンドを使ってアカウントと紐付けて上げましょう。コマンドを実行するとURLが表示されると思うので、そのURLにアクセスして流れに沿って認証していけばAPIトークンが発行されるはずです。
modal token new
2) コードを動かしてみる
次のプログラムをget_started.pyとして保存してください。
# リモート側で動く関数
@stub.function()
def square(x):
    print("This code is running on a remote worker!")
    return x**2

# プログラムのローカル側のエントリポイント(プログラムの中で最初に呼び出されるところ)
@stub.local_entrypoint()
def main():
    # Modalの関数は`<function_name>.remote`で呼び出す必要がある
    print("the square is", square.remote(42))
保存出来たら次のコマンドでプログラムを動かしてみましょう。
modal run get_started.py
いろいろセットアップがなされたあとにthe square is 1764と表示されていれば成功です!
3. Secretsの設定
Hugging Faceからモデルをダウンロードする関係でHugging FaceのAccess Tokenが必要になります。
アカウント登録したら右上のユーザーアイコンをクリックして「Settings」を開きましょう。

「Access Token」というタブを開いて、「New Token」から新しいAccess Tokenを生成しましょう。

無事Access Tokenが生成できたらそれをコピーして、ModalのGetting Startedに戻り、「Set up integrations/secrets」のところから「Hugging Face」を選択します。そしてVALUEにさっきコピーしたAccess Tokenを貼り付けて、「NEXT」をクリックします。
名前はデフォルトのmy-huggingface-secretのままでOKで、「CREATE」をクリックすると無事Secretsが作成されます。

これで下準備は終わりです!!
4. Modalを使ってStable Diffusion WebUIを動かす
準備が出来たところで早速Stable Diffusionを動かして行きましょう!まずは以下のプログラムをstable-diffusion-webui.pyという名前で保存してください。
from colorama import Fore
from pathlib import Path

import modal
import shutil
import subprocess
import sys
import shlex
import os

# modal系の変数の定義
stub = modal.Stub("stable-diffusion-webui-2")
volume_main = modal.NetworkFileSystem.persisted("stable-diffusion-webui-main-2")

# 色んなパスの定義
webui_dir = "/content/stable-diffusion-webui"
webui_model_dir = webui_dir + "/models/Stable-diffusion/"

# モデルのID
model_ids = [
    {
        "repo_id": "hakurei/waifu-diffusion-v1-4",
        "model_path": "wd-1-4-anime_e1.ckpt",
        "config_file_path": "wd-1-4-anime_e1.yaml",
    },
]


@stub.function(
    image=modal.Image.from_registry("python:3.8-slim")
    .apt_install(
        "git", "libgl1-mesa-dev", "libglib2.0-0", "libsm6", "libxrender1", "libxext6"
    )
    .run_commands(
        "pip install -e git+https://github.com/CompVis/taming-transformers.git@master#egg=taming-transformers"
    )
    .pip_install(
        "blendmodes==2022",
        "transformers==4.25.1",
        "accelerate==0.12.0",
        "basicsr==1.4.2",
        "gfpgan==1.3.8",
        "gradio==3.16.2",
        "numpy==1.23.3",
        "Pillow==9.4.0",
        "realesrgan==0.3.0",
        "torch",
        "omegaconf==2.2.3",
        "pytorch_lightning==1.7.6",
        "scikit-image==0.19.2",
        "fonts",
        "font-roboto",
        "timm==0.6.7",
        "piexif==1.1.3",
        "einops==0.4.1",
        "jsonmerge==1.8.0",
        "clean-fid==0.1.29",
        "resize-right==0.0.2",
        "torchdiffeq==0.2.3",
        "kornia==0.6.7",
        "lark==1.1.2",
        "inflection==0.5.1",
        "GitPython==3.1.27",
        "torchsde==0.2.5",
        "safetensors==0.2.7",
        "httpcore<=0.15",
        "tensorboard==2.9.1",
        "taming-transformers==0.0.1",
        "clip",
        "xformers",
        "test-tube",
        "diffusers",
        "invisible-watermark",
        "pyngrok",
        "xformers==0.0.16rc425",
        "gdown",
        "huggingface_hub",
        "colorama",
        "torchmetrics==0.11.4",
    )
    .pip_install("git+https://github.com/mlfoundations/open_clip.git@bb6e834e9c70d9c27d0dc3ecedeebeaeb1ffad6b"),
    secret=modal.Secret.from_name("my-huggingface-secret"),
    network_file_systems={webui_dir: volume_main},
    gpu="a10g",
    timeout=6000,
)
async def run_stable_diffusion_webui():
    print(Fore.CYAN + "\n---------- セットアップ開始 ----------\n")

    webui_dir_path = Path(webui_model_dir)
    if not webui_dir_path.exists():
        subprocess.run(f"git clone -b v2.0 https://github.com/camenduru/stable-diffusion-webui {webui_dir}", shell=True)

    # Hugging faceからファイルをダウンロードしてくる関数
    def download_hf_file(repo_id, filename):
        from huggingface_hub import hf_hub_download

        download_dir = hf_hub_download(repo_id=repo_id, filename=filename)
        return download_dir


    for model_id in model_ids:
        print(Fore.GREEN + model_id["repo_id"] + "のセットアップを開始します...")

        if not Path(webui_model_dir + model_id["model_path"]).exists():
            # モデルのダウンロード&コピー
            model_downloaded_dir = download_hf_file(
                model_id["repo_id"],
                model_id["model_path"],
            )
            shutil.copy(model_downloaded_dir, webui_model_dir + os.path.basename(model_id["model_path"]))


        if "config_file_path" not in model_id:
          continue

        if not Path(webui_model_dir + model_id["config_file_path"]).exists():
            # コンフィグのダウンロード&コピー
            config_downloaded_dir = download_hf_file(
                model_id["repo_id"], model_id["config_file_path"]
            )
            shutil.copy(config_downloaded_dir, webui_model_dir + os.path.basename(model_id["config_file_path"]))


        print(Fore.GREEN + model_id["repo_id"] + "のセットアップが完了しました!")

    print(Fore.CYAN + "\n---------- セットアップ完了 ----------\n")

    # WebUIを起動
    sys.path.append(webui_dir)
    sys.argv += shlex.split("--skip-install --xformers")
    os.chdir(webui_dir)
    from launch import start, prepare_environment

    prepare_environment()
    # 最初のargumentは無視されるので注意
    sys.argv = shlex.split("--a --gradio-debug --share --xformers")
    start()


@stub.local_entrypoint()
def main():
    run_stable_diffusion_webui.remote()
プログラムの解説は長いのでアコーディオンにしておきます。気になる人はどうぞ。
プログラムの解説
全部解説すると長いので要点だけかいつまんで解説します。分からないところがあったら遠慮なくコメントで質問してください!
モデルの設定
Hugging Faceからダウンロードしてくるモデルを指定しています。repo_idにHugging Face内のリポジトリのIDを、model_pathにモデルのパスを、config_file_pathにコンフィグファイルのパスを指定します。
ただ内部的にはmodel_pathもconfig_file_pathもWebUIのmodels/Stable-diffusionディレクトリにコピーされるだけなので気分で分けてるだけです。config_file_pathは省略可能です。
お好きなモデルを追加して遊んでみてください
# モデルのID
model_ids = [
    {
        "repo_id": "hakurei/waifu-diffusion-v1-4",
        "model_path": "wd-1-4-anime_e1.ckpt",
        "config_file_path": "wd-1-4-anime_e1.yaml",
    },
]
関数の設定
@stub.function(...)の()の中にリモート側の設定を書いていくことが出来て、ここでは以下のような指定をしています。
| プロパティ | 説明 |
|---|---|
image |
コンテナイメージの指定。コンテナは一度作成すると使いまわせるのでここで必要なものを事前に全て入れておいて起動時間の短縮を図っている |
secret |
ModalのSecretをここで環境変数に読み込んでいる |
network_file_systems |
{<remote_path>: NetworkFileSystem}のように指定することで、リモート側のパスの一部を永続化(次回起動時にも保存されるように)している |
gpu |
これを指定することでこの関数内でGPUを使えるようになる |
timeout |
関数の連続実行時間の上限。適当に100分にしているので100分経つとWebUIが落ちる |
@stub.function(
    image=modal.Image.from_registry("python:3.8-slim")...,
    secret=modal.Secret.from_name("my-huggingface-secret"),
    network_file_systems={webui_dir: volume_main},
    gpu="a10g",
    timeout=6000,
)
ちなみにNetworkFileSystemの初期化は次のようにやります。"unique_key"が同じなら他のプログラムからでも同じNetworkFileSystemにアクセスできます。
volume_main = modal.NetworkFileSystem.persisted("unique_key")
セットアップ
まずStable Diffusion WebUIをGitHubからクローンしてきます。NetworkFileSystem内に既にある場合はスキップします。
(AUTOMATIC1111氏のリポジトリから直接クローンしないのはバージョンに依らず動作を安定させるためです。)
webui_dir_path = Path(webui_model_dir)
if not webui_dir_path.exists():
    subprocess.run(f"git clone -b v2.0 https://github.com/camenduru/stable-diffusion-webui {webui_dir}", shell=True)
次にモデルをダウンロードしてきます。NetworkFileSystem内に既にある場合はスキップします。
for model_id in model_ids:
    print(Fore.GREEN + model_id["repo_id"] + "のセットアップを開始します...")

    if not Path(webui_model_dir + model_id["model_path"]).exists():
        # モデルのダウンロード&コピー
        model_downloaded_dir = download_hf_file(
            model_id["repo_id"],
            model_id["model_path"],
        )
        shutil.copy(model_downloaded_dir, webui_model_dir + model_id["model_path"])

    if "config_file_path" not in model_id:
      continue

    if not Path(webui_model_dir + model_id["config_file_path"]).exists():
        # コンフィグのダウンロード&コピー
        config_downloaded_dir = download_hf_file(
            model_id["repo_id"], model_id["config_file_path"]
        )
        shutil.copy(
            config_downloaded_dir, webui_model_dir + model_id["config_file_path"]
        )

    print(Fore.GREEN + model_id["repo_id"] + "のセットアップが完了しました!")
モデルや本体をNetworkFileSystemに全部入れることと、事前にコンテナ内でセットアップを終えておくことでWebUI起動までの時間を極限まで短縮しています。
WebUI起動
通常はシェルなどでlaunch.pyを実行するのですが、それだと上手く出力が出てくれなかったのでlaunch.pyをインポートしてきて中の関数を実行するというちょっと強引な手段で実行しています。
# WebUIを起動
sys.path.append(webui_dir)
sys.argv += shlex.split("--skip-install --xformers")
os.chdir(webui_dir)
from launch import start, prepare_environment

prepare_environment()
# 最初のargumentは無視されるので注意
sys.argv = shlex.split("--a --gradio-debug --share --xformers")
start()
保存出来たら以下のコマンドで実行します
modal run stable-diffusion-webui.py
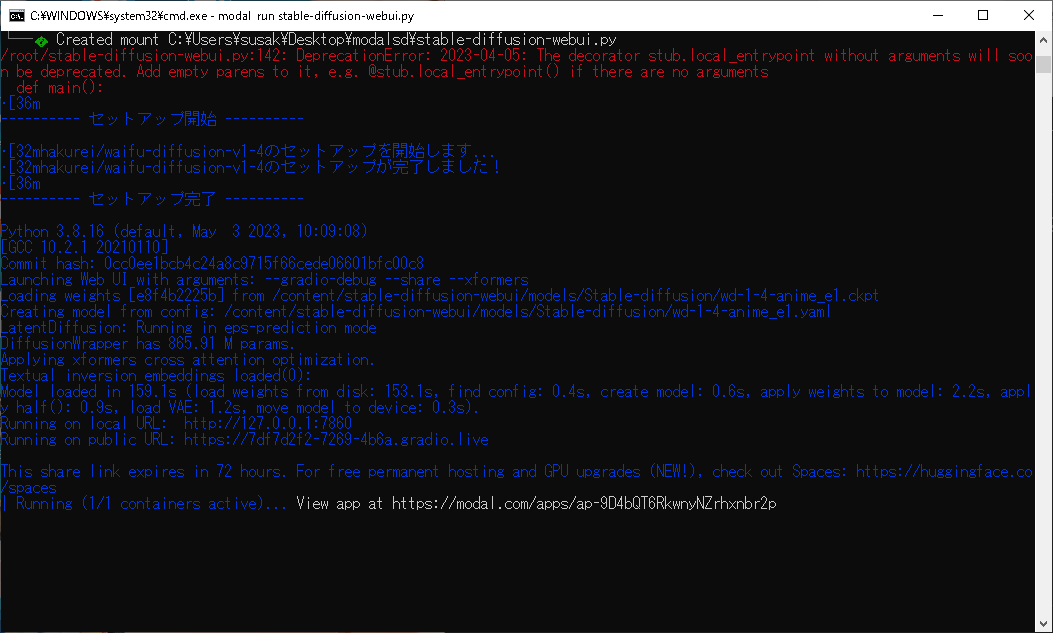
初回はいろいろセットアップをする必要があるので結構時間がかかります。ぼっち・ざ・ろっくでも見ながら気長に待ちましょう(2回目)。
Launching Web UI with arguments: ...みたいなのが出てきたら起動が上手く言っている証拠です。ただ起動にもそこそこ時間がかかるのでぼっち・ざ・ろっくでも見て(ry
起動が終わるとWebUIにアクセスするためのURLを表示してくれるはずです。リモートで動かしてる関係で--shareオプションを使ってGradio経由でアクセスすることになります。ローカルのURLに続いて表示されたURLにアクセスしてみましょう。
こんな感じのWebUIの画面が出たら成功です!

親の顔より見た(?)WebUIの画面
WebUIの使い方に関しては他の人が素晴らしい記事をたくさん書いてくれてると思うのでそちらを参考にして頂ければと思います。
5. オマケ: 生成した画像を一括でダウンロードする
以下のプログラムをdownload-output.pyという名前で保存して、modal run download-output.pyとすると./outputsフォルダに生成された画像がダウンロードされます。
自動で差分を取ってダウンロードしてくれるので、毎回同じファイルをダウンロードし直すことはありません。流石だね。
プログラム
import os
import modal
import subprocess
from concurrent import futures

stub = modal.Stub("stable-diffusion-webui-download-output")

volume_key = 'stable-diffusion-webui-main'
volume = modal.NetworkFileSystem.persisted(volume_key)

webui_dir = "/content/stable-diffusion-webui/"
remote_outputs_dir = 'outputs'
output_dir = "./outputs"


@stub.function(
    network_file_systems={webui_dir: volume},
)
def list_output_image_path(cache: list[str]):
  absolute_remote_outputs_dir = os.path.join(webui_dir, remote_outputs_dir)
  image_path_list = []
  for root, dirs, files in os.walk(top=absolute_remote_outputs_dir):
    for file in files:
      if not file.lower().endswith(('.png', '.jpg', '.jpeg')):
        continue

      absolutefilePath = os.path.join(root, file)
      relativeFilePath = absolutefilePath[(len(absolute_remote_outputs_dir)) :]
      if not relativeFilePath in cache:
        image_path_list.append(relativeFilePath.lstrip('/'))
  return image_path_list

def download_image_using_modal(image_path: str):
  download_dest = os.path.dirname(os.path.join(output_dir, image_path))
  os.makedirs(download_dest, exist_ok=True)
  subprocess.run(f'modal nfs get {volume_key} {os.path.join(remote_outputs_dir, image_path)} {download_dest}', shell=True)

@stub.local_entrypoint()
def main():
  cache = []

  for root, dirs, files in os.walk(top=output_dir):
    for file in files:
      relativeFilePath = os.path.join(root, file)[len(output_dir) :]
      cache.append(relativeFilePath)

  image_path_list = list_output_image_path.remote(cache)

  print(f'\n{len(image_path_list)}ファイルのダウンロードを行います\n')

  future_list = []
  with futures.ThreadPoolExecutor(max_workers=10) as executor:
    for image_path in image_path_list:
        future = executor.submit(download_image_using_modal, image_path=image_path)
        future_list.append(future)
    _ = futures.as_completed(fs=future_list)

  print(f'\nダウンロードが完了しました\n')
Modal vs Colab
結局Modalで優れたAI絵生成体験が得られるのかという話ですが、ボク的には一長一短という感じです。まとめてみるとこんな感じ。
| Modal | Colab | |
|---|---|---|
| コスト | 30ドルまで無料 | ずっと無料 (利用制限あり) |
| 生成速度 (20steps) | 2sぐらい | 4sぐらい |
| 起動速度 | かなり速い | 少し遅い |
| 画像の管理 | 楽 (差分ダウンロードとかができる) | ちょっと大変 (毎回zipにしてダウンロードする必要がある) |
| 難易度 | ちょっと難しい | 簡単 |
Modalの方が2倍ぐらい早いので使う価値はあるかなという感じですね。自分に合った方を使ってみてください!
(正直自前のGPUでやる方がカスタマイズ性もやりやすさも段違いなのでそれに越したことはないですボクもGPU欲しい)
2023/04/22 追記
ColabでWebUIを使おうとすると警告が出るようになったらしい (下のツイートを参照)
なのでWebUIを合法的に使うならModalの方が良いかも (Modalは公式にSDを動かすサンプルがあるぐらいに推してる)
ついでにLLMs使ったボイスチャットとか、LangChain動かすサンプルとか、Whisper使ったPodcastの翻訳とかDreamboothのサンプルとか、ControlNet使うサンプルとか色々あるみたいなのでAIを使ってみたい人的には結構良いかも (ただし全部英語でかかれてるし、使いこなすにはある程度の能力がいりそう)
参考にした記事
Discussion
記事ありがとうございます!!
一つ疑問なのですが、stable diffusion websiteを実行している間は常時CPU、メモリ使用料は発生するのでしょうか?
画像生成の計算時にそれに追加して、計算時間分のGPU使用料が加算されるのでしょうか?
質問ありがとうございます~!
ちょっと検証してみた感じ、CPUはあまり使ってないっぽいですがGPUは常に食ってるっぽいですね~たぶん実際には使ってないと思うんですが...
あとはメモリ(RAM)を食うのでその分は料金かかっちゃいますね~
使わない間は落としておいた方が良さげです (当たり前)
検証ありがとうございます!!
常時起動は現実的じゃないですねw
GPU処理だけをModalで行って、WebGUIはローカルで実行する便利なUIツールがあれば良いですが...
そうですね...Modalは関数ごとにリモートで実行するものとローカルで実行するものを分けられるのでWebUI部分だけをローカルに切り出してきたバージョンを用意すれば行けるのかな...?という気がします ただそうなるとWebUIを解体して再構成するという作業が必要になりますが...
ありがとうございます。Pythonから調べまくりましたw
Google Colabから流れて来ましたが、課金するならModalにします。
モデルの変更までは出来たのですが、Civitaiのモデルの導入方法がわかりませんでした。
動いただけでも感謝しております。
仕事上でプログラマーと接することは有りましたが制御系でした。まさかこんな感じでコードに触れることになるとは思っていなかったので、良い体験をさせて頂きました。必要な部分からプログラミングの習得ができると楽だ(気持ち的に)と思うのですが機会がないのが現実です。
長文すみません。
同じくcolabから流れてきたものです。
大変参考になる記事ありがとうございます、同じくモデル変更は出来たのですが
ここから更にLoraファイルの追加等はできたりしますかね?
素晴らしい記事ありがとうございます!
同じくGoogle cokab難民です。ぼっち・ざ・ろっく第2話まで見ながら、ChilloutMixへのModel変更はできたのですが、LoraやEasyNegativeの入れ方を教えて頂けましたら大変幸いです。
同じく流れてきました。参考になります。
modal volume put コマンドでローカルからファイルアップロードができます。
modal volume put <ボリューム名> <ローカルフォルダ> <リモートフォルダ>
例:
modal volume put stable-diffusion-webui-main lora /models/Lora
同じく流れてきました。Modalは体感、Google Colabの倍速で画像をサクサク作成できるので気持ち良いですね!
上の方も書かれていますが、下記の通り、Loraその他のファイルのアップロードに成功できましたので共有します。
【モデルファイルの追加】
カレントディレクトリの下に「Stable-Diffusion」というフォルダを作成し、追加で使いたいモデルファイル(ChillOutMix等)を入れ、下記コマンドを実行。
modal volume put stable-diffusion-webui-main Stable-Diffusion models/Stable-diffusion/
【Loraファイルの追加】
カレントディレクトリの下に「lora」というフォルダを作成し、そこに使いたいLoraファイルを全て入れ、下記コマンドを実行。
modal volume put stable-diffusion-webui-main lora /models/Lora
【VAEファイルの追加】
カレントディレクトリの下に「VAE」というフォルダを作成し、そこに使いたいVAEファイルを入れ、下記コマンドを実行。
modal volume put stable-diffusion-webui-main VAE /models/VAE
【Textual Inversionファイルの追加】
カレントディレクトリの下に「embeddings」というフォルダを作成し、そこに使いたいEasyNegative、ulzzang、Pure Eros Face等のファイルを入れ、下記コマンドを実行。
modal volume put stable-diffusion-webui-main embeddings /embeddings
人気ある機能の追加はコード側でいけそうです。
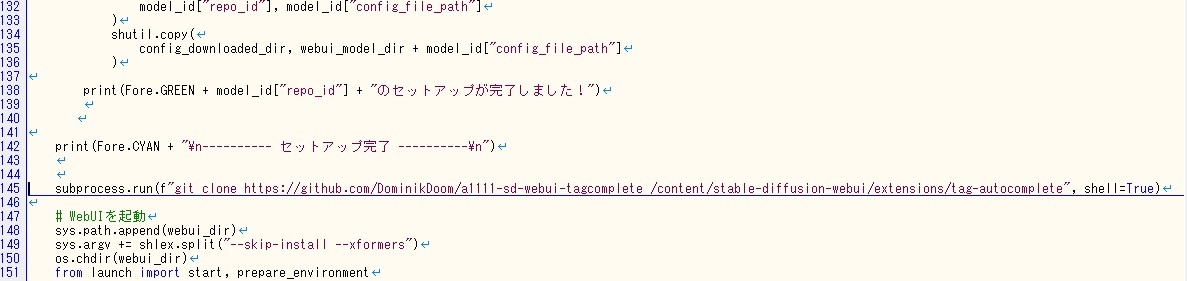
回避入れてないゴリラコードですけど
#Loconインストール
subprocess.run(f"git clone https://github.com/KohakuBlueleaf/a1111-sd-webui-locon /content/stable-diffusion-webui/extensions/locon", shell=True)
#TagCompleteインストール
subprocess.run(f"git clone https://github.com/DominikDoom/a1111-sd-webui-tagcomplete /content/stable-diffusion-webui/extensions/tag-autocomplete", shell=True)
WebUIを起動 の前にでも追加すればOKです
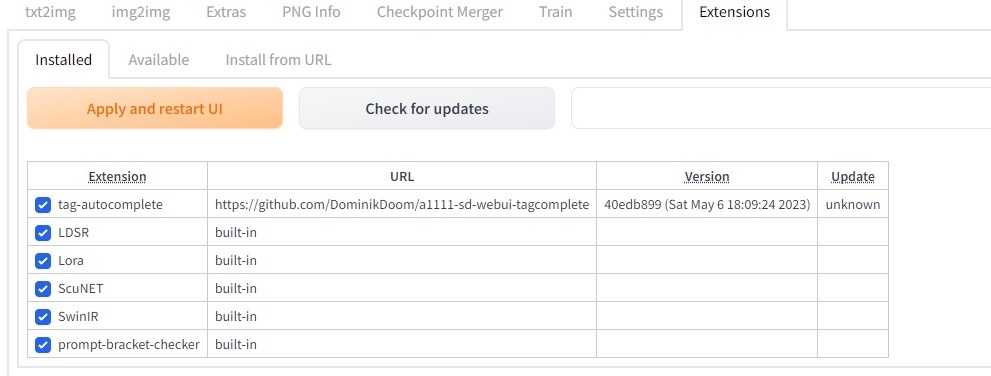
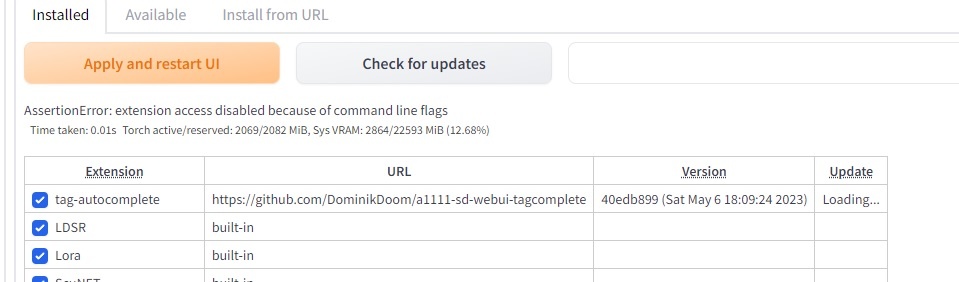
steable diffusion webuiは一応、動いたのですが、#TagCompleteインストールをwebui起動前に記述して動かそうとしましたら、destination path '/content/stable-diffusion-webui/extensions/tag-autocomplete' already exists and is not an empty directoryの注意が出て、webuiでもtag-autocompleteが動きません。
何か、アドバイスがあれば助かります。
よろしく、お願いします。
#TagCompleteインストールをprint文の前に入れてしまっていました。Web起動の直前に挿入して注意は出なくなりました。ただ、正常に動いたと思ったのですが、肝心のtag-autocompleteが動きませんでした。webui上にはhttps://github.com/DominikDoom/a1111-sd-webui-tagcomplete が見えているのですが・・・
うちのところだとこのタイミングで無事インストールできて起動できてますね(´・ω・`)
動かないとなるとエラーなりなにか教えていただかないと、こちらも手のうちようが笑
返信、ありがとうございます。

・コードです
・fatal エラー
・webuiの拡張
・check for updateを押したときのエラー
初めての書き込みですので、これで、画像が入っているか分かりません。画像が見れなかったら申し訳ありません・・・・
Pythonもクローン(Modal)も全く素人ですので、いろいろ間違っているかもしれませんが、アドバイスをいただければと思います。
「fatal destination path」に関してですけど、これはうちが面倒くさいので回避コードを組んでいれてないので、2回め以降は必ずでます。気にしてなくてOKです。すでにファイルもフォルダもあるよってエラーなので
インストール無事できていて起動してないのは、ちょっと原因不明ですね(´・ω・`) それで動くはずなんですけど
ありがとうございます。
もう少し、いじってみます。
PCのルート(c:)にextensionsというフォルダが出来ていて、以下、
/tag-autocomplete/tags/danbooru.csvが自分のPC上にありました。このファイルがここで良いのでしょうか。このファイルが辞書のような役目ということはわかるのですが・・。どのような仕組みで動いているかが分からないのですが、Modal側に無くて良いのでしょうか。
extensionsフォルダはうちのPCにもで来てますけど、そのようなcsvは存在しないですね(´・ω・`)
謎ですねぇ。
stable-diffusion-webui.py の変更点はそこだけなんでしょうか? 他のところが原因で可笑しくなっている可能性を潰したいです
いろいろとすみません。ほかの方のサイトを見て、git bashで直接動かしたとき、自分のPCに出来たのかもしれません。
あとで、一旦消してみます。
解決して正常に動作しました。単純にstable-diffusion-webui.pyの起動方法に大きな間違いがありました。Pythonを良く分かっていなかったためでした。結果的に中途半端に動作していたようです。いろいろありがとうございました。
おめめですん
ダウンロードスクリプトの55行目にエラーが頻発したので修正しました:
Windowsで実行するとスラッシュとバックスラッシュが混ざったパスが誤って認識され、スクリプトが動かなくなりました。
このコードに差し替えることで正常に動作します。
今日動かしてみたところ、上記コードでもエラーが出ました。該当箇所を以下のように書き換えると動作しました↓
本記事を参考にmodalでstable diffusionを動かしています
オマケを使って画像をダウンロードするのですが、No such fileが頻発し、画像をダウンロードできませんでした。
解消方法をご教示いただけますと幸いです。
よろしくお願いいたします。
個人情報に気を付けながらエラー全文を貼ってもらえると助かります
先ほどはご連絡いただきありがとうございます。
以下のようなエラーが連続します。。
/ Running (0/1 containers active)... View app at https://modal.com/apps/ap-**********Usage: modal volume get [OPTIONS] VOLUME_NAME REMOTE_PATH [LOCAL_DESTINATION]
Try 'modal volume get --help' for help.
╭─ Error ──────────────────────────────╮
│ No such file: outputs\txt2img-images/2023--/00009-2864702808.png
───────────────────────────────────╯
このコメントで解決しそうですかね?
ご返信ありがとうございます。
早速、書き換えてみましたが上記と同様のエラーが出ました。。
txt2img等のフォルダは作られるのですが、肝心のファイルだけダウンロードできないです。。
同じ症状で悩んでいたのですが、12行目末尾に"/"を入れたら正常に作動しました。
remote_outputs_dir = 'outputs/'
このように変更してみてください。
ご教示いただいたように"/"を追記したら正常に動作しました。
この度はありがとうございました。
今後ともよろしくお願いいたします。
初歩的な質問で恐縮ですが、Macbookだと動かないことってありますか?
最初のmodal run get_started.pyでちょっとググったぐらいだと厳しいエラーが出てきました。
MacBook-Air-5:mymodal thunder$ modal run get_started.py
✓ Initialized. View app at https://modal.com/apps/ap-3qRSjNgFRjvBkMl20uDk2g
✓ Created objects.
├── 🔨 Created square.
├── 🔨 Created mount get_started.py
├── 🔨 Created mount
│ /usr/local/Cellar/protobuf/3.15.6/libexec/lib/python3.9/site-packages/google
└── 🔨 Created mount /Users/thunder/Desktop/mymodal/get_started.py
Traceback (most recent call last):
File "/usr/local/lib/python3.9/runpy.py", line 188, in _run_module_as_main
mod_name, mod_spec, code = _get_module_details(mod_name, _Error)
File "/usr/local/lib/python3.9/runpy.py", line 111, in _get_module_details
import(pkg_name)
File "/pkg/modal/init.py", line 4, in <module>
from .app import App, container_app, is_local
File "/pkg/modal/app.py", line 4, in <module>
from modal_proto import api_pb2
File "/pkg/modal_proto/api_pb2.py", line 21, in <module>
_APPSTATE = DESCRIPTOR.enum_types_by_name['AppState']
AttributeError: 'NoneType' object has no attribute 'enum_types_by_name'
Runner failed with exit code: 1
╭───────────────────── Traceback (most recent call last) ──────────────────────╮
│ /usr/local/bin/modal:8 in <module> │
│ │
│ 7 │ sys.argv[0] = re.sub(r'(-script.pyw|.exe)?$', '', sys.argv[0]) │
│ ❱ 8 │ sys.exit(main()) │
│ 9 │
│ │
│ /usr/local/lib/python3.9/site-packages/modal/main.py:6 in main │
│ │
│ 5 def main(): │
│ ❱ 6 │ entrypoint_cli() │
│ 7 │
│ │
│ /usr/local/lib/python3.9/site-packages/click/core.py:1130 in call │
│ │
│ 1129 │ │ """Alias for :meth:
main.""" ││ ❱ 1130 │ │ return self.main(*args, **kwargs) │
│ 1131 │
│ │
│ /usr/local/lib/python3.9/site-packages/typer/core.py:778 in main │
│ │
│ 777 │ ) -> Any: │
│ ❱ 778 │ │ return _main( │
│ 779 │ │ │ self, │
│ │
│ /usr/local/lib/python3.9/site-packages/typer/core.py:216 in _main │
│ │
│ 215 │ │ │ with self.make_context(prog_name, args, **extra) as ctx: │
│ ❱ 216 │ │ │ │ rv = self.invoke(ctx) │
│ 217 │ │ │ │ if not standalone_mode: │
│ │
│ /usr/local/lib/python3.9/site-packages/click/core.py:1657 in invoke │
│ │
│ 1656 │ │ │ │ with sub_ctx: │
│ ❱ 1657 │ │ │ │ │ return _process_result(sub_ctx.command.invoke(sub │
│ 1658 │
│ │
│ /usr/local/lib/python3.9/site-packages/click/core.py:1657 in invoke │
│ │
│ 1656 │ │ │ │ with sub_ctx: │
│ ❱ 1657 │ │ │ │ │ return _process_result(sub_ctx.command.invoke(sub │
│ 1658 │
│ │
│ /usr/local/lib/python3.9/site-packages/click/core.py:1404 in invoke │
│ │
│ 1403 │ │ if self.callback is not None: │
│ ❱ 1404 │ │ │ return ctx.invoke(self.callback, **ctx.params) │
│ 1405 │
│ │
│ /usr/local/lib/python3.9/site-packages/click/core.py:760 in invoke │
│ │
│ 759 │ │ │ with ctx: │
│ ❱ 760 │ │ │ │ return __callback(*args, **kwargs) │
│ 761 │
│ │
│ /usr/local/lib/python3.9/site-packages/click/decorators.py:26 in new_func │
│ │
│ 25 │ def new_func(*args, **kwargs): # type: ignore │
│ ❱ 26 │ │ return f(get_current_context(), *args, **kwargs) │
│ 27 │
│ │
│ /usr/local/lib/python3.9/site-packages/modal/cli/run.py:114 in f │
│ │
│ 113 │ │ │ else: │
│ ❱ 114 │ │ │ │ func(*args, **kwargs) │
│ 115 │
│ │
│ /Users/thunder/Desktop/mymodal/get_started.py:14 in main │
│ │
│ 13 def main(): │
│ ❱ 14 │ print("the square is", square.call(42)) │
│ │
│ /usr/local/lib/python3.9/site-packages/synchronicity/synchronizer.py:439 in │
│ proxy_method │
│ │
│ /usr/local/lib/python3.9/site-packages/modal/functions.py:634 in │
│ _call_function │
│ │
│ 633 │ │ try: │
│ ❱ 634 │ │ │ return await invocation.run_function() │
│ 635 │ │ except asyncio.CancelledError: │
│ │
│ /usr/local/lib/python3.9/site-packages/modal/functions.py:234 in │
│ run_function │
│ │
│ 233 │ │ assert not result.gen_status │
│ ❱ 234 │ │ return await _process_result(result, self.stub, self.client) │
│ 235 │
│ │
│ /usr/local/lib/python3.9/site-packages/modal/functions.py:119 in │
│ _process_result │
│ │
│ 118 │ │ │ raise uc_exc │
│ ❱ 119 │ │ raise RemoteError(result.exception) │
│ 120 │
╰──────────────────────────────────────────────────────────────────────────────╯
RemoteError
ボクの手元ではPython3.11.1で動かしていました。3.9.xを使ってるみたいなのでもしかしたらそれが問題かもしれません。
初めまして。contlor netを導入するにはどこにファイルを作成すればよいのでしょうか?ご教示いただけますと幸いです。
をgit cloneで
/content/stable-diffusion-webui/extensions/sd-webui-controlnet/models/
に対して必要なモデルをローカルフォルダに保存してmodal volume put を指示すればいけるかと思いますよ。
颯姫さん、返信いただきありがとうございます。
gitをインストールしてgit bashで貼っていただいたurlをgit cloneし、/content/stable-diffusion-webui/extensions/sd-webui-controlnet/models/とフォルダを作成しモデルを保存したのですが、そのあとのmodal volume putでどのような文章で指示すればいいのか教えていただければ嬉しいです。なお、上記の手順の中で誤っているところがあればご指摘いただけると助かります。
モデル保存できてるならmodal volume put必要ないですよ
もう、contlor net使えてませんか?
試してみたところ、表示されませんでした。確認なのですが、/content/stable-diffusion-webui/extensions/sd-webui-controlnet/models/の順番にフォルダーを作成してmodelsの中にcontrol netのモデルを入れるであっていますでしょうか?
Colab上でcontrolnetをインストールするのは、上記で問題なくいけてるので
それをシンプルにMODAL上でするだけです。
Colab上だと、最新のモデルを使うとWEBUI起動時エラーで弾かれるとか聞いた事あるのですが
そっちの可能性はないでしょうか?
colabのコードはエディタで保存して、コマンドプロンプトで modal runすればいいのでしょうか?
いえ、違います。
そも、control netはcloneできてcontrol netのモデルはいれれているんですよね?
違うのですね、失礼いたしました。
そもそもgit bashにてcontrolnetをgitcloneするという解釈であっていますでしょうか?私の経験としてはgoogle colabのcamanderuさんのstable diffusionのノートブックをワンクリックで起動して動かしたことと、こちらの記事のmodalでstable diffusionを起動してモデル変更やloraやeasynegativeを導入する程度の知識しか持ち合わせていないため、お手数ですが現在の状況の画像を貼らせていただくので確認してもらってもよろしいでしょうか?
git bash使えているなら、うちがわざわざどうこう言わなくてもできてる気がするのですけど笑
(コピーやcloneできるだけの知識あるなら、起動できない問題は別だと思ってます)
そんな複雑に考えないでゴリ押しですけど、git cloneをstable-diffusion-webui.py内で、
WebUIを起動 の前にでも追加。controlnetをcloneする。
その後、別ウィンドウでmodal volume put なりでコマンドプロンプトでローカルに保存してる
必要なMODELをコピーすれば動くはずです。
rgdさんが、何をされているのかが、基本文章ではよくわからないので画像お願い致します。
と思ったのですが、あまりにもわからない点が多すぎるので、もう少し自分で基礎的な部分を学んでから、リトライしてみようと思います。初心者の私にも親切に教えてくださりありがとうございました。
LoRAの追加トライしてみましたが詰まってしまいました…
(試したこと)
・Modal配下にLoraディレクトリ作成
・LoRAファイル(.safetensors)を入れる
・WebUI起動
・以下コマンドを別ウインドウで実行
modal volume put stable-diffusion-webui-main Lora /models/Lora
→起動中のWebUIリロードで変化見られず
→再起動してみたWebUIでも変化見られず
でした。
手順に誤りがあるでしょうか?
上記の手順の内、下記の順番を変更してみたらできるのではないでしょうか?
・以下コマンドを別ウインドウで実行
modal volume put stable-diffusion-webui-main Lora /models/Lora
↓
・WebUI起動
ありがとうございます。そちらも試しましたが変わらずでした…。
bigboyさんや皆さんは上記の手順でLoRA利用できているのでしょうか?
あれ、そうなんですね。僕は上記手順でLoRA利用できてます。
「LoraディレクトリをModal配下に作成」とありますが、
コマンドプロンプトorターミナルで表示されている現在のカレントディレクトリ(現在位置)の直下にLoraフォルダがありますでしょうか?
例えば、現在位置がC:\Users\bigboy\ ならば、C:\Users\bigboy\Loraのフォルダ内にLoraファイルを好きなだけ入れておくとコピーされるはずなのですが……
はい、Modalディレクトリ(Loraディレクトリを包含)に移動して実行していて、upload自体は成功しているように見えます。

ただ、WebUI画面ではLoRAが出てこない状態となっています…
Colabでは実行経験がないのですが、LoRAが適用されているとネガティブフロントとサンプリング方法の間に表示されるはずですよね?
アップロードは成功してますね!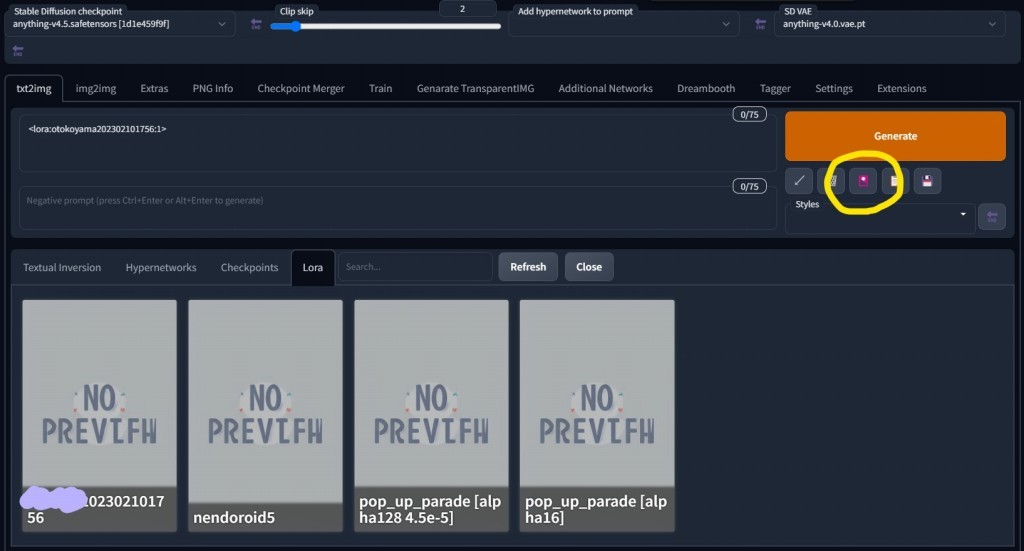
Generateボタンの下にある花札マークを押すと、ネガティブフロントとサンプリング方法の間に表示されると思いますが、いかがでしょうか?
ありがとうございます、できました!
そこ通報マークだと思って触らないようにしてました…笑
ファイル関連の問題だと思っていましたが、WebUI初心者すぎることが問題とは盲点でした!
うまくいけて良かったです!
モデルを増やしてみたところ、今度は
が出ました。
ログを取ってみたところ、
、つまりモデルのIDを入れるところに
のようにmodel_pathにディレクトリを書くとエラーになるようです。
解決方法としてはローカルで保存して
volume putする他に、とすることで完全解決しました。
(もしかして、いくつか改善点をまとめるならコメントするよりいっそ記事にしてしまったほうがいいですか?)
It eats up lots of GPU! I don't think "$0.587333 per 1,000 images" is correct, or it may need some refinement. Shared volume storage
$2/GiB/month.
はじめまして、 Colab難民のtsukiyominaと申します。
こちらの手順通りにやってる積りなのですが、必ずある箇所でエラーになってしまいます。
コンピュータ知識が皆無で挑戦して、質問するのも怒られそうですが、
もし簡単に解決できるのであれば、と思い書き込ませて頂きます。
<動作環境>
PC :DESKTOP-9KKUSNP
windows10
プロセッサ :AMD E1-2500 APU with Radeon(TM) HD Graphics 1.40GHz
実装RAM :4.00 GB (3.46 GB 使用可能) (windows起動直後の利用可能1.7GB)
Python :3.11.1(旧バージョンがinstallされていましたが全てuninstall後に作者様に習ってこのバージョンのみinstall。PC再起動。コマンドラインでpython --version でバージョン確認済み)
<症状>
こちらの手順「4.Modalを使ってStable Diffusion WebUIを動かす」の所で、Timeout(6000s)を迎えて強制終了します。
<症状までの流れ>
1.Modalのアカウントを登録。メール返信し「認証済み」の結果を受け取っています。
2.Modalを動かしてみる
(1) windowsのコマンドプロンプト(cmd.exe)のウィンドウを開き、手順に従い以下のコマンドをこちらのページからコピー、コマンプロンプトにペーストして実行しクライアントをinstall。
以降エラーが出るまでコマンドプロンプトのウィンドウはこの1つだけの状態です。
pip install modal-client
(2)コマンドプロンプトから以下を実行。
modal token new
(1)(2)とも正常終了した模様。error表示はありません。
関係ないと思いますが、(1)終了時pipのバージョンが古いとメッセージが表示されたので、指示通りににコマンドを打ち込みバージョンアップ。
念の為(1)を再実行しています。
3.同じくコマンドプロンプトからget_started.pyを実行。ご説明にある"the square is 1764 と表示されていれば成功"を確認済み。
4.「Modalを使ってStable Diffusion WebUIを動かす」
同じくコマンドプロンプトから、以下のコマンドをコピペして保存済みのプログラムを実行。
少し進んだ後にSSの箇所で止まったまま進まなくなり、Timeout(6000s経過)を迎えて強制終了してしまいます。
modal run stable-diffusion-webui.py
↑1.からの手順を3回試行して3回とも同様にTimeoutErroになります。(3回目だけstable-diffusion-webui.py中のtimeout値を6000→時間が長ければ!と思い9999にしてみました)
無関係かもしれませんが以下も書き足しておきます。
a.コマンドプロンプトを実行しているカレントフォルダはdesktop直下に作成してあるフォルダです。
この中に手順中のpythonのプログラムを保存して実行しています。
C:\Users\user\Desktop\modalsd
Timeoutになるのは10年前のあまりにもゴミPCだからでしょうか?
何も出来ていないのに既にmodalのcreditを$8も使ってしまっています。
分からないなりにもかなり頑張って12時間以上格闘、詰んでしまいました。
他の方のコメントも一通り目を通させて頂きましたが、同じ症状の方がいらっしゃらず途方に暮れております。
もし解決方法に手間を取らないようであればご教授下さい。どうかよろしくお願いします。
長文失礼しました。
おそらく起動はできていると思います。1枚目のスクショの
Running on public URL: ~~~みたいなところのリンクにアクセスすればWebUIを使えるはずです。あとtimeoutになるのはある意味仕様で、(正常に起動しても) ずっと起動しっぱなしだとそのうちtimeoutに引っかかります。
返信ありがとうございます!
寝てない為、ウトウトうととしてました
早速試してみます。
SD起動できました!簡単に生成も出来ました!
手順の中にきちんと記述されているのに、コマンドプロンプトの画面が青文字で見えづらかったとは言え見落としてしまって余計なお手数をお掛けしました。
とても分かり易く解説して下さっているのに大変失礼いたしました。
本当にありがとうございました!感謝します。
download-output.pyを使っての一括ダウンロードなのですが、txt2img-imagesのみだったり、特定の日付のもののみをダウンロードするにはどうすれば良いですか?
の部分を適切に書き換えてください。(
'outputs'を'outputs/txt2img-images/YYYY-MM-DD'みたいに書き換えると良い?)初めまして。記事を参考に、ControlNetの導入までは出来たのですが、Multi-ControlNetの使用で躓いています。
起動したWeb UIのSettingsから、ControlNetモデルの数を増やす→Apply settings→Reload UI、と操作しても、ControlNet Unitのタブが増えない状態です。
既に成功している方はいらっしゃいますか?
因みにControlNetの導入にはこちらの方の記事も参考にしました。
get_started.pyを実行すると、
No function was specified, and no
stubvariable could be found in 'get_started.py'.Usage:
modal run <file_or_module_path>::<function_name>
Given the following example
app.py:You would run foo as modal run app.py::foo
って表示されるんですが、どうすれば解消できるのでしょうか?
loraが突然適用されなくなりました。
花札マークを押すとloraの画面にはなりますが、押してトリガーワード?が挿入されても適用されません。
何か設定が必要でしょうか?
こんにちわ、質問させていただきます。

4. Modalを使ってStable Diffusion WebUIを動かす の項目で
modal run stable-diffusion-webui.py を実行したところ
以下のエラーが出てしまいました使っているpythonのバージョンは3.10.6です
対処方法のアドバイスのご教授お願い致します。
Same, after latest modal update.
torchmetricsのバージョンを0.11.4に固定すると良さそうです
Thanks for reply. I add “torchmetrics==0.11.4” below .pip install ( and now it's working.
Main thing is that it consumes lots of credit. in less than 3 days it eats all the free credit.
maybe here works
迅速な対応ありがとうございます!出来ました!
Twitterで同じようなエラーの方を探したとき"torchmetrics==0.11.4"を挟む方法を見かけてはいたのですが
試してみたときはトンチンカンなところに入れていたみたいで起動せずあきらめていました。
書き込む場所も丁寧に教えてくださり大変ありがとうございます。
residさんも代わりに尋ねていただきありがとうございました。
しーぴーさんこんにちわ、以前ご質問さえていただいたときは丁寧にありがとうございます。
厚かましいお願いとは存じますがまたご質問させていただきます。
あれから楽しく順調に使用させていただいていたのですが、
今月に入ってWebUIに入れないままタイムアウトになってしまい、改めて初めから導入しなおしました。
その際にipiの更新が入ったせいかはわかりませんが、実行したら「DeprecationError: Deprecated on 2023-07-05:
SharedVolume(...)is deprecated. Please useNetworkFileSystem.new(...)」とエラーがでてきてしまいました。 の記事をもとに訂正しましたが、エラーメッセージはでなくなありましたがモデルのセットアップ以降のRunningが一行に進まずタイムアウトしてしまいます。ほかに何か直すところなどあったらアドバイスお願いします。
自分の環境では以下の点を変更したら直りました
modal.SharedVolume().persist('key')→modal.NetworkFileSystem.persisted('key')@stub.function(...)の中のshared_volumes={...}→network_file_systems={...}お礼が遅くなってしまい申し訳ございません
無事にWebUI立ち上げられましたありがとうございます!
また特に問題はないのですが
しーぴーさんのコードを踏襲してほかの方が作ったControlNet追加バージョンを今回の変更を加えて起動した際、うまく作用せずControlNetダウンロードにえらい時間がかかりタイムアウトになってしまうので
あきらめてControlNet無しの状態でもいいかと一度コマンドプロンプトを閉じてしーぴーさんのコードを動かしたところControlNetが反映されました
こういったことはあることなのだとは思いますが、何かこれが原因で何か問題や負担が出ることはあるのでしょうか?
こんにちわ。5ケ月前に教えて頂いたtsukiyominaと申します。
9月中旬のModalアップデートで影響のあった変更箇所の内、上記コメントで書かれている部分は直せたらしく画像生成まで出来るようになりました。ありがとうございます。
恐らくそれに関連した?以下を教えて頂きたいのです。
1.「5. オマケ: 生成した画像を一括でダウンロードする」のプログラム(download-output.py)にも同様の箇所があったため修正を施し実行すると、
"DeprecationError: 2023-08-16:
f.call(...)is deprecated. It has been renamed tof.remote(...)image_path_list = list_output_image_path.call(cache)"
という別のエラーが表示されました。そのまま鵜呑みにプログラム(download-output.py)の下から12行目を次の様に変更しました。 これで合ってますでしょうか?
# image_path_list = list_output_image_path.call(cache)
image_path_list = list_output_image_path.remote(cache)
2.上記1.が正しいのかは分かりませんがエラー表示されなくなり、更に新たに添付したSSのような別のエラーがたくさん?表示されるようになりました。
直し方がさっぱりわかりません。
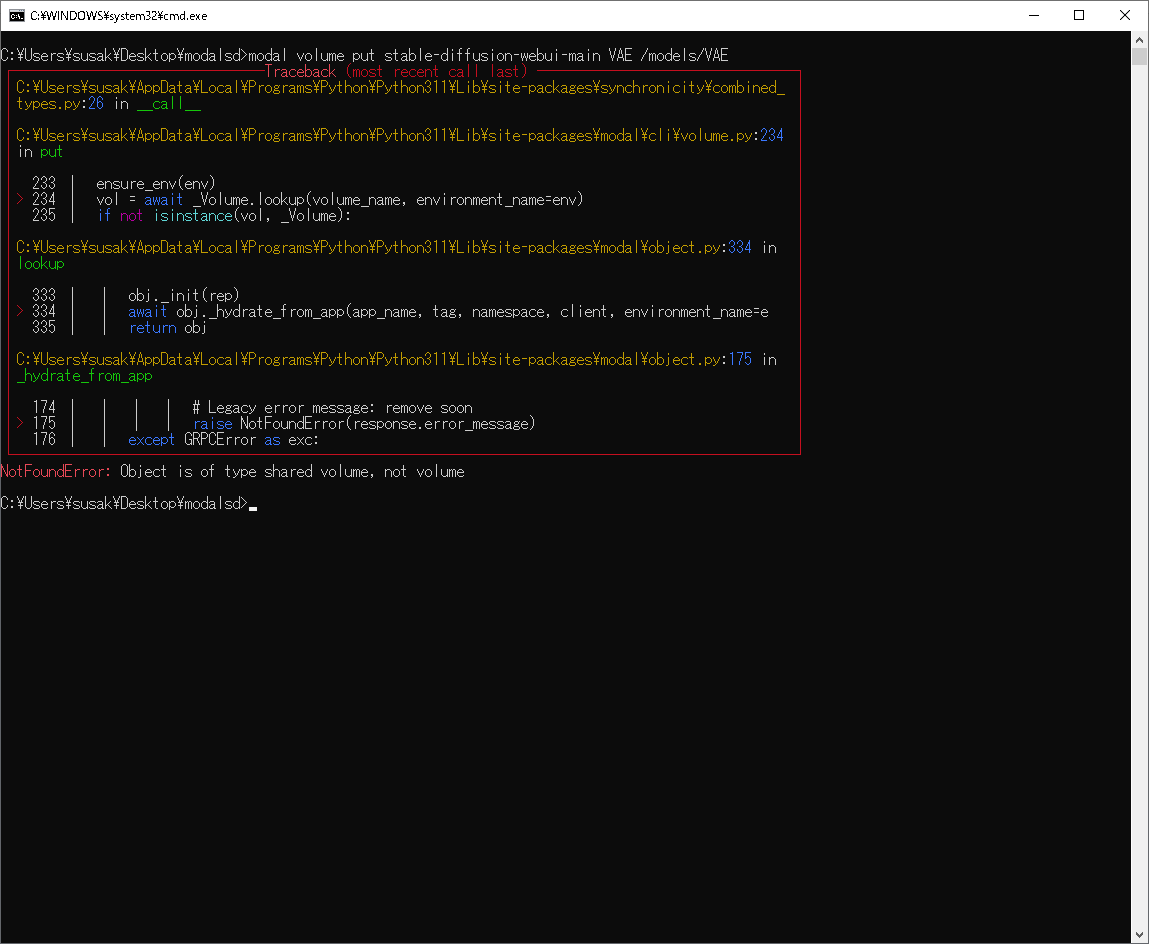
"NotFoundError: Object is of type shared volume, not volume"
3.しーぴーさんの説明以外の部分で恐縮ですが、5ケ月前に”せんせい”という方のコメントでモデルやVAEをアップロードするコマンドをご紹介されています。
実は私は、stable-diffusion-webui.pyの中のモデル指定部分はコメントにして、任意のタイミングでコマンドでアップロードするようにしていました。
現在実行すると、上記2.と同様のエラーになります。
生成した画像をDL出来無いため放置していましたが、やはりmodalを使いたいです。
ご多忙とは存じますが、1.と2.だけでも教えて頂けないでしょうか?
よろしくお願いします。
画像をダウンロードするコードをアップデートしました それで動かしてみてください
早速試してみます。
ありがとうございます!
@stub.function(
shared_volumes={webui_dir: volume},
↓
network_file_systems={webui_dir: volume},
アップデート後のコードの上記だけ修正して正常に動作しました。
感謝します。
SS添付し忘れ失礼しました。
お世話になっております。
以下の問題の対策をご存じでしたらご教示お願いできますでしょうか?
①modal nfs putでアップロードしたモデルが読み込まれなくなりました。(以前は使えていました)
アップロードされていることは以下コマンドで確認済です。
modal nfs ls stable-diffusion-webui-main models/Stable-diffusion
しかしWebUIを立ち上げて、左上のcheckpoint(モデル選択プルダウンメニュー)に出てきません。
一度削除して、再アップロードしても解決しませんでした。
②controlnetモデルが表示されなくなりました。(以前は使えていました)
モデル(pth)アップロードが成功していることは以下コマンドで確認済です。
modal nfs ls stable-diffusion-webui-main extensions/sd-webui-controlnet/models
しかしWebUIのControlnetの欄のprocessor欄はちゃんと出てきますが、modelプルダウンメニューがnoneのみになってしまっています。
気になるのはmodal runでStable diffusionを起動する際に以下のエラーが出ている点です。
Error calling: /content/stable-diffusion-webui/extensions/sd-webui-controlnet/scripts/controlnet.py/ui
Traceback (most recent call last):
File "/content/stable-diffusion-webui/modules/scripts.py", line 262, in wrap_call
res = func(*args, **kwargs)
File "/content/stable-diffusion-webui/extensions/sd-webui-controlnet/scripts/controlnet.py", line 288, in ui
group, state = self.uigroup(f"ControlNet-{i}", is_img2img, elem_id_tabname)
File "/content/stable-diffusion-webui/extensions/sd-webui-controlnet/scripts/controlnet.py", line 268, in uigroup
group.register_callbacks(is_img2img)
File "/content/stable-diffusion-webui/extensions/sd-webui-controlnet/scripts/controlnet_ui/controlnet_ui_group.py", line 820, in register_callbacks
self.preset_panel.register_callbacks(
File "/content/stable-diffusion-webui/extensions/sd-webui-controlnet/scripts/controlnet_ui/preset.py", line 172, in register_callbacks
getattr(element, action)(
AttributeError: 'dict' object has no attribute 'then'
すみません。上の件、sd2になったせいで非対応になったのですね。今気が付きました。
こんにちわ。
先日は大変お世話になりました。
また1つ教えて頂きたいのですが、「3. Secretsの設定」の中の、
"ModalのGetting Startedに戻り、「Set up integrations/secrets」のところから「Hugging Face」を~"は、
"Modalログイン後に、SECRETSタブ中のCreate new secretボタンをクリックし、「Hugging Face」を~以下同様"に変更されたということで良いのでしょうか?
modal run stable-diffusion-webui.py
を実行すると#web UIを起動の所で以下のエラーが出ます。
調べた所、repositories\taming-transformersを一旦削除し、クローンし直すと良いそうですがmodalでのやり方が今一分からず教えて頂けないでしょうか?
RuntimeError: Couldn't checkout commit 24268930bf1dce879235a7fddd0b2355b84d7ea6 for Taming Transformers.
Command: "git" -C "repositories\taming-transformers" checkout 24268930bf1dce879235a7fddd0b2355b84d7ea6
Error code: 128
stdout:
stderr: fatal: reference is not a tree: 24268930bf1dce879235a7fddd0b2355b84d7ea6