Novuで簡単にアプリ内通知機能を!Next.jsで実装してみた
はじめに
自分のアプリケーションに通知機能を組み込みたいと考えたことはありませんか?例えば、ブログサービスの場合、フォローしているユーザーの記事が投稿されたり、自分の記事にいいね・コメントがついたりしたときに通知を送りたいと思うでしょう。しかし、通知といっても様々な種類が存在します。
- アプリ内通知
- メール
- ブラウザのプッシュ通知
- Slack や Teams などの外部アプリケーションへの通知...などなど
アプリ内通知機能を 1 から実装するのは大変だと感じる方もいるかもしれません。今回ご紹介する「Novu」は、任意のアプリケーションに簡単に通知機能を実装できるオープンソースの通知インフラストラクチャです。
Novu とは
Novu はオープンソースの通知インフラストラクチャであり、エンジニアリング チームが充実した製品通知エクスペリエンスを構築できるように構築されています。
公式ドキュメントより引用
Novu is an open-source notification infrastructure, built for engineering teams to help them build rich product notification experiences.
上記のページでは、通知がもたらす企業とユーザーの間の容易なコミュニケーションや Novu ができることについて記載されています。その中でも注目すべき点が三つあります。
1 つ目は、対応している言語・フレームワークとの親和性、それぞれのドキュメントの充実度です。例えば、React や Vue などのフロントエンドフレームワークに関しては、通知を受け取るためのコンポーネントが提供されています。

2 つ目は、通知の種類が豊富である点です。アプリ内通知だけでなく、メールや SMS、スマートフォンへのプッシュ通知、Slack や Teams などの外部アプリケーションへの通知も送信できます。これらは Novu 上でProviderとして提供されています。
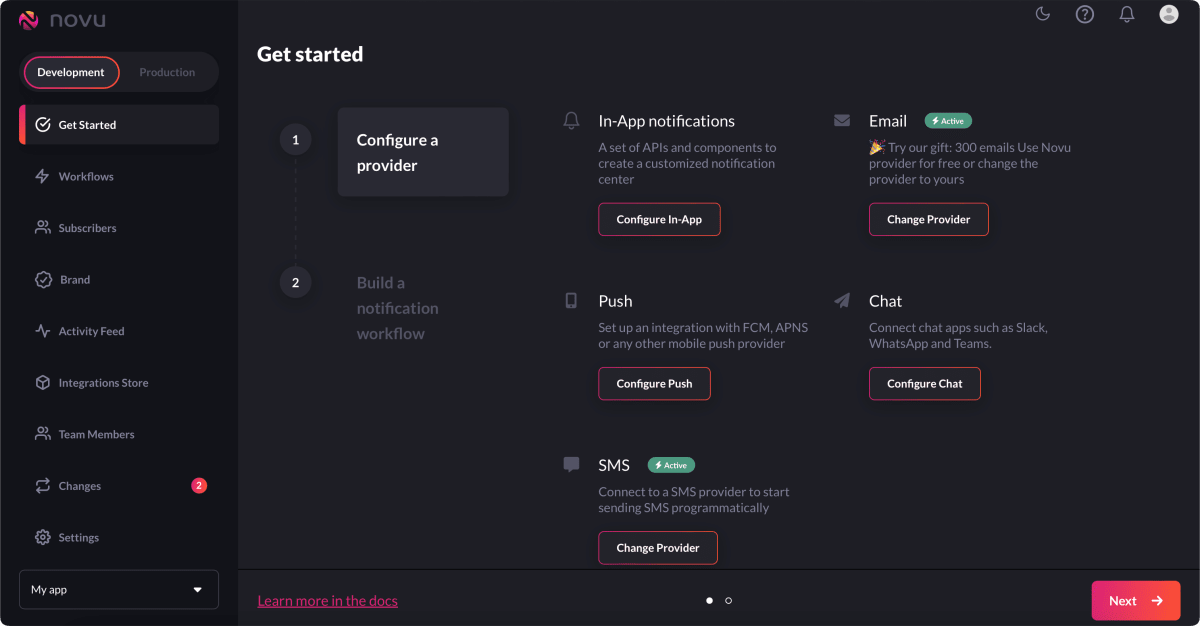
3 つ目は、非エンジニアでも通知管理が行える点です。確かに通知機能といっても、単に通知を送り、受け手がそれを見るだけでは意味がありません。通知を送るタイミングや、送る相手、送る内容などを管理できる必要があります。Novu では、以下のような通知の管理を行うための管理画面が用意されています。
Let's try
今回は Next.js で作成した Web アプリケーションに Novu を導入してみます。
公式チュートリアルがあり、API Routes と Pages Router を使って実装しています。
ですが、せっかくなのでチュートリアルに載っていないApp Router・RSC(React Server Components)を使って実装してみます。
実装する機能
- Subscribe ボタンを押すと、通知を受け取るユーザーとして登録される (=Subscriberになる)
- Subscriber になると、通知を受け取るための通知センターと通知を送るためのフォームが表示される
- フォームに入力した内容を送信すると、本アプリケーション上のすべての Subscriber に通知が送られる
- Unsubscribe ボタンを押すと、通知を受け取るユーザーとして登録が解除される
ソースコード
本記事では一部のコードのみを抜粋して解説します。
今回作成したソースコードは以下のリポジトリにあります。
実行環境
- Mac OS Ventura v13.5.2
- Bun v1.0.15
Novu のセットアップ
アカウント作成・Organization の作成
公式ドキュメントに従って行います。変更点のみ記載します。
- Organization の名前を
Novu-starterに設定
Workflowの作成・アプリ内通知の設定
Workflowとは、通知の種類の選択や通知の内容、通知を送る相手・タイミングなどのルールを定義するためのものです。
公式ドキュメントに従って行いますので、変更点のみ記載します。
- Workflow の名前を
UntitledからNext.jsに変更 - Editor 内の通知フォーマットを以下のように変更
<h3>{{title}}</h3>
<small>{{body}}</small>
また Workflow の設定から、General を選択し、Workflow Identifierをコピーします。
API Key・Application Identifier の取得
管理画面の左メニューから Settings を選択し、API Keys を選択します。
API Key と Application Identifier をコピーします。

Topicの作成
Topicを設定することで、通知を送る相手、つまりSubscriberをグループ化して、複数のSubscriberに対して一斉に通知を送ることができます。
今回トピック名はnovu-starterとします。
管理画面上では新規作成ができないため、Topicの自動生成を行います。
Subscriber をTopicに追加する際に、Topicが存在しない場合は自動的に作成されます。
Next.js のセットアップ
Next.js のプロジェクトを作成します。
bunx create-next-app
各オプション指定
✔ What is your project named? … novu-starter
✔ Would you like to use TypeScript? … Yes
✔ Would you like to use ESLint? … Yes
✔ Would you like to use Tailwind CSS? … Yes
✔ Would you like to use `src/` directory? … Yes
✔ Would you like to use App Router? (recommended) … Yes
✔ Would you like to customize the default import alias (@/_)? … Yes
✔ What import alias would you like configured? … ~/_
必要なライブラリのインストール
bun add @novu/notification-center sonner valibot
bun add -D bun-types
@novu/notification-center:Novu 専用の通知コンポーネントを提供するライブラリ
sonner:トーストコンポーネントを提供するライブラリ (一時的なメッセージを表示するために使用)
valibot: フォームのバリデーションを行うためのライブラリ
bun-types:Bun のための型定義ファイル
@novu/node を使用する人へ
@novu/nodeは現状、型安全でない状態です。その主な原因は、以下のように AxiosResponse の型定義がされていることです。
...
export declare class Subscribers extends WithHttp implements ISubscribers {
    list(page?: number, limit?: number): Promise<AxiosResponse<any, any>>;
    get(subscriberId: string): Promise<AxiosResponse<any, any>>;
...
今回ご紹介する方法では、レスポンスの値をあまり利用しないため、特に型指定は行いません。ただし、型安全に実装したい場合は、公式が OpenAPI Swagger を公開しているので、aspidaなどを利用して実装することができます。
環境変数の設定
.env.localに以下の環境変数を設定します。
NOVU_API_KEY="<先ほどコピーしたAPI KEY>"
NOVU_TOPIC_KEY="novu-starter"
WORKFLOW_IDENTIFIER="<先ほどコピーしたWorkflow Identifier>"
# Client Componentで使用するため「NEXT_PUBLIC」をPrefixにつける
NEXT_PUBLIC_NOVU_APP_INDENTIFIER="<先ほどコピーしたApplication Identifier>"
Subscriber の管理をするNovuApiクラスの作成
今回、Subscriber の Id は Cookie に保存します。
Next.js では、Cookie にアクセスするためのcookies関数が用意されています。
(参考:https://nextjs.org/docs/app/api-reference/functions/cookies)
import { cookies } from "next/headers";
...
  private subscriberId = {
    name: "subscriber_id",
    get: () => cookies().get(this.subscriberId.name)?.value,
    set: (subscriberId: string) =>
      cookies().set(this.subscriberId.name, subscriberId, {
        expires: new Date(Date.now() + 1000 * 60 * 60 * 24 * 365),
      }),
    delete: () => cookies().delete(this.subscriberId.name),
  };
...
アプリケーションを開くたびに、Cookie に保存されている Subscriber の Id が有効かどうかを確認します。そのため Subscriber になった後、表示の切り替えをするためにRevalidate Tagを設定し、再検証を行います。
(参考:https://nextjs.org/docs/app/api-reference/functions/revalidateTag)
export class NovuApi {
  ...
  REVALIDATE_TAG = "<任意の文字列>";

  async verifySubscriber() {
    const subscriberId = this.subscriberId.get();
    if (!subscriberId) return false;

    try {
      const { status } = await this.httpClient(`/subscribers/${subscriberId}`, {
        method: "GET",
        next: { tags: [this.REVALIDATE_TAG] },
      });

      return status === 200 && subscriberId;
    } catch {
      return false;
    }
  }
  async createSubscriber() {
    // ...subscriberの作成処理
    revalidateTag(this.REVALIDATE_TAG);
  }
  ...
}
通知センターの作成
JSX 部分は公式ドキュメント通りですが、今回 App Router 使用しているかつ@novu/notification-centerが提供するPopoverNotificationCenter,NotificationBellはuseContextを内部で使用しているため、ファイル先頭にuse clientを記述する必要があります。
"use client";
import {
  NovuProvider,
  PopoverNotificationCenter,
  NotificationBell,
} from "@novu/notification-center";

type Props = { subscriberId: string };
export const NotificationCenter: React.FC<Props> = ({ subscriberId }) => {
  return (
    <NovuProvider
      subscriberId={subscriberId}
      applicationIdentifier={`${process.env.NEXT_PUBLIC_NOVU_APP_INDENTIFIER}`}
      initialFetchingStrategy={{ fetchNotifications: true }}
    >
      <PopoverNotificationCenter colorScheme="dark">
        {({ unseenCount }) => <NotificationBell unseenCount={unseenCount} />}
      </PopoverNotificationCenter>
    </NovuProvider>
  );
};
src/components/NotificationCenter/index.tsx
Subscribe ボタン・Unsubscribe ボタンの作成
Novu API を使った Subscriber の作成・削除処理のみを Server Side で行うため、use serverをファイル先頭に記述します。一方で処理中のローディング表示は useState を使い Client Side で行うため、Button に処理を渡します。
Button コンポーネントの実装 (React Client Component)
これは後ほど、通知フォームの送信ボタンとして使用します。
"use client";

import { Loader } from "~/components/Loader";
import styles from "~/styles/components/SubscribeButton.module.css";

import { toast } from "sonner";
import { PropsWithChildren, useCallback, useState } from "react";

interface Props extends PropsWithChildren {
  action?: () => Promise<void>;
  message?: {
    success: string;
    error: string;
  };
  pending?: boolean;
}

export const Button = ({ children, message, pending, action }: Props) => {
  const [isLoading, setIsLoading] = useState(false);

  const onClick = useCallback(async () => {
    setIsLoading(true);
    try {
      action && (await action());
      message && toast.success(message.success);
    } catch (error) {
      console.error(error);
      message && toast.error(message.error);
    } finally {
      setIsLoading(false);
    }
  }, [action, message]);

  return (
    <button
      className={styles._}
      disabled={pending || isLoading}
      onClick={action ? onClick : undefined}
      type={action ? "button" : "submit"}
    >
      {(pending || isLoading) && <Loader />}
      <span>{children}</span>
    </button>
  );
};
...
export const SubscribeButton: React.FC = () => {
  const action = async () => {
    "use server";
    await new NovuApi().createSubscriber();
  };

  return <Button action={action}>Subscribe</Button>;
};
...
...
export const UnsubscribeButton: React.FC = () => {
  const action = async () => {
    "use server";
    await new NovuApi().deleteSubscriber();
  };

  return <Button action={action}>Unsubscribe</Button>;
};
...
src/components/SubscribeButton/index.tsx
src/components/UnsubscribeButton/index.tsx
通知フォームの作成
通知の送信処理はServer Actionとして実装します。
"use server";
...
const schema = object({ title: string(), body: string() });

export interface FormState {
  message: string | null;
  error?: Error;
}

export const action = async (
  state: FormState,
  formData: FormData
): Promise<FormState> => {
  try {
    const payload = parse(schema, {
      title: formData.get("title"),
      body: formData.get("body"),
    });

    const novuApi = new NovuApi();
    await novuApi.triggerEvent(payload);

    return {
      message: "Notification sent successfully",
    };
  } catch (error) {
    return {
      message: "Failed to send notification",
      error: error instanceof Error ? error : undefined,
    };
  }
};
src/components/NotificationForm/index.tsx
useFormStateを使うことで上記の action.ts での返り値をリアクティブに取得することができます。
通知フォームの送信ボタンは、先ほど作成した Button コンポーネントを使用します。
useFormStatusは通知フォームと同じコンポーネントでは機能しないため、SubmitButtonとして別コンポーネントに切り出します。
また処理が成功した場合にフォームをリセットするため、useRefを使用して<form .../>の参照を取得します。
...
const SubmitButton = () => {
  const status = useFormStatus();

  return <Button pending={status.pending}>Send</Button>;
};

export const NotificationForm = () => {
  const ref = useRef<HTMLFormElement>(null);
  const [state, dispatch] = useFormState(action, { message: null });
  const formAction = useCallback(
    async (formData: FormData) => {
      await dispatch(formData);
      ref.current?.reset();
    },
    [dispatch]
  );

  useEffect(() => {
    if (!state.message && !state.error) return;
    if (state.error) toast.error(state.error.message);
    else toast.success(state.message);
  }, [state]);

  return (
    <form className={styles._} ref={ref} action={formAction}>
...
src/components/NotificationForm/index.tsx
ページに反映
最後に、作成したコンポーネントをページに反映させます。
subscriberId が存在する場合は通知センターと通知フォームを表示し、存在しない場合は Subscribe ボタンを表示します。
...
export default async function Home() {
  const subscriberId = await new NovuApi().verifySubscriber();

  return (
    <main className={styles.main}>
      <div className={styles.description}>
      ...
        <div className={styles.flex}>
          {subscriberId ? (
            <>
              <UnsubscribeButton />
              <NotificationCenter subscriberId={subscriberId} />
            </>
          ) : (
            <SubscribeButton />
          )}
        </div>
      </div>
      ...
      {subscriberId ? (
        <NotificationForm />
      ) : (
        <div className={styles.grid}>...</div>
      )}
    </main>
  );
}
実装後の動作確認
開発環境でアプリケーションを起動します。
bun dev
Subscribe ボタンを押すと、通知センターと通知フォームが表示されます。

通知フォームに入力した内容を送信すると、通知センターに通知が表示されます。

送信する前に他のブラウザでアプリケーションを開いておき、Subscribe ボタンを押くと、同じく通知センターに通知が届いています。今回は Safari と Chrome で確認しました。

まとめ
アプリ内通知を Novu と Next.js を使って実装してみました。
自分自身NestJSを使った通知機能の実装経験があるからこそ、Novu の簡単さや便利さを感じました。同時に Next.js の Server Action、React の試験的機能であるuseFormState, useFormStatusを触ることができ、勉強になりました。
今回ご紹介した機能は、Novu が提供している機能のほんの一部です。セルフホスティングも対応していますので、ぜひ公式ドキュメントを読んでみてください!
明日は siy1121さんの記事です!
DeNA 24 新卒 Advent Calendar 2023 も残すこと 5 日となりました。最後までお楽しみください!
Discussion