VitestでSnapshotテストを試してみる
TL;DR
前回の記事で、テストコードを実行する上での基本機能を Vitest 実行する方法について紹介しました。
今回は一歩進んで、実践でわりとよく使うことになるSnapshot,Mockの使い方を紹介します。
Snapshot の基本的な使い方
Snapshot の撮影にはexpect() API のtoMatchSnapshot()を利用します。
import '@testing-library/jest-dom';
import { render, screen } from '@testing-library/react';
import { expect, test, describe } from 'vitest';
import App from '../App';

describe("Snapshot Test", () => {
    test('renders h1 text', () => {
        render(<App />);
        const headerElement = screen.getByText("Vite + React");
        expect(headerElement).toMatchSnapshot();
        expect(headerElement).toBeInTheDocument();
    });
})
テストコードを実行した結果、tests/__snapshots__フォルダが作成されました。

さらにその中にApp.test.tsx.snapというファイルが作成されます。
そのファイルの中を見てみます。
// Vitest Snapshot v1, https://vitest.dev/guide/snapshot.html

exports[`Snapshot Test > renders h1 text 1`] = `
<h1>
  Vite + React
</h1>
`;
ではApp.tsxのVite + Reactの文字列を変えてテストを実行してみたいと思います。
import { useState } from 'react'
import reactLogo from './assets/react.svg'
import viteLogo from '/vite.svg'
import './App.css'

function App() {
  const [count, setCount] = useState(0)

  return (
    <>
      <div>
        <a href="https://vitejs.dev" target="_blank">
          <img src={viteLogo} className="logo" alt="Vite logo" />
        </a>
        <a href="https://react.dev" target="_blank">
          <img src={reactLogo} className="logo react" alt="React logo" />
        </a>
      </div>
      <h1>Vite@ + React</h1>
      <div className="card">
        <button onClick={() => setCount((count) => count + 1)}>
          count is {count}
        </button>
        <p>
          Edit <code>src/App.tsx</code> and save to test HMR
        </p>
      </div>
      <p className="read-the-docs">
        Click on the Vite and React logos to learn more
      </p>
    </>
  )
}

export default App
Vite → Vite@に変えてみました。そしてテストコードのgetByTextも同様に修正したのち、テストコードを実行します。
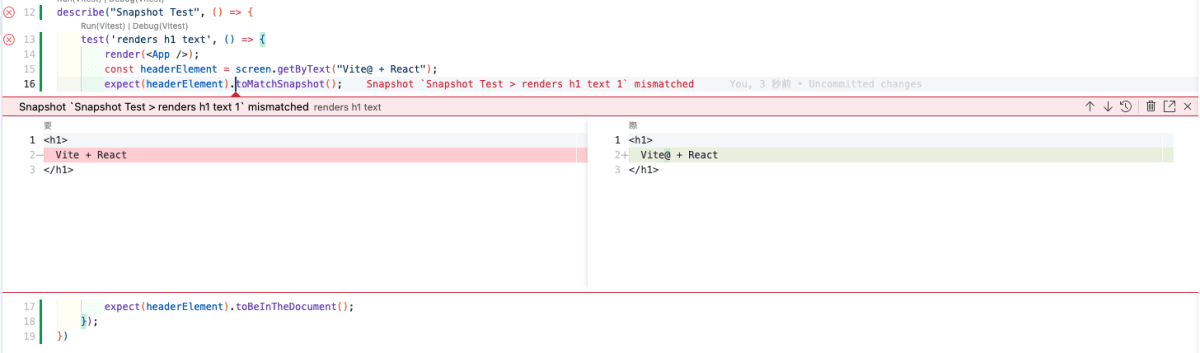
するとこのように Snapshot の比較をしてくれるようになりました。
Snapshot の更新
Snapshot の更新を行うには、npx vitest -uもしくはnpx vitestの watch モード中にuを押下することで更新が行われます。
実際に更新してみた結果、このようにテストが通るようになりました。

また、App.test.tsx.snapを確認してみると…
// Vitest Snapshot v1, https://vitest.dev/guide/snapshot.html

exports[`Snapshot Test > renders h1 text 1`] = `
<h1>
  Vite@ + React
</h1>
`;
こちらも更新されていました。
File Snapshot
「さっきもファイルだったじゃん」という声が聞こえてきそうなのですが、公式が「File Snapshot」と紹介してるので仕方ないんです。
意味合い的には"Different File Type Snapshot"というところでしょうが。
ところで、上記のように「"」あるいは「```」で括るなどして、文字列を強調したい場合があったりするかと思います。
例えば「```」で囲むことでVite + Reactを強調しているとします。
import { useState } from 'react'
import reactLogo from './assets/react.svg'
import viteLogo from '/vite.svg'
import './App.css'

function App() {
  const [count, setCount] = useState(0)

  return (
    <>
      <div>
        <a href="https://vitejs.dev" target="_blank">
          <img src={viteLogo} className="logo" alt="Vite logo" />
        </a>
        <a href="https://react.dev" target="_blank">
          <img src={reactLogo} className="logo react" alt="React logo" />
        </a>
      </div>
      <h1>```Vite + React```</h1>
      <div className="card">
        <button onClick={() => setCount((count) => count + 1)}>
          count is {count}
        </button>
        <p>
          Edit <code>src/App.tsx</code> and save to test HMR
        </p>
      </div>
      <p className="read-the-docs">
        Click on the Vite and React logos to learn more
      </p>
    </>
  )
}

export default App
この場合、先に紹介したようにApp.test.tsx.snapSnapshot が作成されるとどうなるでしょうか?
// Vitest Snapshot v1, https://vitest.dev/guide/snapshot.html

exports[`Snapshot Test > renders h1 text 1`] = `
<h1>
  \`\`\`Vite + React\`\`\`
</h1>
`;
このように「`」がエスケープされた状態でスナップショットが作成されてしまいます。
このエスケープによる何かしらの副作用を受ける場合には、異なるファイル形式でスナップショットを作成することができます。
import '@testing-library/jest-dom';
import { render, screen } from '@testing-library/react';
import { expect, test, describe } from 'vitest';
import App from '../App';

describe("Snapshot Test", () => {
    test('renders h1 text', async () => {
        render(<App />);
        const headerElement = screen.getByText("```Vite + React```");
        await expect(headerElement).toMatchFileSnapshot('./__snapshots__/App.html');
        expect(headerElement).toBeInTheDocument();
    });
})
このように指定することで、先ほどと同じくtests/__snapshots__にhtml形式で Snapshot を作成することができました。

そしてファイルの中を確認すると…
<h1>
  ```Vite + React```
</h1>
今度は「```」がエスケープされず、そのまま出力されていることが確認できます。
Inline Snapshots
さて、ここまでは Snapshot が別のファイルにできる様を見てきたかと思いますが、今度はテストファイルの中に直接作成される Snapshot について見てみたいと思います。
今回はtoMatchInlineSnapshot()という API を使います。
import '@testing-library/jest-dom';
import { render, screen } from '@testing-library/react';
import { expect, test, describe } from 'vitest';
import App from '../App';

describe("Snapshot Test", () => {
    test('renders h1 text', () => {
        render(<App />);
        const headerElement = screen.getByText("Vite + React");
        expect(headerElement).toMatchInlineSnapshot();
        expect(headerElement).toBeInTheDocument();
    });
})
さて、この状態でテストコードを実行すると以下のようにテストコードが書き換えられます。
describe("Snapshot Test", () => {
    test('renders h1 text', () => {
        render(<App />);
        const headerElement = screen.getByText("Vite + React");
        expect(headerElement).toMatchInlineSnapshot(`
          <h1>
            Vite + React
          </h1>
        `);
        expect(headerElement).toBeInTheDocument();
    });
})

この場合のメリットは Snapshot を確認する際他のファイルを開く必要がないと公式ドキュメントには書かれていますが、実際のコンポーネントはこんなに小さいはずないのでファイルに保存する方が無難かなという気はします。
おわりに
Snapshot の使い方について確認しました。
よほどのことがない限りは、一番最初に紹介した*.test.*.snap形式の Snapshot を使うことになるでしょう。
ちなみに公式ドキュメントには Vitest と Jest での Snapshot の違いについて書かれているので、そちらも見てみると良いかと思います。
メンバー募集中!
サーバーサイド Kotlin コミュニティを作りました!
Kotlin ユーザーはぜひご参加ください!!
また関西在住のソフトウェア開発者を中心に、関西エンジニアコミュニティを一緒に盛り上げてくださる方を募集しています。
よろしければ Conpass からメンバー登録よろしくお願いいたします。
Discussion