Introduction
In the previous article, we explained the overview and three prediction types of AWS's AI Surrogate Model solution: AI Surrogate Models in Engineering on AWS (MLSimKit).
[AI Surrogate Model Concept]

In this article, we will explain the procedures for actually running MLSimKit on AWS EC2 and predicting vehicle lift coefficients using the KPI prediction method.
[KPI Prediction (Key Performance Indicator Prediction) Concept]

The official tutorial for KPI prediction explains procedures such as MLSimKit installation, dataset download, and model training, but does not cover EC2 environment setup or troubleshooting when actually running it.
Therefore, this article summarizes recommended configurations and procedures for low-cost, rapid execution that the author successfully achieved after several trials.
Prerequisites:
-
Clone MLSimKit Repository (Local environment)
git clone https://github.com/awslabs/ai-surrogate-models-in-engineering-on-aws.git cd ai-surrogate-models-in-engineering-on-aws -
[Optional] Install Amazon Q Developer CLI
- This article's trials used the AI coding agent Amazon Q Developer CLI to perform AWS environment operations at high speed.
- Installation method: Amazon Q Developer CLI
Execution Procedure Overview:
| Phase |
|---|
| Launch EC2 |
| SSH Connection & GPU Verification |
| Install MLSimKit |
| Download Data |
| Create Manifest |
| Execute Preprocessing |
| Execute Training |
| Test Prediction |
Chapter 1: Preparing the Execution Environment
1-0. Architecture Overview
The AWS architecture to be built in this tutorial is as follows:

**Network Configuration:**
- **VPC**: Use default VPC (automatically created in each AWS account)
  - Example: 172.31.0.0/16 (value in this verification)
- **Subnet**: Public subnet (internet accessible)
  - Example: 172.31.32.0/20 (value in this verification)
  - Allow only your IP in security group
- **Availability Zone**: Any AZ
  - Example: us-east-1c (value in this verification)
- **Internet Gateway**: Required for SSH connection (automatically attached to default VPC)
- **Security Group**: Allow only SSH (22), source is your IP address only
- **External Connection**: Download WindsorML dataset (1.7GB) from Hugging Face

**Recommended Configuration for Production:**
- Private Subnet + NAT Gateway + Bastion Host
- Use when higher security is required
1-1. Launching EC2 Instance
Recommended Specifications
**Instance Type: g5.2xlarge**
- GPU: NVIDIA A10G × 1 (24GB VRAM)
- vCPU: 8 cores
- Memory: 32GB
- Cost: $1.212/hour (us-east-1)
**AMI: Deep Learning Base GPU AMI (Ubuntu 22.04)**
- CUDA 12.1 pre-installed
- NVIDIA driver configured
- Python 3.10 included
**Storage: 100GB EBS gp3**
- WindsorML: 1.7GB
- System + work area: approximately 67GB
- Recommended 100GB with margin (approximately 30GB free)
Launch Procedure
1. Create Key Pair and Save to Secrets Manager
# Create key pair and save to Secrets Manager
KEY_MATERIAL=$(aws ec2 create-key-pair \
  --key-name mlsimkit-tutorial-key \
  --query 'KeyMaterial' \
  --output text)

aws secretsmanager create-secret \
  --name mlsimkit-tutorial-key \
  --secret-string "$KEY_MATERIAL" \
  --region us-east-1

echo "Private key saved to Secrets Manager"
2. Create Security Group
# Get current IP address
MY_IP=$(curl -s https://checkip.amazonaws.com)

# Create security group
SG_ID=$(aws ec2 create-security-group \
  --group-name mlsimkit-tutorial-sg \
  --description "Security group for MLSimKit tutorial" \
  --query 'GroupId' \
  --output text)

# Allow SSH connection
aws ec2 authorize-security-group-ingress \
  --group-id $SG_ID \
  --protocol tcp \
  --port 22 \
  --cidr ${MY_IP}/32
3. Launch EC2 Instance
# Launch instance
INSTANCE_ID=$(aws ec2 run-instances \
  --image-id ami-0601999f27e2188a7 \
  --instance-type g5.2xlarge \
  --key-name mlsimkit-tutorial-key \
  --security-group-ids $SG_ID \
  --block-device-mappings '[{"DeviceName":"/dev/sda1","Ebs":{"VolumeSize":100,"VolumeType":"gp3"}}]' \
  --tag-specifications 'ResourceType=instance,Tags=[{Key=Name,Value=MLSimKit-Windsor-Tutorial}]' \
  --query 'Instances[0].InstanceId' \
  --output text)

echo "Instance ID: $INSTANCE_ID"

# Wait for instance to start
aws ec2 wait instance-running --instance-ids $INSTANCE_ID

# Get public IP
PUBLIC_IP=$(aws ec2 describe-instances \
  --instance-ids $INSTANCE_ID \
  --query 'Reservations[0].Instances[0].PublicIpAddress' \
  --output text)

echo "Public IP: $PUBLIC_IP"
1-2. SSH Connection
Retrieve Private Key
# Retrieve private key from Secrets Manager
aws secretsmanager get-secret-value \
  --secret-id mlsimkit-tutorial-key \
  --region us-east-1 \
  --query 'SecretString' \
  --output text > mlsimkit-tutorial-key.pem

# Set permissions
chmod 400 mlsimkit-tutorial-key.pem
Connect
# Connect to EC2 (using PUBLIC_IP obtained above)
ssh -i mlsimkit-tutorial-key.pem ubuntu@$PUBLIC_IP

# Or specify IP address directly
# ssh -i mlsimkit-tutorial-key.pem ubuntu@<EC2 Public IP>
Verify Successful Connection:
# Verify GPU
nvidia-smi

# Example output:
# +-----------------------------------------------------------------------------------------+
# | NVIDIA-SMI 580.95.05              Driver Version: 580.95.05      CUDA Version: 13.0     |
# |-------------------------------+----------------------+--------------------------------+
# | GPU  Name                 Persistence-M | Bus-Id        Disp.A | Volatile Uncorr. ECC |
# | Fan  Temp   Perf          Pwr:Usage/Cap |         Memory-Usage | GPU-Util  Compute M. |
# |===============================+======================+================================|
# |   0  NVIDIA A10G              On  | 00000000:00:1E.0 Off |                    0 |
# |  0%   23C    P8              11W / 300W |      0MiB / 23028MiB |      0%      Default |
# +-------------------------------+----------------------+--------------------------------+
Important: Verify GPU Recognition
Before starting training, always verify that the GPU is properly recognized.
# Verify GPU recognition
nvidia-smi | grep "NVIDIA A10G"
Expected output:
| 0 NVIDIA A10G On | 00000000:00:1E.0 Off | 0 |
If GPU is not recognized:
- Training time will be slower
- Refer to "GPU Recognition Error" below to resolve
- After resolution, always re-verify GPU recognition with
nvidia-smi
GPU Recognition Error
# Symptom
nvidia-smi
# NVIDIA-SMI has failed because it couldn't communicate with the NVIDIA driver

# Cause
# Mismatch between kernel version and NVIDIA driver
# New kernel (6.8.0-1041) not supported by driver

# Verify
uname -r  # Current kernel
dkms status  # Kernel with installed driver

# Solution 1: Reboot with older kernel
sudo grub-reboot '1>2'
sudo reboot

# Solution 2: Rebuild driver for current kernel (time-consuming)
sudo dkms install nvidia/580.95.05 -k $(uname -r)

# Verify
nvidia-smi  # Verify GPU recognition
1-3. Install MLSimKit
For MLSimKit explanation, refer to here
Install Prerequisites
# Install python3-venv
sudo apt-get update
sudo apt-get install -y python3.10-venv
Download MLSimKit
# Download from GitHub
wget https://github.com/awslabs/ai-surrogate-models-in-engineering-on-aws/archive/refs/heads/main.tar.gz

# Extract
tar -xzf main.tar.gz

# Change directory
cd ai-surrogate-models-in-engineering-on-aws-main
Execute Installation
# System-wide installation
pip install -e .
Verify Installation:
# Check version
mlsimkit-learn --version

# Example output:
# ML for Simulation Toolkit, version 0.1.0
Chapter 2: Preparing WindsorML Dataset
2-1. Download Dataset
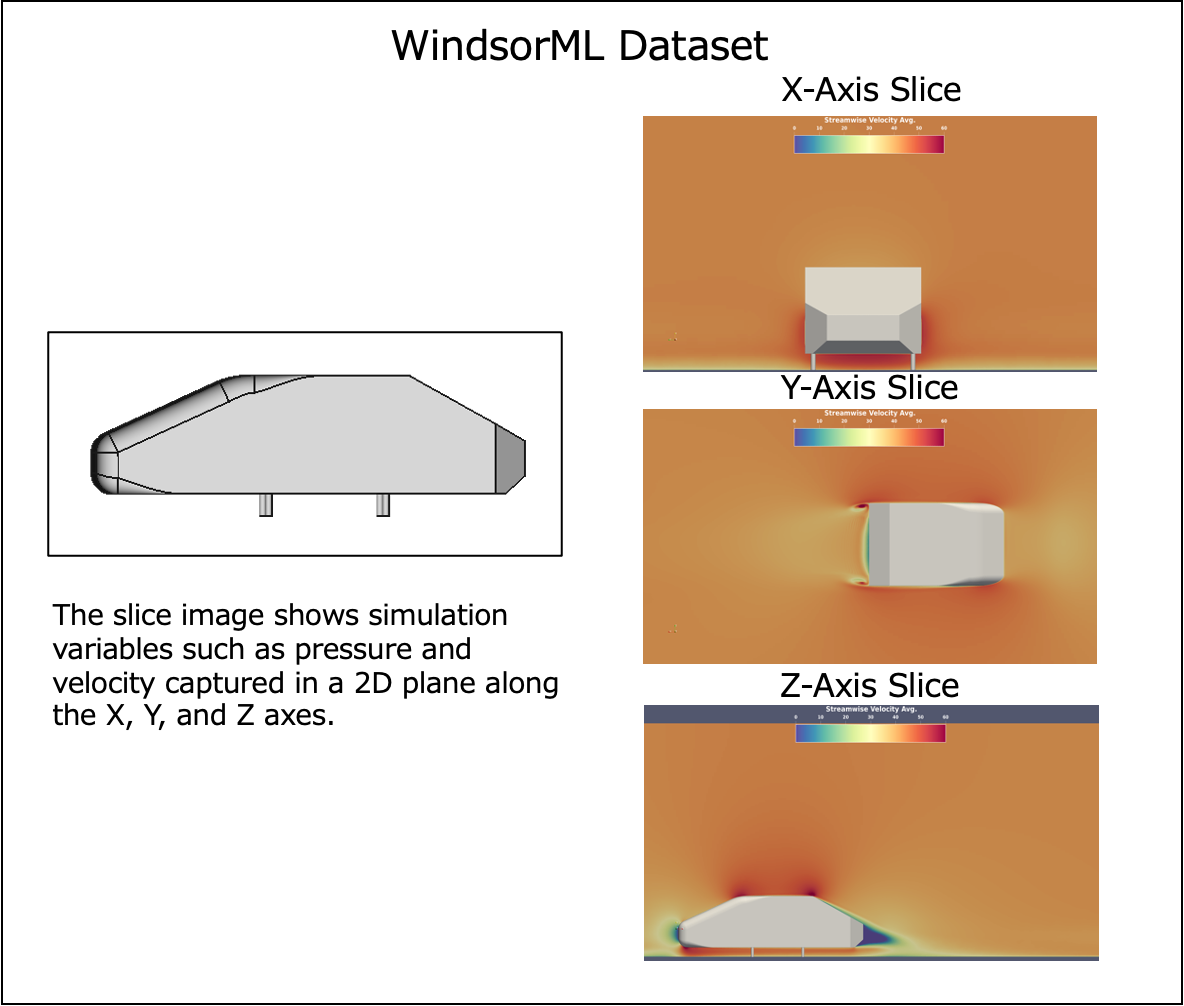
For WindsorML dataset explanation, refer to here
Navigate to Tutorial Directory
cd tutorials/kpi/windsor
ls -la
Available Scripts:
-
download-dataset- Dataset downloader -
run-create-manifest-training- Create training manifest -
run-training-pipeline- Execute training pipeline -
run-create-manifest-prediction- Create prediction manifest -
run-prediction- Execute prediction pipeline
Execute Dataset Download
# Create data storage directory
mkdir -p ~/datasets

# Execute download
./download-dataset ~/datasets
Respond to Prompt:
Download all runs? (y/n):
→ Enter y and press Enter (download all data)
Download Contents:
- Dataset: WindsorML
- Size: 1.7GB
- Cases: 350 cases (run_0 ~ run_349)
- Source: Hugging Face (neashton/windsorml)
If Hugging Face Rate Limit Error Occurs
# Symptom
HTTP 429 Too Many Requests

# Cause
Too many simultaneous downloads hit rate limit

# Solution 1: Wait and retry
# Hugging Face uses local cache, so
# already downloaded files won't be re-downloaded
./download-dataset ~/datasets

# Solution 2: Download one file at a time (recommended)
# Edit download-dataset script to add max_workers=1
2-2. Verify Data Structure
Downloaded Files
# Verify directory structure
ls ~/datasets/

# Example output:
# run_0  run_1  run_2  ... run_354
Contents of One Case
# Check contents of run_0
ls ~/datasets/run_0/

# Example output:
# windsor_0.stl      ← Vehicle 3D shape
# force_mom_0.csv    ← CFD results (KPI values)
Verify CFD Results
# Check KPI values
cat ~/datasets/run_0/force_mom_0.csv

# Example output:
# cd, cs, cl, cmy
# 0.2818169578178322,0.0008234405065462456,0.48822197919945154,-0.07294317299334006
Meaning of KPI Values:
- cd: Drag Coefficient - Air resistance
- cs: Side force Coefficient - Crosswind effects
- cl: Lift Coefficient - Lifting force
- cmy: Pitching Moment Coefficient - Front-to-back rotational force
These values are results calculated by actual CFD simulation (takes several hours). MLSimKit aims to predict these values in a short time.
Chapter 3: Creating Manifest
3-1. Create Training Manifest
Execute Manifest Creation
./run-create-manifest-training ~/datasets
Processing:
- Scan 355 cases of STL and CSV files
- Link shape files and KPI values for each case
- Generate manifest file in JSON Lines format
Generated File:
# Check manifest file
ls -lh training.manifest

# Example output:
# -rw-rw-r-- 1 ubuntu ubuntu 59K Nov 14 06:00 training.manifest
The manifest defines relationships for each drawing across multiple cases (355 cases in this case), as shown in the image below:

Verify Manifest Contents
# Display first 3 lines
head -3 training.manifest
Example output:
{"geometry_files": ["file:///home/ubuntu/datasets/run_0/windsor_0.stl"], "kpi": [0.2818169578178322, 0.0008234405065462456, 0.48822197919945154, -0.07294317299334006]}
{"geometry_files": ["file:///home/ubuntu/datasets/run_1/windsor_1.stl"], "kpi": [0.32251110051821463, -0.059431832381329826, -0.061135997912917385, -0.04094381732630274]}
Role of Manifest:
- Define training data inputs (geometry_files) and outputs (kpi)
- 350 cases used for training
3-2. Verify Training Configuration
Default Configuration File
Verify the default configuration (training.yaml) from the official tutorial:
cat training.yaml
The WindsorML dataset contains four KPI values (Cd, Cs, Cl, CMy), but the default training.yaml predicts only one KPI (Cl: lift coefficient).
Important Settings:
kpi:
  manifest_uri: training.manifest

  train:
    output_kpi_indices: "2"  # Predict only Cl (lift coefficient)
    pooling_type: max
    epochs: 100
    opt:
      learning_rate: 0.003

  predict:
    compare-groundtruth: true
- index 0: Cd (drag coefficient)
- index 1: Cs (side force coefficient)
- index 2: Cl (lift coefficient) ← Default
- index 3: CMy (yaw moment coefficient)
If you want to predict all four coefficients, you need to train and create a model for each coefficient separately (requiring 4× the trials of this execution).
Chapter 4: Execute Preprocessing
4-1. Execute Preprocessing (First Time Only)
KPI training reuses preprocessed data, but preprocessing must be executed the first time:
# Execute only preprocessing with default configuration
mlsimkit-learn --config training.yaml kpi preprocess
Processing:
- Convert 350 STL files to graph structures that MGN (MeshGraphNet) can handle
- Split data for training/validation/testing (60%/20%/20%)
- Save preprocessed data to
outputs/training/preprocessed_data
For MGN (MeshGraphNet) explanation, refer to here
4-2. Verify Data Split
# Check manifest files
wc -l outputs/training/*.manifest

# Example output:
#  210 outputs/training/train.manifest      ← Training (60%)
#   70 outputs/training/validate.manifest   ← Validation (20%)
#   70 outputs/training/test.manifest       ← Testing (20%)
Meaning of Data Split:
- Training (60%): Used for model learning
- Validation (20%): Performance evaluation during learning and hyperparameter tuning
- Testing (20%): Final performance evaluation (not used in training)
4-3. Verify Preprocessed Data Size
du -sh outputs/training/preprocessed_data

# Example output:
# 3.7G    outputs/training/preprocessed_data
Chapter 5: Model Training
5-1. Execute Training Pipeline
Start Training
# Execute KPI training
nohup mlsimkit-learn --config training.yaml kpi train > training.log 2>&1 &

# Record process ID
echo $!
Execution:
- Train only Cl (lift coefficient)
- Execute 100 epochs
5-2. Monitor Progress
# Monitor log in real-time
tail -f training.log

# Exit with Ctrl+C
Training Flow:
[INFO] Training:   0%|          | 0/100 [00:00<?, ?epochs/s]
[INFO] Epoch 0: train loss = 0.988; validation loss = 1.209
...
[INFO] Training: 100%|██████████| 100/100 [13:50<00:00, 8.30s/epochs]
[INFO] Epoch 21: train loss = 0.405; validation loss = 0.420
Measured Time: 14 minutes
Speed: 8.3 seconds/epoch
5-3. Verify Training Results
After training completes, verify the loss progression:
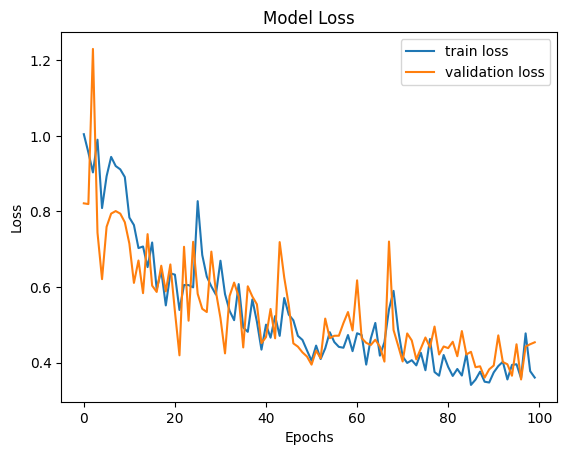
Key Points:
- Both Train Loss and Validation Loss decrease (learning progresses) and converge
- Best validation loss (0.356) achieved at epoch 96
- Small gap between Train Loss (0.359) and Validation Loss (0.356) → No overfitting, high accuracy prediction possible on new data
Train Loss: Prediction error on training data
Validation Loss: Prediction error on validation data
Formula:
Loss = MSE(pred, actual)
     = Mean((predicted value - actual value)²)
Chapter 6: Evaluation on Test Data
6-1. Execute Prediction on Test Data
After training completes, evaluate final accuracy on test data (70 samples):
mlsimkit-learn --output-dir outputs/training --config training.yaml kpi predict --manifest-path outputs/training/test.manifest
Execution:
- Predict on 70 test data samples
- Calculate Cl (lift coefficient) accuracy
- Measured time: 18 seconds
6-2. Verify Test Data Accuracy
# Check accuracy metrics
cat outputs/training/predictions/dataset_prediction_error_metrics.csv
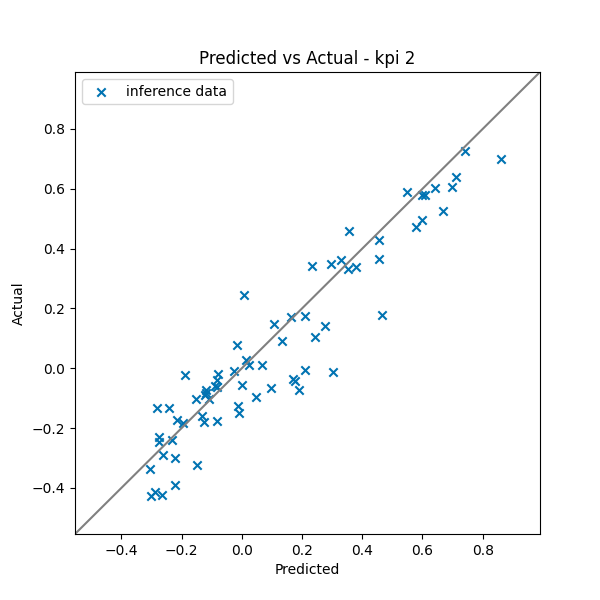
How to Read the Graph:
- X-axis: AI surrogate model predicted values
- Y-axis: CFD simulation actual values
- Gray diagonal line: Perfect match line
Evaluation:
- Points distributed along diagonal line → High accuracy
- Prediction possible across full range of Cl = -0.4 ~ 0.8
- Almost no outliers
Accuracy on Test Data (70 samples):
| Metric | Value | Evaluation |
|---|---|---|
| MAPE | 1.87% | Excellent |
| Directional Correctness | 89.4% | Excellent |
Supplementary Explanation: MAPE (Mean Absolute Percentage Error)
(Click to expand)
Definition
Mean Absolute Percentage Error - Displays relative error as percentage
Formula
MAPE = Mean(|predicted value - actual value| / |actual value|) × 100%
Concrete Example (Drag Coefficient Cd)
Sample 1: Actual 0.30, Predicted 0.32 → |0.32-0.30|/0.30 = 0.067 = 6.7%
Sample 2: Actual 0.31, Predicted 0.28 → |0.28-0.31|/0.31 = 0.097 = 9.7%
Sample 3: Actual 0.29, Predicted 0.30 → |0.30-0.29|/0.29 = 0.034 = 3.4%

MAPE = (6.7% + 9.7% + 3.4%) / 3 = 6.6%
Supplementary Explanation: Directional Correctness
(Click to expand)
Definition
Percentage of matching increase/decrease trends
Calculation Method
For all sample pairs (A, B):
  Actual A < B and Predicted A < B → Match ✓
  Actual A > B and Predicted A > B → Match ✓
  Otherwise → Mismatch ✗

Directional Correctness = Number of matching pairs / Total pairs
Concrete Example (Drag Coefficient Cd)
Sample A: Actual 0.30, Predicted 0.28
Sample B: Actual 0.32, Predicted 0.31
Sample C: Actual 0.28, Predicted 0.33

Pair(A,B): Actual A<B, Predicted A<B → Match ✓
Pair(A,C): Actual A>C, Predicted A<C → Mismatch ✗
Pair(B,C): Actual B>C, Predicted B<C → Mismatch ✗

Directional Correctness = 1/3 = 33.3%
Chapter 7: Cleanup
7-1. Stop EC2 Instance
Stop Instance
# Stop instance (execute on local machine)
aws ec2 stop-instances --instance-ids $INSTANCE_ID

# Or specify instance ID directly
# aws ec2 stop-instances --instance-ids i-XXXXX
Important:
- Always stop after use
- Charges continue if not stopped ($1.212/hour)
7-2. Resource Cleanup
Delete Secrets Manager Private Key (if not using this EC2 in the future)
# Delete private key
aws secretsmanager delete-secret \
  --secret-id mlsimkit-tutorial-key \
  --force-delete-without-recovery \
  --region us-east-1

# Delete local private key file
rm mlsimkit-tutorial-key.pem
Delete EC2 Key Pair and Security Group (if not using this EC2 in the future)
# Delete key pair
aws ec2 delete-key-pair --key-name mlsimkit-tutorial-key

# Delete security group
aws ec2 delete-security-group --group-id $SG_ID
Important: If you don't delete the Secrets Manager private key, charges of $0.40/month will continue.
Summary
In this article, we performed KPI prediction of fluid simulations on EC2 using AWS's AI surrogate model solution MLSimKit, targeting the WindsorML vehicle aerodynamics dataset with 210 cases.
Traditionally, evaluating the aerodynamic performance of a single vehicle shape required hours of CFD simulation, but using AI surrogate models achieved:
• Training time: Just 14 minutes (learning from 210 cases)
• Prediction time: Just 18 seconds (testing on 70 cases)
• Prediction accuracy: MAPE 1.87% (prediction error for lift coefficient Cl - excellent)
This enables high-accuracy prediction of aerodynamic performance for new vehicle shapes in seconds, making it possible to quickly and cost-effectively evaluate numerous shape proposals in the early design stages.
For a comprehensive overview of MLSimKit, please refer to this article:

この Publication に投稿している記事は、アマゾン ウェブ サービス ジャパン合同会社または Amazon Web Services, Inc. 所属社員による個人の見解であり、所属する組織の公式見解ではありません。参加したい従業員の方は、Sugiyama Suguru までお知らせください。
Discussion