poetryで開発からpypiにpublishするまで
poetryを使ったパッケージ開発から公開までの備忘録です。
pypiのアカウント設定等については触れていません。末尾の参考サイトを参照してください。
新規作成
poetry new --src project_name
cd project_name
poetry install
pycharm .
# vscodeの場合
# code .
これで新規のプロジェクトがpycharmで開くので、以下はpycharm内のターミナルで実行。
基本設定
ターミナル
- 依存パッケージの追加
- git init
- README, LICENSE, gitignoreの作成
poetry add -D pytest-watch pytest-mock pytest-cov
poetry shell
mv README.rst README.md
# git init -> デフォルトのブランチ名をdevにする場合
git init -b dev
# LICENSEファイルの作成
license -n atu4403 -o LICENSE mit
# .gitignoreの作成
gibo dump python >> .gitignore
localにある自作モジュールを使いたいなら相対パスで指定する。絶対パスだと失敗する。
poetry add ../moncoll/dist/moncoll-0.1.0.tar.gz
pycharm設定
- ツール - 保存時のアクション - コードの整形をオン
- プロジェクト - pythonインタープリター - 仮想環境のpythonを設定
pytestをインストールしていれば自動的に使ってくれるので特に設定はなし。
これで環境は整うのであとはガシガシ開発。
開発中
-
test_から始まる関数名にしておけばコードブロックの左に自動でtest用の再生ボタンが表示されるのでお手軽TDD/BDD - doctestを書いておけば関数名右クリックでtestできる
- docstringは後でドキュメント作成のために最低限書いておく
- 型アノテーションにmypy使うと煩いので使わない方が捗る
pytest-watch
poetry run ptw --ignore tests/test_download.py
pytest-cov
poetry run pytest --cov-report term-missing --cov=src/adash tests/
完成〜publishまで
TODO確認
すべてのファイルでTODO:を検索して残っていないことを確認する
ci(github actions)
pytestをgithub actionsで動作させる例
.github/workflows/test.ymlを作成。
name: Test
on:
  push:
  pull_request:
jobs:
  ci:
    runs-on: ${{ matrix.os }}
    strategy:
      matrix:
        os:
          - macos-11.0
          - macos-latest
          - windows-latest
          - ubuntu-20.04
          - ubuntu-latest
        python-version: [ 3.8, 3.9 ]
    steps:
      - uses: actions/checkout@v2
      - uses: actions/setup-python@v2
        with:
          python-version: ${{ matrix.python-version }}
      - uses: atu4403/poetry-setup-multi-platform@v1
      - run: |
          poetry install
          poetry run pytest
        shell: bash
nameの部分はそのままバッジのtitleになるので相応なものを設定すること。
doc作成
プロジェクトソース直下の__init__.pyの冒頭にコメントを追加。
"""
.. include:: ../../README.md
"""
# 以下普通に実装
from foo import bar
適当なディレクトリに作成して確認する。
pdoc --html --output-dir tmp --force src/{project-name}
ここではtmpディレクトリが作成されるが、git管理不要なので.gitignoreに追加しておくこと。
githubにpushした時に自動でデプロイする為に.github/workflows/deploy.ymlを作成する。{project-name}の部分は都度設定すること。
name: GitHub Pages

on:
  push:
    branches:
      - main
  pull_request:

jobs:
  deploy:
    runs-on: ubuntu-20.04
    concurrency:
      group: ${{ github.workflow }}-${{ github.ref }}
    steps:
      - uses: actions/checkout@v2
      - uses: actions/setup-python@v2
        with:
          python-version: 3.9
      - name: Build
        run: |
          pip install pdoc3
          pdoc --html --output-dir tmp --force src/{project-name}

      - name: Deploy
        uses: peaceiris/actions-gh-pages@v3
        if: ${{ github.ref == 'refs/heads/main' }}
        with:
          github_token: ${{ secrets.GITHUB_TOKEN }}
          publish_dir: ./tmp
git関連
devブランチのままpushしてCI(GitHubActions)の動作確認。
hub create
git push -u origin dev
CIが通ったら今までの履歴を消してmainブランチにまとめる。
git checkout --orphan main # 履歴のない状態でmainブランチを切る
git commit -m "Initial Commit" # ステージングされた状態になるのでaddせずにcommitする
git push -u origin main
git branch --delete --force dev
git push --delete origin dev
# deleteできない場合は GitHubのsettings → branches からDefault branchをmainに変更し、再度`push —delete`する。
公開の準備
pyproject.tomlを修正。
- descriptionを記入
- homepageとrepositoryのurlを記入
- readmeを記入。以下のようにしないとPyPIにREADMEが反映されない。
- versionの確認。すでに公開している場合はバージョンを上げる。
[tool.poetry]
name = "{project-name}"
version = "0.1.0"
description = "{project description}"
authors = ["atu4403 <73111778+atu4403@users.noreply.github.com>"]
homepage = "https://github.com/atu4403"
repository = "https://github.com/atu4403/{project-name}"
readme = "README.md"
project.tomlをコミットしたらタグも作成
git tag v0.1.0 # 最新のコミットに対してtagを作成
git push origin --tags
testpypiに仮公開
testPyPIにpublishする。アカウントの作成とpoetry configに関しては参考リンク参照
> poetry publish --build -r testpypi
https://test.pypi.org/manage/projects/ に行き、作ったプロジェクトのページを開く。
インストール用のurlがあるのでコピペして実際にインストール&動作確認
> pip3 install -i https://test.pypi.org/simple/ remind-task
# 一部のpackageがインストールできない時は--extra-index-urlを設定する
> pip3 install -i https://test.pypi.org/simple/ --extra-index-url https://pypi.python.org/pypi remind-task
poetryでinstallしたい場合poetry add {url}としてもエラーになる。
poetry runを頭につけて実行するとOK
poetry run pip3 install -i https://test.pypi.org/simple/ --extra-index-url https://pypi.python.org/pypi {project-name}
testPyPIに上げたものに不具合があったら、修正バージョンではバージョンを上げる必要がある。pyproject.tomlのversionを修正する。
[tool.poetry]
name = "project_name"
version = "0.2.0"
GitHubでCIが通ることを最終確認したら本番用のPyPIにpublishして終了。
公開
poetry publish --build
公開直後はpypiの検索に引っかからないことがあるのでhttps://pypi.org/project/{project-name}/で確認。
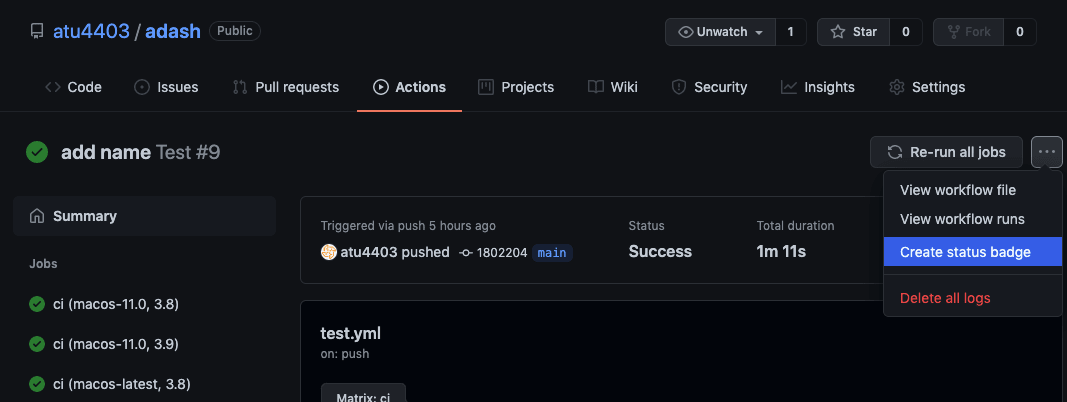
badgeの取得
github actions
actionsのタブから最新のものを開き、右の...から「create status badge」を選択するとmarkdownのlinkがコピーできる
pypi version
Discussion