React Router v7 | フォーム認証・Google認証の実装方法
React Router v7 を使用してフォーム認証と Google 認証を実装する方法を解説します。
参考記事
1️⃣ 完成イメージ

ソースコード
ソースコードは以下のリポジトリで確認できます。
2️⃣ 認証用 User スキーマの作成
2.1 Prisma セットアップ
データベースにアクセスするために Prisma を利用します。今回は sqlite を使用しますが、セットアップ方法の詳細については他の記事にも多く記載されているため、本記事では割愛します。
2.2 User スキーマの追加
以下のスキーマを schema.prisma に追加します。
generator client {
  provider = "prisma-client-js"
}

datasource db {
  provider = "sqlite"
  url      = env("DATABASE_URL")
}

// ...

model User {
  id        String   @id @default(uuid())
  email     String   @unique
  password  String
  name      String
  image     String?
  provider  String   @default("Credentials")
  createdAt DateTime @default(now())
  updatedAt DateTime @updatedAt
}
スキーマファイルを作成したら、以下のコマンドを実行して Prisma Client ファイルを生成します。
prisma generate
3️⃣ セッションストレージの準備
3.1 .env にセッションシークレットを追加
セッションの暗号化に必要なランダムなシークレットキーを生成し、環境変数に設定します。
- シークレットキーを生成する:
openssl rand -base64 32
-
.envに追加:
SESSION_SECRET='****'
-
env.tsに環境変数を追加:
export const env = {
  SESSION_SECRET: process.env.SESSION_SECRET as string,
};
3.2 セッションストレージの作成
以下のコードを app/sessions.server.ts に追加し、セッション管理を行います。
import type { User } from '@prisma/client';
import { createCookieSessionStorage } from 'react-router';
import type { ToastType } from './components/shadcn/custom/custom-sonner';
import { env } from './config/env';

/**
 * セッションデータ。認証で利用する。
 */
type SessionData = {
  user: Omit<User, 'password'>;
};

/**
 * セッションフラッシュメッセージ。トースト表示で利用する。
 */
type SessionFlashData = {
  toast: {
    type: ToastType;
    message: string;
  };
};

const { getSession, commitSession, destroySession } =
  createCookieSessionStorage<SessionData, SessionFlashData>({
    cookie: {
      name: '__session',
      httpOnly: true,
      maxAge: 60 * 60 * 24 * 30, // 30日間有効
      path: '/',
      sameSite: 'lax',
      secrets: [env.SESSION_SECRET || ''],
      secure: process.env.NODE_ENV === 'production',
    },
  });

export { commitSession, destroySession, getSession };
4️⃣ 共通コンポーネント準備
共通コンポーネントには shadcn/ui を使用し、バリデーションには Conform を採用しています。
今回は、ログインフォームとサインアップフォームを作成するにあたり、共通コンポーネントを準備します。
📌 共通コンポーネント詳細
4.1 shadcn/ui のセットアップ設定
以下の設定を components.json に追加し、shadcn/ui をセットアップします。
{
  "$schema": "https://ui.shadcn.com/schema.json",
  "style": "default",
  "rsc": false,
  "tsx": true,
  "tailwind": {
    "config": "tailwind.config.ts",
    "css": "app/app.css",
    "baseColor": "zinc",
    "cssVariables": true,
    "prefix": ""
  },
  "aliases": {
    "components": "~/components/shadcn",
    "utils": "~/lib/utils",
    "ui": "~/components/shadcn/ui",
    "lib": "~/lib",
    "hooks": "~/hooks"
  },
  "iconLibrary": "lucide"
}
4.2 shadcn/ui から追加したコンポーネント
以下のコンポーネントを追加します。
-
shadcn/uiのLabel -
shadcn/uiのInput -
shadcn/uiのAlert
4.3 バリデーション対応のインプットコンポーネント
バリデーションを実装するために必要なパッケージをインストールします。
npm i @conform-to/react @conform-to/zod zod
4.3.1 ConformInput の作成
バリデーション対応の Input コンポーネントを作成します。
import { type FieldMetadata, getInputProps } from '@conform-to/react';
import { Input } from '~/components/shadcn/ui/input';

type OptionType =
  | 'number'
  | 'search'
  | 'color'
  | 'date'
  | 'datetime-local'
  | 'email'
  | 'file'
  | 'hidden'
  | 'month'
  | 'password'
  | 'range'
  | 'tel'
  | 'text'
  | 'time'
  | 'url'
  | 'week';

interface ConformInputProps<Schema>
  extends React.InputHTMLAttributes<HTMLInputElement> {
  metadata: FieldMetadata<Schema>;
}

/**
 * Conform に対応した Input コンポーネント
 * @param param0 - 入力フィールドのメタデータ
 * @returns `ConformInput` コンポーネント
 */
const ConformInput = <Schema,>({
  metadata,
  className,
  ...props
}: ConformInputProps<Schema>) => {
  const { type, ...restProps } = props;
  const inputProps = getInputProps(metadata, { type: type as OptionType });

  return (
    <div className="flex flex-col">
      <Input
        {...inputProps}
        {...restProps}
        className={`${className} ${!!metadata.errors && 'border-red-500'}`}
      />
      {metadata.errors && (
        <div>
          {metadata.errors.map((e, index) => (
            // biome-ignore lint/suspicious/noArrayIndexKey: <explanation>
            <p key={index} className="py-2 text-red-500">
              {e}
            </p>
          ))}
        </div>
      )}
    </div>
  );
};

export { ConformInput };
5️⃣ フォーム認証機能追加
5.1 FormStrategy 作成
5.1.1 パッケージのインストール
以下のコマンドを実行して、必要なパッケージをインストールします。
npm install remix-auth remix-auth-form
npm i bcryptjs
npm i -D @types/bcryptjs
5.1.2 FormStrategy 処理の追加
FormStrategy を利用して、フォーム認証のロジックを実装します。
import type { User } from '@prisma/client';
import bcrypt from 'bcryptjs';
import { Authenticator } from 'remix-auth';
import { FormStrategy } from 'remix-auth-form';
import { prisma } from '~/.server/lib/prisma-client';
import { env } from '~/config/env';

const SESSION_SECRET = env.SESSION_SECRET;

if (!SESSION_SECRET) {
  throw new Error('SESSION_SECRET is not defined');
}

const formStrategy = new FormStrategy(async ({ form }) => {
  const email = form.get('email');
  const password = form.get('password');

  if (!(email && password)) {
    throw new Error('Invalid Request');
  }

  const user = await prisma.user.findUnique({
    where: { email: String(email) },
  });

  if (!user) {
    console.log(`User with email ${email} does not exist`);
    throw new Error(`User with email ${email} does not exist`);
  }

  const passwordsMatch = await bcrypt.compare(String(password), user.password);

  if (!passwordsMatch) {
    console.log('Password does not match');
    throw new Error('Password does not match');
  }

  const { password: _, ...userWithoutPassword } = user;

  return userWithoutPassword;
});

const authenticator = new Authenticator<Omit<User, 'password'>>();

// NOTE: フォームストラテジーには「user-pass」の名称を設定
authenticator.use(formStrategy, 'user-pass');

export { authenticator };
5.2 サインアップ機能作成
5.2.1 ユーザー登録処理の追加
新規ユーザーを作成するための関数 createUser を定義します。
import bcrypt from 'bcryptjs';
import { prisma } from '~/.server/lib/prisma-client';

export const createUser = async (
  data: Record<'name' | 'email' | 'password', string>,
) => {
  const { name, email, password } = data;

  if (!(name && email && password)) {
    throw new Error('Invalid input');
  }

  const existingUser = await prisma.user.findUnique({ where: { email } });

  if (existingUser) {
    return { error: { message: 'Email is already registered' } };
  }

  const hashedPassword = await bcrypt.hash(data.password, 12);
  const newUser = await prisma.user.create({
    data: { name, email, password: hashedPassword, image: '' },
  });

  return { id: newUser.id, email: newUser.email, name: newUser.name };
};
5.2.2 サインアップフォーム管理用のフック作成
バリデーションを含む useSignUpForm フックを作成します。
import { useForm } from '@conform-to/react';
import { parseWithZod } from '@conform-to/zod';
import { z } from 'zod';

const signUpFormSchema = z.object({
  name: z
    .string({ required_error: 'Username is required' })
    .min(1, 'Username is required')
    .max(64, 'Username must be 64 characters or less'),
  email: z
    .string({ required_error: 'Email is required' })
    .email('Please enter a valid email address')
    .max(128, 'Email must be 128 characters or less'),
  password: z
    .string({ required_error: 'Password is required' })
    .min(8, 'Password must be at least 8 characters long')
    .max(128, 'Password must be 128 characters or less')
    .refine(
      (password: string) => /[A-Za-z]/.test(password) && /[0-9]/.test(password),
      'Password must contain both letters and numbers',
    ),
});

const useSignUpForm = () => {
  const form = useForm({
    onValidate({ formData }) {
      return parseWithZod(formData, { schema: signUpFormSchema });
    },
  });

  return form;
};

export { useSignUpForm };
5.2.3 サインアップページ作成
サインアップページの UI を実装します。
// 必要なインポート
import { getFormProps } from '@conform-to/react';
import { AlertCircle } from 'lucide-react';
import { Form, Link, redirect } from 'react-router';
import {
  Alert,
  AlertDescription,
  AlertTitle,
} from '~/components/shadcn/ui/alert';
import { Button } from '~/components/shadcn/ui/button';
import { Label } from '~/components/shadcn/ui/label';
import { ConformInput } from '~/components/shared/conform/conform-input';
import { commitSession, getSession } from '~/sessions.server';
import { authenticator } from '../auth/services/auth.server';
import { createUser } from '../auth/services/signup.server';
import { useSignUpForm } from './hooks/use-signup-form';

const SignUpPage = ({ actionData }: { actionData: any }) => {
  const errors = actionData?.errors;
  const [form, { name, email, password }] = useSignUpForm();

  return (
    <div className="flex h-full flex-col items-center justify-center gap-y-5">
      <div className="w-[420px] rounded-2xl bg-white p-6">
        <h2 className="mb-5 text-center font-extrabold text-3xl text-black-600">
          Create an account
        </h2>
        <Form method="POST" {...getFormProps(form)}>
          <div className="flex flex-col">
            <div>
              <Label>Name</Label>
              <ConformInput metadata={name} type="text" />
            </div>
            <div>
              <Label>Email</Label>
              <ConformInput metadata={email} type="email" />
            </div>
            <div>
              <Label>Password</Label>
              <ConformInput metadata={password} type="password" />
            </div>
            <Button type="submit" name="_action" value="Sign Up" className="mt-4 self-center">
              Create an account
            </Button>
          </div>
        </Form>
      </div>
    </div>
  );
};

export default SignUpPage;
5.3 ログイン機能追加
5.3.1 ログインフォーム管理用のフック作成
まず、ログインフォームの入力データをバリデーションするためのフックを作成します。以下のコードでは、@conform-to/react と zod を利用してフォームの状態管理とバリデーションを行っています。
import { useForm } from '@conform-to/react';
import { parseWithZod } from '@conform-to/zod';
import { z } from 'zod';

const loginFormSchema = z.object({
  email: z
    .string({ required_error: 'Email is required' })
    .email('Please enter a valid email address')
    .max(128, 'Email must be 128 characters or less'),
  password: z
    .string({ required_error: 'Password is required' })
    .min(8, 'Password must be at least 8 characters long')
    .max(128, 'Password must be 128 characters or less')
    .refine(
      (password: string) => /[A-Za-z]/.test(password) && /[0-9]/.test(password),
      'Password must contain both letters and numbers',
    ),
});

const useLoginForm = () => {
  const form = useForm({
    onValidate({ formData }) {
      return parseWithZod(formData, { schema: loginFormSchema });
    },
  });

  return form;
};

export { useLoginForm };
このフックは、フォームデータをzodスキーマでバリデーションし、エラーメッセージを返します。
5.3.2 ログインページ作成
次に、ログインページを作成します。ログインフォームを表示し、ユーザーが入力した内容をサーバーに送信して認証を行います。以下のコードでは、認証が成功した場合にユーザーセッションを開始し、ログインページにリダイレクトします。
import { getFormProps } from '@conform-to/react';
import { AlertCircle } from 'lucide-react';
import { Form, Link, redirect } from 'react-router';
import {
  Alert,
  AlertDescription,
  AlertTitle,
} from '~/components/shadcn/ui/alert';
import { Button } from '~/components/shadcn/ui/button';
import { Label } from '~/components/shadcn/ui/label';
import { ConformInput } from '~/components/shared/conform/conform-input';
import { getSession } from '~/sessions.server';
import { authenticator } from '../auth/services/auth.server';
import type { Route } from './+types/route';
import { useLoginForm } from './hooks/use-login-form';

export const action = async ({ request }: Route.ActionArgs) => {
  // NOTE:
  // cloneせずに値を取得すると、action関数とauthenticatorで2回リクエスト本文(formData)にアクセスすることになってしまいエラーとなる。
  // React Routerではリクエストには1回しかアクセスできないため、リクエストのクローンを作成して、そのクローンをリクエストとして読み取る必要がある。
  const formData = await request.clone().formData();
  const action = String(formData.get('_action'));

  try {
    switch (action) {
      case 'Sign In': {
        const user = await authenticator.authenticate('user-pass', request);
        const session = await getSession(request.headers.get('cookie'));
        session.set('user', user);
        return redirect('/auth/login', {
          headers: { 'Set-Cookie': await commitSession(session) },
        });
        break;
      }

      case 'Sign In Google': {
        // TODO: Google認証の実装
        throw new Error('Not implemented');
      }

      default:
        throw new Error('Unknown action');
    }
  } catch (e) {
    // 認証失敗時にthrowしたエラー
    if (e instanceof Error) {
      return { message: e.message, status: 401 };
    }

    // その他のエラー
    return { message: 'unknown error', status: 401 };
  }
};

const LoginPage = ({ actionData }: Route.ComponentProps) => {
  const data = actionData;
  const [form, { email, password }] = useLoginForm();

  return (
    <div className="flex h-full flex-col items-center justify-center gap-y-5">
      <div className="w-[420px] rounded-2xl bg-white p-6">
        <h2 className="mb-5 text-center font-extrabold text-3xl text-black-600">
          Login
        </h2>
        <Form method="post" {...getFormProps(form)}>
          <div className="flex flex-col gap-4">
            <div>
              <Label>Email</Label>
              <ConformInput metadata={email} type="email" />
            </div>
            <div>
              <Label>Password</Label>
              <ConformInput metadata={password} type="password" />
            </div>
            <Button
              variant="default"
              type="submit"
              name="_action"
              value="Sign In"
              className="mt-4 self-center"
            >
              Login
            </Button>
            {data?.message && (
              <Alert variant="destructive" className="my-1">
                <AlertCircle className="h-4 w-4" />
                <AlertTitle>Error</AlertTitle>
                <AlertDescription>{data.message}</AlertDescription>
              </Alert>
            )}
          </div>
        </Form>
        {/* <GoogleForm /> */}
      </div>
      <p className="text-gray-600">
        {`Don't have an account? `}
        <Link to="/auth/signup">
          <span className="px-2 text-primary hover:underline">Sign Up</span>
        </Link>
      </p>
    </div>
  );
};

export default LoginPage;
このコードでは、ユーザーが正しい情報を入力した場合、セッションを開始してログインします。エラーが発生した場合には、エラーメッセージが表示されます。
5.4 ログアウト機能追加
次に、ログアウト機能を追加します。ログアウト時にセッションを破棄し、ログインページにリダイレクトします。
import { Form, Outlet, redirect } from 'react-router';
import { Button } from '~/components/shadcn/ui/button';
import { destroySession, getSession } from '~/sessions.server';
import type { Route } from './+types/route';

export const loader = async ({ request }: Route.LoaderArgs) => {
  // ログイン中のユーザー取得
  const session = await getSession(request.headers.get('Cookie'));
  const user = session.get('user');
  return user;
};

export const action = async ({ request }: Route.ActionArgs) => {
  // セッションを破棄してログアウト
  const session = await getSession(request.headers.get('Cookie'));
  return redirect('/auth/login', {
    headers: { 'Set-Cookie': await destroySession(session) },
  });
};

const AuthLayout = ({ loaderData }: Route.ComponentProps) => {
  const user = loaderData;
  return (
    <>
      <div className="flex items-center justify-center gap-4 p-4">
        <h1>{`Hello ${user?.name} さん`}</h1>
        {user?.image && (
          <img
            src={user.image}
            alt={user.name}
            className="h-10 w-10 rounded-full"
          />
        )}
        <Form method="post">
          <Button type="submit" name="action" value="logout">
            Logout
          </Button>
        </Form>
      </div>
      <Outlet />
    </>
  );
};

export default AuthLayout;
このコードでは、ユーザーがログアウトするためのボタンが表示され、クリックするとセッションが破棄され、ログインページにリダイレクトされます。
6️⃣ Google認証機能追加
6.1 Google OAuth2.0の認証情報取得
6.1.1 Google Cloudの認証情報画面にアクセス
まず、Google Cloud 認証情報ページにアクセスします。
6.1.2 新しいプロジェクトを作成
Google Cloudを初めて利用する場合は、新しいプロジェクトを作成します。既存のプロジェクトを利用しても問題ありません。
手順詳細
-
「プロジェクトの作成」をクリックします。

-
「プロジェクト名」に任意の名称を入力し、「場所」は「組織なし」を選択します。

6.1.3 OAuth同意画面を構成
次に、ユーザーがアプリケーションにアクセスする際の同意画面を作成します。この画面を通じて、ユーザーから必要な情報へのアクセス許可を得ます。
手順詳細
-
「アプリ名」に任意の名称を入力します。

-
「ユーザーサポートメール」を設定します。
-
「対象」は「外部」を選択します。

-
「連絡先情報」を設定します。

-
最後に、ポリシーを確認し、同意します。

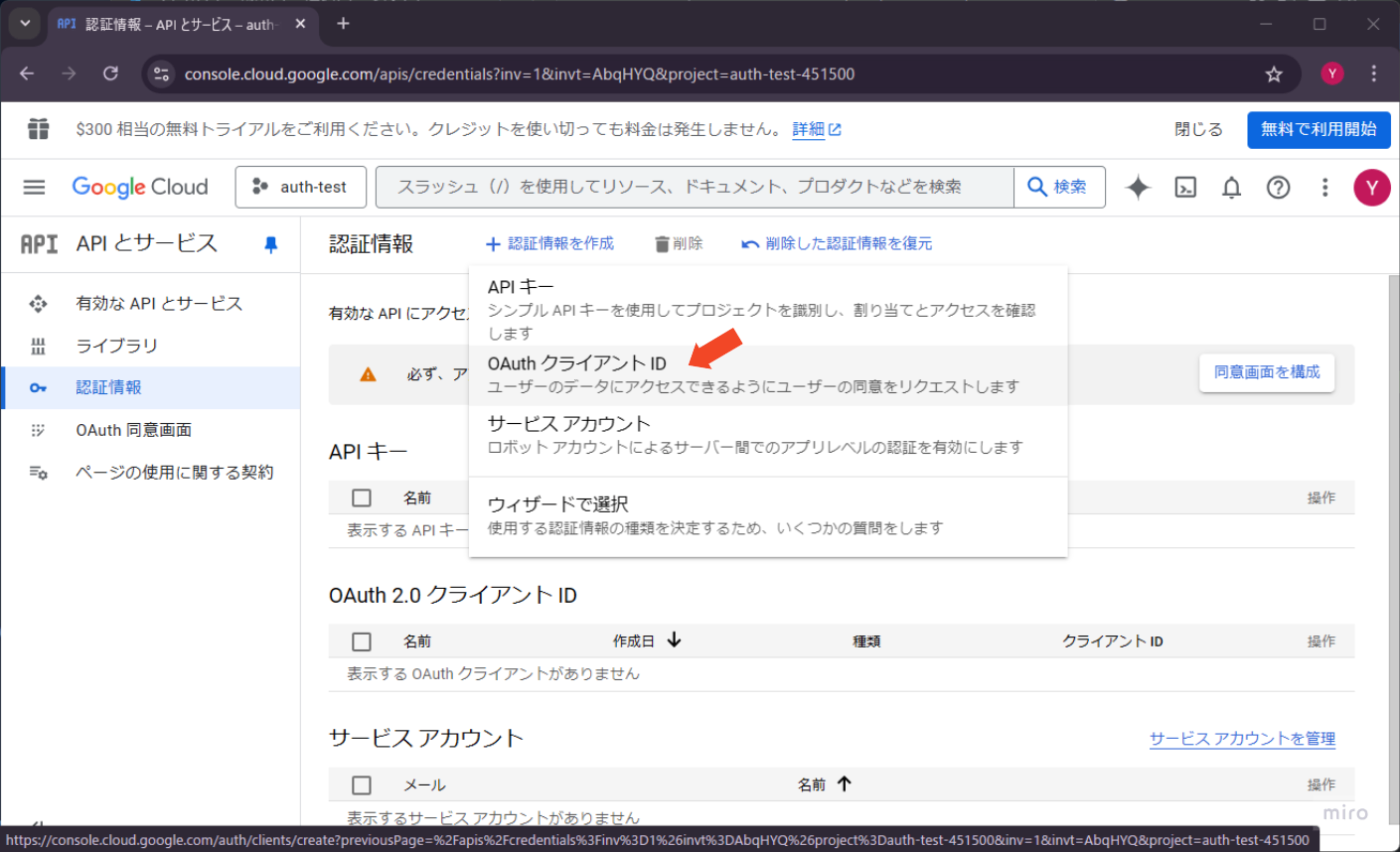
6.1.4 OAuth クライアントIDを作成
次に、OAuth クライアントIDを作成して、認証情報(クライアントIDおよびクライアントシークレット)を取得します。
手順詳細
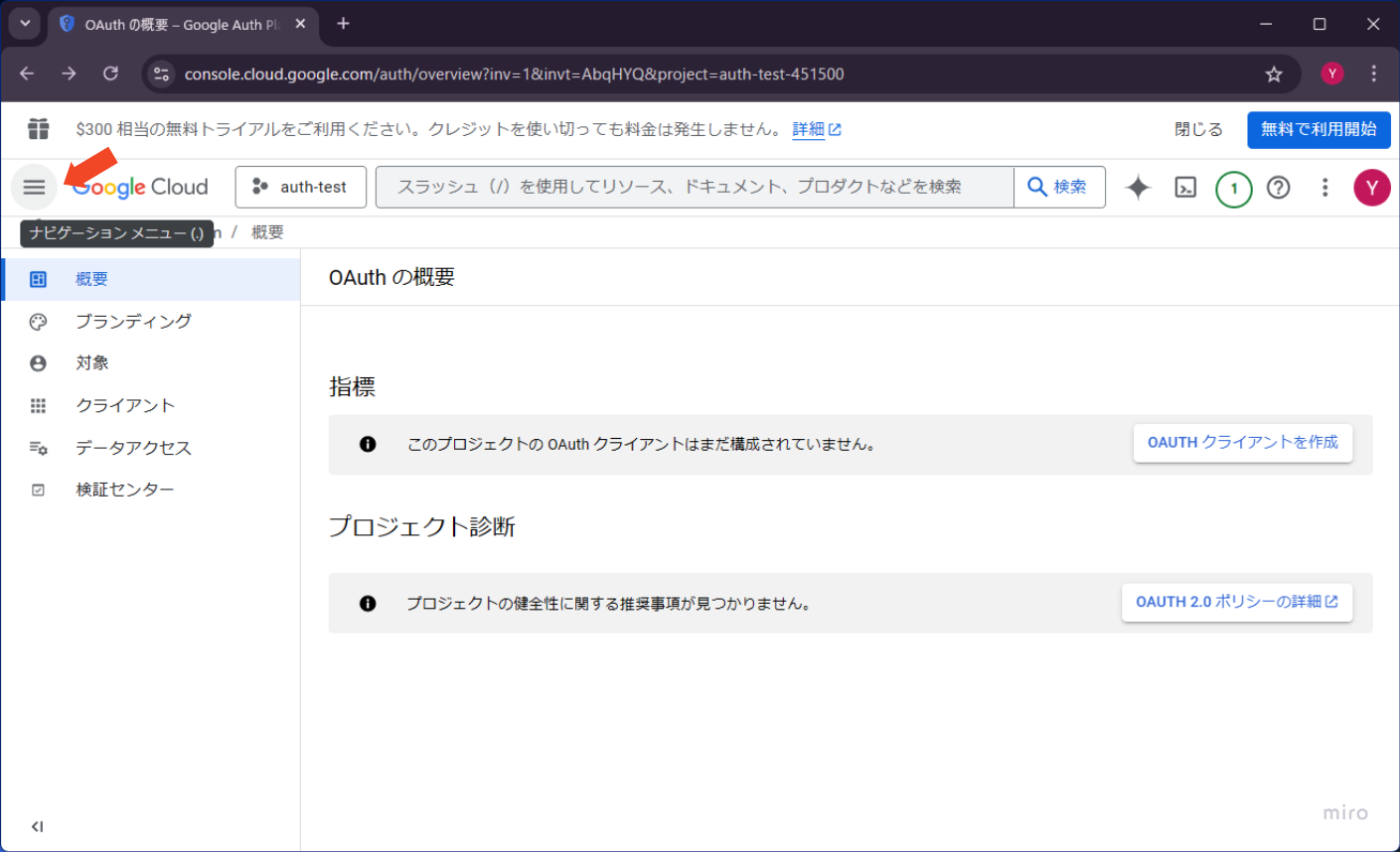
-
「認証情報」ページに移動します。ナビゲーションメニューからアクセスする例を示します。

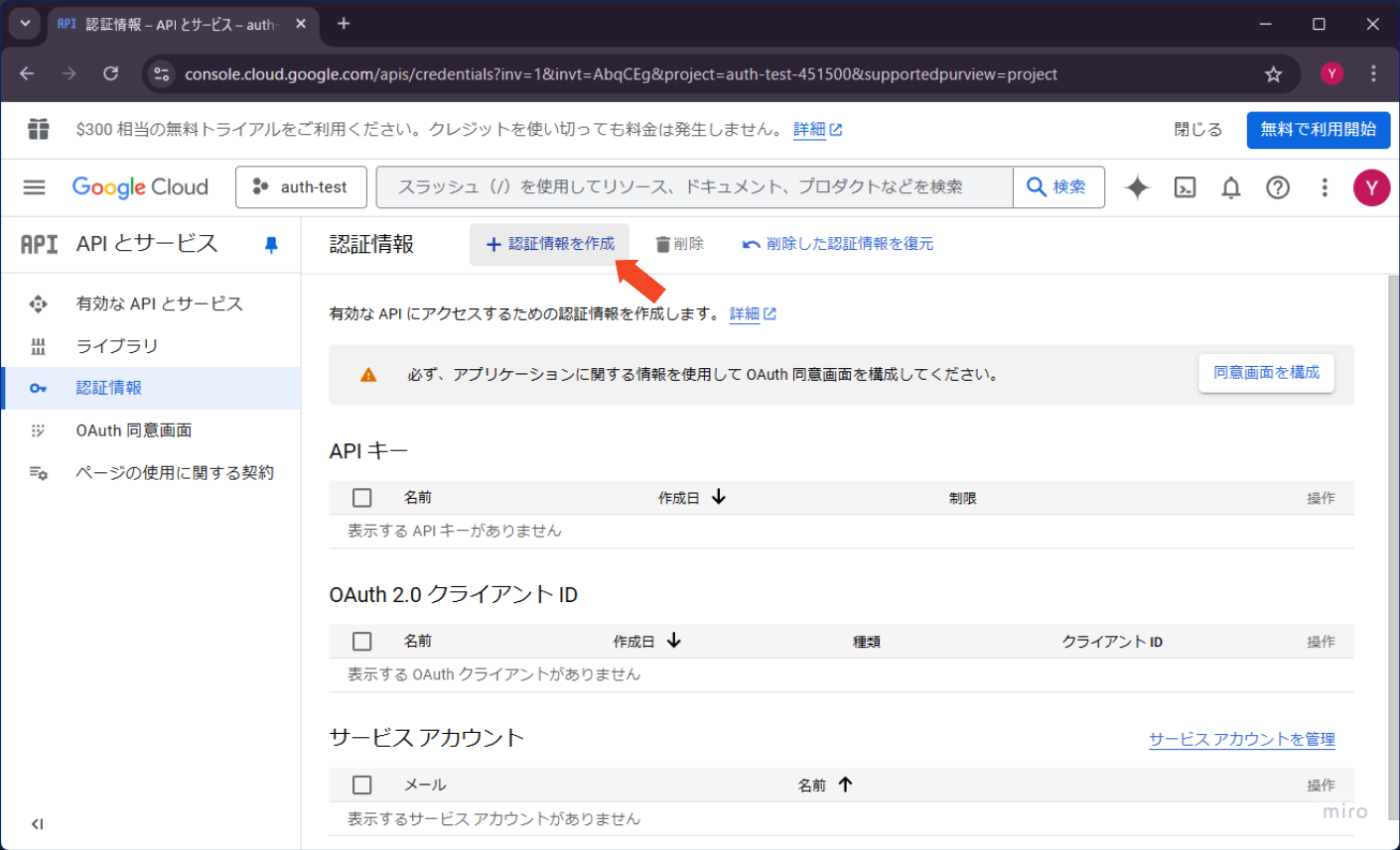
-
「認証情報を作成」をクリックします。
-
「OAuth クライアント ID」を選択します。

-
「アプリケーションの種類」として「ウェブアプリケーション」を選択します。
-
「名前」に任意の名前を入力します。

-
「承認済みの JavaScript 生成元」に
http://localhost:5173を入力します。 -
「承認済みのリダイレクト URI」に
http://localhost:5173/auth/callback/googleを入力します。

-
最後に、「クライアント ID」と「クライアントシークレット」をコピーして控えておきます。

6.2 環境変数にGoogle認証用の設定を追加
次に、コピーした「クライアント ID」と「クライアントシークレット」を環境変数に追加します。
以下のように設定を行います。
# Google認証
CLIENT_URL='http://localhost:5173'
GOOGLE_CLIENT_ID='****'
GOOGLE_CLIENT_SECRET='****'
次に、env.tsファイルに環境変数を読み込む設定を追加します。
export const env = {
  SESSION_SECRET: process.env.SESSION_SECRET as string,
  CLIENT_URL: process.env.CLIENT_URL as string,
  GOOGLE_CLIENT_ID: process.env.GOOGLE_CLIENT_ID as string,
  GOOGLE_CLIENT_SECRET: process.env.GOOGLE_CLIENT_SECRET as string,
};
6.3 Googleストラテジー作成
6.3.1 パッケージのインストール
まず、remix-auth-oauth2パッケージをインストールします。これにより、OAuth 2.0認証を簡単に統合できます。
npm install remix-auth-oauth2
6.3.2 Googleストラテジーを追加
次に、GoogleのOAuth2認証ストラテジーを作成します。以下のコードは、GoogleのOAuth2認証を行うためのクラスGoogleStrategyの定義です。このクラスは、remix-auth-oauth2のOAuth2Strategyを拡張して、Google認証に必要な情報を設定しています。
/**
 * MIT License
 *
 * Copyright (c) 2021 Sergio Xalambrí
 *
 * Permission is hereby granted, free of charge, to any person obtaining a copy
 * of this software and associated documentation files (the "Software"), to deal
 * in the Software without restriction, including without limitation the rights
 * to use, copy, modify, merge, publish, distribute, sublicense, and/or sell
 * copies of the Software, and to permit persons to whom the Software is
 * furnished to do so, subject to the following conditions:
 *
 * The above copyright notice and this permission notice shall be included in all
 * copies or substantial portions of the Software.
 *
 * THE SOFTWARE IS PROVIDED "AS IS", WITHOUT WARRANTY OF ANY KIND, EXPRESS OR
 * IMPLIED, INCLUDING BUT NOT LIMITED TO THE WARRANTIES OF MERCHANTABILITY,
 * FITNESS FOR A PARTICULAR PURPOSE AND NONINFRINGEMENT. IN NO EVENT SHALL THE
 * AUTHORS OR COPYRIGHT HOLDERS BE LIABLE FOR ANY CLAIM, DAMAGES OR OTHER
 * LIABILITY, WHETHER IN AN ACTION OF CONTRACT, TORT OR OTHERWISE, ARISING FROM,
 * OUT OF OR IN CONNECTION WITH THE SOFTWARE OR THE USE OR OTHER DEALINGS IN THE
 * SOFTWARE.
 */

import type { OAuth2Tokens } from 'arctic';
import { OAuth2Strategy } from 'remix-auth-oauth2';

/**
 * @see https://developers.google.com/identity/protocols/oauth2/scopes
 */
export type GoogleScope = string;

export type GoogleStrategyOptions = {
  clientId: string;
  clientSecret: string;
  redirectURI: string;
  /**
   * @default "openid profile email"
   */
  scopes?: GoogleScope[];
  accessType?: 'online' | 'offline';
  includeGrantedScopes?: boolean;
  prompt?: 'none' | 'consent' | 'select_account';
  hd?: string;
  loginHint?: string;
};

export type GoogleProfile = {
  id: string;
  displayName: string;
  name: {
    familyName: string;
    givenName: string;
  };
  emails: [{ value: string }];
  photos: [{ value: string }];
  _json: {
    sub: string;
    name: string;
    given_name: string;
    family_name: string;
    picture: string;
    locale: string;
    email: string;
    email_verified: boolean;
    hd: string;
  };
};

export type GoogleExtraParams = {
  expires_in: 3920;
  token_type: 'Bearer';
  scope: string;
  id_token: string;
} & Record<string, string | number>;

export const GoogleStrategyDefaultScopes = [
  'openid',
  'https://www.googleapis.com/auth/userinfo.profile',
  'https://www.googleapis.com/auth/userinfo.email',
];
export const GoogleStrategyDefaultName = 'google';
const userInfoURL = 'https://www.googleapis.com/oauth2/v3/userinfo';

export class GoogleStrategy<User> extends OAuth2Strategy<User> {
  public name = GoogleStrategyDefaultName;
  private readonly accessType: string;
  private readonly prompt?: 'none' | 'consent' | 'select_account';
  private readonly includeGrantedScopes: boolean;
  private readonly hd?: string;
  private readonly loginHint?: string;

  constructor(
    {
      clientId,
      clientSecret,
      redirectURI,
      scopes,
      accessType,
      includeGrantedScopes,
      prompt,
      hd,
      loginHint,
    }: GoogleStrategyOptions,
    verify: OAuth2Strategy<User>['verify'],
  ) {
    super(
      {
        clientId,
        clientSecret,
        redirectURI,
        authorizationEndpoint: 'https://accounts.google.com/o/oauth2/v2/auth',
        tokenEndpoint: 'https://oauth2.googleapis.com/token',
        scopes: scopes ?? GoogleStrategyDefaultScopes,
      },
      verify,
    );
    this.accessType = accessType ?? 'online';
    this.includeGrantedScopes = includeGrantedScopes ?? false;
    this.prompt = prompt;
    this.hd = hd;
    this.loginHint = loginHint;
  }

  protected authorizationParams(
    params: URLSearchParams,
    _request?: Request,
  ): URLSearchParams {
    params.set('access_type', this.accessType);
    params.set('include_granted_scopes', String(this.includeGrantedScopes));
    if (this.prompt) {
      params.set('prompt', this.prompt);
    }
    if (this.hd) {
      params.set('hd', this.hd);
    }
    if (this.loginHint) {
      params.set('login_hint', this.loginHint);
    }
    return params;
  }

  static async userProfile(tokens: OAuth2Tokens): Promise<GoogleProfile> {
    const response = await fetch(userInfoURL, {
      headers: {
        Authorization: `Bearer ${tokens.accessToken()}`,
      },
    });
    if (!response.ok) {
      throw new Error(`Failed to fetch user profile: ${response.statusText}`);
    }
    const raw: GoogleProfile['_json'] = await response.json();
    const profile: GoogleProfile = {
      id: raw.sub,
      displayName: raw.name,
      name: {
        familyName: raw.family_name,
        givenName: raw.given_name,
      },
      emails: [{ value: raw.email }],
      photos: [{ value: raw.picture }],
      _json: raw,
    };
    return profile;
  }
}
このコードでは、GoogleのOAuth2認証を行うために必要な設定やプロフィール情報を取得するメソッドを実装しています。ユーザーのプロフィールを取得するためにGoogleのAPIを呼び出し、その結果をGoogleProfile型にマッピングしています。
6.3.3 AuthenticatorにGoogleストラテジーを追加
次に、作成したGoogleストラテジーをAuthenticatorに追加します。この処理により、ユーザーがGoogle認証を通じてログインできるようになります。環境変数に必要な値(GoogleのクライアントID、クライアントシークレット、リダイレクトURL)が設定されていることを確認し、GoogleStrategyを使用してGoogle認証の設定を行います。
import type { User } from '@prisma/client';
import bcrypt from 'bcryptjs';
import { Authenticator } from 'remix-auth';
import { FormStrategy } from 'remix-auth-form';
import { prisma } from '~/.server/lib/prisma-client';
import { env } from '~/config/env';
+ import { GoogleStrategy } from './auth-google.server';

const SESSION_SECRET = env.SESSION_SECRET;

if (!SESSION_SECRET) {
  throw new Error('SESSION_SECRET is not defined');
}

// --- FormStrategy
// ...

// --- GoogleStrategy
+ if (!(env.GOOGLE_CLIENT_ID && env.GOOGLE_CLIENT_SECRET && env.CLIENT_URL)) {
+  throw new Error(
+    'GOOGLE_CLIENT_ID, GOOGLE_CLIENT_SECRET, and CLIENT_URL are not defined.',
+  );
+ }

+ const googleStrategy = new GoogleStrategy<User>(
+ {
+   clientId: env.GOOGLE_CLIENT_ID || '',
+   clientSecret: env.GOOGLE_CLIENT_SECRET || '',
+   redirectURI: `${env.CLIENT_URL}/auth/callback/google`,
+ },
+ async ({ tokens }) => {
+   const profile = await GoogleStrategy.userProfile(tokens);

+   try {
+     const user = await prisma.user.findUnique({
+       where: { email: profile.emails[0].value },
+     });

+     if (user) {
+       return user;
+     }
+   } catch (e) {
+     throw new Error((e as Error).message);
+   }

+   try {
+     const newUser = await prisma.user.create({
+       data: {
+         // NOTE: MongoDB等のIDを自動割付するデータベースではidは不要となる
+         id: profile.id,
+         email: profile.emails[0].value || '',
+         password: '',
+         name: profile.displayName,
+         image: profile.photos[0].value || '',
+         provider: 'google',
+       },
+     });
+     return newUser;
+   } catch (e) {
+     throw new Error((e as Error).message);
+   }
+ },
+);

+ authenticator.use(googleStrategy); // name: 'google'

+ export { authenticator };
このコードでは、GoogleStrategyをAuthenticatorに追加しています。ユーザーがGoogleアカウントを使ってログインした場合、その情報を元にデータベースを検索して、既存のユーザーを取得または新しいユーザーを作成します。
6.4 Google認証フォームを作成
Google認証用のボタンを表示するために、react-icons パッケージをインストールします。
npm i react-icons
次に、Google認証用のフォームを作成します。このフォームは、Googleでのサインインを処理するためのボタンを含んでいます。
import { FcGoogle } from 'react-icons/fc';
import { Form } from 'react-router';

export const GoogleForm = () => {
  return (
    <Form method="post" className="my-4">
      <button
        type="submit"
        name="_action"
        value="Sign In Google"
        className="mt-2 w-full rounded-xl border border-gray-600 bg-white px-3 py-2 font-semibold text-white transition duration-300 ease-in-out hover:bg-gray-200"
      >
        <div className="flex justify-center">
          <FcGoogle size={22} className="mr-2" />
          <span className="text-gray-700">Sign in with Google</span>
        </div>
      </button>
    </Form>
  );
};
6.5 ログインページにGoogle認証追加
次に、ログインページにGoogle認証フォームを追加します。まず、Google認証フォームをインポートし、GoogleForm コンポーネントをログインフォームに組み込みます。
// ...
import type { Route } from './+types/route';
+ import { GoogleForm } from './components/google-form';
import { useLoginForm } from './hooks/use-login-form';

export const action = async ({ request }: Route.ActionArgs) => {
  const formData = await request.clone().formData();
  const action = String(formData.get('_action'));

  try {
    switch (action) {
      case 'Sign In': {
        const user = await authenticator.authenticate('user-pass', request);
        const session = await getSession(request.headers.get('cookie'));
        session.set('user', user);
        return redirect('/auth/login', {
          headers: { 'Set-Cookie': await commitSession(session) },
        });
      }

      case 'Sign In Google': {
+       return await authenticator.authenticate('google', request);
      }

      default:
        throw new Error('Unknown action');
    }
  } catch (e) {
+   // NOTE: この記述がないとGoogle認証成功時にリダイレクトできない
+   if (e instanceof Response) {
+     return e;
+   }

    if (e instanceof Error) {
      return { message: e.message, status: 401 };
    }

    return { message: 'Unknown error', status: 401 };
  }
};

const LoginPage = ({ actionData }: Route.ComponentProps) => {
  const data = actionData as { message?: string };
  const [form, { email, password }] = useLoginForm();

  return (
    <div className="flex h-full flex-col items-center justify-center gap-y-5">
      <div className="w-[420px] rounded-2xl bg-white p-6">
        <h2 className="mb-5 text-center font-extrabold text-3xl text-black-600">
          Login
        </h2>
        <Form method="post" {...getFormProps(form)}>
          // ...
        </Form>
+       <GoogleForm />
      </div>
      <p className="text-gray-600">
        {`Don't have an account? `}
        <Link to="/auth/signup">
          <span className="px-2 text-primary hover:underline">Sign Up</span>
        </Link>
      </p>
    </div>
  );
};

export default LoginPage;
補足:
-
action関数内で、Google認証のケース ('Sign In Google') を追加しました。 - Google認証フォーム (
<GoogleForm />) をログインページに追加しました。
6.6 リダイレクト先(callbackURL)のリソースルートを追加
Google認証後のリダイレクト先を設定するために、新しいリソースルートを追加します。認証に成功すると、ユーザーは適切なページにリダイレクトされます。
import { redirect } from 'react-router';
import { commitSession, getSession } from '~/sessions.server';
import { authenticator } from '../auth/services/auth.server';
import type { Route } from './+types/route';

export const loader = async ({ request }: Route.LoaderArgs) => {
  const user = await authenticator.authenticate('google', request);
  const session = await getSession(request.headers.get('cookie'));
  session.set('user', user);

  if (!user) {
    return redirect('/auth/login', {
      headers: { 'Set-Cookie': await commitSession(session) },
    });
  }

  return redirect('/', {
    headers: { 'Set-Cookie': await commitSession(session) },
  });
};
補足:
- Google認証が成功すると、ユーザー情報をセッションに保存し、リダイレクト先を設定します。
- ユーザーが存在しない場合、ログインページにリダイレクトされます。
6.7 サインアップページにGoogle認証追加
サインアップページにもGoogle認証フォームを追加します。Googleでのサインアップもサポートするため、GoogleForm コンポーネントをインポートし、サインアップページに組み込みます。
// ...
+import { GoogleForm } from '../auth.login._index/components/google-form';
import { authenticator } from '../auth/services/auth.server';
import { createUser } from '../auth/services/signup.server';
import type { Route } from './+types/route';
import { useSignUpForm } from './hooks/use-signup-form';

export const action = async ({ request }: Route.ActionArgs) => {
  const formData = await request.clone().formData();
  const action = String(formData.get('_action'));

  try {
    switch (action) {
      case 'Sign Up': {
        const name = String(formData.get('name'));
        const email = String(formData.get('email'));
        const password = String(formData.get('password'));
        const errors: { [key: string]: string } = {};

        if (
          typeof action !== 'string' ||
          typeof name !== 'string' ||
          typeof email !== 'string' ||
          typeof password !== 'string'
        ) {
          return { error: 'Invalid Form Data', form: action, status: 400 };
        }

        const result = await createUser({ name, email, password });

        if (result.error) {
          errors.email = result.error.message;
        }

        if (Object.keys(errors).length > 0) {
          return { errors };
        }

        const user = await authenticator.authenticate('user-pass', request);
        const session = await getSession(request.headers.get('cookie'));
        session.set('user', user);
        if (user) {
          return redirect('/auth/login', {
            headers: { 'Set-Cookie': await commitSession(session) },
          });
        }
        break;
      }

      case 'Sign In Google': {
+       return await authenticator.authenticate('google', request);
      }

      default:
        throw new Error('Unknown action');
    }
  } catch (e) {
+   // NOTE: この記述がないとGoogle認証成功時にリダイレクトできない
+   if (e instanceof Response) {
+     return e;
+   }

    if (e instanceof Error) {
      return { message: e.message, status: 401 };
    }

    return { message: 'Unknown error', status: 401 };
  }
};

const SignUpPage = ({ actionData }: Route.ComponentProps) => {
  const errors = (actionData as { errors?: { [key: string]: string } })?.errors;
  const [form, { name, email, password }] = useSignUpForm();

  return (
    <div className="flex h-full flex-col items-center justify-center gap-y-5">
      <div className="w-[420px] rounded-2xl bg-white p-6">
        <h2 className="mb-5 text-center font-extrabold text-3xl text-black-600">
          Create an account
        </h2>
        <Form method="POST" {...getFormProps(form)}>
          // ...
        </Form>
+       <GoogleForm />
      </div>
      <p className="text-gray-600">
        {'Already have an account? '}
        <Link to="/auth/login">
          <span className="px-2 text-primary hover:underline">Sign In</span>
        </Link>
      </p>
    </div>
  );
};

export default SignUpPage;
補足:
- サインアップページにGoogle認証フォームを追加しました。
- サインアップ時にもGoogle認証ができるようにしています。
以上で、React Router v7に認証機能の実装は完了です。
Discussion