Nreal Light③ ピンチポーズでライトをオンにする
Nreal Lightのハンドトラッキングのデモシーンを起動する方法を紹介した記事は沢山あるけど、実際に自分のプロジェクトを作成する時にどのように実装すれば良いのか分からずお困りではありませんか?
今回は三部に分けて指先からパーティクルを出す方法や、ピンチポーズ(摘まむポーズ)をすることでポイントライトをオンにする方法を初心者の方にも分かりやすいように解説していきます。
第一部 ハンドトラッキング準備
第二部 指先からパーティクルを出す
第三部 ピンチポーズでライトをオンにする
もくじ
- 環境開発
- スクリプトを作成
- ポイントライトを作成
- 作成したポイントライトをスクリプトに適用
- 第二部のスクリプトと併用する場合
開発環境
Unity 2020.3.17f
NRSDK 1.6.0
スクリプトを作成
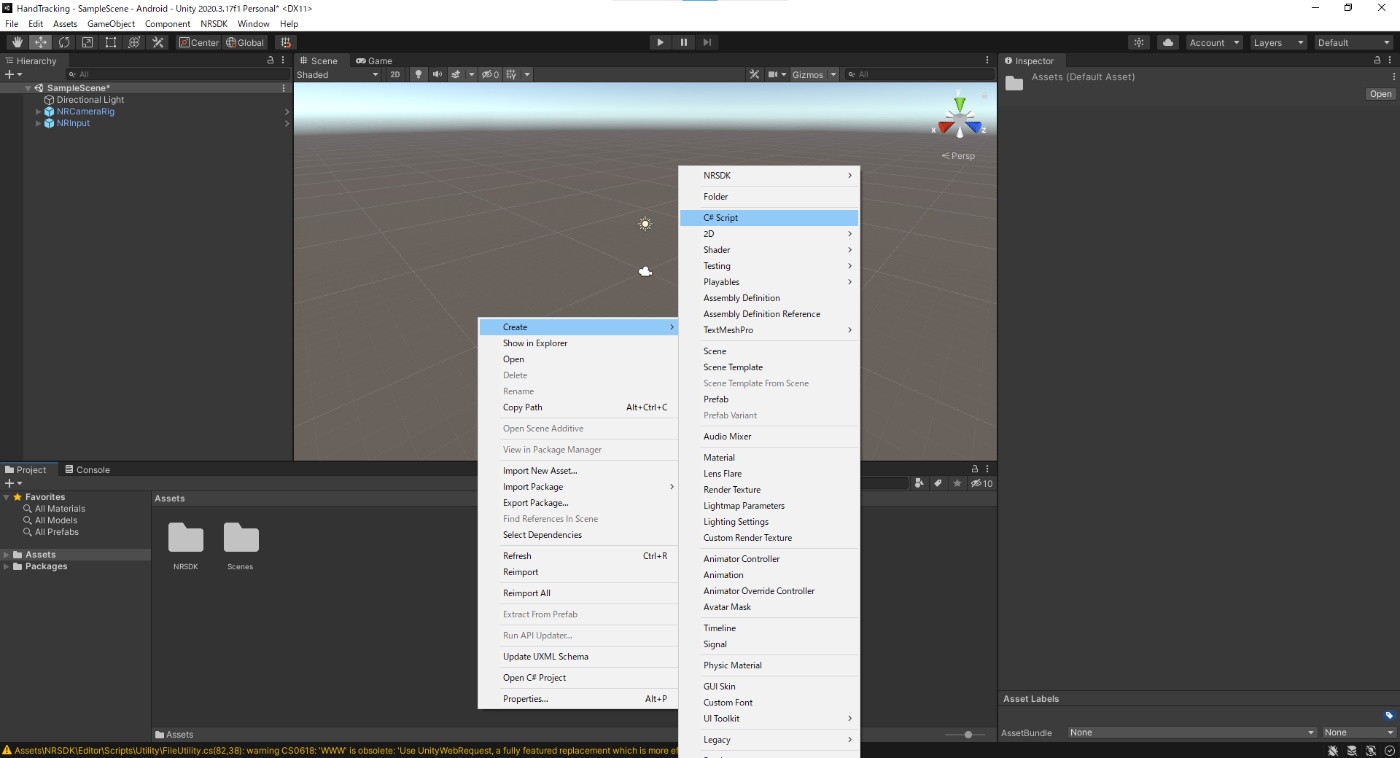
Projectウィンドウで右クリックしてCreate → C# Scriptを選択するとスクリプトを作成できるので任意の名前を付けてください。

ここではPinchTriggerにしました。
作成したPinchTriggerスクリプトをHierarchyのNRHand_Rにドラッグ&ドロップしてください。

これでNRHand_RにPinchTriggerスクリプトがアタッチされて関連付けられました。

続いてスクリプトの内容を記述していきますのでPinchTriggerスクリプトをダブルクリックしてMicrosoft Visual Studioなどコードを記述するソフト(IDE)を開いて下記のコードを記述してください。
using System.Collections;
using System.Collections.Generic;
using UnityEngine;
using NRKernal; //NRSDKの機能を使用する場合は必ず記載。

public class PinchTrigger : MonoBehaviour
{
    public HandEnum handEnum; //ハンドトラッキングの様々な情報を参照できる。
    private bool Pinched = false; //ピンチポーズをしたらtrueに変える。
    private bool Pinched2 = false; //Pinchedがtrueになっている時に更にピンチポーズをしたらtrueに変える。
    public GameObject pointLight; //ポイントライトをInspectorから入れる。
    public float defaultRange; //ポイントライトの範囲と光量をリセットする時の初期値を保管。
    private float triggerLine; //どれぐらいの間ピンチポーズをしていたらポイントライトをオンにするかの数値を保管。
    public float triggerCharge; //ピンチポーズをしている間triggerLineと同じ数値になるまで増加していく数値を保管。

    // Start is called before the first frame update
    void Start()
    {
        pointLight.SetActive(false);
        triggerLine = 1.5f;
        triggerCharge = 0.0f;
        defaultRange = 0.0f;
    }

    // Update is called once per frame
    void Update()
    {
        CheckPose();
    }

    void CheckPose()
    {
        var handState = NRInput.Hands.GetHandState(handEnum); //常に手の状態をチェックして更新する。
        if (handState == null)
        {
            return;
        }
        else if (handState.pinchStrength > 0.9f) //ピンチポーズしているかどうか判定。
        {
            triggerCharge += Time.deltaTime; //triggerChargeの数値を増加させる。
            if (triggerCharge > triggerLine && Pinched == false && Pinched2 == false) //triggerChargeの数値がtriggerLineの数値まで到達するとポイントライトをオン。
            {
                Pinched = true;
                triggerCharge = 0.0f; //増加した数値をリセット。
                pointLight.SetActive(true);
                StartCoroutine("BiggerSize");
            }
            else if (triggerCharge > triggerLine && Pinched == true && Pinched2 == false) //ポイントライトが消える前に更にピンチポーズしたかどうかを判定。
            {
                Pinched2 = true;
                triggerCharge = 0.0f;
            }
        }
        else if (handState.pinchStrength < 0.9f)
        {
            triggerCharge = 0.0f;
        }
    }

    public IEnumerator BiggerSize()
    {
        for (float i = 25.0f; i >= defaultRange; i -= 0.5f) //ポイントライトの範囲と光量を大きくして徐々に小さくしていく。
        {
            pointLight.GetComponent<Light>().range = i;
            pointLight.GetComponent<Light>().intensity = i;
            yield return new WaitForSeconds(0.1f);
            if (Pinched2 == true) //ポイントライトが消える前に更にピンチポーズした場合にもう一度ポイントライトの範囲と光量を大きくして徐々に小さくしていく。
            {
                pointLight.GetComponent<Light>().range = defaultRange;
                pointLight.GetComponent<Light>().intensity = defaultRange;
                StartCoroutine("BiggerSize");
                break;
            }
        }
        if (Pinched2 == false) //ポイントライトの範囲と光量がdefaultRangeの数値まで減少したらポイントライトをオフにする。
        {
            Pinched = false;
            Pinched2 = false;
            pointLight.SetActive(false);
        }
        else if (Pinched2 == true)
        {
            Pinched = true;
            Pinched2 = false;
        }
    }
}
ポイントライトを作成
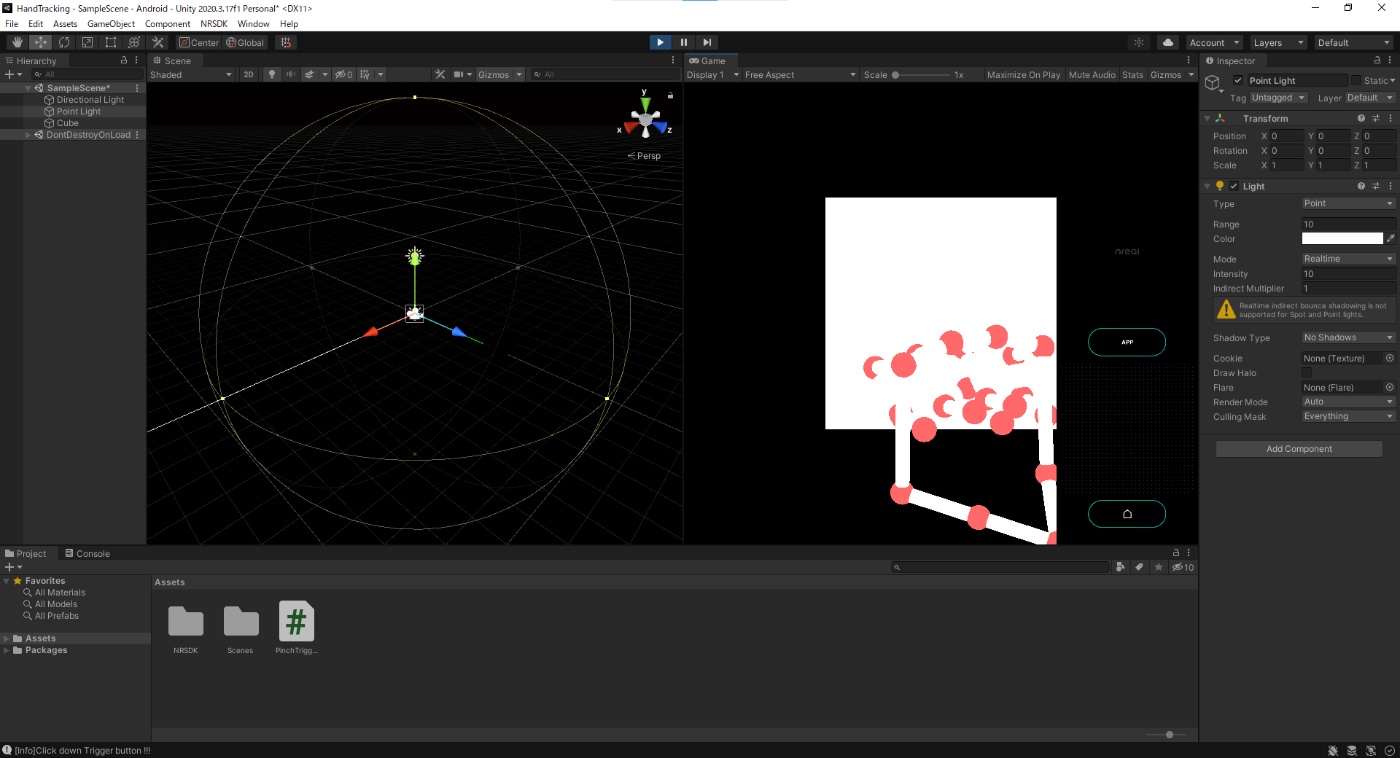
UnityエディターのHierarchyウィンドウで右クリックしてLight → Point Lightを選択してポイントライトを作成します。

作成したポイントライトを選択してInspectorからTransformを以下のように設定してください。
Transform
Position X 0 Y 0 Z 0

また、ポイントライトの変化がわかり易くするためにDirectionalLightの角度を変更してシーンを暗くします。
Transform
Rotation X 270 Y -30 Z 0

作成したポイントライトをスクリプトに適用
HierarchyのNRHand_Rを選択してInspectorから先ほどアタッチしたPinchTrigger(Script)のHandEnumをRightHandに設定。
続けてHandEnumの下に表示されているPointLightの枠内に作成したポイントライトをドラッグ&ドロップします。

Unityエディターでシーンを再生してみましょう。
Gameビューのタブを選択した後、Shiftを押しながらマウスを動かして左クリックをしばらく押し続けるとからポイントライトがオンになって少しずつ小さくなっていることが確認できます。
Cubeなどのオブジェクトを作成して視界内に配置しておくと変化がわかり易くなります。

第二部のスクリプトと併用する場合
第二部で作成したShowHandParticleスクリプトと今回の第三部で作成したPinchTriggerスクリプトを1つのスクリプトのまとめたい場合は新たにスクリプトを作成して以下を記述して下さい。
名前はMyHandArrangeにしています。
using System.Collections;
using System.Collections.Generic;
using UnityEngine;
using NRKernal; //NRSDKの機能を使用する場合は必ず記載。

public class MyHandArrange : MonoBehaviour
{
    public HandEnum handEnum;
    public GameObject[] particles = new GameObject[2];
    private Vector3[] fingerPositions = new Vector3[2];

    private bool Pinched = false;
    private bool Pinched2 = false;
    public GameObject pointLight;
    public float defaultRange;
    private float triggerLine;
    public float triggerCharge;

    // Start is called before the first frame update
    void Start()
    {
        pointLight.SetActive(false);
        triggerLine = 1.5f;
        triggerCharge = 0.0f;
        defaultRange = 0.0f;
    }

    // Update is called once per frame
    void Update()
    {
        var handState = NRInput.Hands.GetHandState(handEnum);
        if (handState.isTracked)
        {
            fingerPositions[0] = handState.GetJointPose(HandJointID.ThumbTip).position;
            fingerPositions[1] = handState.GetJointPose(HandJointID.IndexTip).position;
            for (int i = 0; i < fingerPositions.Length; i++)
            {
                particles[i].SetActive(true);
                particles[i].transform.position = fingerPositions[i];
                if (particles[1])
                {
                    particles[1].transform.position = fingerPositions[1];
                }
            }
        }
        else if (!handState.isTracked)
        {
            for (int i = 0; i < fingerPositions.Length; i++)
            {
                particles[i].SetActive(false);
            }
        }
        CheckPose();
    }
    void CheckPose()
    {
        var handState = NRInput.Hands.GetHandState(handEnum);
        if (handState == null)
        {
            return;
        }
        else if (handState.pinchStrength > 0.9f)
        {
            triggerCharge += Time.deltaTime;
            if (triggerCharge > triggerLine && Pinched == false && Pinched2 == false)
            {
                Pinched = true;
                triggerCharge = 0.0f;
                pointLight.SetActive(true);
                StartCoroutine("BiggerSize");
            }
            else if (triggerCharge > triggerLine && Pinched == true && Pinched2 == false)
            {
                Pinched2 = true;
                triggerCharge = 0.0f;
            }
        }
        else if (handState.pinchStrength < 0.9f)
        {
            triggerCharge = 0.0f;
        }
    }

    public IEnumerator BiggerSize()
    {
        for (float i = 25.0f; i >= defaultRange; i -= 0.5f)
        {
            pointLight.GetComponent<Light>().range = i;
            pointLight.GetComponent<Light>().intensity = i;
            yield return new WaitForSeconds(0.1f);
            if (Pinched2 == true)
            {
                pointLight.GetComponent<Light>().range = defaultRange;
                pointLight.GetComponent<Light>().intensity = defaultRange;
                StartCoroutine("BiggerSize");
                break;
            }
        }
        if (Pinched2 == false)
        {
            Pinched = false;
            Pinched2 = false;
            pointLight.SetActive(false);
        }
        else if (Pinched2 == true)
        {
            Pinched = true;
            Pinched2 = false;
        }
    }
}
NRHand_RからShowHandParticleとPinchTrigger(Script)をリムーブして、新しく作成したMyHandArrangeスクリプトをアタッチしてください。

また、InspectorのMyHandArrange(Script)でHandEnumの設定およびパーティクルとポイントライトのドラッグ&ドロップを忘れないようにしてください。

第三部から始められた方で手のモデルを非表示にしたい場合はHierarchyのNRHand_Rの子になっているNRhandCapsuleVisual_Rを選択してInspectorでチェックを外してください。

Discussion