Pythonを使ったチュートリアルを通してDataflow試してみた
今回は、昨日実施したDataflowチュートリアルの続編となります。前回はDataflowのテンプレートを利用したパイプラインの動作チェックでしたが、今回はPython SDKを利用したチュートリアルを実施してみます。前回の記事はこちらですので、ぜひご参照ください。
早速チュートリアルを試してみる
チュートリアル概要
今回は、DataflowをPythonから利用するチュートリアルを利用してみます。チュートリアルの概要は以下のようです。本記事は前回の記事の続編という立て付けでいこうと思いますので、ステップ1及び2は省略して進めていきます。

なお、このチュートリアルは前回のWord CountサンプルをPythonから実行するというものになっていましたが、別でコードが提供されているので、後半ではそのコードを解析してみます。
Cloud ShellにApache Beam SDKをインストールする
それではまずはCloud ShellにApache Beam SDKをインストールしてみます。
Cloud Shellを開くためには、画面右上に以下のようなアイテムがあると思いますので、左から二番目のアイコンを選択します。

クリックすると私のプロジェクトの状態では以下の質問が表示されました。権限を与えるために承認を選択します。

それではCloud ShellがひらけたところでApache Beam SDKをインストールしてみましょう。チュートリアルではvirtualenv モジュールをインストールし、仮想環境を作成して有効にしますということで、それに倣って進めてみようと思います。virtualenvはpip経由でインストールできますので、インストールし、通常のvirtualenvの使用方法と同様にactivateします。
pip3 install virtualenv
python3 -m virtualenv env
source env/bin/activate
次に、同様にpipを利用してSDKをインストールします。コマンドは以下で可能です。
pip3 install apache-beam[gcp]
私が実行したタイミングでは問題なくSDKがインストールできました。それでは次のステップに行ってみましょう。
Cloud Storageのバケット設定
次にパイプラインの出力を保存するCloud Storageバケットを作成します。バケット名はなんでもいいと思いますが、今回もチュートリアルの内容に従って値を指定します。今回の設定は以下になりました。
- バケット名:
dataflow-apache-quickstart_gke-prac-457911 - データの保存場所:
asia-northeast2のシングルリージョン - ストレージクラス:Standard
- アクセス制御方法:きめ細かい管理
前回もほぼ同じ設定でしたが、今回はアクセス制御方法にきめ細かい管理を指定した理由を調べてみます。ドキュメントを見ると
[きめ細かい管理] オプションを使用すると、IAM とアクセス制御リスト(ACL)を併用して権限を管理できます。ACL は、Amazon S3 と相互運用できるように設計された Cloud Storage 用のレガシー アクセス制御システムです。ACL では、オブジェクト単位でアクセス権を指定することもできます。
とあります。
均一の方は推奨設定ではありますがIAMでの制御にのみ対応しているということです。そこで疑問なのがDataflowはきめ細かい管理を利用すべきなのか?ということです。こちらはあくまで予想ですが、Dataflowでは一時ファイルや出力ファイルが生成されるので、バケットレベルではなくオブジェクトレベルでのアクセス制御をするためだと予測しています。
パイプラインの実行
それではパイプラインを実行してみましょう。以下のコマンドを実行すると、Word Countのパイプラインを実行してくれます。
python3 -m apache_beam.examples.wordcount --region us-central1 --input gs://dataflow-samples/shakespeare/kinglear.txt --output gs://dataflow-apache-quickstart_gke-prac-457911/results/output --runner DataflowRunner --project ... --temp_location gs://dataflow-apache-quickstart_gke-prac-457911/temp/
コマンドを紐解くと以下のことがわかりますね。
- 入力データは
us-central1リージョンのgs://dataflow-samples/shakespeare/kinglear.txtにある - 出力ファイルは先ほど設定したCloud Storageである
gs://dataflow-apache-quickstart_gke-prac-457911/results/outputになっている - 一時ファイルは同様に
gs://dataflow-apache-quickstart_gke-prac-457911/temp/に保存されている
こちらを実行すると以下のようにパイプラインが構築されました。なお、内容を比較すると、前回のテンプレート形式のものと比べるとステップが増えているようです。
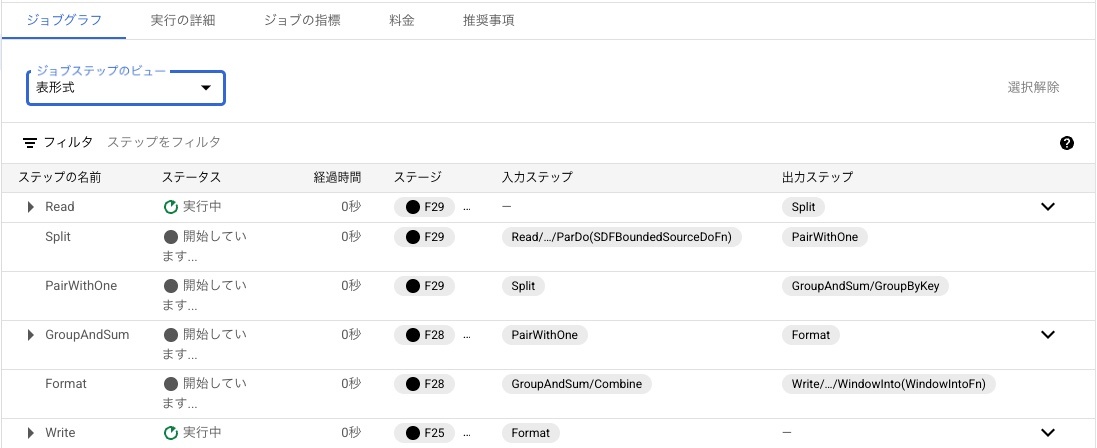
ステップの内容についてはソースコードを見て紐解いていこうと思います
結果の確認など
この後のステップについては前回の流れと同じですので本記事では割愛させていただきますが、出力に指定したバケットに同様のカウント結果が保存されています。
ソースコードの分析
それでは今回実行したコードの中身を見てみましょう。GitHubにてコードが共有されています。
#
# Licensed to the Apache Software Foundation (ASF) under one or more
# contributor license agreements.  See the NOTICE file distributed with
# this work for additional information regarding copyright ownership.
# The ASF licenses this file to You under the Apache License, Version 2.0
# (the "License"); you may not use this file except in compliance with
# the License.  You may obtain a copy of the License at
#
#    http://www.apache.org/licenses/LICENSE-2.0
#
# Unless required by applicable law or agreed to in writing, software
# distributed under the License is distributed on an "AS IS" BASIS,
# WITHOUT WARRANTIES OR CONDITIONS OF ANY KIND, either express or implied.
# See the License for the specific language governing permissions and
# limitations under the License.
#

"""A word-counting workflow."""

# pytype: skip-file

# beam-playground:
#   name: WordCount
#   description: An example that counts words in Shakespeare's works.
#   multifile: false
#   pipeline_options: --output output.txt
#   context_line: 87
#   categories:
#     - Combiners
#     - Options
#     - Quickstart
#   complexity: MEDIUM
#   tags:
#     - options
#     - count
#     - combine
#     - strings

import argparse
import logging
import re

import apache_beam as beam
from apache_beam.io import ReadFromText
from apache_beam.io import WriteToText
from apache_beam.options.pipeline_options import PipelineOptions
from apache_beam.options.pipeline_options import SetupOptions
from apache_beam.runners.runner import PipelineResult


class WordExtractingDoFn(beam.DoFn):
  """Parse each line of input text into words."""
  def process(self, element):
    """Returns an iterator over the words of this element.

    The element is a line of text.  If the line is blank, note that, too.

    Args:
      element: the element being processed

    Returns:
      The processed element.
    """
    return re.findall(r'[\w\']+', element, re.UNICODE)


def run(argv=None, save_main_session=True) -> PipelineResult:
  """Main entry point; defines and runs the wordcount pipeline."""
  parser = argparse.ArgumentParser()
  parser.add_argument(
      '--input',
      dest='input',
      default='gs://dataflow-samples/shakespeare/kinglear.txt',
      help='Input file to process.')
  parser.add_argument(
      '--output',
      dest='output',
      required=True,
      help='Output file to write results to.')
  known_args, pipeline_args = parser.parse_known_args(argv)

  # We use the save_main_session option because one or more DoFn's in this
  # workflow rely on global context (e.g., a module imported at module level).
  pipeline_options = PipelineOptions(pipeline_args)
  pipeline_options.view_as(SetupOptions).save_main_session = save_main_session

  pipeline = beam.Pipeline(options=pipeline_options)

  # Read the text file[pattern] into a PCollection.
  lines = pipeline | 'Read' >> ReadFromText(known_args.input)

  counts = (
      lines
      | 'Split' >> (beam.ParDo(WordExtractingDoFn()).with_output_types(str))
      | 'PairWithOne' >> beam.Map(lambda x: (x, 1))
      | 'GroupAndSum' >> beam.CombinePerKey(sum))

  # Format the counts into a PCollection of strings.
  def format_result(word, count):
    return '%s: %d' % (word, count)

  output = counts | 'Format' >> beam.MapTuple(format_result)

  # Write the output using a "Write" transform that has side effects.
  # pylint: disable=expression-not-assigned
  output | 'Write' >> WriteToText(known_args.output)

  # Execute the pipeline and return the result.
  result = pipeline.run()
  result.wait_until_finish()
  return result


if __name__ == '__main__':
  logging.getLogger().setLevel(logging.INFO)
  run()
今回はパイプラインの構成の部分に焦点を当ててみようと思います。実際にパイプラインの構築をしているのはこちらの部分と思われます。
pipeline_options = PipelineOptions(pipeline_args)
pipeline_options.view_as(SetupOptions).save_main_session = save_main_session

pipeline = beam.Pipeline(options=pipeline_options)

# Read the text file[pattern] into a PCollection.
lines = pipeline | 'Read' >> ReadFromText(known_args.input)

counts = (
    lines
    | 'Split' >> (beam.ParDo(WordExtractingDoFn()).with_output_types(str))
    | 'PairWithOne' >> beam.Map(lambda x: (x, 1))
    | 'GroupAndSum' >> beam.CombinePerKey(sum))

# Format the counts into a PCollection of strings.
def format_result(word, count):
    return '%s: %d' % (word, count)

output = counts | 'Format' >> beam.MapTuple(format_result)

# Write the output using a "Write" transform that has side effects.
# pylint: disable=expression-not-assigned
output | 'Write' >> WriteToText(known_args.output)
beam.Pipelineがパイプラインの構築をするためのクラスであり、pipeline_optionsで設定をしているようです。その設定の中にはコマンドライン引数のoutputを受けていると思われますので、こちらでCloud Storageのパスを渡していると考えられます。ちなみに、|と>>が利用されていますが、Apache BeamのPython SDKでは、"A" >> BでBというトランスフォームにAというラベルを春ということができるようです。実際、表形式であらためてパイプラインを見ると、ラベルとトランスフォームが一対一で対応していることが確認できます。

今回で言うと、以下の順番でパイプラインが構築されています。
- 入力ファイルからテキストを読み込む
- ラベル:Read
- トランスフォーム:ReadFromText
- テキストを分割する
- ラベル:Split
- トランスフォーム:beam.ParDo(WordExtractingDoFn()).with_output_types(str)
- 各分割に対して1をペアに設定する
- ラベル:PairWithOne
- トランスフォーム:beam.Map(lambda x: (x, 1))
- 分割ごとに集計する
- ラベル:GroupAndSum
- トランスフォーム:beam.CombinePerKey(sum)
- タプルをフォーマットする
- ラベル:Format
- トランスフォーム:beam.MapTuple(format_result)
- 出力ファイルをCloud Storageに保存する
- ラベル:Write
- トランスフォーム:WriteToText(known_args.output)
トランスフォームについてはApache BeamのIOにて定義されているようですが、今回の記事では割愛して、次回の記事で解説しようと思います。
まとめ
今回は、前回利用したWord CountのチュートリアルをPythonから実行するとともに、ソースコードについてもパイプラインの部分を中心に掘り下げてみました。次回は実際にPythonコードを自作して動かしてみたいと思います。
Discussion