Texture packing with Three.js
Introduction
I wrote this while having it translated by ChatGPT. I apologize for any English mistakes.
↓ 日本語の記事はこちら (Click here to read the article in Japanese.)
I'll be writing this as a memo. This information is intended for those who have a decent understanding of Three.js.
Texture packing involves consolidating small textures into one large texture, optimizing memory usage. This technique can be applied to Three.js for better performance.
I've also uploaded a sample to Git for reference.
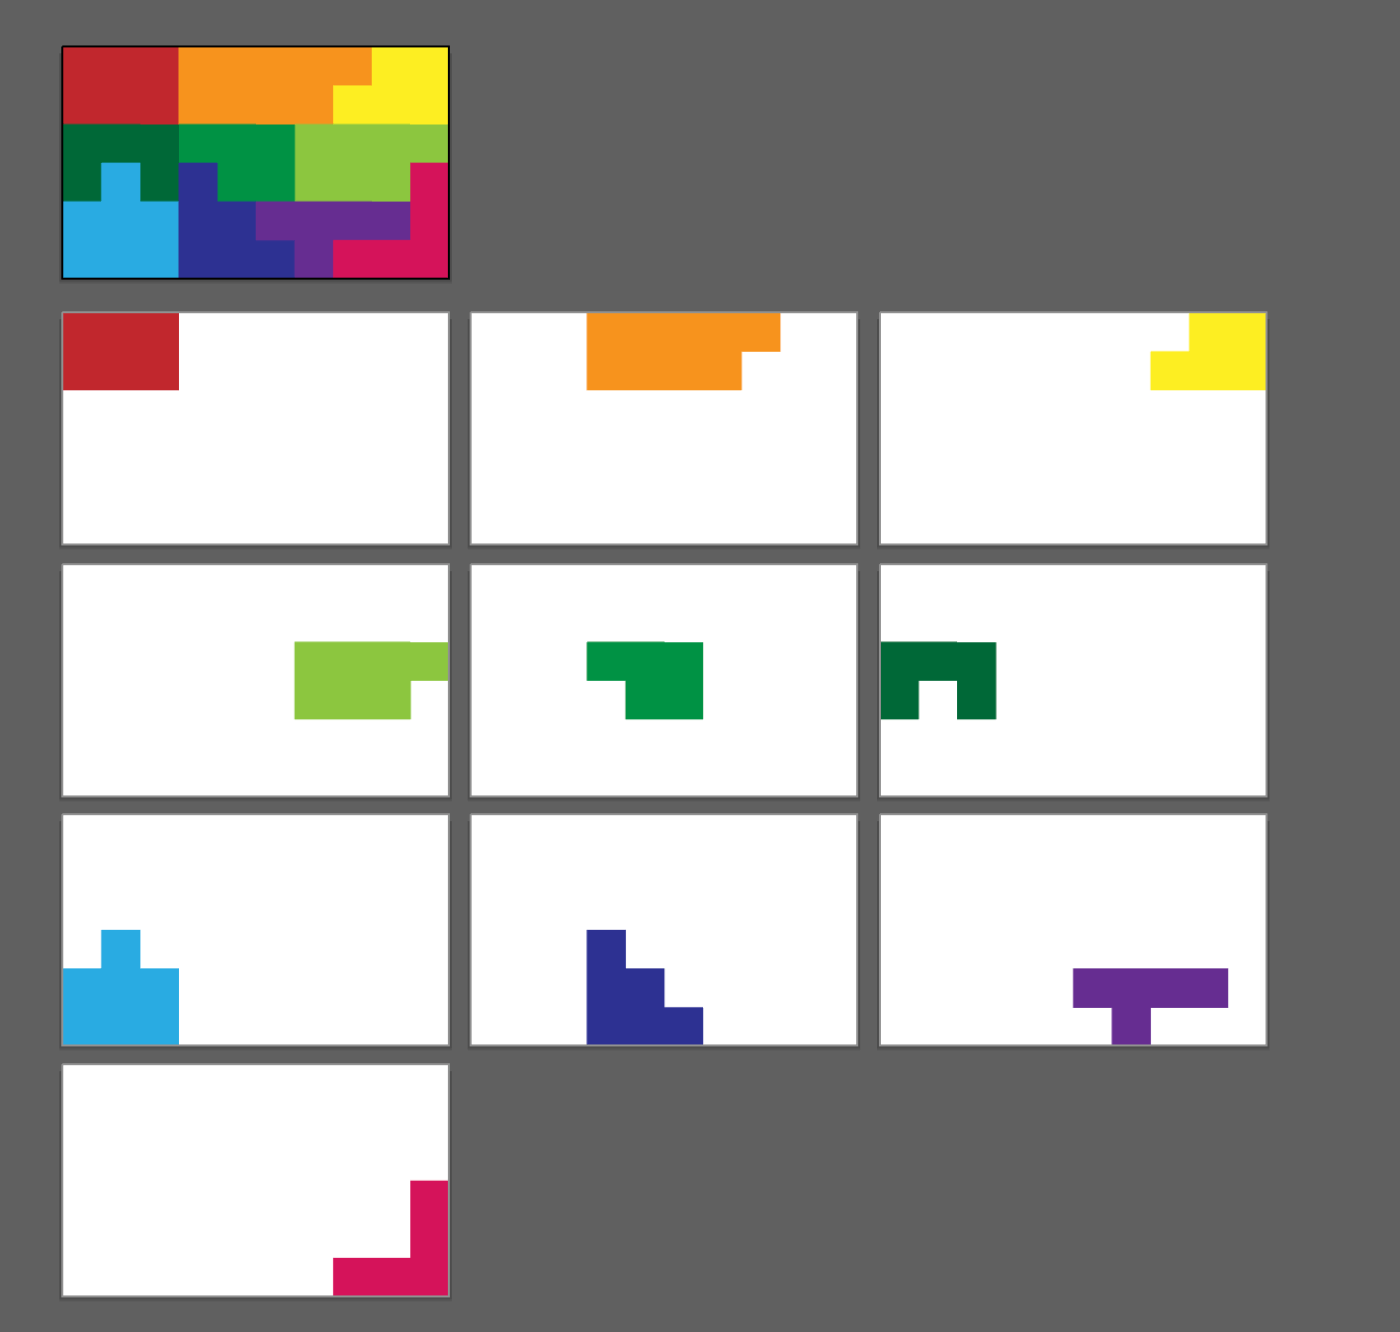
Final result
This time, we'll assemble a puzzle from 10 pieces.
(*Note: The image in the top-left corner represents the completed puzzle when all textures are stacked together.)
Preparation
In this article, we'll be using a software called TexturePacker, so please download it from https://www.codeandweb.com/texturepacker.
*Note: The TexturePacker software used in the article is a paid version, and the limitations of the free plan are not taken into account. Please be aware of this beforehand.
Environment
Use next.js
next: 14.0.3
react: ^18
node-version: 20.2.0
1. Texture Preparation
Please download the assets from the GitHub repository using the following link: https://github.com/AdachiSaya/threejs-texture-packer-sample/tree/main/_textures
After downloading the assets, drag and drop them into TexturePacker. Then, adjust the settings on the right side to match the provided image.
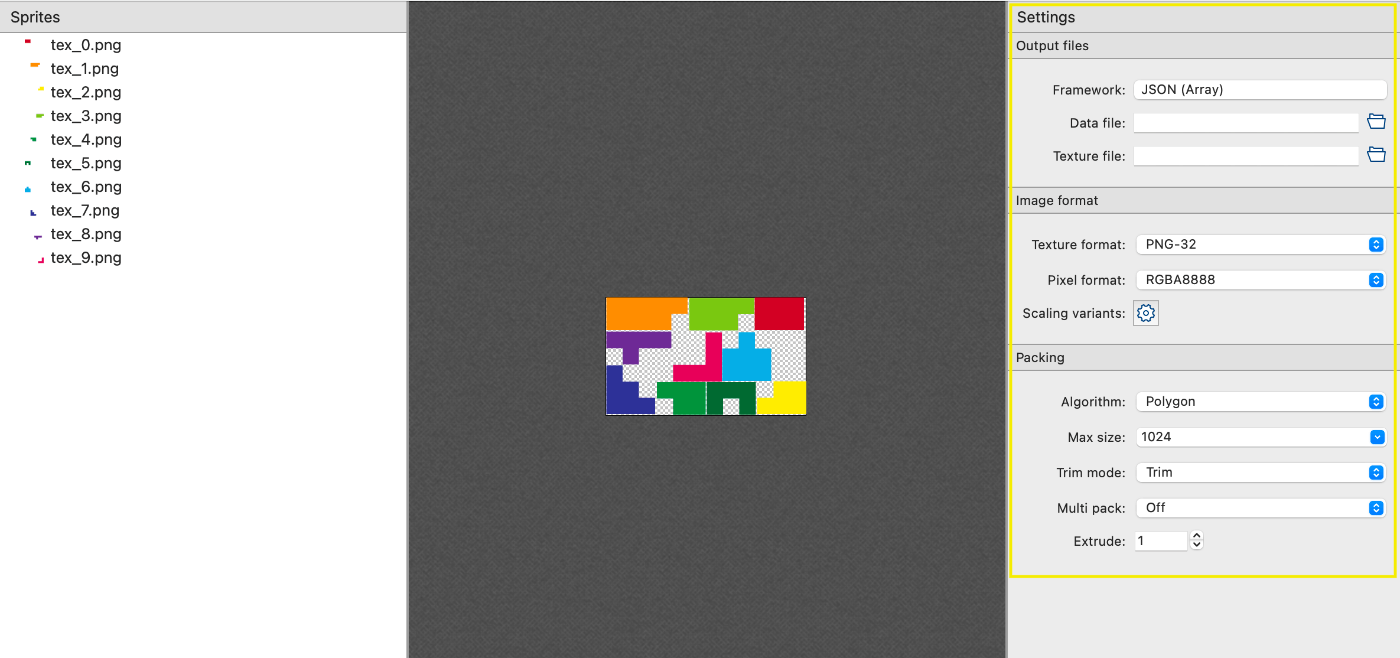
Click on "Publish sprite sheet" and download both the PNG and JSON files. This time, we named it "puzzle_textures."
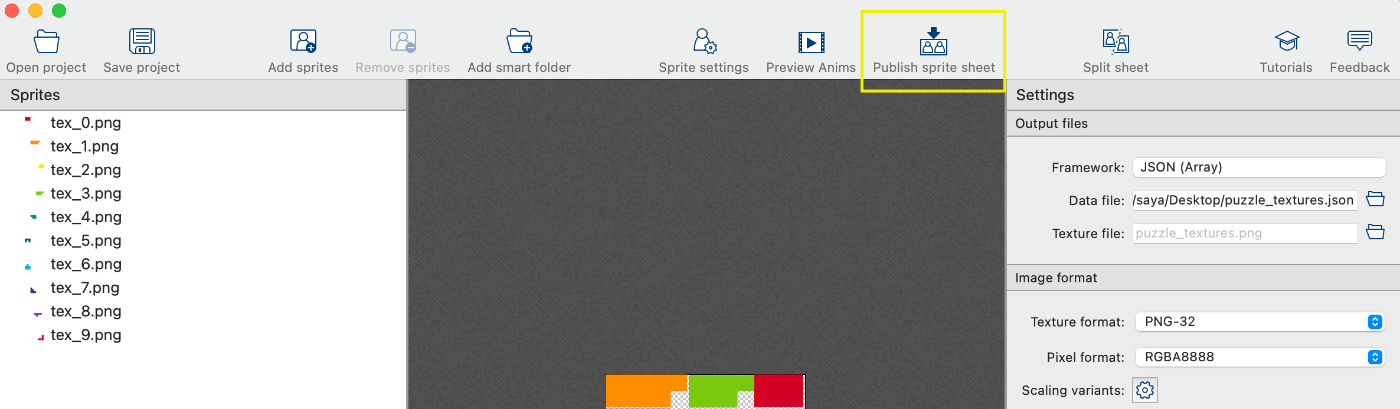
Once exported, you will find two files at the specified file path.

Now, the 10 PNG images have been consolidated into a single PNG file.

2. Preparation for Three.js
We will create the base.
main.ts
import * as THREE from 'three';
import Stats from 'stats.js';
import { OrbitControls } from 'three/examples/jsm/Addons.js';

export class Main {
	stats?: Stats;
	camera?: THREE.Camera;
	scene?: THREE.Scene;
	renderer?: THREE.Renderer;

	init(element: HTMLElement) {
		const windowWidth = window.innerWidth;
		const windowHeight = window.innerHeight;

		this.scene = new THREE.Scene();
		this.scene.background = new THREE.Color(0x000000);

		this.camera = new THREE.PerspectiveCamera(45, windowWidth / windowHeight, 0.1, 5000);
		this.camera.position.set(0, 0, 1000);
		const rad = (45 / 2) * (Math.PI / 180);
		let distance = (windowHeight / 2) / Math.tan(rad);
		this.camera.position.set(0, 0, distance);
		(this.camera as THREE.PerspectiveCamera).aspect = windowWidth / windowHeight;
		(this.camera as THREE.PerspectiveCamera).updateProjectionMatrix();

		this.renderer = new THREE.WebGLRenderer({
			alpha: true,
			antialias: true,
		});
		this.renderer.setSize(windowWidth, windowHeight);

		// ※Controller
		const controls = new OrbitControls(this.camera!, this.renderer.domElement);
		controls.enabled = true;
		controls.target.set(0, 0, 0);
		controls.update();

		// ※Stats
		this.stats = new Stats();
		this.stats.showPanel(0);
		document.body.appendChild(this.stats.dom);

		element.appendChild(this.renderer.domElement);
		requestAnimationFrame(this.update);
	}

	update = () => {
		this.stats?.begin();
		this.renderer?.render(this.scene!, this.camera!);
		this.stats?.end();
		requestAnimationFrame(this.update);
	};
}
Please pass the DOM element where you want to create a canvas as an argument directly at the init timing.
It is optional. OrbitControls is used for rotating the screen.
Stats is used for displaying FPS.
index.tsx
import { useEffect, useRef } from 'react';
import { Main } from '../assets/main';
import styles from "../styles/component/index.module.scss";

export default function Index() {
	const mainVisualRef = useRef<HTMLDivElement>(null);
	useEffect(() => {
		if (!mainVisualRef.current) return;
		const main = new Main();
		main.init(mainVisualRef.current);
	}, []);
	return (
		<div ref={mainVisualRef} className={styles.mainVisual} style={{ width: "100%", height: "100vh" }} />
	);
}
At this stage, the screen is still completely dark.

3.Loading data created with TexturePacker
We have created a utils class and TextureAtlas for loading data this time. Please copy and use them.
textureAtlas.ts
import Path from "path";
import { Texture, TextureLoader, Vector2 } from "three";

interface TextureAtlasJsonData {
	filename: string;
	frame: {
		x: number,
		y: number,
		w: number,
		h: number;
	},
	rotated: boolean,
	trimmed: boolean,
	spriteSourceSize: {
		x: number,
		y: number,
		w: number,
		h: number;
	},
	sourceSize: {
		w: number,
		h: number;
	};
}

interface TexturePackerJsonData {
	frames: { [key: string]: TextureAtlasJsonData; };
	meta: {
		app: string;
		version: string;
		image: string;
		format: string;
		size: {
			w: number,
			h: number;
		},
		scale: string,
		smartupdate: string;
	};
}

export class TextureData {
	key: string;
	texture: Texture;
	data: TextureAtlasJsonData;
	width: number;
	height: number;
	offset: Vector2;
	textureWidth: number;
	textureHeight: number;
	scale: number;

	constructor(key: string, texture: Texture, data: TextureAtlasJsonData, scale: number = 1) {
		this.scale = scale;
		this.key = key;
		this.texture = texture;
		this.data = data;
		this.textureWidth = data.frame.w / this.scale;
		this.textureHeight = data.frame.h / this.scale;
		this.texture.repeat.set(data.frame.w / texture.image.width, data.frame.h / texture.image.height);
		this.texture.offset.set(
			data.frame.x / texture.image.width,
			1 - data.frame.h / texture.image.height - data.frame.y / texture.image.height
		);
		this.texture.needsUpdate = true;
		this.width = data.sourceSize.w / this.scale;
		this.height = data.sourceSize.h / this.scale;
		this.offset = new Vector2(-this.textureWidth / 2, -this.textureHeight / 2);
		this.offset.x -= data.spriteSourceSize.x / this.scale;
		this.offset.y += (data.spriteSourceSize.y / this.scale + data.spriteSourceSize.h / this.scale) - this.height;
	}

	clone() {
		return new TextureData(this.key, this.texture, this.data);
	}
}

export class TextureAtlas {
	path: string;
	json?: TexturePackerJsonData;
	textureDataList: { [key: string]: TextureData; } = {};

	constructor(path: string) {
		this.path = path;
	}

	async load() {
		return new Promise<void>(async resolve => {
			this.json = await (await fetch(this.path)).json();
			const imagePath = this.getImagePath(this.json, this.path);
			const loader = new TextureLoader();
			loader.load(
				imagePath,
				(texture: Texture) => {
					this.init(texture);
					resolve();
				},
			);
		});
	}

	protected init(texture: Texture) {
		if (!this.json) return;
		Object.keys(this.json?.frames).forEach((key: string) => {
			const t = texture.clone();
			const data = new TextureData(key, t, this.json!.frames[key], Number(this.json!.meta.scale));
			this.textureDataList[key] = data;
		});
	}

	protected getImagePath(json: any, path: string): string {
		const dir = Path.dirname(path);
		return Path.join(dir, json.meta.image);
	}

}
How to use TextureAtlas
- importing the TextureAtlas class
import { TextureAtlas } from '. /textureAtlas';.
- Create a new TextureAtlas. At this time, . /public folder, passing the path to the .json file stored in the folder.
this.textureAtlas: TextureAtlas = new TextureAtlas("/puzzle_textures.json");
Use TextureAtlas to load textures. Use await since this is an asynchronous process. (Since await is used, add "async" to the function name.)
await this.textureAtlas!.load();
4.
Get an array of texture data from textureAtlas. (After that, create a mesh with this data to make it look good.)
const textures = this.textureAtlas!.textures;
main.ts
The following is an excerpt of where the TextureAtlas class is used in main.ts.
import { TextureAtlas } from './textureAtlas';
export class Main {
	// 省略
	textureAtlas: TextureAtlas = new TextureAtlas("/puzzle_textures.json");

	async init(element: HTMLElement) {
		// 省略
		await this.load();
		// 省略
	}

	async load() {
		await this.textureAtlas!.load();
		const dataList = this.textureAtlas!.textureDataList;
	}

	// 省略
}
4. Image display method
The image display is based on the data in textureAtlas.textureDataList.
In this case, we use a home-made class that displays images in a nice way.
Image.ts
import * as THREE from 'three';
import { TextureData } from './textureAtlas';

export class Image extends THREE.Object3D {
	mesh: THREE.Mesh;
	container: THREE.Object3D;
	texture?: THREE.Texture;
	width: number = 0;
	height: number = 0;
	anchor: THREE.Vector2 = new THREE.Vector2(0.5, 0.5);
	textureData?: TextureData;

	constructor(textureData: TextureData, anchor: THREE.Vector2 = new THREE.Vector2(0.5, 0.5)) {
		super();
		this.mesh = new THREE.Mesh();
		this.container = new THREE.Object3D();
		this.container.add(this.mesh);
		this.add(this.container);
		this.init(textureData, anchor);
	}

	protected init(textureData: TextureData, anchor: THREE.Vector2 = new THREE.Vector2(0.5, 0.5)) {
		this.createMesh(textureData.texture, textureData.textureWidth, textureData.textureHeight);
		this.textureData = textureData;
		this.anchor = anchor;
		this.width = textureData.width;
		this.height = textureData.height;
		// apply offset
		this.mesh.position.x = -this.textureData.offset.x - (this.width * 0.5);
		this.mesh.position.y = -this.textureData.offset.y - (this.height * 0.5);
		// set base rotation center for artbord center
		this.container.position.x = this.width * (0.5 - this.anchor.x);
		this.container.position.y = -this.height * (0.5 - this.anchor.y);

	}

	protected createMesh(tex: THREE.Texture, width: number, height: number) {
		this.texture = tex;
		this.width = width;
		this.height = height;
		this.mesh.geometry = new THREE.PlaneGeometry(this.width, this.height);
		this.mesh.material = new THREE.MeshBasicMaterial({
			map: tex,
			transparent: true,
			side: THREE.FrontSide,
			depthTest: false,
		});
	}
}
main.ts
The following is an excerpt of the Image class usage in main.ts.
import { Image } from './image';
export class Main {
	images: Array<Image> = [];

	// 省略

	async load() {
	await this.textureAtlas!.load();
		const dataList = this.textureAtlas!.textureDataList;
		for (const key in dataList) {
			const image = new Image(dataList[key]);
			this.images.push(image);
			this.scene!.add(image);
		}
	}
}
In the *Image class, TextureData is passed as the first argument and anchor as the second argument.
The anchor refers to the reference point for rotation and is set to the center of the image with margins (Vector2(0.5, 0.5)) by default.
5. Combine all
main.ts
import * as THREE from 'three';
import Stats from 'stats.js';
import { OrbitControls } from 'three/examples/jsm/Addons.js';
import { TextureAtlas } from './textureAtlas';
import { Image } from './image';

export class Main {
	stats?: Stats;
	camera?: THREE.Camera;
	scene?: THREE.Scene;
	renderer?: THREE.Renderer;
	images: Array<Image> = [];
	textureAtlas: TextureAtlas = new TextureAtlas("/puzzle_textures.json");

	async init(element: HTMLElement) {
		const windowWidth = window.innerWidth;
		const windowHeight = window.innerHeight;

		// Scene
		this.scene = new THREE.Scene();
		this.scene.background = new THREE.Color(0x000000);

		// Camera
		this.camera = new THREE.PerspectiveCamera(45, windowWidth / windowHeight, 0.1, 5000);
		this.camera.position.set(0, 0, 1000);
		const rad = (45 / 2) * (Math.PI / 180);
		let distance = (windowHeight / 2) / Math.tan(rad);
		this.camera.position.set(0, 0, distance);
		(this.camera as THREE.PerspectiveCamera).aspect = windowWidth / windowHeight;
		(this.camera as THREE.PerspectiveCamera).updateProjectionMatrix();

		// Renderer
		this.renderer = new THREE.WebGLRenderer({
			alpha: true,
			antialias: true,
		});
		this.renderer.setSize(windowWidth, windowHeight);

		// Controller
		const controls = new OrbitControls(this.camera!, this.renderer.domElement);
		controls.enabled = true;
		controls.target.set(0, 0, 0);
		controls.update();

		// Stats
		this.stats = new Stats();
		this.stats.showPanel(0);
		document.body.appendChild(this.stats.dom);

		await this.load();
		element.appendChild(this.renderer.domElement);
		requestAnimationFrame(this.update);
	}

	/**
	 * load
	 */
	async load() {
		await this.textureAtlas!.load();
		const dataList = this.textureAtlas!.textureDataList;
		for (const key in dataList) {
			const image = new Image(dataList[key]);
			this.images.push(image);
			this.scene!.add(image);
		}
	}

	/**
	 * update
	 */
	update = () => {
		this.stats?.begin();
		this.renderer?.render(this.scene!, this.camera!);
		this.stats?.end();
		requestAnimationFrame(this.update);
	};
}
The puzzle now appears on the screen.

Extra: Play with it.
Try to rotate it with respect to the y-axis.
(Also check that the reference point changes by changing the second argument anchor of the Image class.)

main.ts
	async load() {
		await this.textureAtlas!.load();
		const dataList = this.textureAtlas!.textureDataList;
		for (const key in dataList) {
			const image = new Image(dataList[key]);
			// --- add ---
			(image.mesh.material as THREE.MeshBasicMaterial).side = THREE.DoubleSide;
			// --- add ---
			this.images.push(image);
			this.scene!.add(image);
		}
	}

	update = () => {
		this.stats?.begin();
		this.renderer?.render(this.scene!, this.camera!);
		// --- add ---
		this.images.forEach((image, index) => {
			image.rotation.y += (0.001 * index);
		});
		// --- add ---
		this.stats?.end();
		requestAnimationFrame(this.update);
	};
last
Thank you for calling the article.
As a personal experiment, it was also a test to see if translating the same content into English would increase the number of people who would show interest in the article!
Discussion