Three.js+Texture Packerでテクスチャパッキング
はじめに
備忘録で書きます。
Three.jsに対して、ある程度理解のある方向けです。
テクスチャパッキングで小さなテクスチャを1枚の大きなテクスチャにまとめることで、メモリ使用量を最適化することが出来ます。
gitにサンプルも上げています。
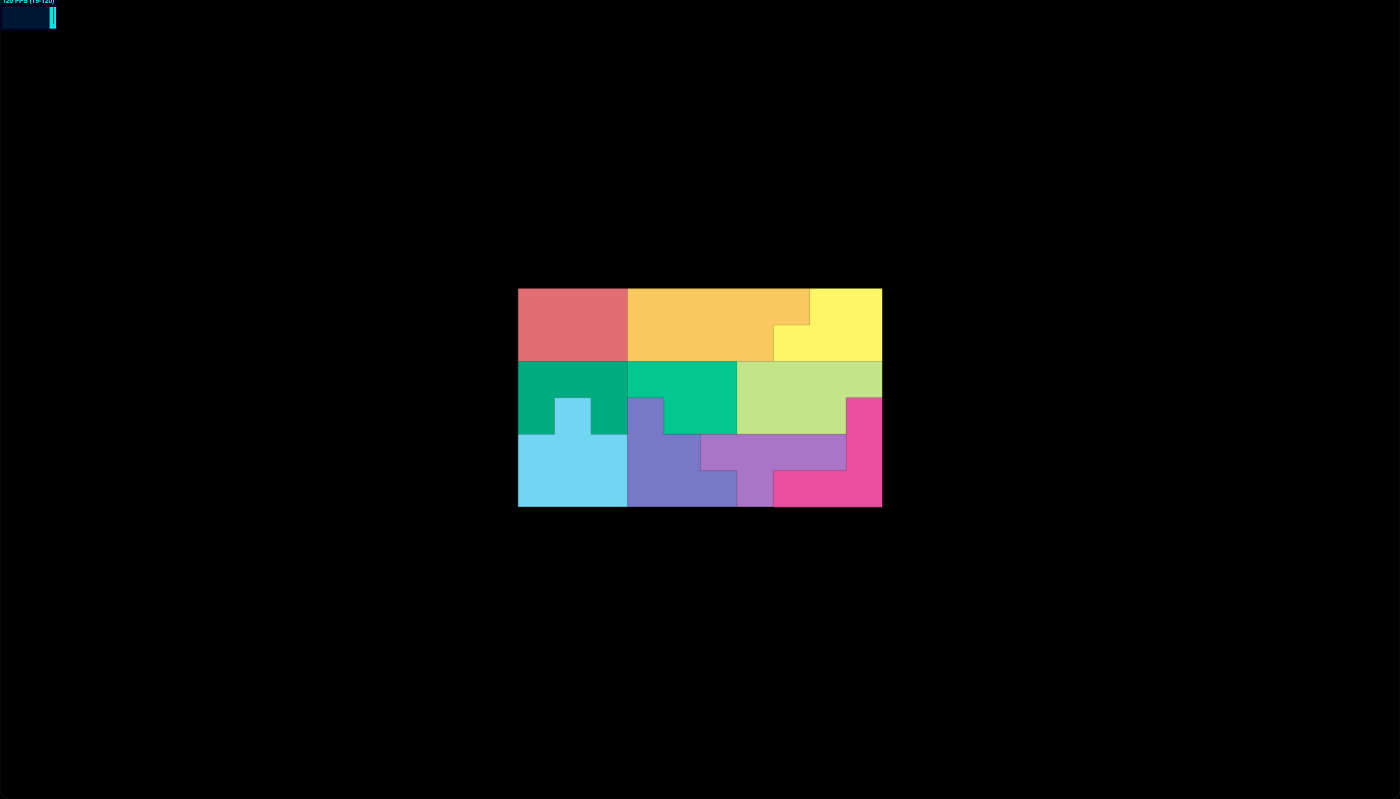
完成図
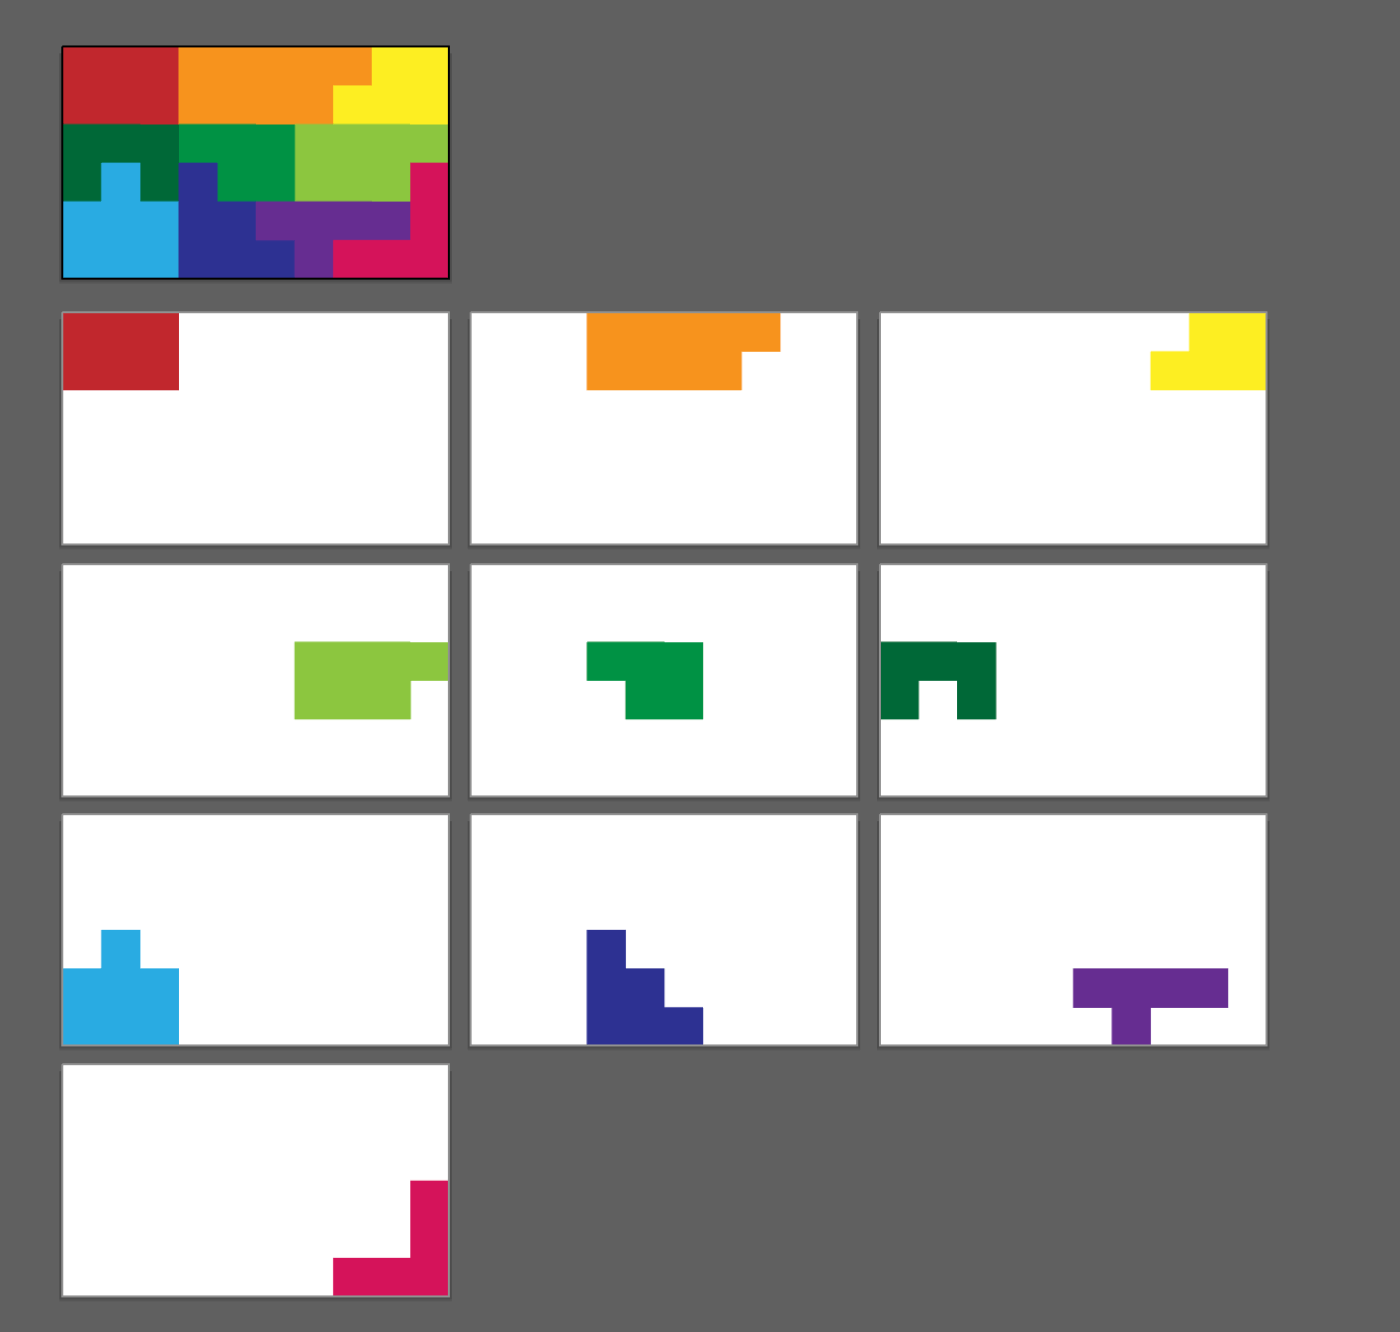
今回は10個のパーツからパズルを組み上げます。
(※左上がすべてのTextureを重ねたときの完成図になります。)
準備
記事内でTexturePackerというソフトを使用しますのでダウンロードしてください ※記事内で使用するTexturePackerというソフトは課金済みですので、フリープランの場合の制限を考慮していません。予めご了承ください。
環境
next.jsを使用します。
next: 14.0.3
react: ^18
node-version: 20.2.0
1.Textureの準備
gitから素材をダウンロードしてください。
TexturePackerにダウンロードした素材をすべてドラッグ&ドロップしてください。
その後、右側の設定を写真と同じにしてください。
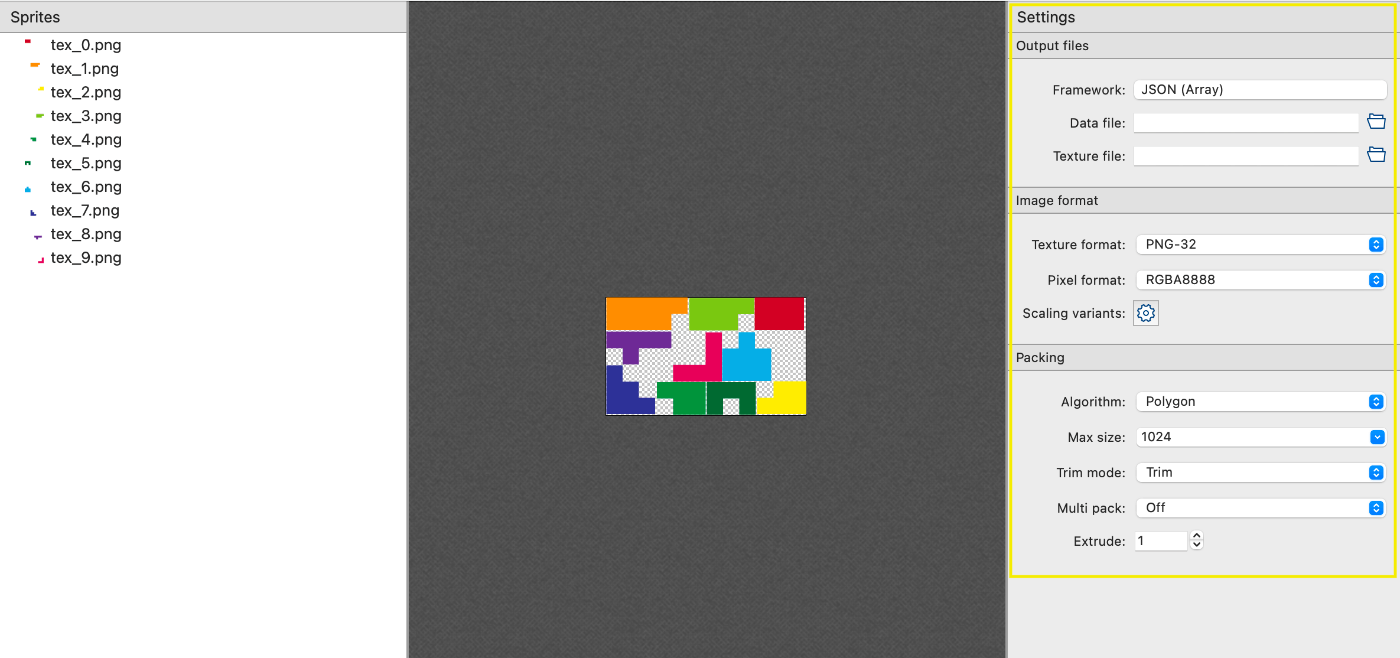
publish sprite sheetからPNGとJSONをダウンロードしてください。
今回は「puzzle_textures」という名前を付けました。
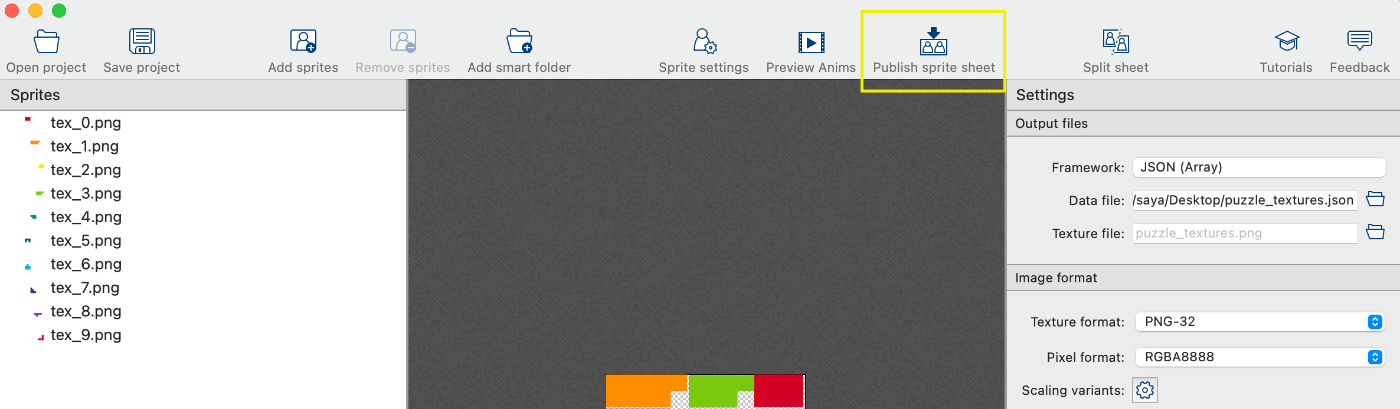
書き出されると、指定したファイルパスに以下の2つが出力されます。

これで10枚のPNGを1枚のPNGにまとめることができました。

2.Three.jsの下準備
ベースを作成します。
main.ts
import * as THREE from 'three';
import Stats from 'stats.js';
import { OrbitControls } from 'three/examples/jsm/Addons.js';

export class Main {
	stats?: Stats;
	camera?: THREE.Camera;
	scene?: THREE.Scene;
	renderer?: THREE.Renderer;

	init(element: HTMLElement) {
		const windowWidth = window.innerWidth;
		const windowHeight = window.innerHeight;

		this.scene = new THREE.Scene();
		this.scene.background = new THREE.Color(0x000000);

		this.camera = new THREE.PerspectiveCamera(45, windowWidth / windowHeight, 0.1, 5000);
		this.camera.position.set(0, 0, 1000);
		const rad = (45 / 2) * (Math.PI / 180);
		let distance = (windowHeight / 2) / Math.tan(rad);
		this.camera.position.set(0, 0, distance);
		(this.camera as THREE.PerspectiveCamera).aspect = windowWidth / windowHeight;
		(this.camera as THREE.PerspectiveCamera).updateProjectionMatrix();

		this.renderer = new THREE.WebGLRenderer({
			alpha: true,
			antialias: true,
		});
		this.renderer.setSize(windowWidth, windowHeight);

		// ※Controller
		const controls = new OrbitControls(this.camera!, this.renderer.domElement);
		controls.enabled = true;
		controls.target.set(0, 0, 0);
		controls.update();

		// ※Stats
		this.stats = new Stats();
		this.stats.showPanel(0);
		document.body.appendChild(this.stats.dom);

		element.appendChild(this.renderer.domElement);
		requestAnimationFrame(this.update);
	}

	update = () => {
		this.stats?.begin();
		this.renderer?.render(this.scene!, this.camera!);
		this.stats?.end();
		requestAnimationFrame(this.update);
	};
}
initのタイミングで直下に引数にcanvasを作成したいdomを渡して下さい。
※はなくても良いです。
OrbitControls: 画面をくるくる回すために使用
Stats: FPS表示
index.tsx
import { useEffect, useRef } from 'react';
import { Main } from '../assets/main';
import styles from "../styles/component/index.module.scss";

export default function Index() {
	const mainVisualRef = useRef<HTMLDivElement>(null);
	useEffect(() => {
		if (!mainVisualRef.current) return;
		const main = new Main();
		main.init(mainVisualRef.current);
	}, []);
	return (
		<div ref={mainVisualRef} className={styles.mainVisual} style={{ width: "100%", height: "100vh" }} />
	);
}
この段階でまだ画面は真っ暗です。
3.TexturePackerで作成したデータの読み込み
今回は、データを読み込むためのutilsクラス、TextureAtlasを作成しました。
コピペして使用してください。
textureAtlas.ts
import Path from "path";
import { Texture, TextureLoader, Vector2 } from "three";

interface TextureAtlasJsonData {
	filename: string;
	frame: {
		x: number,
		y: number,
		w: number,
		h: number;
	},
	rotated: boolean,
	trimmed: boolean,
	spriteSourceSize: {
		x: number,
		y: number,
		w: number,
		h: number;
	},
	sourceSize: {
		w: number,
		h: number;
	};
}

interface TexturePackerJsonData {
	frames: { [key: string]: TextureAtlasJsonData; };
	meta: {
		app: string;
		version: string;
		image: string;
		format: string;
		size: {
			w: number,
			h: number;
		},
		scale: string,
		smartupdate: string;
	};
}

export class TextureData {
	key: string;
	texture: Texture;
	data: TextureAtlasJsonData;
	width: number;
	height: number;
	offset: Vector2;
	textureWidth: number;
	textureHeight: number;
	scale: number;

	constructor(key: string, texture: Texture, data: TextureAtlasJsonData, scale: number = 1) {
		this.scale = scale;
		this.key = key;
		this.texture = texture;
		this.data = data;
		this.textureWidth = data.frame.w / this.scale;
		this.textureHeight = data.frame.h / this.scale;
		this.texture.repeat.set(data.frame.w / texture.image.width, data.frame.h / texture.image.height);
		this.texture.offset.set(
			data.frame.x / texture.image.width,
			1 - data.frame.h / texture.image.height - data.frame.y / texture.image.height
		);
		this.texture.needsUpdate = true;
		this.width = data.sourceSize.w / this.scale;
		this.height = data.sourceSize.h / this.scale;
		this.offset = new Vector2(-this.textureWidth / 2, -this.textureHeight / 2);
		this.offset.x -= data.spriteSourceSize.x / this.scale;
		this.offset.y += (data.spriteSourceSize.y / this.scale + data.spriteSourceSize.h / this.scale) - this.height;
	}

	clone() {
		return new TextureData(this.key, this.texture, this.data);
	}
}

export class TextureAtlas {
	path: string;
	json?: TexturePackerJsonData;
	textureDataList: { [key: string]: TextureData; } = {};

	constructor(path: string) {
		this.path = path;
	}

	async load() {
		return new Promise<void>(async resolve => {
			this.json = await (await fetch(this.path)).json();
			const imagePath = this.getImagePath(this.json, this.path);
			const loader = new TextureLoader();
			loader.load(
				imagePath,
				(texture: Texture) => {
					this.init(texture);
					resolve();
				},
			);
		});
	}

	protected init(texture: Texture) {
		if (!this.json) return;
		Object.keys(this.json?.frames).forEach((key: string) => {
			const t = texture.clone();
			const data = new TextureData(key, t, this.json!.frames[key], Number(this.json!.meta.scale));
			this.textureDataList[key] = data;
		});
	}

	protected getImagePath(json: any, path: string): string {
		const dir = Path.dirname(path);
		return Path.join(dir, json.meta.image);
	}

}
TextureAtlasの使い方
- TextureAtlasクラスのインポート
import { TextureAtlas } from './textureAtlas';
- TextureAtlasを新しく作成します。このとき、./publicフォルダに格納されている.jsonファイルのパスを渡します。
this.textureAtlas: TextureAtlas = new TextureAtlas("/puzzle_textures.json");
- TextureAtlasを使用してテクスチャをロードします。非同期処理なのでawaitを使用します。(awaitを使用しているのでファンクション名にasyncをつけてください。)
await this.textureAtlas!.load();
- textureAtlasからテクスチャデータの配列を取得します。(後は、このデータで良い感じにmeshを作成します。)
const textures = this.textureAtlas!.textures;
main.ts
main.tsにおけるTextureAtlasクラスの使用箇所を抜粋したものを以下に示します。
import { TextureAtlas } from './textureAtlas';
export class Main {
	// 省略
	textureAtlas: TextureAtlas = new TextureAtlas("/puzzle_textures.json");

	async init(element: HTMLElement) {
		// 省略
		await this.load();
		// 省略
	}

	async load() {
		await this.textureAtlas!.load();
		const dataList = this.textureAtlas!.textureDataList;
	}

	// 省略
}
4.画像表示
textureAtlas.textureDataListのデータをもとに画像表示を行います。
今回は画像をいい感じに表示する自作クラスを使用しています。
Image.ts
import * as THREE from 'three';
import { TextureData } from './textureAtlas';

export class Image extends THREE.Object3D {
	mesh: THREE.Mesh;
	container: THREE.Object3D;
	texture?: THREE.Texture;
	width: number = 0;
	height: number = 0;
	anchor: THREE.Vector2 = new THREE.Vector2(0.5, 0.5);
	textureData?: TextureData;

	constructor(textureData: TextureData, anchor: THREE.Vector2 = new THREE.Vector2(0.5, 0.5)) {
		super();
		this.mesh = new THREE.Mesh();
		this.container = new THREE.Object3D();
		this.container.add(this.mesh);
		this.add(this.container);
		this.init(textureData, anchor);
	}

	protected init(textureData: TextureData, anchor: THREE.Vector2 = new THREE.Vector2(0.5, 0.5)) {
		this.createMesh(textureData.texture, textureData.textureWidth, textureData.textureHeight);
		this.textureData = textureData;
		this.anchor = anchor;
		this.width = textureData.width;
		this.height = textureData.height;
		// オフセットの反映
		this.mesh.position.x = -this.textureData.offset.x - (this.width * 0.5);
		this.mesh.position.y = -this.textureData.offset.y - (this.height * 0.5);
		// アートボードの中心が回転の基準になるようにしている
		this.container.position.x = this.width * (0.5 - this.anchor.x);
		this.container.position.y = -this.height * (0.5 - this.anchor.y);

	}

	protected createMesh(tex: THREE.Texture, width: number, height: number) {
		this.texture = tex;
		this.width = width;
		this.height = height;
		this.mesh.geometry = new THREE.PlaneGeometry(this.width, this.height);
		this.mesh.material = new THREE.MeshBasicMaterial({
			map: tex,
			transparent: true,
			side: THREE.FrontSide, // 裏面も表示したいときはTHREE.DoubleSideにしてください
			depthTest: false,
		});
	}
}
main.ts
main.tsにおけるImageクラスの使用箇所を抜粋したものを以下に示します。
import { Image } from './image';
export class Main {
	images: Array<Image> = [];

	// 省略

	async load() {
	await this.textureAtlas!.load();
		const dataList = this.textureAtlas!.textureDataList;
		for (const key in dataList) {
			const image = new Image(dataList[key]);
			this.images.push(image);
			this.scene!.add(image);
		}
	}
}
※Imageクラスでは、第一引数にTextureData、第二引数にanchorを渡します。
anchorは回転の基準点を指し、デフォルトは余白込みの画像の中心(Vector2(0.5, 0.5))に設定されています。
5.すべてを結合
main.ts
import * as THREE from 'three';
import Stats from 'stats.js';
import { OrbitControls } from 'three/examples/jsm/Addons.js';
import { TextureAtlas } from './textureAtlas';
import { Image } from './image';

export class Main {
	stats?: Stats;
	camera?: THREE.Camera;
	scene?: THREE.Scene;
	renderer?: THREE.Renderer;
	images: Array<Image> = [];
	textureAtlas: TextureAtlas = new TextureAtlas("/puzzle_textures.json");

	async init(element: HTMLElement) {
		const windowWidth = window.innerWidth;
		const windowHeight = window.innerHeight;

		// Scene
		this.scene = new THREE.Scene();
		this.scene.background = new THREE.Color(0x000000);

		// Camera
		this.camera = new THREE.PerspectiveCamera(45, windowWidth / windowHeight, 0.1, 5000);
		this.camera.position.set(0, 0, 1000);
		const rad = (45 / 2) * (Math.PI / 180);
		let distance = (windowHeight / 2) / Math.tan(rad);
		this.camera.position.set(0, 0, distance);
		(this.camera as THREE.PerspectiveCamera).aspect = windowWidth / windowHeight;
		(this.camera as THREE.PerspectiveCamera).updateProjectionMatrix();

		// Renderer
		this.renderer = new THREE.WebGLRenderer({
			alpha: true,
			antialias: true,
		});
		this.renderer.setSize(windowWidth, windowHeight);

		// Controller
		const controls = new OrbitControls(this.camera!, this.renderer.domElement);
		controls.enabled = true;
		controls.target.set(0, 0, 0);
		controls.update();

		// Stats
		this.stats = new Stats();
		this.stats.showPanel(0);
		document.body.appendChild(this.stats.dom);

		await this.load();
		element.appendChild(this.renderer.domElement);
		requestAnimationFrame(this.update);
	}

	/**
	 * load
	 */
	async load() {
		await this.textureAtlas!.load();
		const dataList = this.textureAtlas!.textureDataList;
		for (const key in dataList) {
			const image = new Image(dataList[key]);
			this.images.push(image);
			this.scene!.add(image);
		}
	}

	/**
	 * update
	 */
	update = () => {
		this.stats?.begin();
		this.renderer?.render(this.scene!, this.camera!);
		this.stats?.end();
		requestAnimationFrame(this.update);
	};
}
画面にパズルが表示されました。
おまけ: 遊んでみる。
y軸を基準に回転させてみます。
(Imageクラスの第二引数anchorを変更することで、基準点が変わることも確認してみてください。)

main.ts
	async load() {
		await this.textureAtlas!.load();
		const dataList = this.textureAtlas!.textureDataList;
		for (const key in dataList) {
			const image = new Image(dataList[key]);
			// --- 追加 ---
			(image.mesh.material as THREE.MeshBasicMaterial).side = THREE.DoubleSide;
			// --- 追加 ---
			this.images.push(image);
			this.scene!.add(image);
		}
	}

	update = () => {
		this.stats?.begin();
		this.renderer?.render(this.scene!, this.camera!);
		// --- 追加 ---
		this.images.forEach((image, index) => {
			image.rotation.y += (0.001 * index);
		});
		// --- 追加 ---
		this.stats?.end();
		requestAnimationFrame(this.update);
	};
最後に
手順さえ踏めば、three.jsでもいい感じにテクスチャパッキングが利用できて便利です。
よろしければ、試してみてください。
なにかあれば、コメントいただけますと幸いです。
Discussion