AWS サービスをざっくりキャッチアップ
AWS Amplify
サービス概要
- フルスタックの Web・Mobile アプリケーションを "簡単に" 構築するためのサービスである。
- Web・Mobile アプリケーションにはデザインパターンがある程度あって、特定の機能を実現するのに必要なアーキテクチャと AWS サービスは決まっており、それに沿ったアプリケーションをサクッと作れてしまう。
構成要素・コンポーネント
- Amplify CLI: バックエンドの設定を行うための CLI ツール
- 様々なバックエンドコンポーネント (API や Auth、Hosting など) が用意されている
- Amplify Libraries: 自分のフロントエンドアプリをバックエンドリソースに繋ぐためのクライアントライブラリ
- Amplify Studio: フルスタックのウェブアプリやモバイルアプリを構築できる視覚的な開発環境
- Amplify UI Components: フロントエンドアプリを構築するための UI ライブラリ
- Amplify Hosting: git ベースの CD とフルスタックウェブアプリのホストを実現するサービス
ざっくり言ってしまえば
- バックエンド => Amplify CLI で構築
- フロントエンド => Amplify Libraries を使って Web・Mobile アプリ開発
Hands-On
公式 Hnads-On をやってみる
AWS Hands-on for Beginners AWS Amplify を用いた Web サイトの構築方法を学ぼう | AWS Webinar
PDF はこちら
Cloud9 で環境構築
環境の作成
- "Create environment" をクリック
- "Name" を適当に埋める (Description は空白で OK)
- "Environment type" は "New EC2 instance" のまま
- "Instance type" は "t3.small" を選択
- "Platform" は "Amazon Linux 2" を選択
- "Timeout" は "30 minutes" のまま
- "Network settings" もデフォルトのまま
- "Create environment" をクリック
クリデンシャルの設定
1.. Cloud9 IDE を開く
2. Cloud9 のアイコンをクリック
3. "Preferences" => "AWS Settings" => "AWS managed temporary credentials" を無効にする
EBS ボリュームのサイズ拡張
- Cloud9 のアイコンをクリック
- "Go To Your Dashboard" をクリック
- 使っている Cloud9 環境を選択し、"View details" をクリック
- "Manage EC2 instance" をクリック
- 対象の EC2 インスタンスを選択し、EC2 インスタンスを停止
- EC2 インスタンスの詳細の "Storage" タブから対象の Volume ID をクリック
- 対象の EBS ボリュームを選択し、"Actions" => "Modify Volume" をクリックし、Size を 32 GiB に変更し "Modify" をクリック
- EC2 インスタンスのページに戻り、EC2 インスタンスを開始
- Cloud9 のページに戻ってリロード
- パーティションの拡張
$ lsblk
NAME          MAJ:MIN RM SIZE RO TYPE MOUNTPOINT
nvme0n1       259:0    0  32G  0 disk
├─nvme0n1p1   259:1    0  10G  0 part /
└─nvme0n1p128 259:2    0   1M  0 part

$ sudo growpart /dev/nvme0n1 1
CHANGED: partition=1 start=4096 old: size=20967391 end=20971487 new: size=67104735 end=67108831

$ lsblk
NAME          MAJ:MIN RM SIZE RO TYPE MOUNTPOINT
nvme0n1       259:0    0  32G  0 disk
├─nvme0n1p1   259:1    0  32G  0 part /
└─nvme0n1p128 259:2    0   1M  0 part
- ファイルシステムの拡張
$ df -hT
Filesystem     Type      Size  Used Avail Use% Mounted on
/dev/nvme0n1p1 xfs        10G  6.6G  3.5G  66% /

$ sudo xfs_growfs -d /

$ df -hT
Filesystem     Type      Size  Used Avail Use% Mounted on
/dev/nvme0n1p1 xfs        32G  6.6G   26G  21% /
CLI の環境構築
Set up Amplify CLI - React - AWS Amplify Documentation
FE/API/DB の設定
Connect API and database to the app - React - AWS Amplify Documentation
Auth の追加
Add authentication - React - AWS Amplify Documentation
アプリのデプロイ & ホスト
Deploy and host app - React - AWS Amplify Documentation
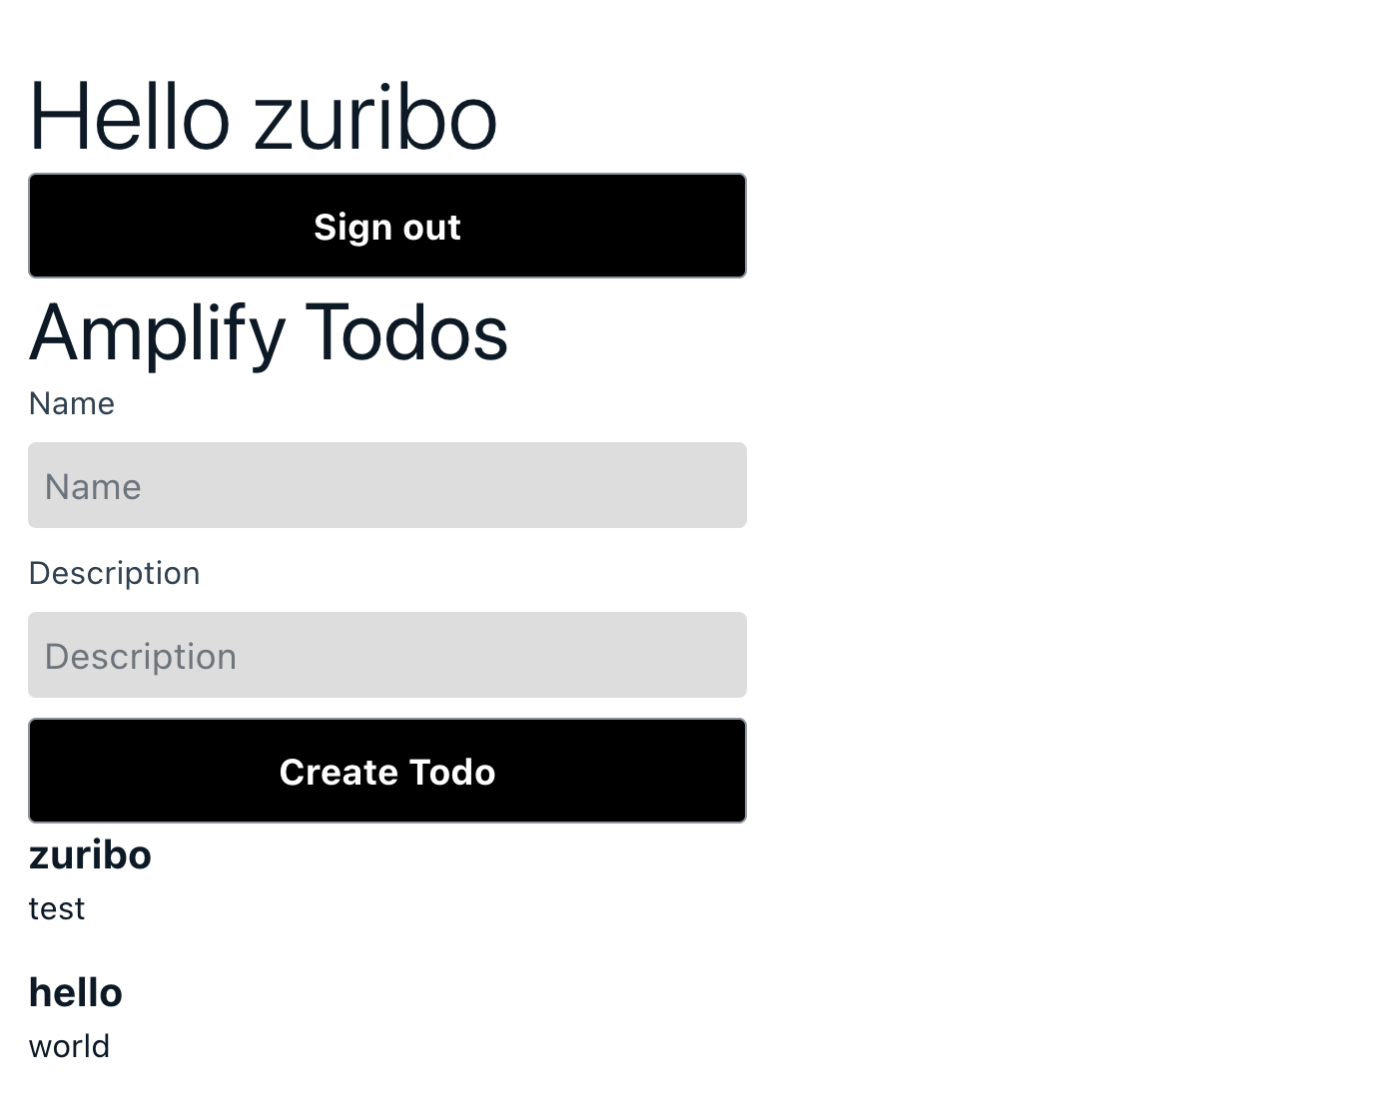
ちゃんと動いた
Amplify CLI
インストール方法
$ npm install -g @aws-amplify/cli
$ amplify configure
コマンドの種類
-
amplify configure: AWS クリデンシャルやリージョンの設定 -
amplify init: 新しいプロジェクトの初期化 -
amplify add <category>: アプリへの機能の追加 -
amplify update <category>: 追加済みの機能の更新 -
amplify push: ローカルの変更内容のプッシュ -
amplify pull: リモートのバックエンド環境設定の取得 -
amplify status: ローカルリソースのリモートへの反映状態を確認
どうやって動いてる?
- バックエンドの作成は、結局 CloudFormation を使っている。
リンク集
Amazon Elastic Container Service (Amazon ECS)
- コンテナオーケストレーションを行うサービスである。
- ECS のクラスター内の EC2 インスタンス上に、コンテナを必要に応じてデプロイしてくれる。
- コンテナオーケストレーションがないと、EC2 インスタンスに SSH ログインして、コンテナを実行しないといけない。
- AWS が管理する control plane が、EC2 インスタンス内で動作する Amazon ECS container agent と通信をして、コンテナのライフサイクルの管理を行ってくれる。
Hands-On
とりあえずサンプルコンテナをデプロイ
Docker コンテナの元になる Docker イメージの作成
Docker イメージを作成するためのレシピとなる Dockerfile を作成。
FROM ubuntu:18.04

# Install apache2
RUN apt-get update && \
    apt-get -y install apache2

# Create an index page showing "Hello World!"
RUN echo "Hello World!" > /var/www/html/index.html

# Configure apache2
RUN echo ". /etc/apache2/envvars" > /root/run_apache.sh && \
    echo "mkdir -p /var/run/apache2" >> /root/run_apache.sh && \
    echo "mkdir -p /var/lock/apach2" >> /root/run_apache.sh && \
    echo "/usr/sbin/apache2 -D FOREGROUND" >> /root/run_apache.sh &&  \
    chmod 755 /root/run_apache.sh

# This is required to avoid "Could not reliably determine the server's fully qualified domain name" error
RUN echo "ServerName localhost" >> /etc/apache2/apache2.conf

# Allow access to port 80
EXPOSE 80

# Launch a web server when a container launches
CMD /root/run_apache.sh
Docker イメージをビルド
$ docker build -t hello-world .
// snipped
Successfully tagged hello-world:latest
ちゃんとビルドされてることを確認
$ docker images
REPOSITORY                         TAG       IMAGE ID       CREATED          SIZE
hello-world                        latest    6f7c1b07971e   26 seconds ago   205MB
ローカルでテストするため、Docker コンテナを起動
$ docker run -t -i -p 80:80 hello-world
実際にアクセスしてみる
$ curl localhost
Hello World!
Docker イメージを Amazon ECR にプッシュ
まずはリポジトリを作成
$ aws ecr create-repository --repository-name hello-world --region us-east-1
{
    "repository": {
        "repositoryArn": "arn:aws:ecr:us-east-1:<account-id>:repository/hello-world",
        "registryId": "<account-id>",
        "repositoryName": "hello-world",
        "repositoryUri": "<account-id>.dkr.ecr.us-east-1.amazonaws.com/hello-world",
        "createdAt": "2024-01-02T21:39:49+00:00",
        "imageTagMutability": "MUTABLE",
        "imageScanningConfiguration": {
            "scanOnPush": false
        },
        "encryptionConfiguration": {
            "encryptionType": "AES256"
        }
    }
}
Docker イメージにタグ付け
$ docker tag hello-world <account-id>.dkr.ecr.us-east-1.amazonaws.com/hello-world
ログイン
$ aws ecr get-login-password --region us-east-1 | docker login --username AWS --password-stdin <account-id>.dkr.ecr.us-east-1.amazonaws.com
WARNING! Your password will be stored unencrypted in /home/ec2-user/.docker/config.json.
Configure a credential helper to remove this warning. See
https://docs.docker.com/engine/reference/commandline/login/#credentials-store

Login Succeeded
Docker イメージをプッシュ
$ docker push <account-id>.dkr.ecr.us-east-1.amazonaws.com/hello-world
Using default tag: latest
The push refers to repository [<account-id>.dkr.ecr.us-east-1.amazonaws.com/hello-world]
b13eaecb15be: Pushed
f9f8179e5a5f: Pushed
38f03f405f21: Pushed
4bfb734d1e1b: Pushed
548a79621a42: Pushed
latest: digest: sha256:<sha256> size: 1363
クラスターの作成
クラスター名だけを入れたら、あとはデフォルトで作成。
デフォルトは Fargate になっており、EC2 インスタンスの起動が必要ない。
タスク定義の作成
{
    "family": "hello-world",
    "containerDefinitions": [
        {
            "name": "hello-world",
            "image": "<account-id>.dkr.ecr.us-east-1.amazonaws.com/hello-world:latest",
            "portMappings": [
                {
                    "containerPort": 80,
                    "hostPort": 80,
                    "protocol": "tcp"
                }
            ],
            "essential": true,
        }
    ],
    "executionRoleArn": "arn:aws:iam::<account-id>:role/ecsTaskExecutionRole",
    "networkMode": "awsvpc",
    "requiresCompatibilities": [
        "FARGATE"
    ],
    "cpu": "256",
    "memory": "512"
}
サービスの作成
クラスターのページから "hello-world" を開いて、サービスを作成する。
デフォルトからは以下を変更。
- "Compute options": "Launch type"
- "Application type" : "Task"
- "Family": "hello-world"
アクセスしてみる
"Tasks" タブから作成された Task を選択して、"Configuration" タブの "Public IP" のところから "open address" をクリック。
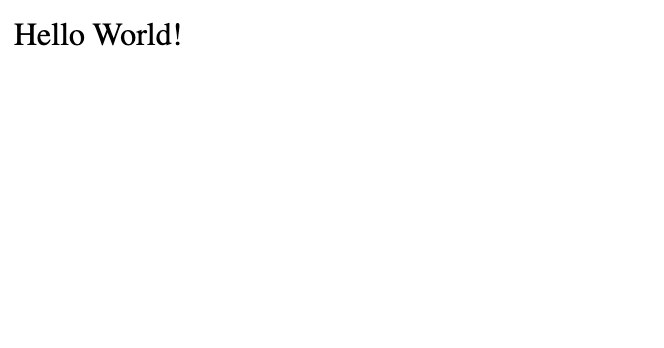
無事 "Hello World!" が表示された。
リンク集
Amazon OpenSearch Service
サービス概要
- Amazon OpenSearch Service とは、AWS 上で OpenSearch クラスターを容易に利用できるようにするマネージドサービスである。
- Amazon OpenSearch Service は、OpenSearch および従来の Elastisearch OSS (7.10 まで) をサポートしている。
- テキストの検索・分析・可視化機能を提供する簡単に実現することができる。
Lucene / OpenSearch / Elasticsearch とは
Apache Lucene
- OSS の検索エンジンライブラリである。
- ライセンスは Apache License 2.0 を使用している。
- 全文インデックスや検索機能を必要とするアプリケーション(インターネットの検索エンジンやサイト内検索機能)で利用される。
Elasticsearch
- Apache Lucene をベースに構築された検索エンジンであり、分散型の全文検索エンジンを提供する。
- Elasticsearch はドキュメントのデータを保持し、ドキュメントに検索可能なリファレンスを自動的に付与して、検索機能とドキュメント取得機能を Elasticsearch API を通して提供する。Kibana を使うことで、データを可視化し、インタラクティブなダッシュボードを構築することができる。
- 2010 年のリリースから、ログ分析や全文検索などのユースケースで利用されてきたが、2021 年 1 月 21 日に Elastic NV が Elasticsearch と Kibana を Apache License 2.0 (ALv2) で公開するのをやめることを発表し、代わりに以降のバージョン (7.11) はオープンソースライセンスとしては認められていない Elastic License と Server Side Public License (SSPL) のデュアルラインセンスで公開することになった。
OpenSearch
- Elasticsearch のラインセンスの変更に伴い、AWS が Apache License 2.0 を使って公開されていた頃の Elasticsearch と Kibana のバージョン (7.10.2) をフォークして作られたものであり、Apache License 2.0 で公開されている。
Hands-On
とりあえず Getting Started
ドメインを指定の設定で作成する。
1つのドキュメントを追加する。
$ curl -XPUT -u 'master-user:master-user-password' 'domain-endpoint/movies/_doc/1' -d '{"director": "Burton, Tim", "genre": ["Comedy","Sci-Fi"], "year": 1996, "actor": ["Jack Nicholson","Pierce Brosnan","Sarah Jessica Parker"], "title": "Mars Attacks!"}' -H 'Content-Type: application/json'
{"_index":"movies","_id":"1","_version":1,"result":"created","_shards":{"total":3,"successful":1,"failed":0},"_seq_no":0,"_primary_term":1}
複数のドキュメントを追加するために、以下の bulk_movies.json ファイルを作成する。
{ "index" : { "_index": "movies", "_id" : "2" } }
{"director": "Frankenheimer, John", "genre": ["Drama", "Mystery", "Thriller", "Crime"], "year": 1962, "actor": ["Lansbury, Angela", "Sinatra, Frank", "Leigh, Janet", "Harvey, Laurence", "Silva, Henry", "Frees, Paul", "Gregory, James", "Bissell, Whit", "McGiver, John", "Parrish, Leslie", "Edwards, James", "Flowers, Bess", "Dhiegh, Khigh", "Payne, Julie", "Kleeb, Helen", "Gray, Joe", "Nalder, Reggie", "Stevens, Bert", "Masters, Michael", "Lowell, Tom"], "title": "The Manchurian Candidate"}
{ "index" : { "_index": "movies", "_id" : "3" } }
{"director": "Baird, Stuart", "genre": ["Action", "Crime", "Thriller"], "year": 1998, "actor": ["Downey Jr., Robert", "Jones, Tommy Lee", "Snipes, Wesley", "Pantoliano, Joe", "Jacob, Ir\u00e8ne", "Nelligan, Kate", "Roebuck, Daniel", "Malahide, Patrick", "Richardson, LaTanya", "Wood, Tom", "Kosik, Thomas", "Stellate, Nick", "Minkoff, Robert", "Brown, Spitfire", "Foster, Reese", "Spielbauer, Bruce", "Mukherji, Kevin", "Cray, Ed", "Fordham, David", "Jett, Charlie"], "title": "U.S. Marshals"}
{ "index" : { "_index": "movies", "_id" : "4" } }
{"director": "Ray, Nicholas", "genre": ["Drama", "Romance"], "year": 1955, "actor": ["Hopper, Dennis", "Wood, Natalie", "Dean, James", "Mineo, Sal", "Backus, Jim", "Platt, Edward", "Ray, Nicholas", "Hopper, William", "Allen, Corey", "Birch, Paul", "Hudson, Rochelle", "Doran, Ann", "Hicks, Chuck", "Leigh, Nelson", "Williams, Robert", "Wessel, Dick", "Bryar, Paul", "Sessions, Almira", "McMahon, David", "Peters Jr., House"], "title": "Rebel Without a Cause"}
一気にドキュメントの追加をする。
$ curl -XPOST -u 'master-user:master-user-password' 'domain-endpoint/_bulk' --data-binary @bulk_movies.json -H 'Content-Type: application/json'
{"took":21,"errors":false,"items":[{"index":{"_index":"movies","_id":"2","_version":1,"result":"created","_shards":{"total":3,"successful":3,"failed":0},"_seq_no":0,"_primary_term":1,"status":201}},{"index":{"_index":"movies","_id":"3","_version":1,"result":"created","_shards":{"total":3,"successful":3,"failed":0},"_seq_no":0,"_primary_term":1,"status":201}},{"index":{"_index":"movies","_id":"4","_version":1,"result":"created","_shards":{"total":3,"successful":3,"failed":0},"_seq_no":0,"_primary_term":1,"status":201}}]}
コマンドラインからドキュメントを検索する。
$ curl -XGET -u 'master-user:master-user-password' 'domain-endpoint/movies/_search?q=mars&pretty=true'
{
  "took" : 1081,
  "timed_out" : false,
  "_shards" : {
    "total" : 5,
    "successful" : 5,
    "skipped" : 0,
    "failed" : 0
  },
  "hits" : {
    "total" : {
      "value" : 1,
      "relation" : "eq"
    },
    "max_score" : 0.2876821,
    "hits" : [
      {
        "_index" : "movies",
        "_id" : "1",
        "_score" : 0.2876821,
        "_source" : {
          "director" : "Burton, Tim",
          "genre" : [
            "Comedy",
            "Sci-Fi"
          ],
          "year" : 1996,
          "actor" : [
            "Jack Nicholson",
            "Pierce Brosnan",
            "Sarah Jessica Parker"
          ],
          "title" : "Mars Attacks!"
        }
      }
    ]
  }
}
最後にドメインを削除しておく。