GitHub で公開されている「Apple Silicon Mac Users」をお手本として、M1 MacBook Pro で Stable Diffusion の txt2img と img2img を試します。
ちなみに Windows PC であれば今や GUI 環境も揃っているので、そこそこ強い GPU を搭載しているなど最低限の環境が揃っているならあえて Mac で頑張る必要はないという認識です:p
前述の通り Apple Silicon (M1/M2) 向けの Core ML に最適化した Stable Diffusion がリリースされたため、Mac 側の環境が揃っているのであれば、必ずしもつよつよ Windows PC を用意する必要がなくなりました。
準備編
Stable Diffusion を動かす際に必要となるものをあらかじめ用意します。
- cmake と rust のインストール
- Anaconda のインストール
- モデルのダウンロード
モデルのダウンロード以外は既に済んでいる可能性もあります。
cmake と rust のインストール
cmake と rust が未インストールの場合は brew install します。
$ brew install cmake
$ brew install rust
Anaconda のインストール
conda コマンドを実行できるようにするため、未導入の場合は Anaconda をインストールします。
Homebrew との相性問題があるらしい (未検証) ので、今回は pyenv 経由で anaconda3-2022.05 をインストールしました。
$ pyenv install anaconda3-2022.05
$ pyenv global anaconda3-2022.05
モデルのダウンロード
必要となるモデルを Hugging Face からダウンロードします。
今回は stable-diffusion-v1-5 を選択しました。v1-5-pruned.ckpt をダウンロードして models/ldm/stable-diffusion-v1/model.ckpt に保存します。
- v1-5-pruned-emaonly.ckpt - 4.27GB, ema-only weight. uses less VRAM - suitable for inference
- v1-5-pruned.ckpt - 7.7GB, ema+non-ema weights. uses more VRAM - suitable for fine-tuning
ファイル容量が大きめなので要注意です。
導入編
準備編の仕込みが済んでいれば、手順通りに進めます。
git clone
まずは Apple Silicon に対応している branch apple-silicon-mps-support の Stable Diffusion をローカルに git clone します。
$ git clone -b apple-silicon-mps-support https://github.com/bfirsh/stable-diffusion.git
$ cd stable-diffusion
$ mkdir -p models/ldm/stable-diffusion-v1/
仮想環境の構築
事前に用意されている environment-mac.yaml から Anaconda で仮想環境を構築します。
$ conda env create -f environment-mac.yaml
$ conda activate ldm
これで txt2img.py と img2img.py が実行できるようになります。
実行編
テキストから画像を生成する txt2img と、画像から画像を生成する img2img を試します。
txt2img の実行
テキストから画像を生成する txt2img を実行します。
$ python scripts/txt2img.py
txt2img で出力された画像
正常に動作すると outputs/txt2img-samples に画像が保存されています。
prompt パラメーターを指定しない場合は、デフォルト値として設定されている『a painting of a virus monster playing guitar』として出力されます。
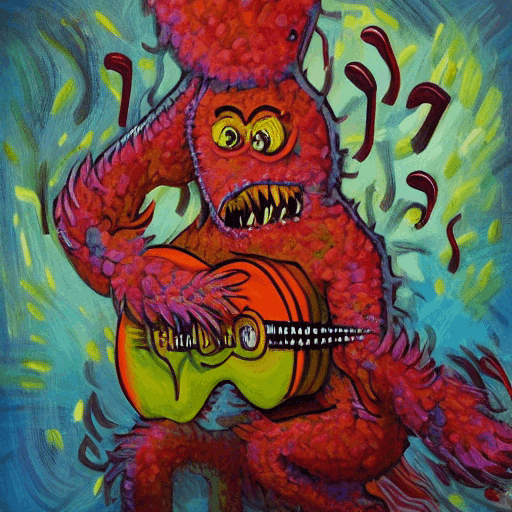
a painting of a virus monster playing guitar

a painting of a virus monster playing guitar
prompt パラメーターを指定する場合はダブルクオーテーションで囲みます。
$ python scripts/txt2img.py --prompt "japanese traditional fashion monster"
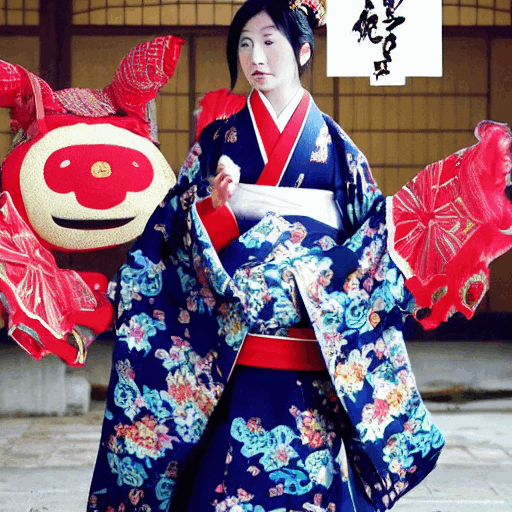
japanese traditional fashion monster
Stable Diffusion に限らず、美麗な画像を出力する場合はより細かいパラメーターの指定が必要です。
■ txt2img で指定できるパラメーター
おそらく環境依存により動作しないパラメーターも複数ありましたが txt2img で指定できるパラメーターとして次のサイトが参考になりました。
img2img の実行
画像から画像を生成する img2img を実行します。
$ python scripts/img2img.py --init-img input/input.png
txt2img と異なり、input 画像を指定するパラメーター --init-img が必須です。
img2img で出力された画像
txt2img と同様に、正常に動作すると outputs/txt2img-samples に画像が保存されています。
$ python scripts/img2img.py --init-img input/wani.png --prompt "
crocodile swimming in the amazon river"
input 画像に「ワニの手書きイラスト」を、prompt に「アマゾン川で泳いでいるワニ」を指定しました。
input 画像
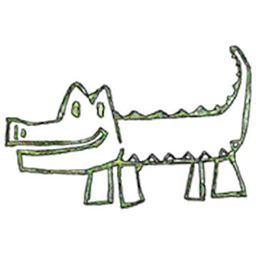
画像引用元: illustAC https://www.ac-illust.com/main/detail.php?id=1759612
output 画像
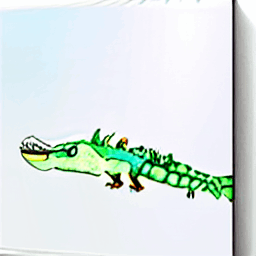
crocodile swimming in the amazon river
なんとも調整のしがいがある仕上がりですね:)
■ エラー対策
起こり得るエラーは GitHub に概ね記載されていそうなので、エラーでページ内検索すると見つかります。
txt2img で起きたエラー
例えば MPS に対応していないというエラーが出た場合、記載されている通り CPU を利用する Fallback 用の環境変数を追加します。
NotImplementedError: The operator 'aten::index.Tensor' is not current implemented for the MPS device. If you want this op to be added in priority during the prototype phase of this feature, please comment on https://github.com/pytorch/pytorch/issues/77764. As a temporary fix, you can set the environment variable
PYTORCH_ENABLE_MPS_FALLBACK=1to use the CPU as a fallback for this op. WARNING: this will be slower than running natively on MPS.
$ export PYTORCH_ENABLE_MPS_FALLBACK=1
img2img で起きたエラー
input 画像に txt2img で出力した 512*512 の画像を指定した際に「Error: product of dimension sizes > 2**31'」が発生しました。
However, if you're using that size and you get the above error, try 256 x 256 or 512 x 256 or something as the source image.
input 画像を 256*256 に縮小することでエラーを回避しました。
おわりに
タイトルの通り M1 MacBook Pro で Stable Diffusion を動かしました。今回はあえてローカルで動かしていますが、試すだけであれば Google Colab で動かす方が早くて楽かもしれません:p
Stable Diffusion web UI もおすすめです。
Midjourney から民主化が始まった画像生成 AI ムーブメントですが、直近の推しは有償の NovelAI です。課金しましょう。
現場からは以上です!

Discussion