Pterodactylを立ててみる(Panel&Wings)
非常に長いです。
Pterodactylとは
ゲームサーバーを管理するパネルです。
以上。これ以上何も言えないけどとても使いやすい。
今回の環境
今回はVirtualBox上のdebianにインストールしていきます。
6vCPU,RAM16GBの設定です。
ネットワークはブリッジにしています。
あとCloudflareTunnelを使います。
必要なもん
- 少しの知識
- Cloudflareで管理してるドメイン
- rootログインできる環境
Cloudflaredを入れておく
CloudflareTunnelを使用するためCloudflaredを入れておくこと。
Panel
依存関係を入れる
公式ドキュメントを参考にしつつ、やっていきます。debianの例です。
sudo su -
apt -y install software-properties-common curl apt-transport-https ca-certificates gnupg
wget -O /etc/apt/trusted.gpg.d/sury-php.gpg https://packages.sury.org/php/apt.gpg
echo "deb https://packages.sury.org/php $(lsb_release -sc) main" | tee /etc/apt/sources.list.d/sury-php.list
curl -fsSL https://packages.redis.io/gpg | sudo gpg --dearmor -o /usr/share/keyrings/redis-archive-keyring.gpg
echo "deb [signed-by=/usr/share/keyrings/redis-archive-keyring.gpg] https://packages.redis.io/deb $(lsb_release -cs) main" | sudo tee /etc/apt/sources.list.d/redis.list
apt update
apt -y install php8.3 php8.3-{common,cli,gd,mysql,mbstring,bcmath,xml,fpm,curl,zip} mariadb-server nginx tar unzip git redis-server
これで実行に必要なものが入ります。
Composerのインストール
phpの依存関係のインストーラーらしい。
curl -sS https://getcomposer.org/installer | sudo php -- --install-dir=/usr/local/bin --filename=composer
ファイルのダウンロード
panel用のファイルをダウンロードして展開します。
mkdir -p /var/www/pterodactyl
cd /var/www/pterodactyl
curl -Lo panel.tar.gz https://github.com/pterodactyl/panel/releases/latest/download/panel.tar.gz
tar -xzvf panel.tar.gz
chmod -R 755 storage/* bootstrap/cache/
これでpanel用のファイルが準備される。
データベースの用意
今回はmariadbを使う
mariadb -u root -p
CREATE USER 'pterodactyl'@'127.0.0.1' IDENTIFIED BY 'yourPassword';
CREATE DATABASE panel;
GRANT ALL PRIVILEGES ON panel.* TO 'pterodactyl'@'127.0.0.1' WITH GRANT OPTION;
exit
yourPasswordは適切に設定してください。
インストール
まずデフォルトの環境設定をコピーして、コアの依存関係をインストールします。
cp .env.example .env
COMPOSER_ALLOW_SUPERUSER=1 composer install --no-dev --optimize-autoloader
続いて、アプリケーション暗号化キーを生成。
php artisan key:generate --force
.envファイルは適切にバックアップを取っておくことをお勧めします。暗号化キーが入っているので。
環境設定
基本的な設定(URLやdb)はcliコマンドを使えます。]
まずメイン部分の設定を。
php artisan p:environment:setup
以下のように設定
- Egg Author Email → そのままEnter
- Application URL → https://panel.example.com (環境に合わせて)
- Application Timezone → Asia/Tokyo
- Cache Driver → redis
- Session Driver → redis
- Queue Driver → redis
- Enable UI based settings editor? → yes
- Enable sending anonymous telemetry data? → どっちでもいい
- Redis Host → そのままEnter
- Redis Password → そのままEnter
- Redis Port → そのままEnter
これが終わったらredis-serverを起動しておく。
systemctl enable --now redis-server.service
続いてデータベースの設定を。
php artisan p:environment:database
以下のように設定
- Database Host → そのままEnter
- Database Port → そのままEnter
- Database Name → そのままEnter
- Database Username → そのままEnter
- Database Password → データベース作った時のパスワード
これでおk。
データベースのセットアップ
見ていて楽しい時間です。これを実行。
php artisan migrate --seed --force
文字がいっぱい出てきて楽しいよ。
ユーザーを追加
最初のユーザーを追加しましょう。
php artisan p:user:make
以下のように設定
- Is this user an administrator? → 管理者になりたいならyes
- Email Address → 自分のやつ
- それ以降はお好きなように

これが出たらOK。
権限を設定
panel用のディレクトリやファイルに適切な権限を設定します。
chown -R www-data:www-data /var/www/pterodactyl/*
キューリスナー
バックグラウンド処理用のキューワーカーだそうです。
まずcrontabを設定します。
crontab -e
でcrontabを開き、以下を追記。
* * * * * php /var/www/pterodactyl/artisan schedule:run >> /dev/null 2>&1
続いてキューワーカーを作成します。
nano /etc/systemd/system/pteroq.service
でサービスファイルを作成し以下を追記し保存してください。
# Pterodactyl Queue Worker File
# ----------------------------------

[Unit]
Description=Pterodactyl Queue Worker
After=redis-server.service

[Service]
# On some systems the user and group might be different.
# Some systems use `apache` or `nginx` as the user and group.
User=www-data
Group=www-data
Restart=always
ExecStart=/usr/bin/php /var/www/pterodactyl/artisan queue:work --queue=high,standard,low --sleep=3 --tries=3
StartLimitInterval=180
StartLimitBurst=30
RestartSec=5s

[Install]
WantedBy=multi-user.target
最後にこのサービスを有効にしましょう。
systemctl enable --now pteroq.service
自己TLS証明書の発行
SSL用に自己TLS証明書を発行します。
mkdir -p /etc/certs/
cd /etc/certs/
openssl req -new -newkey rsa:4096 -days 3650 -nodes -x509 -subj "/C=NA/ST=NA/L=NA/O=NA/CN=Generic SSL Certificate" -keyout privkey.pem -out fullchain.pem
nginxの設定
まずデフォルトの設定を消す。
rm /etc/nginx/sites-enabled/default
そしてpterodactyl用のファイルを作成し記載していきます。
nano /etc/nginx/sites-available/pterodactyl
以下を記載する。
server {
    # Replace the example 192.168.0.x with your domain name or IP address
    listen 80;
    server_name 192.168.0.x;
    return 301 https://$server_name$request_uri;
}

server {
    # Replace the example 192.168.0.x with your domain name or IP address
    listen 8443 ssl http2;
    server_name 192.168.0.x;

    root /var/www/pterodactyl/public;
    index index.php;

    access_log /var/log/nginx/pterodactyl.app-access.log;
    error_log  /var/log/nginx/pterodactyl.app-error.log error;

    # allow larger file uploads and longer script runtimes
    client_max_body_size 100m;
    client_body_timeout 120s;

    sendfile off;

    # SSL Configuration
    ssl_certificate /etc/certs/fullchain.pem;
    ssl_certificate_key /etc/certs/privkey.pem;
    ssl_session_cache shared:SSL:10m;
    ssl_protocols TLSv1.2 TLSv1.3;
    ssl_ciphers "ECDHE-ECDSA-AES128-GCM-SHA256:ECDHE-RSA-AES128-GCM-SHA256:ECDHE-ECDSA-AES256-GCM-SHA384:ECDHE-RSA-AES256-GCM-SHA384:ECDHE-ECDSA-CHACHA20-POLY1305:ECDHE-RSA-CHACHA20-POLY1305:DHE-RSA-AES128-GCM-SHA256:DHE-RSA-AES256-GCM-SHA384";
    ssl_prefer_server_ciphers on;

    # See https://hstspreload.org/ before uncommenting the line below.
    # add_header Strict-Transport-Security "max-age=15768000; preload;";
    add_header X-Content-Type-Options nosniff;
    add_header X-XSS-Protection "1; mode=block";
    add_header X-Robots-Tag none;
    add_header Content-Security-Policy "frame-ancestors 'self'";
    add_header X-Frame-Options DENY;
    add_header Referrer-Policy same-origin;

    location / {
        try_files $uri $uri/ /index.php?$query_string;
    }

    location ~ \.php$ {
        fastcgi_split_path_info ^(.+\.php)(/.+)$;
        fastcgi_pass unix:/run/php/php8.3-fpm.sock;
        fastcgi_index index.php;
        include fastcgi_params;
        fastcgi_param PHP_VALUE "upload_max_filesize = 100M \n post_max_size=100M";
        fastcgi_param SCRIPT_FILENAME $document_root$fastcgi_script_name;
        fastcgi_param HTTP_PROXY "";
        fastcgi_intercept_errors off;
        fastcgi_buffer_size 16k;
        fastcgi_buffers 4 16k;
        fastcgi_connect_timeout 300;
        fastcgi_send_timeout 300;
        fastcgi_read_timeout 300;
        include /etc/nginx/fastcgi_params;
    }

    location ~ /\.ht {
        deny all;
    }
}
上の内容のうち、192.168.0.xは自身の環境に合わせて設定してください。
保存したらサイトを有効化します。以下のコマンドを実行しシンボリックリンクを作成します。
ln -s /etc/nginx/sites-available/pterodactyl /etc/nginx/sites-enabled/
あとはnginx -tでエラーが起きなかったら大丈夫でしょう。
ここまでやったらnginxを再起動/起動しましょう。
systemctl restart nginx
systemctl enable --now nginx
パブリックホスト名の設定
CloudflareTunnelのパブリックホスト名を追加しましょう。

だーいぶ前に設定したApplication URLに合うように、
タイプはHTTPS,URLは<IPアドレス>:8443って感じにして、その他のアプリケーション設定→TLS 検証なしを有効にしてね。
アクセスすると以下のような画面が出るはずです!!
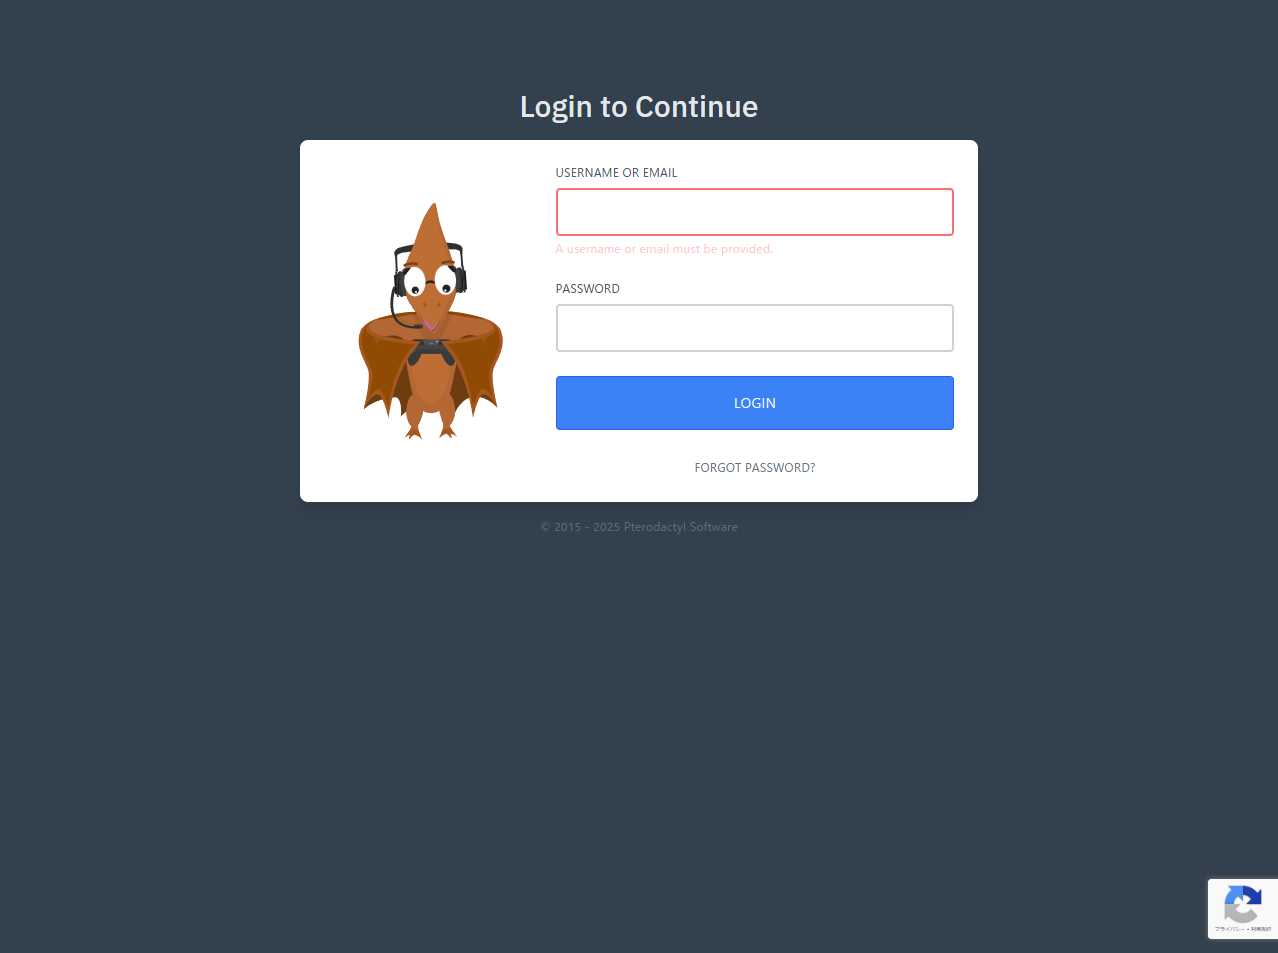
ログインもできる!!

wingsのインストール
Dockerを入れる
curl -sSL https://get.docker.com/ | CHANNEL=stable bash
あとは起動時に立ち上がるように
systemctl enable --now docker
スワップを有効にする
grubの設定を変更してDockerがスワップ領域を設定できるようにするらしい。
nano /etc/default/grub
でgrubの設定を開いてGRUB_CMDLINE_LINUX_DEFAULTにswapaccount=1を追加する。

なお既存のものは変更しないように。あくまで追記のみ。
保存したら
update-grub
reboot
Wingsのインストール
以下のコマンドを実行
sudo mkdir -p /etc/pterodactyl
curl -L -o /usr/local/bin/wings "https://github.com/pterodactyl/wings/releases/latest/download/wings_linux_$([[ "$(uname -m)" == "x86_64" ]] && echo "amd64" || echo "arm64")"
sudo chmod u+x /usr/local/bin/wings
ノード用パブリックホストの設定
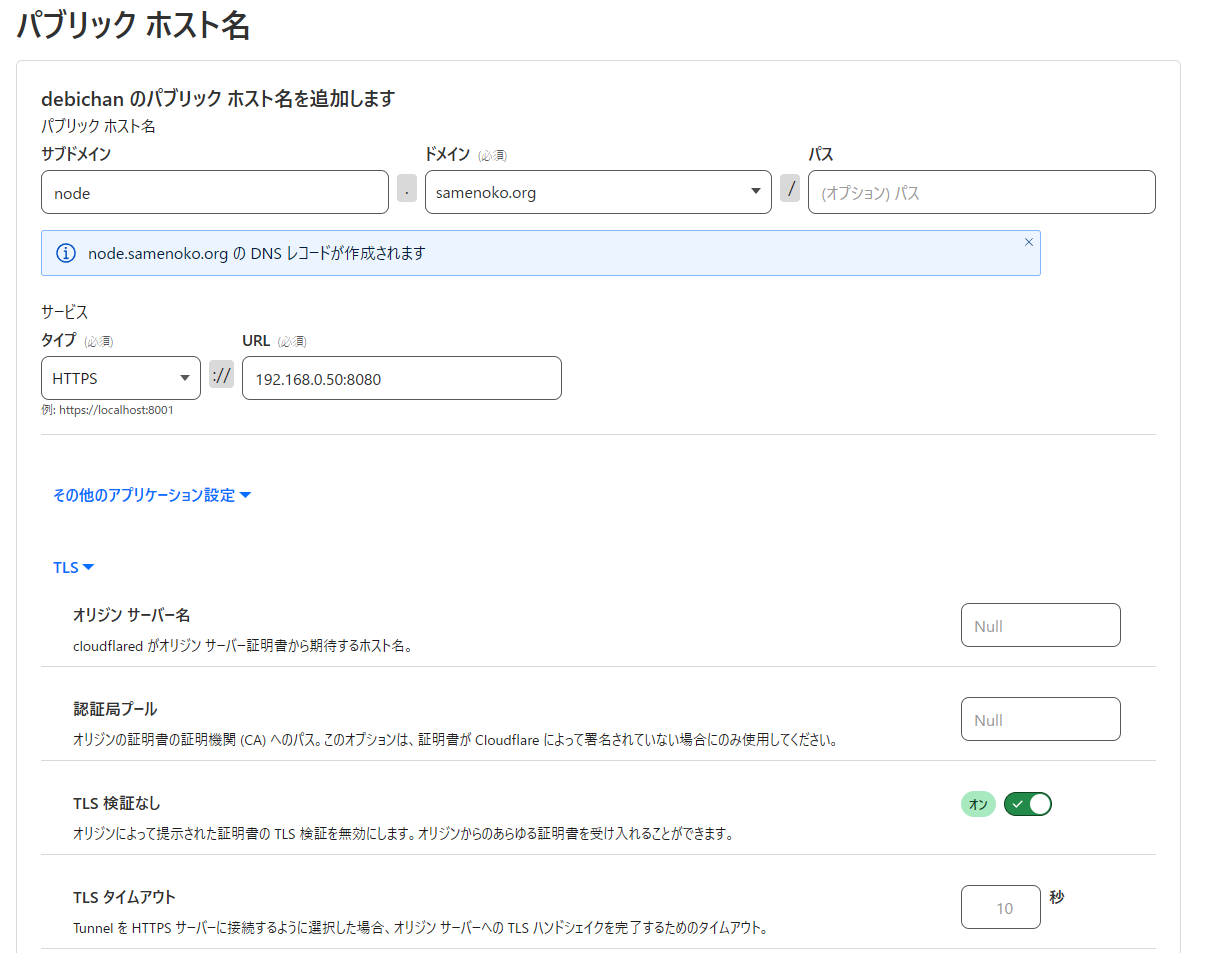
画像のように設定。基本的にはパネルと同様。:8080が変わってるくらい?
ノードの設定
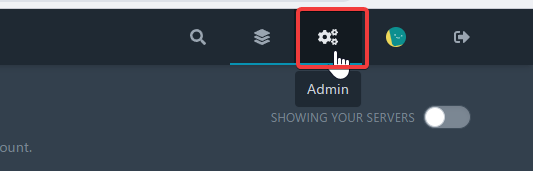
ダッシュボードの右上にある歯車アイコンをクリックして管理画面へ。
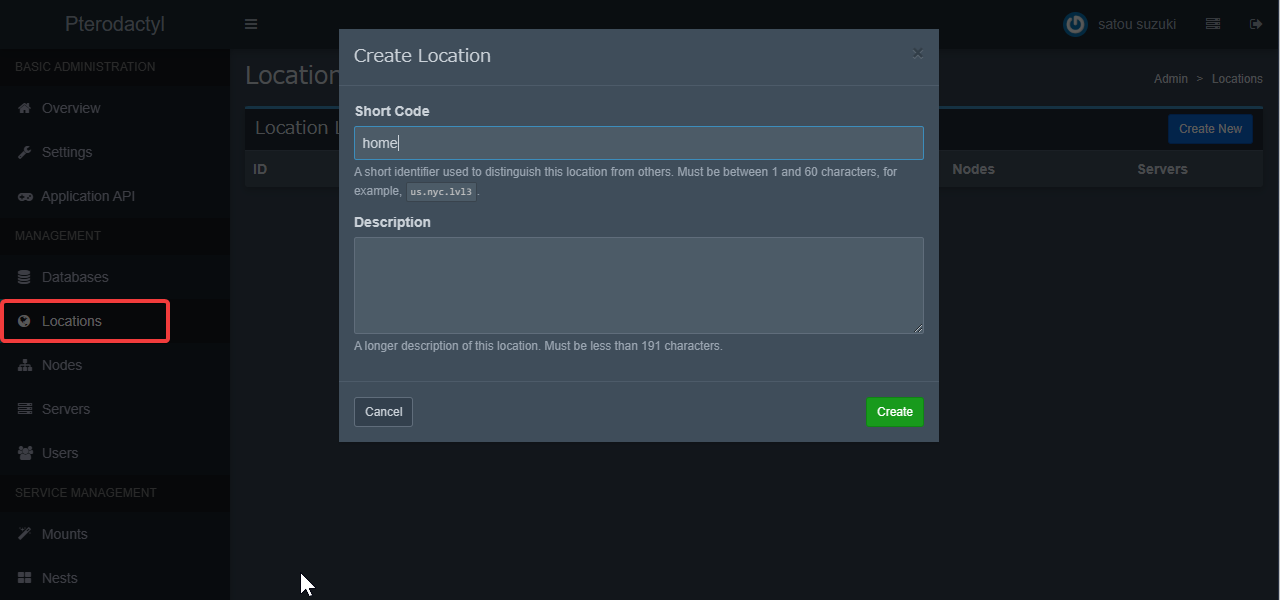
サイドバーにあるLocationを開きCreateNew、適当な設定をして作成しましょう。

続いてNodesを開き、Create New

画像のように設定します。

詳細
- Name: ノードの名前
- FQDN: ノードのパブリックホスト名
- Total Memory: ノード全体の割り当てメモリ
- Memory Over-Allocation: メモリオーバーの許容量
- Total Disk Space: ノード全体の割り当てストレージ
- Disk Over-Allocation: 容量オーバーの許容量
- Daemon Port: 8080じゃなくて443にする
設定したらCreate Node
あとはアロケーションの設定


これが終わったらConfigurationタブに移動
赤枠のConfiguration Fileをコピーします。

nano /etc/pterodactyl/config.yml
で設定ファイルを開き、さっきの赤枠のものをペースト、sslセクションを以下のように変更。
ssl:
    enabled: true
    cert: /etc/certs/fullchain.pem
    key: /etc/certs/privkey.pem
Wingsを起動
wings --debug
で仮起動してみましょう。エラーが出なければOK。
Ctrl+Cで停止
config.ymlを編集
さっきPortを443にしましたがconfig.yml側は8080にします。
じゃないと動かないので。
もう一度wingsを立ち上げるとノード一覧のハートマークが緑色になっているかと思います。

Wingsのデーモン化
nano /etc/systemd/system/wings.service
でサービスファイルを作成し以下を記述。
[Unit]
Description=Pterodactyl Wings Daemon
After=docker.service
Requires=docker.service
PartOf=docker.service

[Service]
User=root
WorkingDirectory=/etc/pterodactyl
LimitNOFILE=4096
PIDFile=/var/run/wings/daemon.pid
ExecStart=/usr/local/bin/wings
Restart=on-failure
StartLimitInterval=180
StartLimitBurst=30
RestartSec=5s

[Install]
WantedBy=multi-user.target
Wingsの起動!!(デーモン)
いよいよwingsを起動です。
systemctl enable --now wings
終わり

サーバー作成してみたの図
以上です。パネル自体の使い方はググってください!!終わりで~す。
Discussion