Flutter M1 Mac环境配置
はじめに
- Flutter 公式からも環境設定の説明を用意していますが、実際に着手してみると、初めてなので色々トラブルが発生しました。
- 本記事では 、私が踏んだ落穴を経験として、M1 Macbook をターゲットに導入中の注意点と導入順番を改善しました。
- M1 Macbook であれば、公式より本記事の方が詳しくてわかりやすいと思っています。
Rosetta 2(SUDO命令)
- Apple Silicon Mac に Flutter を 導入する場合 Rosetta(ロゼッタ)が必要です。
ターミナルを開き、下記のコマンドで Rosetta 2 を導入します。
Rosetta(ロゼッタ)とは ?
Rosetta(ロゼッタ)は、特定のアーキテクチャのプログラムコードを持つバイナリを、別のアーキテクチャに適宜変換 (en:Dynamic recompilation) することでバイナリの互換性を維持する Apple の技術。
sudo softwareupdate --install-rosetta --agree-to-licensea
sudo 命令を実行するには Mac のパスワードが要求されますが、入力して実行を続きます。
~ % sudo softwareupdate --install-rosetta --agree-to-licensea
Password:
softwareupdate: unrecognized option `--agree-to-licensea'
usage: softwareupdate <cmd> [<args> ...]

** Manage Updates:
	-l | --list		List all appropriate update labels (options:  --no-scan, --product-types)
	-d | --download		Download Onlyƒ
	-i | --install		Instal
		<label> ...	specific updates
		-a | --all		All appropriate updates
		-R | --restart		Automatically restart (or shut down) if required to complete installation.
		-r | --recommended	Only recommended updates
		     --os-only	Only OS updates
		     --safari-only	Only Safari updates
		     --stdinpass	Password to authenticate as an owner. Apple Silicon only.
		     --user	Local username to authenticate as an owner. Apple Silicon only.
	--list-full-installers		List the available macOS Installers
	--fetch-full-installer		Install the latest recommended macOS Installer
		--full-installer-version	The version of macOS to install. Ex: --full-installer-version 10.15
	--install-rosetta	Install Rosetta 2
	--background		Trigger a background scan and update operation

** Other Tools:
	--dump-state		Log the internal state of the SU daemon to /var/log/install.log
	--evaluate-products	Evaluate a list of product keys specified by the --products option
	--history		Show the install history.  By default, only displays updates installed by softwareupdate.

** Options:
	--no-scan		Do not scan when listing or installing updates (use available updates previously scanned)
	--product-types <type>		Limit a scan to a particular product type only - ignoring all others
		Ex:  --product-types macOS  || --product-types macOS,Safari
	--products		A comma-separated (no spaces) list of product keys to operate on.
	--force			Force an operation to complete.  Use with --background to trigger a background scan regardless of "Automatically check" pref
	--agree-to-license		Agree to the software license agreement without user interaction.

	--verbose		Enable verbose output
	--help			Print this help

~ %
Xcode(App Store)
- Apple Store を開き、
Xcodeと言うソフトウエアをインストールします。
なぜ
Xcodeを導入しますか?主に iOS シミュレーターを使用するため、いわば iOS 用の Flutter アプリを開発するためです。
後は Xcode コマンド ライン ツール を使用するためです。
Xcode と Xcode コマンド ライン ツールの関係や利用方法についてはここで展開しません。

- ターミナルを開き、下記コマンドで Xcode コマンド ライン ツールを最新にします。
sudo 命令はパスワードが要求されるので、入力してください。
この設定が実行されたら、何も出ませんのが正常です。心配しないでください。
sudo xcode-select --switch /Applications/Xcode.app/Contents/Developer
- 最新バージュンへの自動化設定を下記コマンドで設定します。
sudo xcodebuild -runFirstLaunch
Cocoapods(brew)
ちょっと大事なことをここで:
Uinx like(macOS) で開発環境の設定やソフトウエアの管理を便利にできるのが
Homebrewを使用するのが定番です。
本記事の環境設定も、面倒なパス設定をスッキプするために
Homebrewを利用しています。
簡単な利用方法は10分ですぐ出来ますので、
Homebrewの使用解説はこちらまたはネット上の記事を参照してください。
- macOS デスクトップ開発とプラグインの使用は Cocoapods が必要となります。
Cocoapodsとは
CocoaPods は、Swift および Objective-C プロジェクトの依存関係マネージャーです。93,000 以上のライブラリがあり、300 万以上のアプリで使用されています。CocoaPods は、プロジェクトをエレガントにスケーリングするのに役立ちます。
- ターミナルを開き、下記のコマンドで Cocoapods を導入します。
brew install cocoapods
~ % brew install cocoapods
Warning: Treating cocoapods as a formula. For the cask, use homebrew/cask/cocoapods
==> Fetching dependencies for cocoapods: libyaml, ca-certificates, openssl@1.1, readline and ruby
==> Fetching libyaml
================長い一部を省略します=================
==> Installing cocoapods
==> Pouring cocoapods--1.11.3_1.arm64_ventura.bottle.1.tar.gz
🍺  /opt/homebrew/Cellar/cocoapods/1.11.3_1: 13,476 files, 27.9MB
==> Running `brew cleanup cocoapods`...
Disable this behaviour by setting HOMEBREW_NO_INSTALL_CLEANUP.
Hide these hints with HOMEBREW_NO_ENV_HINTS (see `man brew`).
~ %
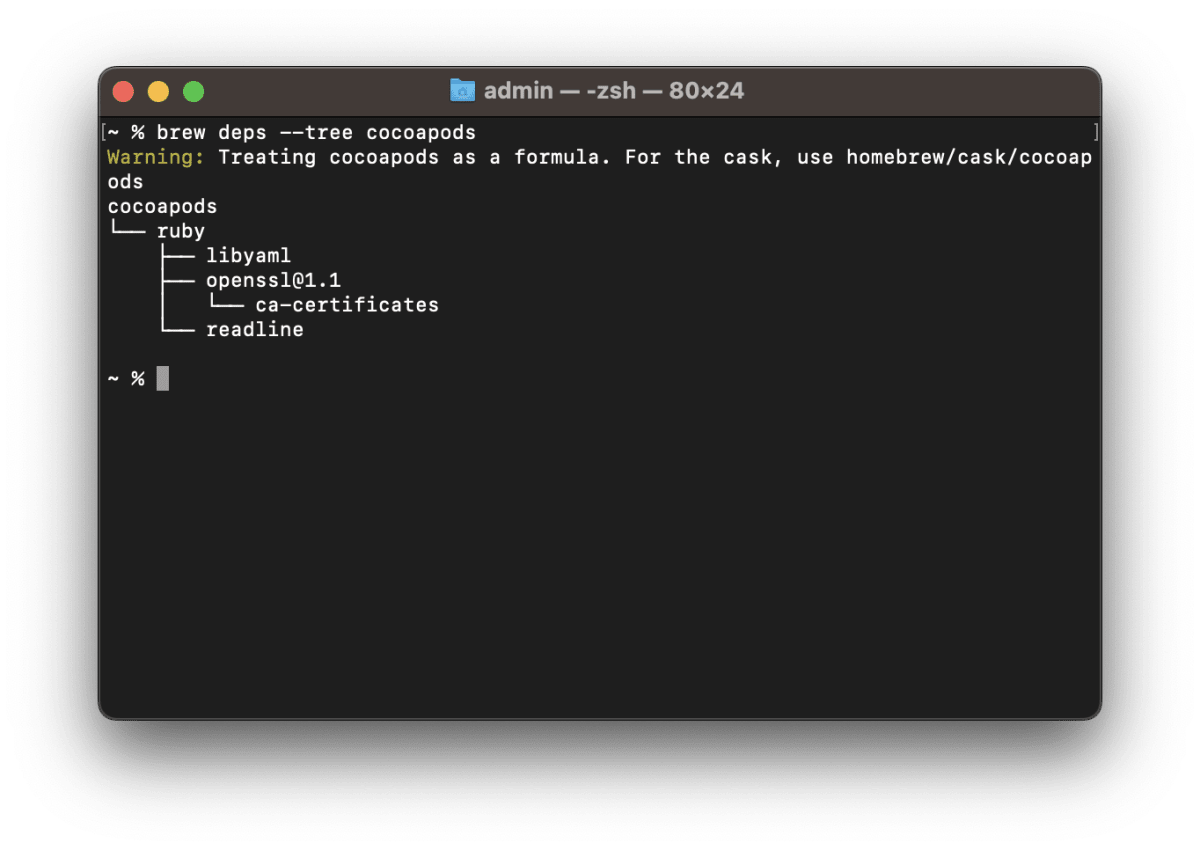
気づいたかもしれない、Cocoapods 以外のソフトウエアもいくつ導入されています。
それは Cocoapods を利用できるための依存ソフトウエアです、
Homebrewを使っているので、Cocoapods とその依存ソフトウエアを容易に管理できます。
Flutter SDK(brew)
- ターミナルを開き、下記のコマンドで Flutter SDK を導入します。
brew install flutter
- 🍺 flutter was successfully installed!
~ % brew install flutter
Running `brew update --auto-update`...
==> Auto-updated Homebrew!
Updated 2 taps (homebrew/core and homebrew/cask).

==> Downloading https://storage.googleapis.com/flutter_infra_release/releases/st
Already downloaded: /Users/admin/Library/Caches/Homebrew/downloads/18fd0ad2115d4c8b910546eee9d8df2c41d37b327355bd47dca81bbf52227d37--flutter_macos_arm64_3.3.10-stable.zip
==> Installing Cask flutter
==> Linking Binary 'dart' to '/opt/homebrew/bin/dart'
==> Linking Binary 'flutter' to '/opt/homebrew/bin/flutter'
🍺  flutter was successfully installed!
一行のコマンドで導入完了!
Java(brew)
- Android 用の Flutter アプリを開発するため Java が必要です。
ターミナルを開き、下記のコマンドで Open JDK、いわゆる Java を導入します。
brew install openjdk
~ % brew install openjdk
==> Fetching dependencies for openjdk: giflib, libpng, freetype, fontconfig, pcre2, gettext, glib, xorgproto, libxau, libxdmcp, libxcb, libx11, libxext, libxrender, lzo, pixman, cairo, graphite2, icu4c, harfbuzz, jpeg-turbo, lz4, xz, zstd, libtiff and little-cms2
==> Fetching giflib
================長い一部を省略します=================

If you need to have openjdk first in your PATH, run:
  echo 'export PATH="/opt/homebrew/opt/openjdk/bin:$PATH"' >> ~/.zshrc

For compilers to find openjdk you may need to set:
  export CPPFLAGS="-I/opt/homebrew/opt/openjdk/include"

~ % sudo ln -sfn /opt/homebrew/opt/openjdk/libexec/openjdk.jdk /Library/Java/JavaVirtualMachines/openjdk.jdk
Password:
~ % echo 'export PATH="/opt/homebrew/opt/openjdk/bin:$PATH"' >> ~/.zshrc
~ % export CPPFLAGS="-I/opt/homebrew/opt/openjdk/include"
~ %
- Homebrew はいつも最新なバージョンをインストールします。
何も出来ませんが、一度java -versionでバージュンを確認して安心します。
~ % java -version
openjdk version "19.0.1" 2022-10-18
OpenJDK Runtime Environment Homebrew (build 19.0.1)
OpenJDK 64-Bit Server VM Homebrew (build 19.0.1, mixed mode, sharing)
~ %
Android Studio(brew)
- ターミナルを開き、下記のコマンドで Android Studio 導入します。
brew install android-studio
- インストール完了したら、
Android Studioを開きます。
==> Installing Cask android-studio
==> Moving App 'Android Studio.app' to '/Applications/Android Studio.app'
🍺  android-studio was successfully installed!

- Plugin で Flutter( Dart) をダウンロードします。
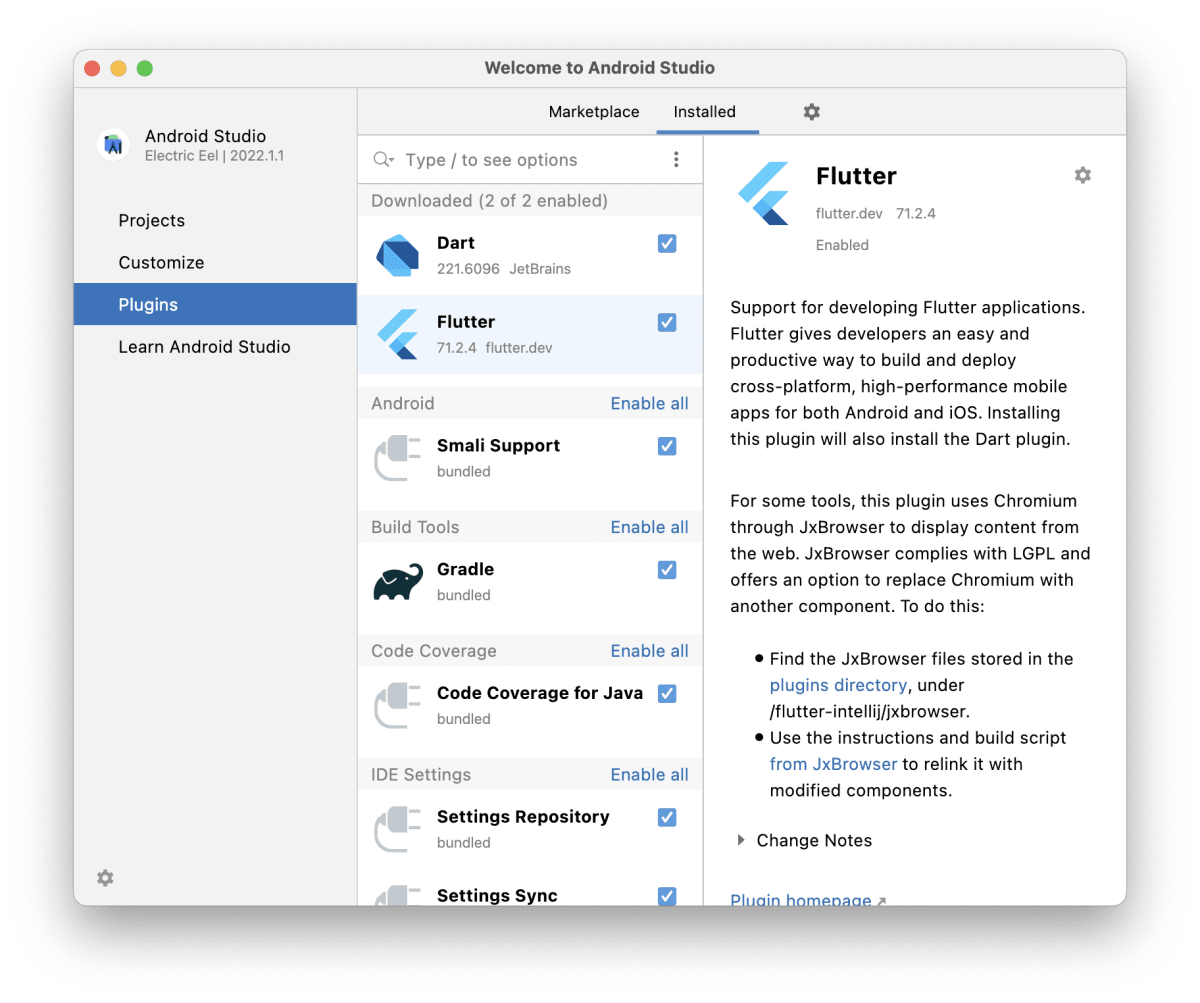
-
All settingsを開き、下記場所でAndroid-SDK command line tools(latest)をダウンロードします。


- 次は謎のエラー
✗ Unable to find bundled Java version.を解決するてため、下記の手順を行います。
原因不明で
Android studioの名前がjreのフォルダがjbrになっています。これを修正します。
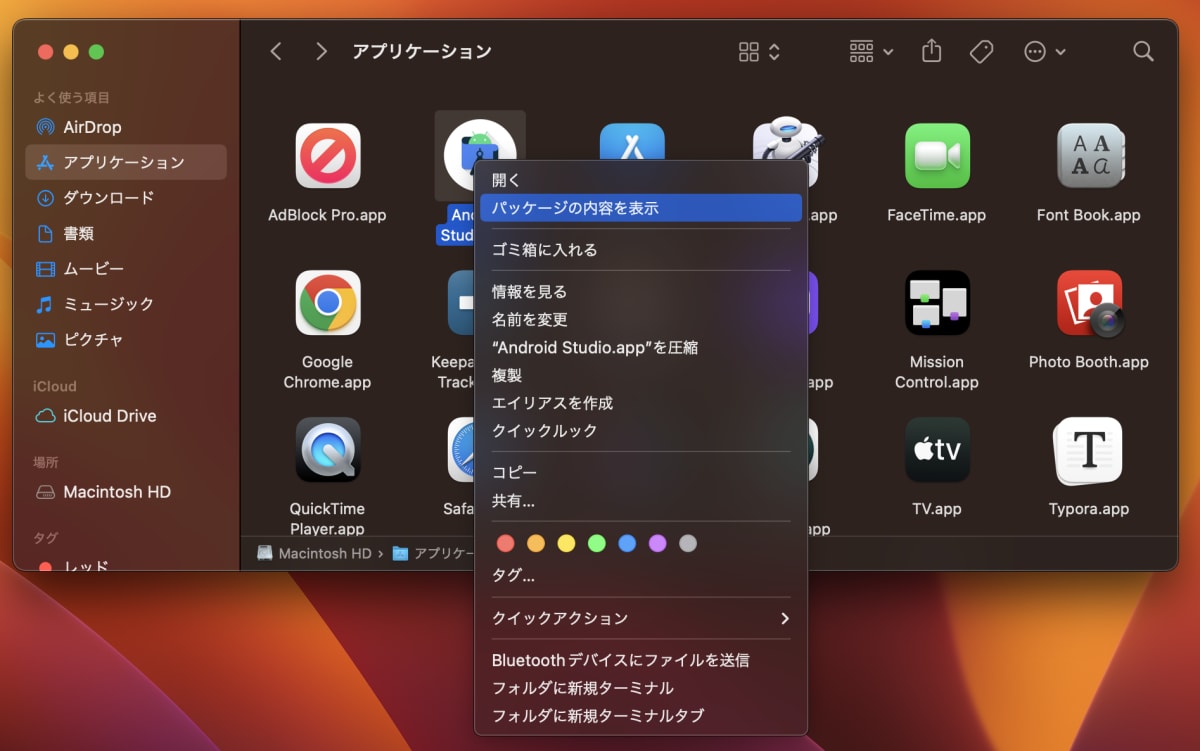
- アイコンを右クリックして、
パッケージの内容を表示を選択します。
- 新規フォルダで名前を
jreにします。

-
jbrの中身をjreフォルダの中にコピペします。

- ターミナルを開き、下記のコマンドで Android ライセンス規約をYes(同意)しながら導入します。
$ flutter doctor --android-licenses
写真を撮り忘れました。。。
Hello World ! (Flutter)
早速Flutter DEMOを一つ立ち上げましょう。
-
New Flutter Projectを選択します。

- 下記のパスに Homebrew でダウンロードした Flutter を見つけて選択します。
/opt/homebrew/Caskroom/flutter/3.3.10/flutter

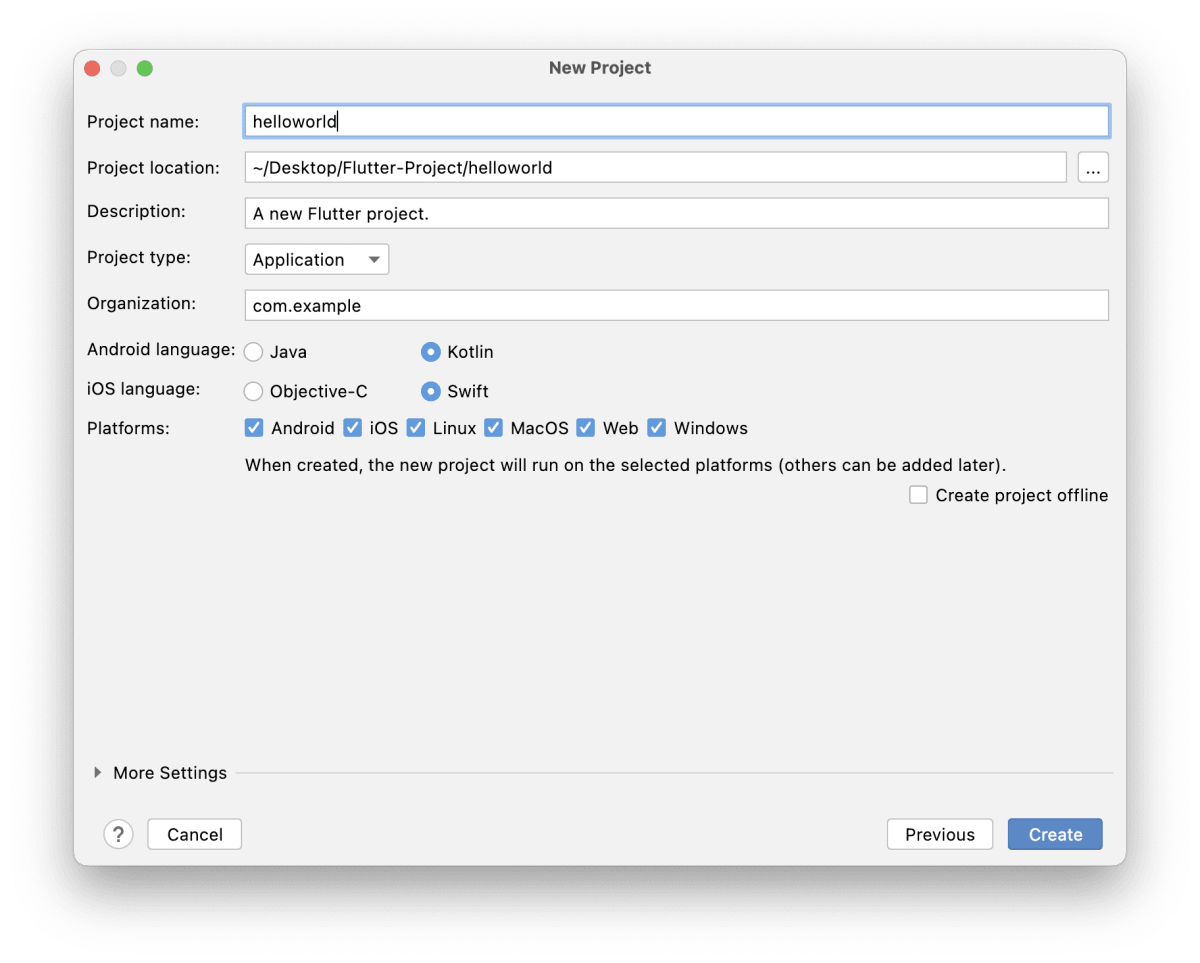
- プロジェクトの名前を入力して、
Createを選択します。
- これで Flutter のプロジェクトが作成できました。

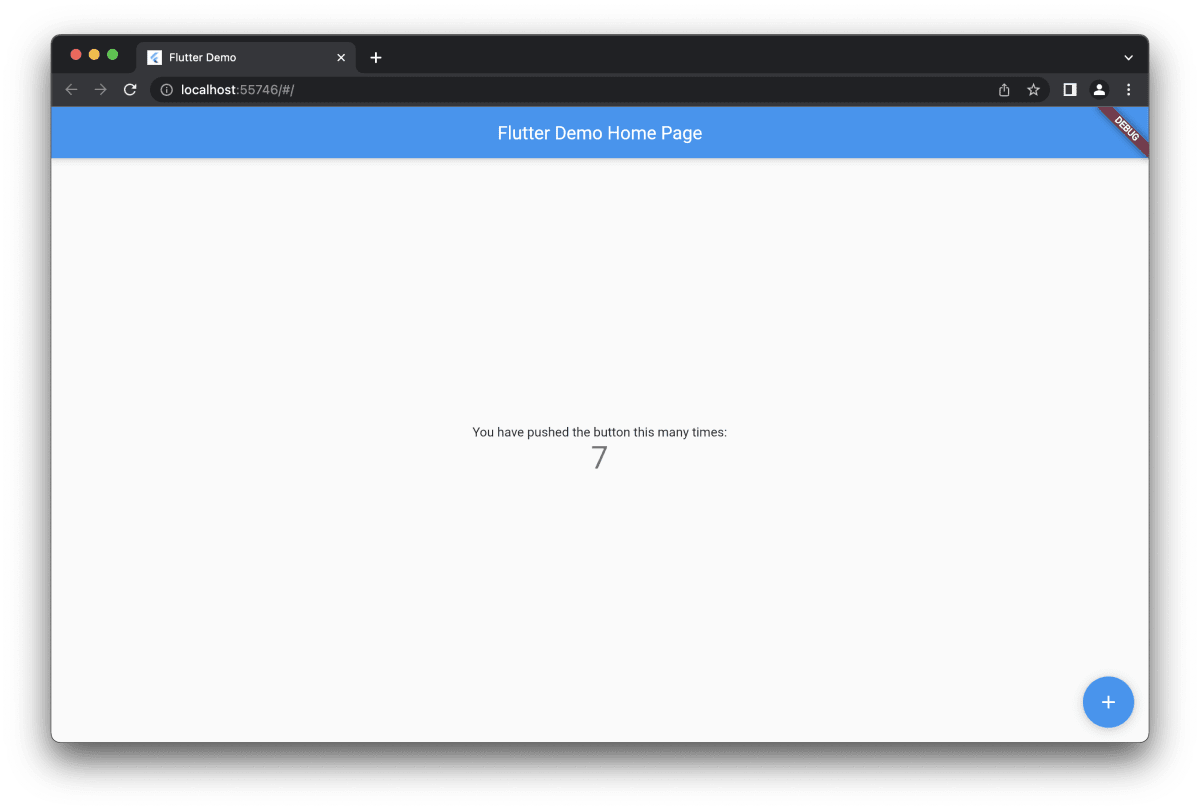
- Chrome でプロジェクトを実行します。
終わりに
ほぼゼロから M1 Macbook の Flutter 導入方法を説明しました。ご参考になればうれしいと思います。
わからない事や補充のところがあれば、コメントで遠慮なくお願いします。
Discussion