[Blender]複数のくり抜き(ブーリアン)を簡単に実施するPythonスクリプト
たくさん穴が開いたオブジェクトを簡単に作りたい
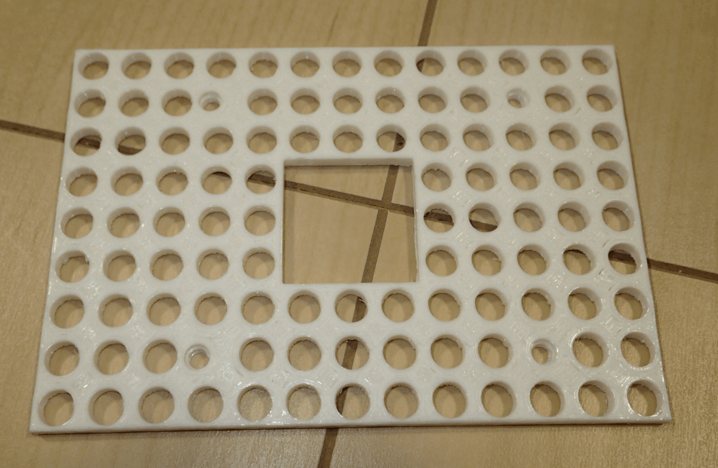
3Dプリンターでレゴ互換パーツを作っています。レゴ互換パーツの3Dモデルの作成は Blender を使っています。例えばこれはラズパイを設置できるレゴ互換パーツです。こんなのを作っています。

この3Dモデルは以下のように円柱の3Dモデルでくり抜き(ブーリアン)をいくつも実施しています。

円柱のくり抜きは1つづつ実施していて超面倒なのでスクリプトでまとめて実行するようにしたいと思います。
ちなみに、Blender初心者です。
参考にしたサイト
- BlenderをPythonで操作する
- https://qiita.com/tatsuruM/items/9d4222c6c7d96b4c5b3c
- オブジェクトをスクリプトで作成する方法を参考にしました。
- How to make boolean modifiers with python? [duplicate]
- https://blender.stackexchange.com/questions/45004/how-to-make-boolean-modifiers-with-python
- くり抜き(ブーリアン)をスクリプトで実行する方法を参考にしました。
他にもいろいろサイトをみたのですがリンク忘れました。
環境
Windows11
Blender 3.1.2
BlenderのコンソールでPythonバージョンを確認
>>> import sys
>>> sys.version
'3.10.2 (main, Jan 27 2022, 08:34:43) [MSC v.1928 64 bit (AMD64)]'
Blender Pythonスクリプトの書き方
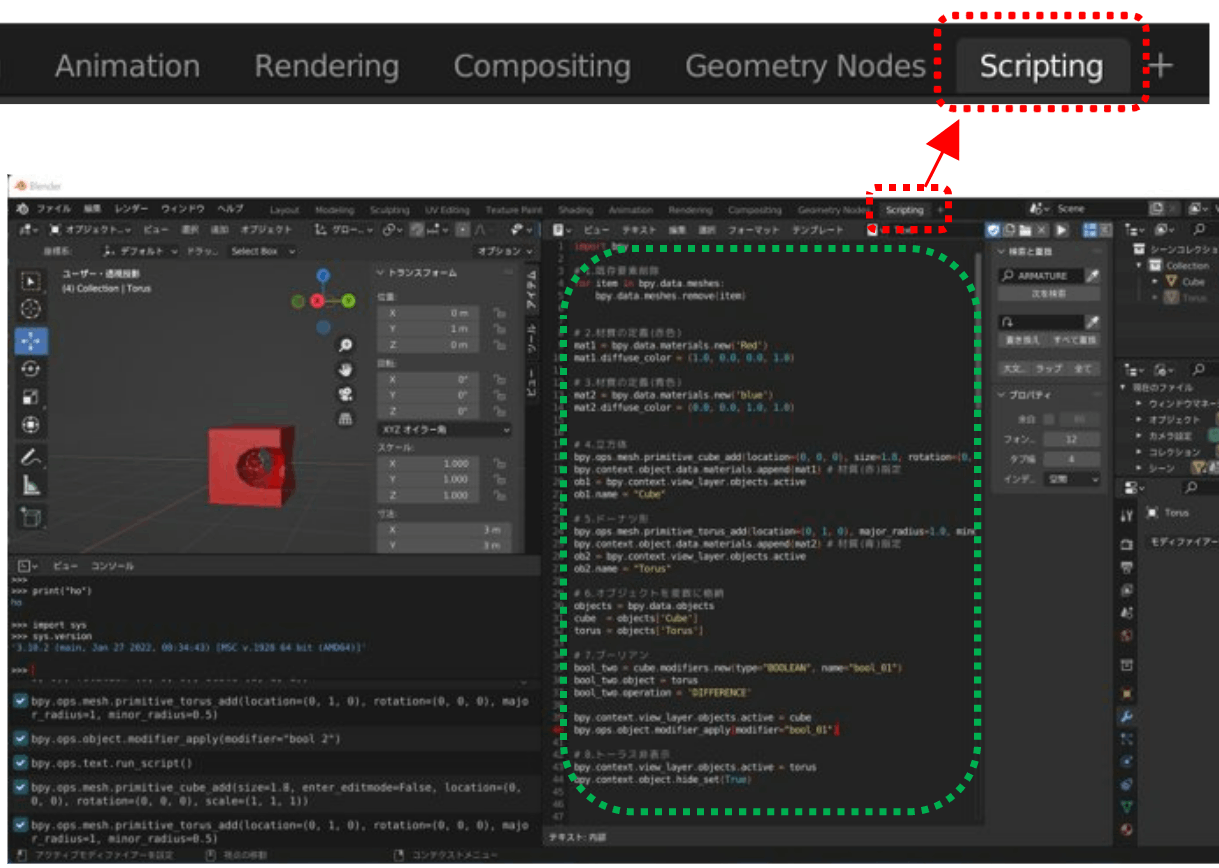
Blenderの Scripting をクリックするとPythonスクリプトを記載する領域(図の緑破線)が表示されます。

サンプル①:くり抜き(ブーリアン)のPythonスクリプト
立方体をトーラス(ドーナツ)でくり抜きしたスクリプトです。
↓の図の左がスクリプトの実行結果です。図の右はくり抜いたトーラス(ドーナツ)を非表示→表示に変更した状態です。

import bpy

# 1.既存要素削除
for item in bpy.data.meshes:
    bpy.data.meshes.remove(item)

# 2.材質の定義(赤色)
mat1 = bpy.data.materials.new('Red')
mat1.diffuse_color = (1.0, 0.0, 0.0, 1.0)

# 3.材質の定義(青色)
mat2 = bpy.data.materials.new('Blue')
mat2.diffuse_color = (0.0, 0.0, 1.0, 1.0)

# 4.立方体
bpy.ops.mesh.primitive_cube_add(location=(0, 0, 0), size=1.8, rotation=(0, 0, 0))
bpy.context.object.data.materials.append(mat1) # 材質(赤)指定
ob1 = bpy.context.view_layer.objects.active
ob1.name = "Cube"

# 5.ドーナツ形
bpy.ops.mesh.primitive_torus_add(location=(0, 1, 0), major_radius=1.0, minor_radius=0.5, rotation=(0, 0, 0))
bpy.context.object.data.materials.append(mat2) # 材質(青)指定
ob2 = bpy.context.view_layer.objects.active
ob2.name = "Torus"

# 6.オブジェクトを変数に格納
objects = bpy.data.objects
cube  = objects['Cube']
torus = objects['Torus']

# 7.ブーリアン
bool_two = cube.modifiers.new(type="BOOLEAN", name="bool_01")
bool_two.object = torus
bool_two.operation = 'DIFFERENCE'

bpy.context.view_layer.objects.active = cube
bpy.ops.object.modifier_apply(modifier="bool_01")

# 8.トーラス非表示
bpy.context.view_layer.objects.active = torus
bpy.context.object.hide_set(True)
サンプル②:複数くり抜き(ブーリアン)のPythonスクリプト
サンプル①と同様に立方体をトーラスでくり抜きします。その後に、トーラスを移動し再度立方体をくり抜きます。
↓の図の左がスクリプトの実行結果です。図の右はくり抜いたトーラス(ドーナツ)を非表示→表示に変更した状態です。

import bpy

# 1.既存要素削除
for item in bpy.data.meshes:
    bpy.data.meshes.remove(item)

# 2.材質の定義(赤色)
mat1 = bpy.data.materials.new('Red')
mat1.diffuse_color = (1.0, 0.0, 0.0, 1.0)

# 3.材質の定義(青色)
mat2 = bpy.data.materials.new('Blue')
mat2.diffuse_color = (0.0, 0.0, 1.0, 1.0)

mat3 = bpy.data.materials.new('Green')
mat3.diffuse_color = (0.0, 1.0, 0.0, 1.0)

mat4 = bpy.data.materials.new('Yellow')
mat4.diffuse_color = (1.0, 1.0, 0.0, 1.0)

# 4.立方体
bpy.ops.mesh.primitive_cube_add(location=(0, 0, 0), size=1.8, rotation=(0, 0, 0))
bpy.context.object.data.materials.append(mat3) # 材質指定
ob1 = bpy.context.view_layer.objects.active
ob1.name = "Cube"

# 5.ドーナツ形
bpy.ops.mesh.primitive_torus_add(location=(0, 1, 0), major_radius=1.0, minor_radius=0.5, rotation=(0, 0, 0))
bpy.context.object.data.materials.append(mat4) # 材質指定
ob2 = bpy.context.view_layer.objects.active
ob2.name = "Torus"

# 6.オブジェクトを変数に格納
objects = bpy.data.objects
cube  = objects['Cube']
torus = objects['Torus']

# 7.ブーリアン
bool_two = cube.modifiers.new(type="BOOLEAN", name="bool_01")
bool_two.object = torus
bool_two.operation = 'DIFFERENCE'

bpy.context.view_layer.objects.active = cube
bpy.ops.object.modifier_apply(modifier="bool_01")

# 8.トーラスを移動
bpy.context.view_layer.objects.active = torus
torus.location = ( 1.2, -1.2, 0 )

# 9.ブーリアン
bool_two = cube.modifiers.new(type="BOOLEAN", name="bool_01")
bool_two.object = torus
bool_two.operation = 'DIFFERENCE'

bpy.context.view_layer.objects.active = cube
bpy.ops.object.modifier_apply(modifier="bool_01")

# 10.トーラス非表示
bpy.context.view_layer.objects.active = torus
bpy.context.object.hide_set(True)
サンプル②スクリプトの一部を関数にする
サンプル③の前にサンプル②スクリプトを少し変えて、『7.ブーリアン』『8.トーラスを移動』『9.ブーリアン』『10.トーラス非表示』の処理を関数にします。
##-----------##
# (関数)ブーリアン
def booleanFnc(obj01 , obj02):
    bool01 = obj01.modifiers.new(type="BOOLEAN", name="bool_01")
    bool01.object = obj02
    bool01.operation = 'DIFFERENCE'
    bpy.context.view_layer.objects.active = obj01
    bpy.ops.object.modifier_apply(modifier="bool_01")

# (関数)オブジェクト移動
def moveFnc(obj01, mX, mY, mZ):
    bpy.context.view_layer.objects.active = obj01
    obj01.location = ( mX, mY, mZ )

# (関数)オブジェクト非表示
def hideFnc(obj01, setVal):
    bpy.context.view_layer.objects.active = obj01
    bpy.context.object.hide_set( setVal )
##-----------##

# 7.ブーリアン
booleanFnc(cube , torus)

# 8.トーラスを移動
moveFnc(torus, 1.2 , -1.2 , 0)

# 9.ブーリアン
booleanFnc(cube , torus)

# 10.トーラス非表示
hideFnc(torus, True)
サンプル③:ループ処理を使った複数くり抜き(ブーリアン)のPythonスクリプト
サンプル②での複数くり抜きをループ処理で実施します。
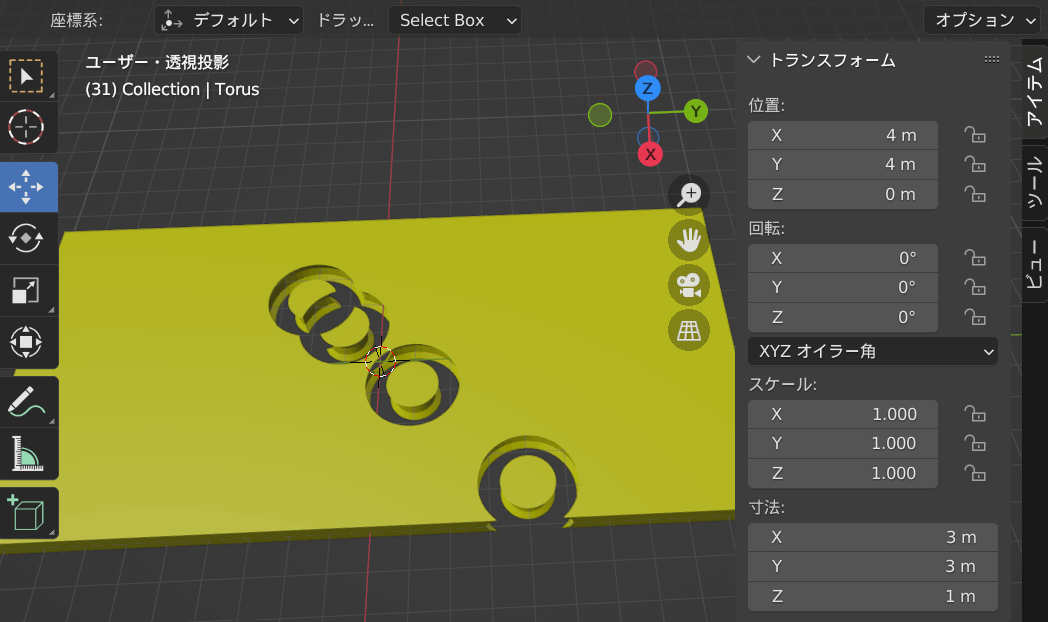
実行すると↓の図のようにトーラスで4回くり抜いたオブジェクトが完成します。

import bpy

# 1.既存要素削除
for item in bpy.data.meshes:
    bpy.data.meshes.remove(item)

# 2.材質の定義(赤色)
mat1 = bpy.data.materials.new('Red')
mat1.diffuse_color = (1.0, 0.0, 0.0, 1.0)

# 3.材質の定義(青色)
mat2 = bpy.data.materials.new('blue')
mat2.diffuse_color = (0.0, 0.0, 1.0, 1.0)
mat3 = bpy.data.materials.new('Green')
mat3.diffuse_color = (0.0, 1.0, 0.0, 1.0)
mat4 = bpy.data.materials.new('Yellow')
mat4.diffuse_color = (1.0, 1.0, 0.0, 1.0)

# 4.立方体
bpy.ops.mesh.primitive_cube_add(location=(0, 0, 0), size=1., rotation=(0, 0, 0))
bpy.context.object.data.materials.append(mat4)  #材質指定
bpy.ops.transform.resize(value=(10.0,20.0,0.8)) #図形変形
ob1 = bpy.context.view_layer.objects.active
ob1.name = "Cube"

# 5.ドーナツ形
bpy.ops.mesh.primitive_torus_add(location=(0, 1, 0), major_radius=1.0, minor_radius=0.5, rotation=(0, 0, 0))
bpy.context.object.data.materials.append(mat1) #材質指定
ob2 = bpy.context.view_layer.objects.active
ob2.name = "Torus"

# 6.オブジェクトを変数に格納
objects = bpy.data.objects
cube  = objects['Cube']
torus = objects['Torus']

##-----------##
# (関数)ブーリアン
def booleanFnc(obj01 , obj02):
    bool01 = obj01.modifiers.new(type="BOOLEAN", name="bool_01")
    bool01.object = obj02
    bool01.operation = 'DIFFERENCE'
    bpy.context.view_layer.objects.active = obj01
    bpy.ops.object.modifier_apply(modifier="bool_01")

# (関数)オブジェクト移動
def moveFnc(obj01, mX, mY, mZ):
    bpy.context.view_layer.objects.active = obj01
    obj01.location = ( mX, mY, mZ )

# (関数)オブジェクト非表示
def hideFnc(obj01, setVal):
    bpy.context.view_layer.objects.active = obj01
    bpy.context.object.hide_set( setVal )
##-----------##

pnt = [-2,-2,0] # (x,y,z)

for num in range(4):
    pnt[0] += num
    pnt[1] += num
    moveFnc(torus, pnt[0] , pnt[1] , pnt[2])    # 7.トーラスを移動
    booleanFnc(cube , torus)    # 8.ブーリアン

hideFnc(torus, True)    # 9.トーラス非表示
サンプル④:座標指定で複数くり抜き(ブーリアン)のPythonスクリプト
サンプル③ではオブジェクトの移動を現在位置からX,Y軸方向に1増加した位置に移動していました。今回は、移動先の座標を指定しています。移動先の座標はリスト型の変数 pnts に格納しています。
↓の図はスクリプトの実行結果です。

import bpy

# 1.既存要素削除
for item in bpy.data.meshes:
    bpy.data.meshes.remove(item)

# 2.材質の定義(赤色)
mat1 = bpy.data.materials.new('Red')
mat1.diffuse_color = (1.0, 0.0, 0.0, 1.0)

mat2 = bpy.data.materials.new('blue')
mat2.diffuse_color = (0.0, 0.0, 1.0, 1.0)

mat3 = bpy.data.materials.new('Green')
mat3.diffuse_color = (0.0, 1.0, 0.0, 1.0)

mat4 = bpy.data.materials.new('Yellow')
mat4.diffuse_color = (1.0, 1.0, 0.0, 1.0)

# 3.立方体
bpy.ops.mesh.primitive_cube_add(location=(0, 0, 0), size=1., rotation=(0, 0, 0))
bpy.context.object.data.materials.append(mat1)  #材質指定
bpy.ops.transform.resize(value=(8.0,10.0,0.8)) #図形変形
ob1 = bpy.context.view_layer.objects.active
ob1.name = "Cube"

# 4.円柱
bpy.ops.mesh.primitive_cylinder_add(location=(-5, 5, 0), radius=0.3, depth=3, rotation=(0, 0, 0))
bpy.context.object.data.materials.append(mat2) #材質指定
ob2 = bpy.context.view_layer.objects.active
ob2.name = "Cylinder"

# 5.オブジェクトを変数に格納
objects  = bpy.data.objects
cube     = objects['Cube']
cylinder = objects['Cylinder']

##-----------##
# (関数)ブーリアン
def booleanFnc(obj01 , obj02):
    bool01 = obj01.modifiers.new(type="BOOLEAN", name="bool_01")
    bool01.object = obj02
    bool01.operation = 'DIFFERENCE'
    bpy.context.view_layer.objects.active = obj01
    bpy.ops.object.modifier_apply(modifier="bool_01")

# (関数)オブジェクト移動
def moveFnc(obj01, mX, mY, mZ):
    bpy.context.view_layer.objects.active = obj01
    obj01.location = ( mX, mY, mZ )

# (関数)オブジェクト非表示
def hideFnc(obj01, setVal):
    bpy.context.view_layer.objects.active = obj01
    bpy.context.object.hide_set( setVal )
##-----------##

pnts=[
    [-2, -2, 0.4],
    [-2, -1, 0.4],
    [-2, -0, 0.4],
    [-1, -2, 0.4],
    [-1, -1, 0.4],
    [-1,  0, 0.4],
    [ 0, -2, 0.4],
    [ 0, -1, 0.4],
    [ 0,  0, 0.4],
    [ 1, -2, 0.4],
    [ 1, -1, 0.4],
    [ 1,  0, 0.4],
]

for pnt in pnts:
    moveFnc(cylinder, pnt[0] , pnt[1] , pnt[2]) # 6.トーラスを移動
    booleanFnc(cube , cylinder)                 # 7.ブーリアン

hideFnc(cylinder, True)    # 8.トーラス非表示
ここで紹介したスクリプトを応用してレゴ互換の3Dオブジェクトをスクリプトの実行ボタンを押すだけで作れるようになりました。
作成した3Dオブジェクトを3Dプリンターで造形しました。

ラズパイが設置でき、レゴとの互換性も問題なさそうです。

Discussion