Next.jsにCognito認証をつける
初めてサービスに認証をつけたいと思った方を対象に書きました。
業務にNext.jsでログイン機能をつけたいと思ってCognitoを使いましたが細かいエラーで困ったりしたので備忘録として残したいと思います。
CognitoはAWSにある認証と認可の機構です。細かい内容はドキュメントに載っているのでこちらからお読みください。
使用するライブラリ
- @aws-amplify/ui-react 1.3.1
- @aws-amplify/ui-components 1.2.0
- aws-amplify 4.0.2
aws-amplifyという開発プラットフォームを使えばログイン機能などがAWSクラウドを使って実装できます。ReactやVueなどのフレームワークに対応したUIも提供しているのでスピーディーに実装することが可能です。
ログイン機能をつけるにあたり、まずはCognitoのユーザープール・IDプールの作成が必要になります。
ユーザープールは認証、IDプールは認可の役割を担っています。
ユーザープール作成
デフォルトでOKで進んでいきます。

アプリクライアントの項目にいき、クライアントシークレットを作成のチェックを外してください。
CognitoのJavascriptSDKでは秘密鍵をサポートしていないようで、これをつけたまま実装するとログイン時にエラーがでます。

Unable to verify secret hash for client *******
チェックを外したらアプリクライアントの作成でOKです。
作り終えると設定画面が出てくるかと思います。でてきたらユーザープールの作成は完了です!
次にIDプールの設定をします。
IDプール作成
フェデレーテッドアイデンティティにいき、新しいIDプールの作成をクリックします。

IDプール名を入れたら認証プロバイダーへ行き、CognitoタブにあるユーザープールIDとアプリクライアントIDに先ほど作成したユーザープールの情報を入力し、プールの作成をクリックします。
ユーザープールIDは全般設定、アプリクライアントIDはアプリクライアントの設定に表示されています。

プールを作成すると、Identify the IAM roles to use with your new identity poolのページに遷移するかと思います。
ページ本文はちょっと長いですが日本語に訳すると、
- IDプールは認証済IDと未認証IDの2つを定義 IAMの独自の役割を割り当てられる
- Cognitoがユーザーリクエストを受信した際にそのリクエストが認証済か未認証かを判断し認証済IAMロールまたは未認証IAMロールに関連付けられたポリシーを使用してリクエストに応答する
未認証のユーザーにはリソースへのアクセス制御を行ったりすることができます。
許可をクリックするとIDプールが作成されます。これで一通りのCognitoの設定は終了!
フロント側での設定
次に先ほど設定した情報を.envファイルに定義してAmplifyに渡してあげましょう。
フロント側で使うのでNEXT_PUBLIC_をつける必要があります。
NEXT_PUBLIC_COGNITO_IDENTITYPOOLID='*****'     // IDプールID
NEXT_PUBLIC_COGNITO_REGION='****'              // Cognitoのリージョン
NEXT_PUBLIC_COGNITO_USERPOOLID='****'          // ユーザープールID
NEXT_PUBLIC_COGNITO_USERPOOLWEBCLIENTID='****' // アプリクライアントID
const awsConfig = {
  identityPoolId: process.env.NEXT_PUBLIC_COGNITO_IDENTITYPOOLID,
  region: process.env.NEXT_PUBLIC_COGNITO_REGION,
  userPoolId: process.env.NEXT_PUBLIC_COGNITO_USERPOOLID,
  userPoolWebClientId: process.env.NEXT_PUBLIC_COGNITO_WEBCLIENTID,
};

export default awsConfig;
あとは_app.tsxでconfigを設定してComponentをAmplifyAuthenticatorでラップするだけでできちゃいます!
import * as React from 'react';
import '../styles/globals.css';
import type { AppProps } from 'next/app';
import Amplify, { Auth } from 'aws-amplify';
import { AmplifyAuthenticator } from '@aws-amplify/ui-react';

Amplify.configure(awsConfig);
Auth.configure(awsConfig); // stagingやproductionで動かす際にはこの1行が必要です。

function MyApp({ Component, pageProps }: AppProps) {
 return (
     <AmplifyAuthenticator>
       <Component {...pageProps} />
     </AmplifyAuthenticator>
  );
}
うまくいくと下の画像のような表示になるかと思います。

設定情報がうまくamplifyに渡っていないとこのエラーがでます。
[ERROR] 23:40.145 AuthError -
     Error: Amplify has not been configured correctly.
     The configuration object is missing required auth properties.
     This error is typically caused by one of the following scenarios:

     1. Did you run `amplify push` after adding auth via `amplify add auth`?
      See https://aws-amplify.github.io/docs/js/authentication#amplify-project-setup for more information

     2. This could also be caused by multiple conflicting versions of amplify packages, see (https://docs.amplify.aws/lib/troubleshooting/upgrading/q/platform/js) for help upgrading Amplify packages.
また、このエラーがでる他の原因としては
- amplify関連ライブラリのバージョンが違う
- userPoolIDが間違っている
- Auth.configureが無い
が挙げられます。
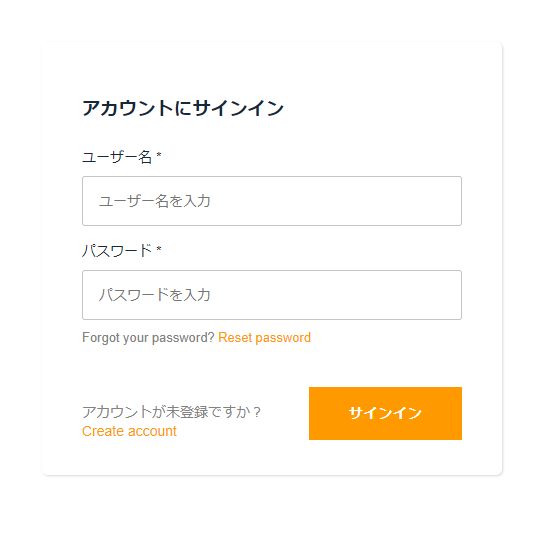
うまく表示できたら今のUIは英語なので日本語に変えちゃいましょう!
日本語ファイルを用意して、amplifyに渡してあげるだけでできちゃいます。
export const vocabularies = {
  ja: {
    'Sign In': 'サインイン',
    'Sign Up': 'サインアップ',
    'Sign Out': 'サインアウト',
    'Sign in to your account': 'アカウントにサインイン',
    'Username *': 'ユーザー名 *',
    'Password *': 'パスワード *',
    'Enter your username': 'ユーザー名を入力',
    'Enter your password': 'パスワードを入力',
    'No account?': 'アカウントが未登録ですか?',
  },
};
import * as React from 'react';
import '../styles/globals.css';
import type { AppProps } from 'next/app';
import Amplify, { Auth, I18n } from 'aws-amplify';
import { AmplifyAuthenticator } from '@aws-amplify/ui-react';
import { vocabularies } from '../assets/i18n/amplify/vocabularies';

Amplify.configure(awsConfig);
Auth.configure(awsConfig);

I18n.putVocabularies(vocabularies);
I18n.setLanguage('ja');

function MyApp({ Component, pageProps }: AppProps) {
 return (
     <AmplifyAuthenticator>
       <Component {...pageProps} />
     </AmplifyAuthenticator>
  );
}

jaオブジェクトの中に足りない日本語訳があるので全部は訳されていませんが、日本語に変えることができました!足りない部分は英語ができる方に翻訳してもらうか、翻訳サイトで一つ一つ埋めていく必要があります。
ボタンの色やテキストの色も変えることができます。next.jsではstyles/global.cssで全体にcssをあてることができるのでここで行います。
:root {
  --amplify-primary-color: #0cb2b4;
}

色が変わりました!!
AmplifyにあるHubユーティリティを使えば、認証イベントが発火したときになんらかの処理を行うことも可能です。
next.jsではuseEffect内でイベントをlistenし、クリーンアップ時にremoveするようにします。
import * as React from 'react';
import '../styles/globals.css';
import Amplify, { Auth, I18n } from 'aws-amplify';
import { AmplifyAuthenticator } from '@aws-amplify/ui-react';
import { onAuthUIStateChange } from '@aws-amplify/ui-components';
import { vocabularies } from '../assets/i18n/amplify/vocabularies';

Amplify.configure(awsConfig);
Auth.configure(awsConfig);

I18n.putVocabularies(vocabularies);
I18n.setLanguage('ja');

function MyApp({ Component, pageProps }: AppProps) {
 React.useEffect(() => {
    const listener = Hub.listen('auth', (data) => {
      switch (data.payload.event) {
        case 'signIn':
          console.log('user signed in');
          router.push('/test');                  // サインインしたら/testに遷移させる
          break;
        case 'signUp':
          console.log('user signed up');
          break;
        case 'signOut':
          console.log('user signed out');
          router.push('/');                      // サインアウトしたらルートに遷移させる
          break;
        case 'signIn_failure':
          console.log('user sign in failed');
          break;
        case 'configured':
          console.log('the Auth module is configured');
      }
    });
    const listenStateChange = onAuthUIStateChange(() => {
      Hub.listen('auth', listener);
    });
    listenStateChange();

    return () => {
      Hub.remove('auth', () => listener);
    };
  }, []);
 return (
     <AmplifyAuthenticator>
       <Component {...pageProps} />
     </AmplifyAuthenticator>
  );
}
以上が自分の行った実装です。もっと良いやり方や処理があるとは思いますが参考になれば幸いです!
Discussion