😎
Microsoft PurviewをPythonから操作する
Microsoft Purviewとは?
- Purviewはいわゆるデータガバナンスを行うためのソリューションで、データの民主化を実現します。
- Purviewを使用すれば、企業内のどこにどのようなデータがあるかがわかります。
Purviewの主な機能は以下になります。
- データ資産全体の管理:オンプレミス、マルチクラウド、サービスとしてのソフトウェア (SaaS) のデータ管理とガバナンスに役立つ統合データガバナンスソリューションです。
- 自動化されたデータの検出:データ環境全体の最新のマップを作成するための自動化されたデータの検出機能があります。
- エンドツーエンドのデータ系列:データの起源を把握するためのエンドツーエンドのデータ系列視覚化機能があります。
- データ資産とその関係性の統合マップ:データ資産全体にわたるデータの統合マップを作成することができます。
- データアクセスのプロビジョニング:データエンジニアとデータ所有者がデータ資産へのアクセスをプロビジョニングできるようにします。
Pythonから操作するメリット
- Purviewは自動的にデータを検出できますが、このデータがどのような情報をもつデータなのかといった情報は手動で入力する必要があり時間がかかっていました。
- PurviewはAPIを提供しており、Python SDKを使用することでPurviewの情報を取得、エクスポート、編集してインポートすることができます。
- GUIを使用するよりも効率的にビジネスメタデータを入力することができます。
- 今回は以下のPurviewの画面で「Asset description」を編集していきます。こちらには検出されたアセットのビジネスメタデータを入力する箇所です。

Python SDKの使用方法
-
前提条件
- Python 3.6 以降
- Purviewアカウント
- クライアントシークレットを持つサービスプリンシパル
認証情報を作成
-
クライアントID、テナントID、クライアントシークレットを取得します。
-
アプリ登録を行います。デフォルトの設定のまま任意の名前を付けます(例:purview-python)

-
クライアントID、テナントIDを取得

-
クライアントシークレットを取得

-
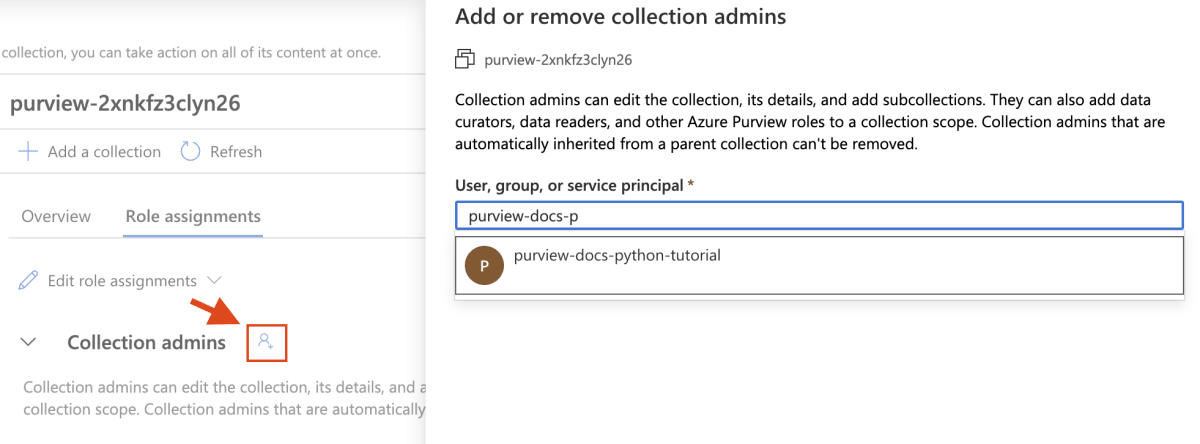
Purviewポータル上から作成したサービスプリンシパルに権限を付与します
以下に権限を割り当てます。- コレクション管理者
- データソース管理者
- データキュレーター
- データリーダー
情報の取得、エクスポート
Jupyter Notebook(1.export_catalog_assets)を使用してPython SDKを使用する方法を説明します。
- 必要な資格情報を設定します
1.export_catalog_assets.ipynb
client_id = "<your client id>"
client_secret = "<your client secret>"
tenant_id = "<your tenant id>"
- Purview操作に必要なパッケージをインストール
1.export_catalog_assets.ipynb
%pip install azure-identity
%pip install azure-purview-scanning
%pip install azure-purview-administration
%pip install azure-purview-catalog
%pip install azure-purview-account
%pip install azure-core
%pip install pandas
- エンドポイント指定します
1.export_catalog_assets.ipynb
purview_endpoint = "https://{your_purview_account_name}.purview.azure.com/"
purview_scan_endpoint = "https://{your_purview_account_name}.purview.azure.com/scan"
#新しいpurviewポータルの場合は、以下のエンドポイントを使用してください
#purview_endpoint = "https://api.purview-service.microsoft.co"
#purview_scan_endpoint="https://scan.api.purview-service.microsoft.com"
- カタログクライアント等をインポートします
1.export_catalog_assets.ipynb
from azure.purview.catalog import PurviewCatalogClient
from azure.identity import ClientSecretCredential
from azure.core.exceptions import HttpResponseError
import pandas as pd
from datetime import datetime
import os
- カタログ クライアントをインスタンス化します
1.export_catalog_assets.ipynb
def get_credentials():
     credentials = ClientSecretCredential(client_id=client_id, client_secret=client_secret, tenant_id=tenant_id)
     return credentials

def get_catalog_client():
    credentials = get_credentials()
    client = PurviewCatalogClient(endpoint=purview_endpoint, credential=credentials, logging_enable=True)
    return client

try:
    client_catalog = get_catalog_client()
except ValueError as e:
    print(e)
- 検索するキーワードを指定
1.export_catalog_assets.ipynb
keywords = "*"

body_input={
    "keywords": keywords
}
keywordsはGUIだと以下で検索するワードになります。

- カタログを検索します。Json形式で返ってきます。
1.export_catalog_assets.ipynb
try:
    response = client_catalog.discovery.query(search_request=body_input)
    print(response)
except HttpResponseError as e:
    print(e)
- Valueの中身のみをdataframeに変換
1.export_catalog_assets.ipynb
df = pd.DataFrame(response['value'])
df
- 必要なカラムのみを抽出。用途によって変更してください。
- Asset descriptionはuserDescriptionに該当します。
1.export_catalog_assets.ipynb
df_full = df[['id','name', 'entityType','qualifiedName', 'userDescription','createBy']]
df_full
-
今回指定したカラムはGUI上だとProperties等から確認できます。

-
Assetの説明が記載されていないものを抽出するために、userDescriptionがNaN(未入力)のみをフィルタリング
1.export_catalog_assets.ipynb
df_filtered = df_full[df_full['userDescription'].isna()]
df_filtered
- 適切なフォルダにCSVで保存
1.export_catalog_assets.ipynb
# 必要に応じてexportフォルダを作成
os.makedirs('export', exist_ok=True)

# 現在の日時を取得
now = datetime.now()

# ファイル名にタイムスタンプを付ける形式でフォーマット
file_name = now.strftime("export_purview_%Y%m%d_%H%M%S.csv")
# カレントディレクトリのexportフォルダにファイル名を結合して完全なパスを作成
file_path = os.path.join('export', file_name)

# DataFrameをCSVファイルとして指定したパスに保存
df_filtered.to_csv(file_path, index=False)
- これで「Asset description」が記載されていないものをCSVでエクスポートすることができました。
- GUIで大量のAssetを編集するのは大変ですがCSV(エクセル)だと一括で編集することができます。
編集してインポートする方法
- エクスポートしたCSVの「userDescription」列を編集します。
- インポート用に新しいjupyter notebook(2.inport_catalog_assets)を作成します。
2.inport_catalog_assets.ipynb
from azure.purview.catalog import PurviewCatalogClient
from azure.identity import ClientSecretCredential
from azure.core.exceptions import HttpResponseError
import pandas as pd
#インスタンス化
def get_credentials():
     credentials = ClientSecretCredential(client_id=client_id, client_secret=client_secret, tenant_id=tenant_id)
     return credentials

def get_catalog_client():
    credentials = get_credentials()
    client = PurviewCatalogClient(endpoint=purview_endpoint, credential=credentials, logging_enable=True)
    return client

try:
    client_catalog = get_catalog_client()
except ValueError as e:
    print(e)
- クライアントを作成します。
2.inport_catalog_assets.ipynb
client = PurviewCatalogClient(endpoint=purview_endpoint, credential=get_credentials(), logging_enable=True)
- 試しにAssetの1つを編集する方法
2.inport_catalog_assets.ipynb
entities = {
    "entities": [
        {
            "typeName": "azure_storage_account",
            "attributes": {
                "qualifiedName": "https://{your_purview_account_name}.core.windows.net",
                "name": "{your_azure_storage_account_name}",
                "description": "This is a sample dataset"
            }
        }
    ]
}
# エンティティを作成または更新
try:
    response = client.entity.create_or_update_entities(entities=entities)
    print(response)
except HttpResponseError as e:
    print(e)
- 以下のようにAssetの説明が更新されます。

- 複数のアセットを編集する場合
- 編集したエクセルをdaraframeに変換
2.inport_catalog_assets.ipynb
df = pd.read_csv(file_path)
df
- dataframeを用いて、CSVファイルの各行からエンティティの情報を読み取り、それらをリストに追加
2.inport_catalog_assets.ipynb
entities_list = []

# CSVファイルの各行に対して繰り返し処理
for index, row in df.iterrows():
    # エンティティ情報を作成
    entity = {
        "typeName": row['entityType'],
        "attributes": {
            "qualifiedName": row['qualifiedName'],
            "name": row['name'],
            "description": row['userDescription']
        }
    }
    # エンティティリストに追加
    entities_list.append(entity)

# 全てのエンティティを含む辞書を作成
entities = {"entities": entities_list}
- エンティティを一括更新
2.inport_catalog_assets.ipynb
try:
    response = client.entity.create_or_update_entities(entities=entities)
    print(response)
except HttpResponseError as e:
    print(e)
これで終了です。入力した内容が反映されているかPurviewのポータルで確認してください。
その他考慮すべきこと
- エクスポートする場合は、データ量が多くなる可能性があります。
- Git連携などを行い、エクスポートしたCSVをバックアップすることをお勧めします。
- 他の操作は以下のリンクを参照してください。
まとめ
- データガバナンスソリューションPurviewの管理、自動データ検出、データ系列の可視化などの機能をPythonを通じて効率化する方法を説明しました。
- Python SDKを使用し、API経由でPurviewの情報取得、エクスポート、編集が可能で、GUIよりも効率的な操作を実現します。
- 認証情報の作成から、カタログの検索、結果のエクスポート、そしてエクスポートしたデータの編集とインポートの手順を説明しました。
- ビジネスメタデータの手動入力の時間削減と、大量のアセット管理の効率化が可能になります。
Discussion