Gmailの特定のメールをSlackに通知する方法
概要
このブログ記事では、Gmailの特定のメールを自動的に検出し、その内容をSlackに通知する方法を紹介します。
背景
通知設定をしているのに、メールの通知が届かなくて対応が送れることがありました。
slackの通知はリアルタイムで届くので、メールが届いたらslackへ通知を送って通知に気づかなかったという事態をなくそうと思い、今回の機能を作成しました。
使用する技術とツール
- Google Apps Script
- Slack API
- Google Sheets
実装手順
1. スプレッドシートの準備
-
シート名:設定
シートを作成し、Webhook URLやフィルタ条件を入力します。

-
シート名:条件設定
シートを作成し、各条件(送信者、件名、キーワード、Slackチャンネル)を入力します。

2. Google Apps Script
- スプレッドシートで設定した条件のメールをslackに通知する機能を実装します。(下記参照)
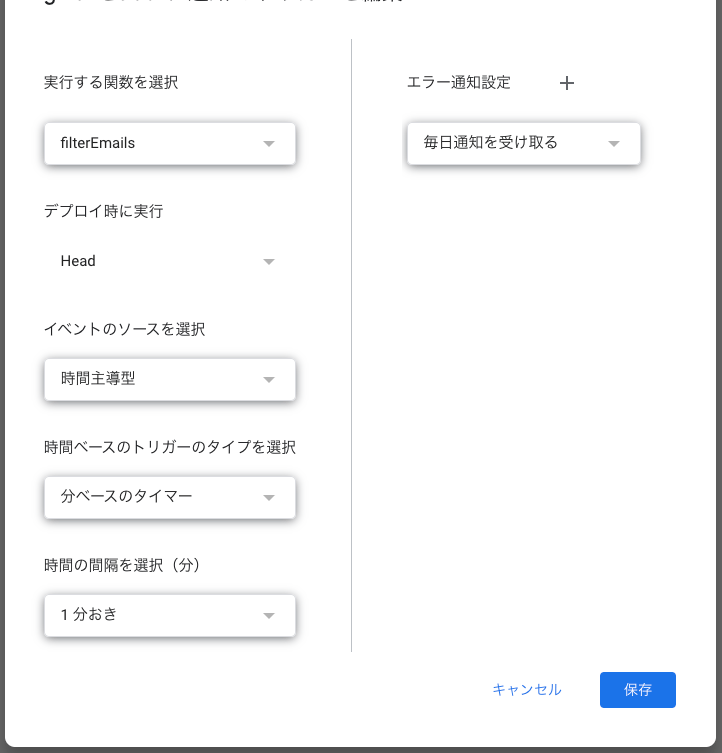
- トリガーを設定し、定期的に filterEmails 関数を実行するようにします。
コードの詳細説明
メールのフィルタリングと通知
const filterEmails = () => {
  const sheet = SpreadsheetApp.getActiveSpreadsheet().getSheetByName('条件設定');
  const range = sheet.getDataRange();
  const values = range.getValues();
  const settings = getSettings();
  const slackWebhookUrl = settings['webhookUrl'];
  const afterDate = settings['afterDate'];
  values.forEach(row => {
    const [sender, subject, keyword, slackChannel] = row;
    if (!sender && !subject && !keyword && !slackChannel) return;
    const query = buildQuery(sender, subject, keyword, afterDate);
    const threads = GmailApp.search(query);
    const messages = GmailApp.getMessagesForThreads(threads);
    messages.forEach(thread => {
      thread.forEach(message => {
        const messageText = `
送信者: ${message.getFrom()}
件名: ${message.getSubject()}
本文: ${message.getPlainBody().slice(0, 100)}...
`;
        sendToSlack(slackChannel, messageText, slackWebhookUrl);
        message.markRead();
      });
    });
  });
};
スプレッドシートの「条件設定」シートからメールフィルタの条件を取得し、その条件に基づいてGmailのメールを検索し、Slackに通知を送る関数です。
1. スプレッドシートのデータ取得
const sheet = SpreadsheetApp.getActiveSpreadsheet().getSheetByName('条件設定');
const range = sheet.getDataRange();
const values = range.getValues();
SpreadsheetApp.getActiveSpreadsheet().getSheetByName('条件設定'): 現在のスプレッドシートの中で「条件設定」という名前のシートを取得します。
sheet.getDataRange(): シート内のすべてのデータ範囲を取得します。
range.getValues(): データ範囲のすべての値を2次元配列として取得します。
2. 設定の取得
const settings = getSettings();
const slackWebhookUrl = settings['webhookUrl'];
const afterDate = settings['afterDate'];
getSettings() 関数を呼び出して、設定シートからWebhook URLと検索するメールの日付条件を取得します。(getSettings関数の説明は下記参照)
3. 各フィルタ条件に基づいてメールを検索
values.slice(1).forEach(row => {
  const [sender, subject, keyword, slackChannel] = row;
  if (!sender && !subject && !keyword && !slackChannel) return;
  const query = buildQuery(sender, subject, keyword, afterDate);
  const threads = GmailApp.search(query);
  const messages = GmailApp.getMessagesForThreads(threads);
values: データの配列を取得します。
forEach(row => { ... }): 各行(row)に対して処理を行います。
const [sender, subject, keyword, slackChannel] = row;: 各行のデータをそれぞれの変数に代入します(送信者、件名、キーワード、Slackチャンネル)。
if (!sender && !subject && !keyword && !slackChannel) return;: すべての条件が空の場合、その行の処理をスキップします。
const query = buildQuery(sender, subject, keyword, afterDate);: buildQuery 関数を使ってGmailの検索クエリを作成します。
const threads = GmailApp.search(query);: クエリに基づいてGmailのスレッドを検索します。
const messages = GmailApp.getMessagesForThreads(threads);: 各スレッド内のメールメッセージを取得します。(buildQuery関数の説明は下記参照)
4. メールメッセージの処理とSlackへの通知
messages.forEach(thread => {
  thread.forEach(message => {
    const messageText = `
送信者: ${message.getFrom()}
件名: ${message.getSubject()}
本文: ${message.getPlainBody().slice(0, 100)}...
`;
    sendToSlack(slackChannel, messageText, slackWebhookUrl);
    message.markRead();
  });
});
messages.forEach(thread => { ... }): 各スレッド(thread)に対して処理を行います。
thread.forEach(message => { ... }): 各スレッド内の各メールメッセージ(message)に対して処理を行います。
const messageText = ...;: メッセージテキストを作成します。メールの送信者、件名、本文の一部を含みます。
sendToSlack(slackChannel, messageText, slackWebhookUrl);: sendToSlack 関数を呼び出して、Slackに通知を送ります。(sendToSlack関数の説明は下記参照)
message.markRead();: 処理が完了したメールを既読に設定します。
設定の取得
const getSettings = () => {
  const sheet = SpreadsheetApp.getActiveSpreadsheet().getSheetByName('設定');
  const range = sheet.getDataRange();
  const values = range.getValues();
  let settings = {};
  values.forEach(row => {
    settings[row[0]] = row[1];
  });
  settings['afterDate'] = Utilities.formatDate(new Date(settings['afterDate']), Session.getScriptTimeZone(), 'yyyy/MM/dd');
  return settings;
};
この関数は、スプレッドシートから設定を取得します。
クエリの構築
const buildQuery = (sender, subject, keyword, afterDate) => {
  const conditions = [];
  if (sender) {
    conditions.push(`from:${sender}`);
  }
  if (subject) {
    conditions.push(`subject:${subject}`);
  }
  if (keyword) {
    conditions.push(`"${keyword}"`);
  }
  if (afterDate) {
    conditions.push(`after:${afterDate}`);
  }
  return conditions.join(' ').trim();
};
この関数は、Gmailの検索クエリを構築します。
Slackへの通知
const sendToSlack = (channel, text, webhookUrl) => {
  if (!webhookUrl) {
    Logger.log('Webhook URL is missing');
    return;
  }
  const payload = { channel: `#${channel}`, text: text };
  const options = {
    method: 'post',
    contentType: 'application/json',
    payload: JSON.stringify(payload),
    muteHttpExceptions: true,
  };
  try {
    const response = UrlFetchApp.fetch(webhookUrl, options);
    const responseCode = response.getResponseCode();
    if (responseCode !== 200) {
      Logger.log(`Error: ${response.getContentText()}`);
    }
  } catch (e) {
    Logger.log(`Exception: ${e}`);
  }
};
Slackにメッセージを送信するための関数です。
1. Webhook URLの確認
if (!webhookUrl) {
  Logger.log('Webhook URL is missing');
  return;
}
説明:
まず、関数は webhookUrl が指定されているかどうかを確認します。
指定されていない場合(つまり、webhookUrl が null または空の場合)、エラーメッセージをログに記録して関数を終了します。
2. ペイロードの作成
const payload = { channel: `#${channel}`, text: text };
payload はSlackに送信するデータです。
ここでは、送信先のチャンネル名とメッセージテキストを含むオブジェクトを作成しています。
channelには、チャンネル名を指定します。
textには、実際に送信するメッセージを設定します。
3. リクエストオプションの設定
const options = {
  method: 'post',
  contentType: 'application/json',
  payload: JSON.stringify(payload),
  muteHttpExceptions: true,
};
options はHTTPリクエストの設定です。
4. リクエストの送信
try {
  const response = UrlFetchApp.fetch(webhookUrl, options);
  const responseCode = response.getResponseCode();
  if (responseCode !== 200) {
    Logger.log(`Error: ${response.getContentText()}`);
  }
} catch (e) {
  Logger.log(`Exception: ${e}`);
}
try ブロック内で UrlFetchApp.fetch メソッドを使用してHTTPリクエストを送信します。
response にはリクエストの結果が格納されます。
responseCode を取得して、リクエストが成功したかどうかを確認します。成功した場合は200のステータスコードが返されます。
ステータスコードが200でない場合、エラーメッセージをログに記録します。
catch ブロックでは、リクエスト送信中に発生した例外をキャッチし、例外メッセージをログに記録します。
GASのトリガーの設定
メールが届いた時にリアルタイムに検知する方法はないです。そのため、時間主導型のトリガーで、検知間隔を1分にすることで、擬似的にリアルタイムで通知が来る設定にします。

まとめ
この記事では、Gmailの特定のメールをSlackに通知する方法を紹介しました。
毎回、gmailを開く必要もなくなったので、結構助かってます。
最後まで読んでいただき、ありがとうございました!
Discussion