さぁテストを始めよう![Next.js14]
よく「テスト書いて挙動確かめよう」って思うけど、毎回、「テストってどうやって始めるんだっけ?」ってよくわからなくなるのでまとめようと思う。
なのでゴールは「テストコードが動く」という最初の一歩を踏み出すこと
基本はこれ通り
Jest and React Testing Library
以下React Testing LibraryはRTLと書きます
JestとRTLを使うことで作成したコンポーネントが期待通り動くかテストしていく
Jestを使うか、RTLを使うか
これは自分の勘違いなのだが最初 「JestとRTLどっちを使うほうがいいんだろう?」 って思ってた。
しかし、当たり前だがどっちかではなく 「両方必要」
JestはJavaScriptのためのテストフレームワークであり、RTLはReactのコンポーネントテストのためのライブラリである。それぞれ目的が違う。
テストを運転免許の試験で例えると、Jestは試験会場や筆記試験、発表方法などを広範囲のテストに必要なものを準備する。それに対してRTLは実技試験を準備するようなイメージ。
だから 「JestとRTLどっちを使うほうがいいの?」 と言われたら 「両方必要」
# 必要なライブラリをインストール
npm install --save-dev jest jest-environment-jsdom @testing-library/react @testing-library/jest-dom @types/jest @testing-library/user-event
そして指示通りにjest.config.mjsを作成
// next/jest.js はNext.jsによって提供されるJestの設定を簡単に行うためのヘルパー
import nextJest from "next/jest.js";

// nextJest はNext.jsの設定を読み込むためのディレクトリを指定している
// これを使うことでnext.config.jsや.envをテスト環境に組み込める
const createJestConfig = nextJest({
  dir: "./",
});

// Jestのカスタム設定
/** @type {import('jest').Config} */
const config = {
  // Jestがテストを実行する環境を指定
  testEnvironment: "jest-environment-jsdom",
};

// 作成したJestのカスタム設定をエクスポートする
export default createJestConfig(config);
package.jsonにもテスト用のコマンドを追加しておく
  "scripts": {
    "dev": "next dev",
    "build": "next build",
    "start": "next start",
    "lint": "next lint",
+   "test": "jest --watch"
  },
簡単なテストで試す①
簡単なコンポーネントを作成し、テストできるか実際に試す。
+ボタンを押せば、カウントが1増える、という単純なもの。
"use client";

import React, { useState } from "react";

export const Counter = () => {
  const [count, setCount] = useState(0);

  return (
    <>
      <div>Count: {count}</div>
      <button onClick={() => setCount(count + 1)}>+</button>
    </>
  );
};
テストはこれ。ボタンを教えたらカウントが1増えるか、というだけのもの
import React from "react";
import { render, screen } from "@testing-library/react";
import userEvent from "@testing-library/user-event";
import { Counter } from "./Counter";

describe("Counter", () => {
  test("increments count by 1 on button click", async () => {
    render(<Counter />);
    expect(screen.queryByText(/Count: 0/)).toBeInTheDocument();
    const button = screen.getByText("+");
    await userEvent.click(button);
    expect(screen.queryByText(/Count: 1/)).toBeInTheDocument();
  });
});
TypeError: expect(...).toBeInTheDocument is not a function
なんか「toBeInTheDocumentがないよ!」と怒られる
これはJestにマッチャーのtoBeInTheDocumentがないので、使うなら@testing-library/jest-domをインポートしようね!ってことらしい。
というわけでJestの設定にインポートする
import "@testing-library/jest-dom";
// Jestのカスタム設定
/** @type {import('jest').Config} */
const config = {
+ // jestがテストを実行する前に読み込むセットアップファイルを指定
+ setupFilesAfterEnv: ["<rootDir>/jest.setup.js"],
  // Jestがテストを実行する環境を指定
  testEnvironment: "jest-environment-jsdom",
};
これでテストも無事通りました!
簡単なテストで試す②
もう1つ簡単なテストを作成
今度はボタンをクリックすると https://jsonplaceholder.typicode.com/users/1 からユーザー情報を取得し username, email を表示させる、というもの
"use client";

import React, { useState } from "react";

type User = {
  username: string;
  email: string;
};

export const FetchUser = () => {
  const [isLoading, setIsLoading] = useState(false);
  const [user, setUser] = useState<User | undefined>(undefined);

  const fetchUser = async () => {
    setIsLoading(true);
    try {
      const res = await fetch("https://jsonplaceholder.typicode.com/users/1");
      const data = await res.json();
      const user: User = {
        username: data.username,
        email: data.email,
      };
      setUser(user);
    } catch (error) {
      console.error(error);
    } finally {
      setIsLoading(false);
    }
  };

  return (
    <div>
      <button onClick={fetchUser} disabled={isLoading}>
        get user
      </button>
      {user && (
        <div>
          <p>username: {user.username}</p>
          <p>email: {user.email}</p>
        </div>
      )}
    </div>
  );
};
テストコードはこれ
import { render, screen } from "@testing-library/react";
import userEvent from "@testing-library/user-event";
import { FetchUser } from "./FetchUser";

describe("FetchUser", () => {
  test("fetch user on button click", async () => {
    render(<FetchUser />);
    expect(screen.queryByText("username")).toBeNull();
    const button = screen.getByText("get user");
    await userEvent.click(button);
    // データが表示されるのを待機する
    const username = await screen.findByText("username: dummy user");
    const email = await screen.findByText("email: dummy@example.com");

    expect(username).toBeInTheDocument();
    expect(email).toBeInTheDocument();
  });
});
ReferenceError: fetch is not defined
今度は「fetchがないよ!」と怒られる
「いやあるだろ」って思ったが、Jestのテスト環境であるjest-environment-jsdom(jest.config.mjsで設定した)には fetch が含まれていないらしい。
そのためJestのテスト中にfetchを使おうとすると「ReferenceError: fetch is not defined」というエラーが出てしまう。
というわけで次のように変更
import { render, screen } from "@testing-library/react";
import userEvent from "@testing-library/user-event";
import { FetchUser } from "./FetchUser";

+ // fetchのモック関数を定義
+ const dataMock = () => {
+ return new Promise((resolve) => {
+   resolve({
+     json: async () => ({
+       username: "dummy user",
+       email: "dummy@example.com",
+     }),
+   });
+ });
+ };

describe("FetchUser", () => {
+ // 全てのテストが完了した後にfetchのモックをクリアする
+ afterAll(() => {
+   (global.fetch as jest.Mock).mockClear();
+ });
  test("fetch user on button click", async () => {
+   // fetchのモックをグローバルに設定する。
+   // これでfetchは、テスト中このモックに差し替えられる
+   global.fetch = jest.fn().mockImplementation(dataMock);
    render(<FetchUser />);
    expect(screen.queryByText("username")).toBeNull();
    const button = screen.getByText("get user");
    await userEvent.click(button);
    // データが表示されるのを待機する
    const username = await screen.findByText("username: dummy user");
    const email = await screen.findByText("email: dummy@example.com");

    expect(username).toBeInTheDocument();
    expect(email).toBeInTheDocument();
  });
});
これでなんとかなった
Playwright
次はPlaywrightである。
Playwrightを使うことでNext.jsで作成されたページや機能が実際のブラウザで期待通りに動くかテストする
こっちも基本これに従う
あとこれ
というわけで必要なものをインストール
# 必要なライブラリをインストール
npm install --save-dev @playwright/test
package.jsonに追加
  "scripts": {
    "dev": "next dev",
    "build": "next build",
    "start": "next start",
    "lint": "next lint",
    "test": "jest --watch",
+   "test:e2e": "playwright test"
  },
Playwrightの初期設定も行う
# playwrightの初期設定
npm init playwright@latest

# playwright用のテストはどこに書く? => e2e
✔ Where to put your end-to-end tests? · e2e
# 自動テストの実行はどうする? => 今回はやらないのでno
✔ Add a GitHub Actions workflow? (y/N) · false
# テストに使うブラウザはどうする?準備しちゃっていい? => 自分でやるとミスしそうなのでyes
✔ Install Playwright browsers (can be done manually via 'npx playwright install')? (Y/n) · true
これでplaywrightの設定ファイルや、サンプルのテストコードが生成される。これを参考にやっていくわけだが...
Jestが自動作成されたテストコードを実行しようとするので無視するように設定
// Jestのカスタム設定
/** @type {import('jest').Config} */
const config = {
+ // jestに無視してほしいパスを指定
+ testPathIgnorePatterns: ["/e2e/", "/tests-examples/"],
  // jestがテストを実行する前に読み込むセットアップファイルを指定
  setupFilesAfterEnv: ["<rootDir>/jest.setup.js"],
  // Jestがテストを実行する環境を指定
  testEnvironment: "jest-environment-jsdom",
};
あとplaywrightの設定をちょっと変更
import { defineConfig, devices } from "@playwright/test";

export default defineConfig({
  // テストファイルがあるディレクトリを指定
  testDir: "./e2e",
  // テスト結果のレポートをHTML形式で出力。
  // 完了するたびにHTMLレポートを自動でブラウザで開くように指定
  reporter: [["html", { open: "always" }]],

  // テストの設定オプション
  use: {
    // 最初のリトライ時にトレースを取得
    trace: "on-first-retry",
    baseURL: "http://localhost:3000",
  },

  // 複数のブラウザでテストを行うプロジェクトの設定
  projects: [
    {
      name: "chromium",
      use: { ...devices["Desktop Chrome"] },
    },

    {
      name: "firefox",
      use: { ...devices["Desktop Firefox"] },
    },

    {
      name: "webkit",
      use: { ...devices["Desktop Safari"] },
    },
  ],
});
これでPlaywrightの準備はOK
テストする
準備はできたので実際のテストを行う
トップページを変更
import Link from "next/link";

export default function Home() {
  return (
    <nav>
      <Link href="/about">About</Link>
    </nav>
  );
}
/aboutを作成
export default function About() {
  return (
    <div>
      <h1>About Page</h1>
    </div>
  );
}
テストファイルの作成
import { test, expect } from "@playwright/test";

test("should navigate to the about page", async ({ page }) => {
  // Start from the index page (the baseURL is set via the webServer in the playwright.config.ts)
  await page.goto("/");
  // Find an element with the text 'About Page' and click on it
  await page.click("text=About");
  // The new URL should be "/about" (baseURL is used there)
  await expect(page).toHaveURL("/about");
  // The new page should contain an h1 with "About Page"
  await expect(page.locator("h1")).toContainText("About Page");
});
テスト前に事前にサーバーを起動しておく
# サーバーを起動しておく
npm run dev
テストを実行
npm run test:e2e
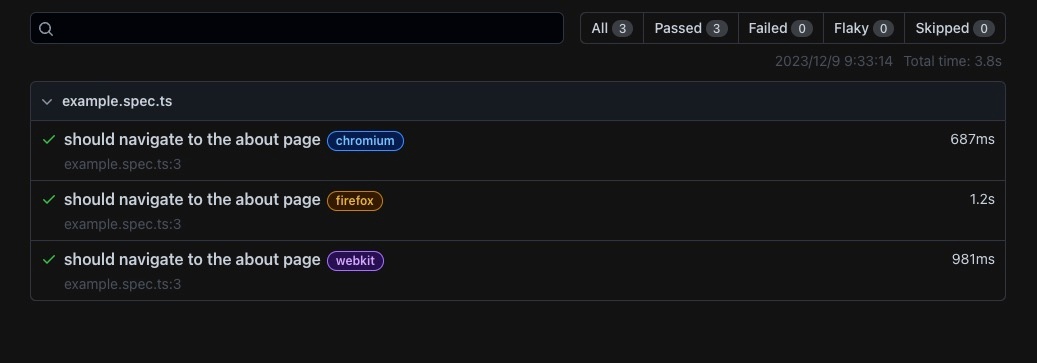
すると、ブラウザが開き、テスト結果を確認できる

これでOK
まとめ
これでテストがすぐに始められるようになった。
自分のための「さぁテストを始めよう!」でした。
Discussion