Auth0のJWTトークンをSpringBoot/KotlinなAPIでRBACに認証認可する
概要
SpringBoot/Kotlinで実装するREST APIとして、Auth0のJWTトークンの検証とJWTトークンの認可情報を用いたアクセス制御を行う方法について、試行錯誤した結果をまとめました。
使用した主なライブラリのバージョンは下記になります。
| フレームワーク | バージョン |
|---|---|
| SpringBoot | 3.5.3 |
| spring-security-web | 6.5.1 |
| okta-spring-boot-starter | 3.0.7 |
Auth0でRBACの設定を行う
アプリケーション > API の設定について記載します
API以外の説明(クライアントアプリケーションとかDBとかActionとか)はこの記事では割愛します。
Auth0のJWTトークンの概要
JWT自体が検証できることに加えて、scopeもしくはpermissionsフィールドに含まれる値を使用して認可処理を行います。

Auth0/APIのパーミッション(scope)の設定
アプリケーション > API からよしなにAPIを作成します。

その後「パーミッション」からパーミッションの設定を行います。
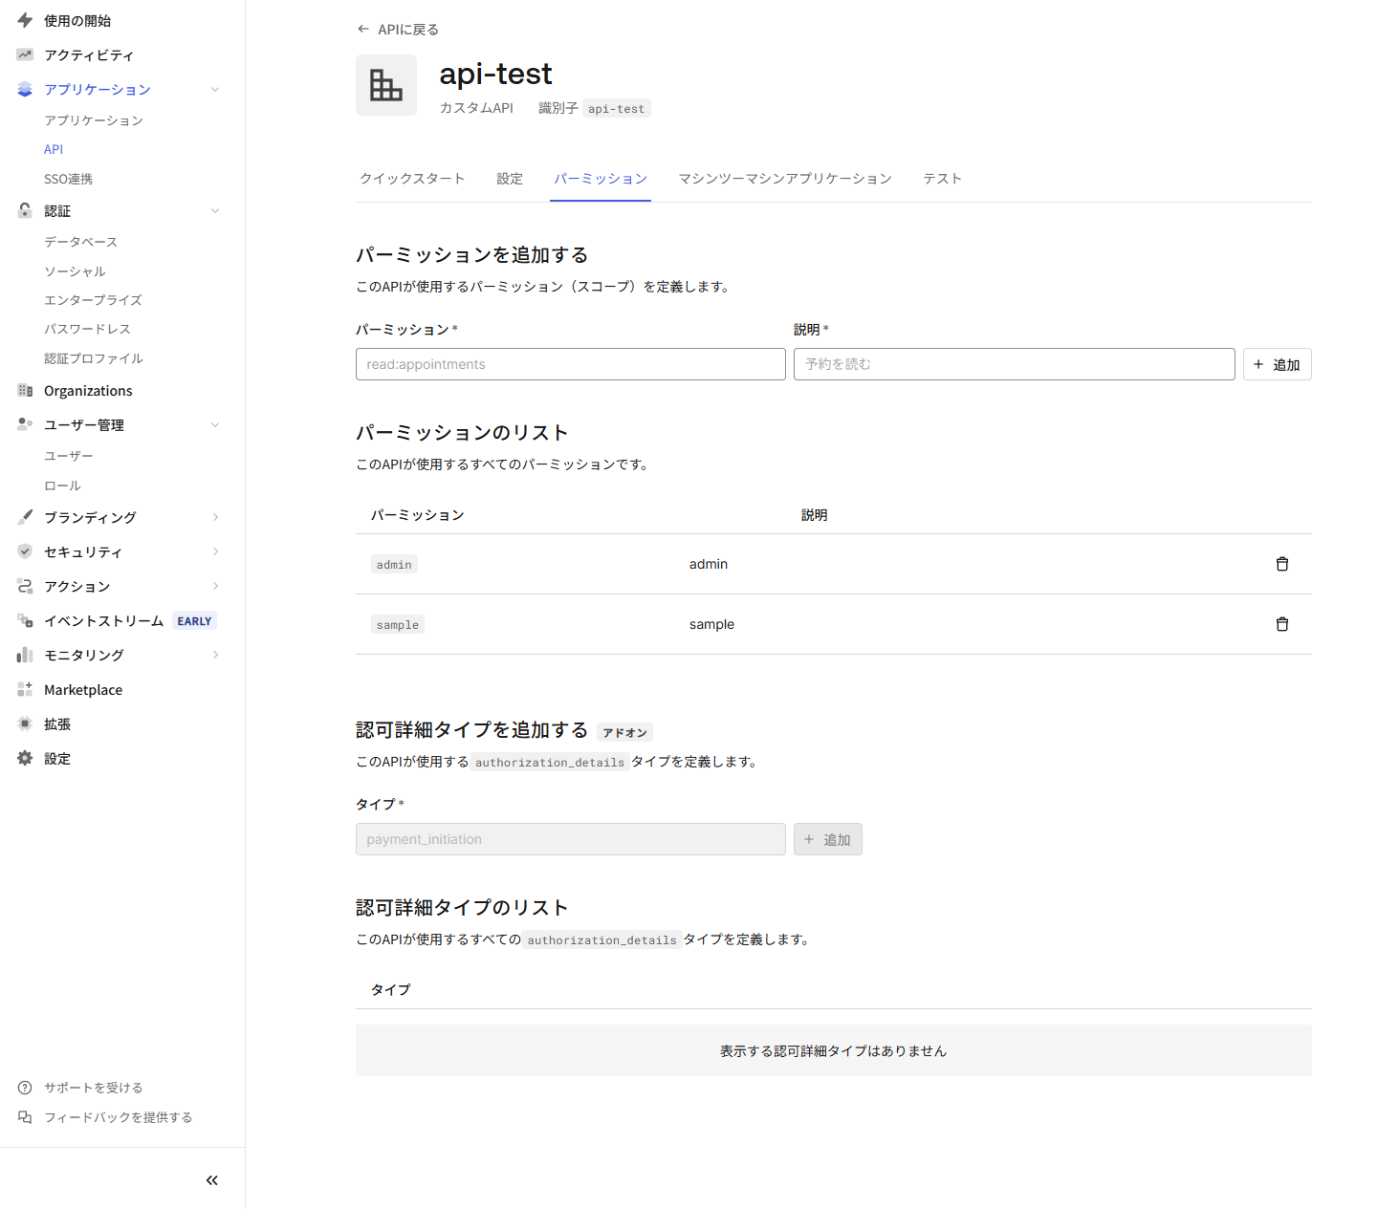
ここで設定した値がJWTのscopeフィールドおよびpermissionsフィールドで使用可能な値になります。
Auth0/APIのRBACの有効化
デフォルトの状態ではRBAC等の設定は無効になっています。また、permissionsフィールドがJWTに含まれません。
この状態だと、auth0のユーザーの設定にかかわらずAPIのscopeとして設定されていれば、クライアント側で要求したscopeはJWTトークンにすべて付与されます。
これでは特定のユーザーのみのadminの権限を渡すといった処理が行えません。
そのため「設定」>「RBACの設定」にて下記設定を行います
- RBACを有効化→有効にする
- 有効にすることで、Auth0のダッシュボード等でユーザーの割り当てた権限のscopeのみがJWTに設定されるようになります
- 注意点としてユーザーから要求されていないscopeはJWTに付与されません
- アクセストークンに権限を追加する→有効にする
- JWTに
permissionsフィールドが追加されます - Auth0のダッシュボード等でユーザーの割り当てたpermissionがすべてこのフィールドに記載されます。
- JWTに
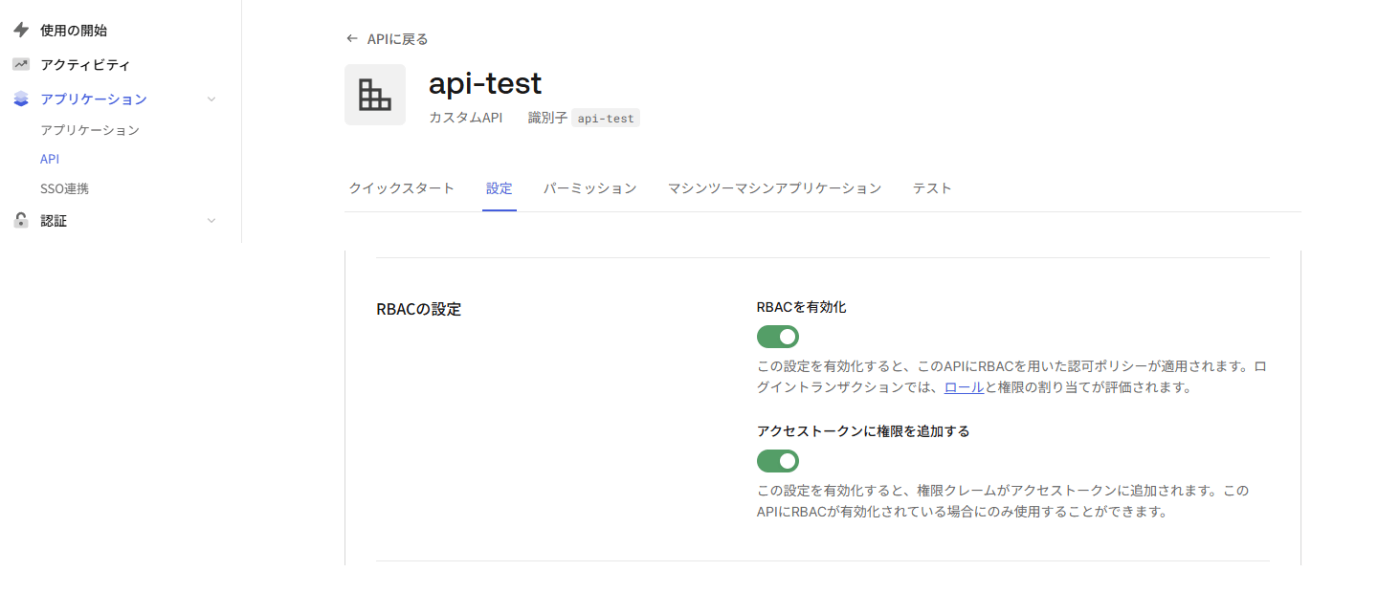
その後忘れず画面下部の「保存」ボタンを押下し設定を保存します。
参考: https://auth0.com/docs/ja-jp/get-started/apis/enable-role-based-access-control-for-apis
Auth0/ユーザー
ユーザーに直接もしくはロールを介してpermissionsを付与します。
詳細はこの記事では割愛します。
依存関係の追加
build.gradle.ktのdependencies配下にspring-boot-starter-securityとcom.okta.spring:okta-spring-boot-starter:3.0.7を追加します。
dependencies {
	implementation("org.springframework.boot:spring-boot-starter-web")
	implementation("com.fasterxml.jackson.module:jackson-module-kotlin")
	implementation("org.jetbrains.kotlin:kotlin-reflect")
	testImplementation("org.springframework.boot:spring-boot-starter-test")
	testImplementation("org.jetbrains.kotlin:kotlin-test-junit5")
	testRuntimeOnly("org.junit.platform:junit-platform-launcher")

	//追加
	implementation("org.springframework.boot:spring-boot-starter-security")
	implementation("com.okta.spring:okta-spring-boot-starter:3.0.7")
}
application.ymlの設定
application.ymlへ下記のように、issuerとaudienceを行います。
okta:
  oauth2:
    issuer: https://<テナント名>.auth0.com/
    audience: api-test //API作成時に設定した識別子(Audience)
SpringSecurityによらないauth0固有の設定はこれで終わりです。
検証用のcontrollerの追加
適当に検証用のcontrollerを作成します
package com.example.demo.controller

import org.springframework.web.bind.annotation.GetMapping
import org.springframework.web.bind.annotation.RestController

@RestController
class SampleController {
    @GetMapping("/api/public/sample")
    fun getSample(): String{
        return "{\"result\": \"aaa\"}"
    }
    @GetMapping("/api/private")
    fun getPrivateSample(): String{
        return "{\"result\": \"private sample\"}"
    }

    @GetMapping("/api/private-scoped")
    fun getPrivateScoped(): String{
        return "{\"result\": \"private scoped email\"}"
    }

    @GetMapping("/api/private-scoped2")
    fun getPrivateScoped2(): String{
        return "{\"result\": \"private scoped sample\"}"
    }
}
SpringSecurityの設定(scopeを使う場合)
@Configurationおよび@EnableWebSecurityを付与したSecurityConfigクラスを作成し、SecurityFilterChainクラスのインスタンスを返すBeanとして設定を行います。
下記の設定を行いました。
-
/api/public/以下のエンドポイント全てはすべてのリクエストを許可 -
/api/privateのエンドポイントは認証済みのリクエストを許可- application.ymlで指定したissuer/audienceのJWTを持つもの
-
/api/private-scopedはJWTのscopeフィールドにemailが含まれる場合のみアクセスを許可 - 上記すべてに当てはまらないリクエストはアクセスを拒否
package com.example.demo.security

import org.springframework.context.annotation.Bean
import org.springframework.context.annotation.Configuration
import org.springframework.security.config.annotation.web.builders.HttpSecurity
import org.springframework.security.config.annotation.web.configuration.EnableWebSecurity
import org.springframework.security.config.annotation.web.invoke
import org.springframework.security.web.SecurityFilterChain


@Configuration
@EnableWebSecurity
class SecurityConfig {
    @Bean
    fun filterChain(http: HttpSecurity): SecurityFilterChain{
        http{
            authorizeHttpRequests {
                authorize("/api/public/**", permitAll)
                authorize("/api/private", authenticated)
                authorize("/api/private-scoped", hasAuthority("SCOPE_email"))
                authorize(anyRequest, authenticated)
            }
            oauth2ResourceServer {
                jwt {  }
            }
        }
        return http.build()

    }
}
SpringSecurityのJWTの処理で、デフォルトでJWTのscopeフィールドの内容を取得し、SCOPE_プレフィックスをつけたうえでhasAuthority()メソッドで内容を参照できるようにしてくれるようです。
認証が行われ、レスポンスが返却されることが確認できました。

ちなみに、JWTの検証ができない場合(Authorizationヘッダーがない・署名が不正な値で検証に失敗する など)は401が、hasAuthorityで指定する値がJWTにない場合は403が返却されました。
SpringSecurityの設定(permissionを使う場合)
JWTのscopeではなくpermissonを使って認可処理を行う方法もあります。
この場合JWTをhasAuthorityメソッドから参照されるAuthenticationに変換する処理を作成し、これを使うように設定する必要があります。
jwtPermissionAuthenticationConverter()のBeanの定義を追加し、これをfilterChain()のBean定義のhttp.oauth2ResourceServer.jwt内でこれを使うように設定しました。
package com.example.demo.security

import org.springframework.context.annotation.Bean
import org.springframework.context.annotation.Configuration
import org.springframework.security.config.annotation.web.builders.HttpSecurity
import org.springframework.security.config.annotation.web.configuration.EnableWebSecurity
import org.springframework.security.config.annotation.web.invoke
import org.springframework.security.oauth2.server.resource.authentication.JwtAuthenticationConverter
import org.springframework.security.oauth2.server.resource.authentication.JwtGrantedAuthoritiesConverter
import org.springframework.security.web.SecurityFilterChain


@Configuration
@EnableWebSecurity
class SecurityConfig {
    @Bean
    fun filterChain(http: HttpSecurity): SecurityFilterChain{
        http{
            authorizeHttpRequests {
                authorize("/api/public/**", permitAll)
                authorize("/api/private", authenticated)
                authorize("/api/private-scoped2", hasAuthority("sample"))

                authorize(anyRequest, authenticated)
            }
            oauth2ResourceServer {
                jwt { jwtAuthenticationConverter = jwtPermissionAuthenticationConverter() }
            }
        }
        return http.build()

    }

    @Bean
    fun jwtPermissionAuthenticationConverter(): JwtAuthenticationConverter {
        val grantedAuthoritiesConverter = JwtGrantedAuthoritiesConverter()
        grantedAuthoritiesConverter.setAuthoritiesClaimName("permissions") //JWTのpermissionsの値を取得するように設定
        grantedAuthoritiesConverter.setAuthorityPrefix("") // hasAuthority()で検証するときにプレフィックスが付与されないように設定

        val jwtAuthenticationConverter = JwtAuthenticationConverter()
        jwtAuthenticationConverter.setJwtGrantedAuthoritiesConverter(grantedAuthoritiesConverter)
        return jwtAuthenticationConverter
    }
}
このとき、scopeの値でhasAuthority()メソッドでの認可処理は行えなくなります。
コントローラーからレスポンスが返却されることを確認できました。

参考
Discussion