TypeScriptサーバーでOpenAPIを最大限活用したい
シンプルなRESTライクAPIサーバーを作るとなったら、OpenAPIは欠かせない存在です。
しかしTypeScriptサーバーでOpenAPIを使おうとすると、意外とかゆいところに手が届かないのが現状です。
本記事ではかゆいポイントを紹介しながら、TypeScriptサーバーで最大限OpenAPIの恩恵に与るための工夫を紹介していきます。
openapi-generatorにTypeScriptサーバー用のジェネレーターが存在しない
いきなり致命的ですが、 https://github.com/OpenAPITools/openapi-generator#overview を見るとわかるようにJavaScriptのサーバージェネレーターは nodejs-express-server しか存在しません。
そのため、まず各モデルの型が欲しいとなったらクライアントサイドの TypeScriptジェネレーターから借りてくることになるでしょう。
また nodejs-express-server で得られるのは実際のところ、ほぼプロジェクト立ち上げのためのボイラープレートにすぎません。
expressとの繋ぎ込みやpackage.jsonまで出力されてしまうのでOpenAPIの更新に合わせて生成するのには向きません。(ignoreもできますがそもそも可食部がほとんどない)
nodejs-express-server の生成物を見ると、express接続部では express-openapi-validator が使われています。
validatorと言いながら、ルーティングや値のシリアライズ/デシリアライズまでやってくれる万能マシンです。これだけあればわざわざコード生成する必要ないわけです。
最小構成で書いてみる
ということでまずは小さなスキーマを作ってサーバーを書いてみます。
openapi: 3.0.0
info:
  version: 1.0.0
  title: Example API
paths:
  /hello:
    get:
      operationId: hello
      parameters:
        - name: name
          in: query
          schema:
            type: string
          required: true
      responses:
        "201":
          description: response message
          content:
            text/plain:
              schema:
                type: string
import express from "express";
import * as OpenApiValidator from "express-openapi-validator";

const app = express();

app.use(OpenApiValidator.middleware({ apiSpec: "./openapi/index.yaml" }));

app.get("/hello", (req, res) => {
  res.end("Hello World! " + req.query.name);
});

app.listen(3000);
これで準備完了です。
$ curl localhost:3000/hello?name=Yuto
Hello World! Yuto
$ curl localhost:3000/hello
<!DOCTYPE html>...(400 Bad Requestを示すHTMLが続く)
name がrequiredフィールドになっているので、リクエストに含んでいなければしっかり弾いてくれます。
小さいAPI群を書くだけならこれで万事解決といえるでしょう。
パラメーターに型がついていない
さて、APIサーバーがそれなりに大きくなってきたらどうでしょうか。
Webアプリケーション用のサーバーなどを想定するとエンドポイントは軽く30を超えてくるかと思います。
エンドポイントによっては複雑なオブジェクトを受け取ったり、ファイルのアップロードを受け付ける必要があるでしょう。
すると、 (req: Request, res: Response) => void という RequestHandler 型で処理を書くのがきつくなってきます。
また、パラメーターの型もあってないようなものです。 req.query.name を覗いてみると
![req.query.name の型が string | QueryString.ParsedQs | string[] | QueryString.ParsedQs[] | undefined と表示されている](https://storage.googleapis.com/zenn-user-upload/ebc55c12a97a-20231111.png)
string | QueryString.ParsedQs | string[] | QueryString.ParsedQs[] | undefined とでており、せっかく OpenAPI で定義した string であるという情報も必須フィールドであるという情報も反映できていません。
そもそも、どんなフィールドがどこに(pathに?queryに?headerに?cookieに?requestBodyに?)入っているはずなのかも、わざわざOpenAPI定義を読みにいかなければわかりません。
せっかくOpenAPIで定義したんだから
(args: {name: string}) => Promise<string>
というシグネチャでハンドラを書きたいですよね?
実は openapi-generator の nodejs-express-server にはまさに「リクエストの色んな項目から必要なパラメーターを集めてくる」という処理が含まれていて、各パラメーターの在りかを気にせずハンドラが書けるようになっています。
ただし、やはり型情報がないため自分で確認する必要があるのと、Node.jsのバージョンによってはうまく動かないエラーがあるので使いたくないところです。
ということで自前で作りました。
ハンドラを書きやすくするアダプターです。express-openapi-validator と一緒に使う前提のパッケージになっています。
簡単に説明すると「リクエストから必要なパラメーターを集めてきてハンドラに渡す」ものです。型の情報もつけることができるのでyamlをわざわざ見に行かなくても型安全に処理を書くことができるようになります。
ちなみにピュアなESMですので、CommonJSはサポートしていません。
JSコミュニティの一員としてESMを頑張っていくという姿勢もふくめて。
型情報を用意する
eov-handler-adapter を使うにあたって、まず型情報を用意する必要があります。
ここまでまだ openapi-generator を使っていないので、型定義が存在しません。
冒頭で述べた通りサーバー向けのジェネレーターにはTypeScriptに対応したものがありません。
そこでクライアント向けの typescript-node から型を借りてこようと思います。
model生成
$ npx openapi-generator-cli generate --global-property models -p modelPropertyNaming=original -i ./openapi/index.yaml -o ./src/generated -g typescript-node
-
--global-property models : 「モデルだけ生成してください」という意味です。見過ごしがちなオプションですが今回のような用途では
.openapi-generator-ignoreよりもずっと指定しやすいです。 https://openapi-generator.tech/docs/globals/ -
-p modelPropertyNaming=original : これは重要です。生成されるモデルのフィールド名の命名規則を決めるのですが、デフォルトでは camelCase になっています。つまり
born_atのようなフィールドが勝手にbornAtに変換されてしまいopenapiで定義したフィールドとの互換を失ってしまうので必ずoriginalを指定する必要があります。 https://openapi-generator.tech/docs/generators/typescript-node/#config-options
これでいい感じにモデルが生成されてくれると思います( RequestFile のインポートでエラーが出ますがこれはあとで解決します)
API型生成
ただこれだけだと半分です。
モデルとは別に、APIハンドラの型を生成していきます。
しかし typescript-node ジェネレーターはあくまでクライアント向けなので、 --global-property に apis を指定してもAPIクライアントのコードが生成されるだけです。
そんなときは、自分でテンプレートを書きましょう。
OpenAPIジェネレーターのカスタマイズというと一瞬うっっとなりますが、身構える必要はありません。
フルカスタマイズはかなりきついですが、既存のジェネレーターに自前のテンプレートを渡すだけなら一瞬でできるのです。
User-defined Templates の章だけが該当箇所です。そのあとの章は全部無関係です。
今回の場合は下のようなconfigファイルを用意して
templateDir: openapi
files:
  apis.mustache:
    templateType: API
    destinationFilename: .ts
出力したいファイルのテンプレートを書きます
{{>licenseInfo}}

{{#imports}}
import { {{classname}} } from '{{filename}}';
{{/imports}}

{{#operations}}
export interface {{classname}} {
  {{#operation}}
  {{operationId}}: [{ {{#allParams}}{{paramName}}{{^required}}?{{/required}}: {{{dataType}}}, {{/allParams}} }, {{#returnType}}{{{.}}}{{/returnType}}{{^returnType}}void{{/returnType}}];
  {{/operation}}
}
{{/operations}}
これでもう一度出力してみます。-cフラグでconfig.yamlを指定して設定を適用できます。
--global-property に apis も追加しています。
$ npx openapi-generator-cli generate --global-property models,apis -p modelPropertyNaming=original -c ./openapi/config.yaml -i ./openapi/index.yaml -o ./src/genereted -g typescript-node
すると以下が出力されます。
export interface DefaultApi {
  hello: [{ name: string,  }, string];
}
扱いやすさのためにAPIシグネチャを [Input, Output] のタプルで表現しています。
ここは好みなので必要に応じて apis.mustache をいじってください。
これで各エンドポイントのハンドラの型を用意することができました。
おまけ
ところで、openapi-generator-cliのオプションがかなり長く嫌な感じです。
先ほど作った config.yaml に移動することができます。
 templateDir: openapi
+globalProperties:
+  apis: ""
+  models: ""
+additionalProperties:
+  modelPropertyNaming: original
 files:
   apis.mustache:
     templateType: API
     destinationFilename: .ts
$ npx openapi-generator-cli generate -c ./openapi/config.yaml -i ./openapi/index.yaml -o ./src/genereted -g typescript-node
すっきりしました。
ハンドラを書く
ここまで来たらあとはハンドラを書くだけです。
 import express from "express";
 import OpenApiValidator from "express-openapi-validator";
+import {
+  EOVHandlerAdapter,
+  Handler,
+  HandlerResponse,
+  typeScriptNodeGenCoordinator,
+} from "eov-handler-adapter";
+import { DefaultApi } from "./genereted/api/defaultApi.js";

 const app = express();

 app.use(OpenApiValidator.middleware({
   apiSpec: "./openapi/index.yaml",
+  $refParser: { mode: "dereference" },
 }));

+const adapter = new EOVHandlerAdapter(typeScriptNodeGenCoordinator());

-app.get("/hello", (req, res) => {
-  res.end("Hello World! " + req.query.name);
-});
+const helloHandler: Handler<DefaultApi["hello"]> = async ({ name }) => {
+  return HandlerResponse.resolve(`Hello World! ${name}`);
+};
+app.get("/hello", adapter.connect(helloHandler));

 app.listen(3000);
Handler のジェネリクスに入出力のタプルを渡すことで型補完が効くようになります。
name にカーソルをあてると確かに string 型になっていることが分かります。
また、レスポンスには HandlerResponse.resolve(), HandlerResponse.reject() を使用します。こちらも誤った型を返そうとすると型エラーが発生するので安心です。
EOVHandlerAdapterを使ってconnectすることで、expressのハンドラとして接続することができます。
($refParser.mode を 'dereference' にするのは現時点での eov-handler-adapter の要求です。そのうち直したいかも。)
これでOpenAPIをもとにして、手軽に型の効いたハンドラを書くことができるようになりました!
人によってはここでゴールになるでしょう。
ルーティングも自動でやってほしい
先ほどのコードでは app.get("/hello", ...) とあるように GETメソッドであることと、そのパス /hello を自前で記述してハンドラを渡しています。
メソッドもパスもOpenAPIで記述しているんだから、そこも自動でやってほしいですよね。
express-openapi-validator では operationHandler というオプションを設定すればルーティングを自動でやってくれます。 (see: https://github.com/cdimascio/express-openapi-validator/wiki/Documentation#example-express-api-server-with-operationhandlers )
しかし一つ問題があって、これを機能させるにはOpenAPIスペックのほうで x-eov-operation-handler を設定しなければいけません。
見た目の通りこのフィールドはカスタムフィールド的なもので、特定の用途のみでの利用を前提としています。
問題?設定すればええやん、と思うかもしれませんが、スキーマファーストと言うからにはあくまでスキーマが先。そのあとどう利用されるかはスキーマが知ったことではない、というのが理想ですよね。
(そんなこと言ったら operationId は?という話ですが、まあこれは標準フィールドなのでセーフということで。。)
ということでちょっと工夫を施します。 express-openapi-validator の operationHandler は、標準のルーティングに代わってカスタムルーティングを設定することができます。
resolver にルーティング用の関数を渡すことができます。
これを使ってルーティングを書きましょう
 import express from "express";
 import OpenApiValidator from "express-openapi-validator";

 import {
+  Controller,
   EOVHandlerAdapter,
   Handler,
   HandlerResponse,
   typeScriptNodeGenCoordinator,
 } from "eov-handler-adapter";
 import { DefaultApi } from "./genereted/api/defaultApi.js";

+import { OpenAPIV3 } from "express-openapi-validator/dist/framework/types.js";
+import { RouteMetadata } from "express-openapi-validator/dist/framework/openapi.spec.loader.js";

 const app = express();

 const adapter = new EOVHandlerAdapter(typeScriptNodeGenCoordinator);

 const helloHandler: Handler<DefaultApi["hello"]> = async ({ name }) => {
   return HandlerResponse.resolve(`Hello World! ${name}`);
 };

-app.get("/hello", adapter.connect(helloHandler));
+// キーに `operationId` が対応します
+const handlers: Record<string, Controller> = {
+  hello: adapter.connect(helloHandler),
+};

+type HttpMethods = "get" | "put" | "post" | "delete" | "options" | "head" | "patch" | "trace";
 app.use(
   OpenApiValidator.middleware({
     apiSpec: "./openapi/index.yaml",
     $refParser: { mode: "dereference" },
+    operationHandlers: {
+      basePath: "",
+      resolver: (
+        _: string,
+        route: RouteMetadata,
+        apiDoc: OpenAPIV3.Document
+      ) => {
+        const pathKey = route.openApiRoute.slice(route.basePath.length);
+        const schema =
+          apiDoc.paths[pathKey][route.method.toLowerCase() as HttpMethods];
+        if (!schema) {
+          throw new Error(`No schema found for ${route.method} ${pathKey}`);
+        }
+        const operationId = schema.operationId;
+        if (!operationId) {
+          throw new Error(
+            `operationId is not defined on ${route.method} ${pathKey}`
+          );
+        }
+        const handle = handlers[operationId];
+        if (!handle) {
+          throw new Error(`Handler is not registered for ${operationId}`);
+        }
+        return handle;
+      },
+    },
   })
 );

 app.listen(3000);
ちょっと長くなっちゃいましたね。
本当は resolver の route に schema という形でリクエストに応じたAPIスキーマが抜き出されているはずなんですが、ESMとの兼ね合いで上手くいっていないそうなのです。
そのため、スキーマ全体をたどって取りに行っています。
ルートの解決は最初にまとめて行われるのでパフォーマンスに関してはあんまり気にしなくていいはずです。
また、 resolver の型が Function になってしまっているので、引数の型は自分で書くしかないです。
何はともあれ、これでメソッドとエンドポイントパスを意識することなくハンドラを接続できるようになりました。
エンドポイントが増えたら handlers にキーとして operationId に該当する文字列を設定して、コントローラーを入れてやれるだけでOKです。
さて、ハンドラの準備とルーティングに関してはこれで完了です!
date-timeの型がずれている
もう使える状態にはなっているのですが、実際に使っていると「え?」というタイミングが訪れます。
date-time フォーマットがそれです。
下記のOpenAPI定義を使ってみます
openapi: 3.0.0
info:
  version: 1.0.0
  title: Example API
paths:
  /dates:
    get:
      operationId: dates
      parameters:
        - name: birthday
          in: query
          schema:
            type: string
            format: date
	  requied: true
        - name: bornAt
          in: query
          schema:
            type: string
            format: date-time
	  requied: true
      responses:
        "201":
          description: empty response
date のほうが日付のフォーマットで、 date-time が日時のフォーマットですね。
さて、ここからAPIの型を生成すると以下のようになります。
export interface DefaultApi {
  dates: [{ birthday: string, bornAt: Date,  }, void];
}
期待通りです。日時はやっぱりDateで受け取るのが取り回しよくていいですよね。
さて、ハンドラーを書きましょう。

補完が完璧に効いていて気持ち良いです。
const datesHandler: Handler<DefaultApi["dates"]> = async ({
  birthday,
  bornAt,
}) => {
  console.log(`My birthday is ${birthday}`);
  console.log(`I was born at ${bornAt.toISOString()}`);
  return HandlerResponse.resolve(undefined);
};

const handlers: Record<string, Controller> = {
  hello: adapter.connect(helloHandler),
  dates: adapter.connect(datesHandler),
};
ハンドラーを書いたら、handlersに operationId のキーで格納するだけです。
リクエストを投げてみましょう。URLエンコードを忘れずに。
$ curl "localhost:3000/dates?birthday=2020-01-01&bornAt=2020-01-01T08%3A00%3A00%2B09%3A00"
My birthday is 2020-01-01
TypeError: bornAt.toISOString is not a function
残念ながらエラーです。 bornAt.toISOString is not a function とありますね。Date型には toISOString メソッドが生えているはずなのに。
見出しの時点でお気づきかとは思いますが、そう、この bornAt 実際にはstring型が格納されています。つまり 2020-01-01T08:00:00+09:00 という文字列がそのまま入っています。
これをキャストしてやる必要があります。といっても自前でやろうと思ったらスキーマ内のオブジェクトを走査して、、と大変です。
実はこれも express-openapi-validator がやってくれます。バリデーターとは一体...?
serDes というオプションです。serialize/deserialize の略ですね。
デフォルトでは date および date-time に対するserializerのみがセットされています。
つまり、レスポンスを返すときはDateを渡せばISO文字列に勝手に変換してくれるということですね。
対してdeserializerはデフォルトではセットされていません。
ということでセットしましょう。
 app.use(
   OpenApiValidator.middleware({
     apiSpec: "./openapi/index.yaml",
     $refParser: { mode: "dereference" },
     operationHandlers: {/* 略 */},
+    serDes: [
+      OpenApiValidator.serdes.dateTime,
+      OpenApiValidator.serdes.date.serializer,
+    ],
   })
 );
My birthday is 2020-01-01
I was born at 2019-12-31T23:00:00.000Z
ちゃんと動きました!
ファイルのアップロード
欲を言えばここもちゃんとカバーしたいですよね。
Firebase StorageとかS3使ってる分にはAPIサーバーを経由しなくてもいいことが多いですが、逆にストレージを経由したくないこともあると思います。
ファイルのアップロードには application/octet-stream などでバイナリをそのままがつんと渡す方法と、 multipart/form-data で送る方法とあります。
後者はフィールド名の指定や複数ファイルの送信もできるので便利ですし、HTMLフォームからそのままリクエストもできます。APIとしては後者のほうが一般的かなと思います。
一応網羅のために前者のパターンから見ていきましょう。
application/octet-stream
openapi: 3.0.0
info:
  version: 1.0.0
  title: Example API
paths:
  /single_file:
    post:
      operationId: singleFile
      requestBody:
        content:
          application/octet-stream:
	    required: true
            schema:
              type: string
              format: binary
      responses:
        "201":
          description: empty response
スキーマはこんな感じ。format: binary を指定することでバイナリで受け取ることを表します。
ここからapi型を生成すると以下のようになります。
export interface DefaultApi {
  singleFile: [{ body: RequestFile,  }, void];
}
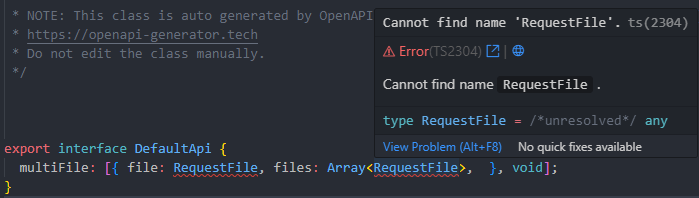
RequestFile というのが独自の型になっています。この型は本来 typescript-node の生成でつくられるものですが、今回はオプションで省いているので出力されていません。
これはあとで自前で RequestFile 型を定義してあげるとして、ハンドラを書きましょう。
app.use(bodyParser.raw());

const singleFileHandler: Handler<DefaultApi["singleFile"]> = async ({
  body,
}) => {
  console.log("Received: ", body);
  console.log("Content:  ", (body as Buffer).toString("utf-8"));
  return HandlerResponse.resolve(undefined);
};

const handlers: Record<string, Controller> = {
  singleFile: adapter.connect(singleFileHandler),
};
bodyParser を忘れずに入れましょう。自分は毎回忘れては原因究明に無駄な時間を費やします。
ファイルを送ってみます。
This is a sample file.
$ curl -X POST -H 'Content-Type: application/octet-stream' --data-binary '@./sample.txt' localhost:3000/single_file
結果
Received:  <Buffer 54 68 69 73 20 69 73 20 61 20 73 61 6d 70 6c 65 20 66 69 6c 65 2e>
Content:   This is a sample file.
Buffer を受け取れました。用途によってはこれでも全然ありですね。
multipart/form-data
次はこちら
openapi: 3.0.0
info:
  version: 1.0.0
  title: Example API
paths:
  /multi_file:
    post:
      operationId: multiFile
      requestBody:
        required: true
        content:
          multipart/form-data:
            schema:
              type: object
              properties:
                file:
                  type: string
                  format: binary
                files:
                  type: array
                  items:
                    type: string
                    format: binary
              required:
                - file
                - files
      responses:
        "201":
          description: empty response
単体と配列両方用意してみました。
生成されるAPI型はこうなります。
export interface DefaultApi {
  multiFile: [{ file: RequestFile, files: Array<RequestFile>,  }, void];
}
至極普通ですね。普通がいちばん。
ハンドラを書いて
const multiFileHandler: Handler<DefaultApi["multiFile"]> = async ({
  file,
  files,
}) => {
  console.log("file", file);
  console.log("files", files);
  return HandlerResponse.resolve(undefined);
};

const handlers: Record<string, Controller> = {
  multiFile: adapter.connect(multiFileHandler),
};

app.use(
  OpenApiValidator.middleware({
    apiSpec: "./openapi/index.yaml",
    $refParser: { mode: "dereference" },
    operationHandlers: /* 略 */,
    serDes: /* 略 */,
    fileUploader: {
      dest: "uploads",
    },
  })
);
リクエストを投げます
curl -X POST localhost:3000/multi_file \
--form 'file=@./sample.txt' \
--form 'files=@./package.json' \
--form 'files=@./tsconfig.json'
結果
file {
  fieldname: 'file',
  originalname: 'sample.txt',
  encoding: '7bit',
  mimetype: 'text/plain',
  destination: 'uploads',
  filename: '57ca587dcc2feaf4e30cd59f26350283',
  path: 'uploads\\57ca587dcc2feaf4e30cd59f26350283',
  size: 22
}
files [
  {
    fieldname: 'files',
    originalname: 'package.json',
    encoding: '7bit',
    mimetype: 'application/octet-stream',
    destination: 'uploads',
    filename: '9ac4f2bf59a6930f1c6d07c2063e638d',
    path: 'uploads\\9ac4f2bf59a6930f1c6d07c2063e638d',
    size: 904
  },
  {
    fieldname: 'files',
    originalname: 'tsconfig.json',
    encoding: '7bit',
    mimetype: 'application/octet-stream',
    destination: 'uploads',
    filename: 'f1673c476a7f7c21dacd48aa420cb26b',
    path: 'uploads\\f1673c476a7f7c21dacd48aa420cb26b',
    size: 12200
  }
]
こんなオブジェクトが入ってきました。
これはかの有名なMulterによるファイルオブジェクトで、 Express.Multer.File にあたります。Multerを入れた覚えはないですが、 express-openapi-validator に最初から装備されているためこうなります。
uploads ディレクトリを見てみると確かにアップロードしたファイルたちが格納されていることが確認できます。
ファイル型を補完する
さて、現時点で file は RequestFile 型ですが、これはまだ定義していませんでした。
入ってきうるファイルの型を教えてあげましょう。
declare global {
  type RequestFile = Buffer | Express.Multer.File;
}

export {};

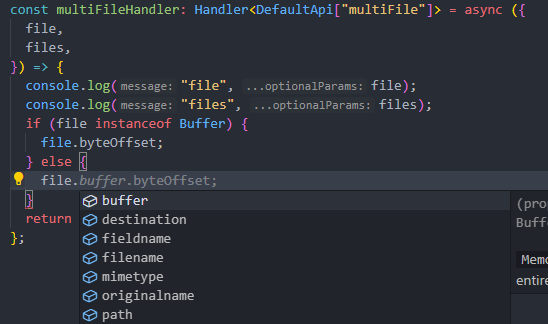
補完が効くようになりました、完璧です。
いちいち Buffer か Express.Multer.File か判定するのは面倒なので、後者だけつかうと決め打ちで Buffer は除外してもいいかもしれませんね。
ESM互換でない
ES Modulesを使用している場合はもう一つ問題があります。
$ref でスキーマを参照しているときにこの問題はおこります。つまりはほぼすべてのユースケースに該当します。
  /with_refs:
    post:
      operationId: withRefs
      requestBody:
        required: true
        content:
          application/json:
            schema:
              $ref: "#/components/schemas/InputObject"
      responses:
        "200":
          description: birth object from external file
          content:
            application/json:
              schema:
                $ref: "./birth_external.yaml"
components:
  schemas:
    InputObject:
      type: object
      properties:
        name:
          type: string
        age:
          type: integer
          format: int32
type: object
properties:
  birthday:
    type: string
    format: date
  bornAt:
    type: string
    format: date-time
  birth_month:
    $ref: "./year_month.yaml"
type: object
properties:
  year:
    type: integer
    format: int32
  month:
    type: integer
    format: int32
required:
  - year
  - month
多くの場合はこんな感じで複数のファイルやcomponentsに分かれますよね。
生成されるファイルは下のようになります。
import { BirthExternal } from '../model/birthExternal';
import { InputObject } from '../model/inputObject';

export interface DefaultApi {
  withRefs: [{ inputObject: InputObject,  }, BirthExternal];
}
import { RequestFile } from "./model"
import { YearMonth } from './yearMonth';

export class BirthExternal {
    'birthday'?: string;
    'bornAt'?: Date;
    'birthMonth'?: YearMonth;
}
コンポーネントのキーやファイル名がそのまま型の名前になってくれるのは非常に良いのですが、、ESMを使っているとこうなります。

ESMを使っている場合はモジュール名の拡張子を省略することはできないので、ちゃんと .js まで書かないといけません。
ただ、Node.jsにおいてESMネイティブな書き方はいまだに浸透していないのでジェネレーター側では対応がありません。
Issueは上がっていますが放置気味ですね...。
ここまでくると、そもそも openapi-generator を使うこと自体筋が悪いのではないかという気がしてきますが、今更引き返せないというコンコルド効果もあって続けます。
RESTが死ぬことは考えづらいので今後も需要はあり続けるとおもうんですけどね。
API定義の修正
さて、API定義のほうはさっき作ったテンプレートをちょっと手直しするだけです
 {{>licenseInfo}}

 {{#imports}}
-import { {{classname}} } from '{{filename}}';
+import { {{classname}} } from '{{filename}}.js';
 {{/imports}}

 /* 略 */
Modelの修正
問題はこっちです。こっちもカスタムテンプレートに置き換えるしかないですね。
もともと出力されてたモデルも余計なフィールドがあったりしてうっとうしかったのでちょうどいいです。
まずは config.yaml を修正
 templateDir: openapi
 globalProperties:
   apis: ""
   models: ""
 additionalProperties:
  modelPropertyNaming: original
 files:
+  model.mustache:
+    templateType: Model
+    destinationFilename: .ts
   apis.mustache:
     templateType: API
     destinationFilename: .ts
以下をベースにしてテンプレートを起こします。
diffだけ示すと
-import { RequestFile } from './models';

-import { {{classname}} } from '{{filename}}';
+import { {{classname}} } from '{{filename}}.js';

-{{#discriminator}}
-static discriminator: string | undefined = "{{discriminatorName}}";
-{{/discriminator}}
-{{^discriminator}}
-static discriminator: string | undefined = undefined;
-{{/discriminator}}
-
-{{^isArray}}
-static attributeTypeMap: Array<{name: string, baseName: string, type: string}> = [
-    {{#vars}}
-    {
-        "name": "{{name}}",
-        "baseName": "{{baseName}}",
-        "type": "{{#isEnum}}{{{datatypeWithEnum}}}{{/isEnum}}{{^isEnum}}{{{dataType}}}{{/isEnum}}"
-    }{{^-last}},
-    {{/-last}}
-    {{/vars}}
-];
-
-static getAttributeTypeMap() {
-    {{#parent}}
-    return super.getAttributeTypeMap().concat({{classname}}.attributeTypeMap);
-    {{/parent}}
-    {{^parent}}
-    return {{classname}}.attributeTypeMap;
-    {{/parent}}
-}
-{{/isArray}}
こんな感じでいいんじゃないでしょうか。
下部のやつはあっても害ないんですが、なんか邪魔なので消しました。
あと import { RequestFile } from './models' も今回は生成していないので消しました。
結局全部自前のテンプレートになっちゃいました。
ということでモデルはこんな感じで生成されます
import { YearMonth } from './yearMonth.js';

export class BirthExternal {
    'birthday'?: string;
    'bornAt'?: Date;
    'birthMonth'?: YearMonth;
}
きれいでいいですね。
自分の場合は class もやめて interface にしています。
classじゃなきゃ動かないケースがあるのかもしれませんが、そうなってから考えます。
結果的に生成物全部カスタムテンプレートになってしまいましたが、まあ2種類ですし、フルコントロールを得たということでポジティブにとらえましょう。
enumの型がanyになっている
どんだけ落とし穴あんねん。
本格的に openapi-generator を使うこと自体間違いな気もしてきましたが、これが最後です。
openapi: 3.0.0
info:
  version: 1.0.0
  title: Example API
paths:
  /fruits:
    get:
      operationId: fruits
      responses:
        "200":
          description: enum response
          content:
            application/json:
              schema:
                type: array
                items:
                  $ref: "./fruit.yaml"
type: string
enum:
  - STRAWBERRY
  - CHERRY
  - GRAPE
  - DEKOPON
  - ORANGE
  - APPLE
  - PEAR
  - PEACH
  - PINEAPPLE
  - MELON
  - WATERMELON
フルーツを表すenum値を用意してみました。
生成コードは以下のようになります。
import { Fruits200Response } from '../model/fruits200Response.js';

export interface DefaultApi {
  fruits: [{  }, Array<Fruit>];
}
export enum Fruit {
    Strawberry = <any> 'STRAWBERRY',
    Cherry = <any> 'CHERRY',
    Grape = <any> 'GRAPE',
    Dekopon = <any> 'DEKOPON',
    Orange = <any> 'ORANGE',
    Apple = <any> 'APPLE',
    Pear = <any> 'PEAR',
    Peach = <any> 'PEACH',
    Pineapple = <any> 'PINEAPPLE',
    Melon = <any> 'MELON',
    Watermelon = <any> 'WATERMELON'
}
なんなんでしょうかこの <any> は。何か理由があるのかもしれませんがよく分かりません。
それから、TypeScriptのenumを使うのはあまり良しとされていません。
せっかくフルカスタムにしたので、こちらもテンプレートを書き換えちゃいましょう。
2か所該当しますが、1か所のdiffだけ掲載します
-export enum {{classname}} {
+export const {{classname}}s = {
 {{#allowableValues}}
     {{#enumVars}}
-    {{name}} = <any> {{{value}}}{{^-last}},{{/-last}}
+    {{name}}: {{{value}}}{{^-last}},{{/-last}}
     {{/enumVars}}
     {{/allowableValues}}
 }
+export type {{classname}} = typeof {{classname}}s[keyof typeof {{classname}}s];
こんな感じですかねー。
すると以下のような生成結果になります。
export const Fruits = {
    Strawberry: 'STRAWBERRY',
    Cherry: 'CHERRY',
    Grape: 'GRAPE',
    Dekopon: 'DEKOPON',
    Orange: 'ORANGE',
    Apple: 'APPLE',
    Pear: 'PEAR',
    Peach: 'PEACH',
    Pineapple: 'PINEAPPLE',
    Melon: 'MELON',
    Watermelon: 'WATERMELON'
} as const;
export type Fruit = typeof Fruits[keyof typeof Fruits];
文句なしです。
まとめ
晴れてOpenAPIの恩恵を最大限に受けながらTypeScriptサーバーを書くことができるようになりました。
- 型つきのハンドラー
- リクエストオブジェクトを意識せずにパラメーターを利用できる
- 自動ルーティング
- 柔軟な生成物コントロール(ポジティブ)
いちいち経緯を書いていたので記事は長くなりましたが、成果物自体は非常に簡潔にまとまっています。是非サンプルリポジトリを覗いてみてください。
ここまでお読みいただきありがとうございました。
P.S.
そろそろ express ではなく Web Standard の Request に対するフレームワーク非依存のバリデーターが生まれてほしいところですがそういう動きはなんでしょうかね。
それとももうOpenAPI自体の動きが鈍ってしまっているのか...情報お持ちのかたはいただけると幸いです。
Discussion