⚙️
Azure 開発用仮想マシンをBicepで構築する
はじめに
開発用のAzure Virtual Machines(仮想マシン)を毎回ちまちま作っているのが煩わしいので、備忘用にBicepにしました。
パラメータを指定することで、Azure リソースの省略形に従って作成します。
OSはWindows 11で、サイズはStandard_D4s_v3固定にしていますので適宜調整してください。
前提事項
下記が必要
- Azure CLI
- Bicep
コマンドライン
任意のディレクトリへ下記のBicepをmain.bicepとして用意します。
main.bicep
param environmentName string
param vmName string = 'vm-${environmentName}'
param publicIpName string = 'pip-${environmentName}'
param storageAccountName string = 'vmst${replace(environmentName, '-', '')}'
param nicName string = 'nic${replace(environmentName, '-', '')}'
param virtualNetworkName string = 'vnet-${environmentName}'
param networkSecurityGroupName string = 'nsg-${environmentName}'

@description('Username for the Virtual Machine.')
param adminUsername string

@description('Password for the Virtual Machine.')
@minLength(12)
@secure()
param adminPassword string

@description('Unique DNS Name for the Public IP used to access the Virtual Machine.')
param dnsLabelPrefix string = toLower('${vmName}-${uniqueString(resourceGroup().id, vmName)}')

@description('Allocation method for the Public IP used to access the Virtual Machine.')
@allowed([
  'Dynamic'
  'Static'
])
param publicIPAllocationMethod string = 'Dynamic'

@description('SKU for the Public IP used to access the Virtual Machine.')
@allowed([
  'Basic'
  'Standard'
])
param publicIpSku string = 'Basic'

@description('The Windows version for the VM. This will pick a fully patched image of this given Windows version.')
@allowed([
  'win11-21h2-pro'
])
param OSVersion string = 'win11-21h2-pro'

@description('Size of the virtual machine.')
param vmSize string = 'Standard_D4s_v3'

@description('Location for all resources.')
param location string = resourceGroup().location


@description('Security Type of the Virtual Machine.')
@allowed([
  'Standard'
  'TrustedLaunch'
])
param securityType string = 'Standard'

var addressPrefix = '10.0.0.0/16'
var subnetName = 'Subnet'
var subnetPrefix = '10.0.0.0/24'
var securityProfileJson = {
  uefiSettings: {
    secureBootEnabled: true
    vTpmEnabled: true
  }
  securityType: securityType
}
var extensionName = 'GuestAttestation'
var extensionPublisher = 'Microsoft.Azure.Security.WindowsAttestation'
var extensionVersion = '1.0'
var maaTenantName = 'GuestAttestation'
var maaEndpoint = substring('emptyString', 0, 0)

resource storageAccount 'Microsoft.Storage/storageAccounts@2022-05-01' = {
  name: storageAccountName
  location: location
  sku: {
    name: 'Standard_LRS'
  }
  kind: 'Storage'
}

resource publicIp 'Microsoft.Network/publicIPAddresses@2022-05-01' = {
  name: publicIpName
  location: location
  sku: {
    name: publicIpSku
  }
  properties: {
    publicIPAllocationMethod: publicIPAllocationMethod
    dnsSettings: {
      domainNameLabel: dnsLabelPrefix
    }
  }
}

resource networkSecurityGroup 'Microsoft.Network/networkSecurityGroups@2022-05-01' = {
  name: networkSecurityGroupName
  location: location
  properties: {
    securityRules: [
      {
        name: 'default-allow-3389'
        properties: {
          priority: 1000
          access: 'Allow'
          direction: 'Inbound'
          destinationPortRange: '3389'
          protocol: 'Tcp'
          sourcePortRange: '*'
          sourceAddressPrefix: '*'
          destinationAddressPrefix: '*'
        }
      }
    ]
  }
}

resource virtualNetwork 'Microsoft.Network/virtualNetworks@2022-05-01' = {
  name: virtualNetworkName
  location: location
  properties: {
    addressSpace: {
      addressPrefixes: [
        addressPrefix
      ]
    }
    subnets: [
      {
        name: subnetName
        properties: {
          addressPrefix: subnetPrefix
          networkSecurityGroup: {
            id: networkSecurityGroup.id
          }
        }
      }
    ]
  }
}

resource nic 'Microsoft.Network/networkInterfaces@2022-05-01' = {
  name: nicName
  location: location
  properties: {
    ipConfigurations: [
      {
        name: 'ipconfig1'
        properties: {
          privateIPAllocationMethod: 'Dynamic'
          publicIPAddress: {
            id: publicIp.id
          }
          subnet: {
            id: resourceId('Microsoft.Network/virtualNetworks/subnets', virtualNetworkName, subnetName)
          }
        }
      }
    ]
  }
  dependsOn: [

    virtualNetwork
  ]
}

resource vm 'Microsoft.Compute/virtualMachines@2022-03-01' = {
  name: vmName
  location: location
  properties: {
    hardwareProfile: {
      vmSize: vmSize
    }
    osProfile: {
      computerName: vmName
      adminUsername: adminUsername
      adminPassword: adminPassword
    }
    storageProfile: {
      imageReference: {
        publisher: 'microsoftwindowsdesktop'
        offer: 'windows-11'
        sku: OSVersion
        version: 'latest'
      }
      osDisk: {
        createOption: 'FromImage'
        managedDisk: {
          storageAccountType: 'StandardSSD_LRS'
        }
      }
      dataDisks: [
        {
          diskSizeGB: 1023
          lun: 0
          createOption: 'Empty'
        }
      ]
    }
    networkProfile: {
      networkInterfaces: [
        {
          id: nic.id
        }
      ]
    }
    diagnosticsProfile: {
      bootDiagnostics: {
        enabled: true
        storageUri: storageAccount.properties.primaryEndpoints.blob
      }
    }
    securityProfile: ((securityType == 'TrustedLaunch') ? securityProfileJson : null)
  }
}

resource vmExtension 'Microsoft.Compute/virtualMachines/extensions@2022-03-01' = if ((securityType == 'TrustedLaunch') && ((securityProfileJson.uefiSettings.secureBootEnabled == true) && (securityProfileJson.uefiSettings.vTpmEnabled == true))) {
  parent: vm
  name: extensionName
  location: location
  properties: {
    publisher: extensionPublisher
    type: extensionName
    typeHandlerVersion: extensionVersion
    autoUpgradeMinorVersion: true
    enableAutomaticUpgrade: true
    settings: {
      AttestationConfig: {
        MaaSettings: {
          maaEndpoint: maaEndpoint
          maaTenantName: maaTenantName
        }
      }
    }
  }
}

output hostname string = publicIp.properties.dnsSettings.fqdn
コマンドプロンプトで下記を実行します。
VMログイン時のユーザ名と、各コンポーネント本体の名称を渡します。
bash
# sign in
az login --tenant %your_tenant_id%
# create resoure group
az group create --name rg-osa-test-001 --location japaneast
# create resource
az deployment group create --resource-group rg-osa-test-001 --template-file main.bicep --parameters adminUsername=adminuser environmentName=osa-test-001

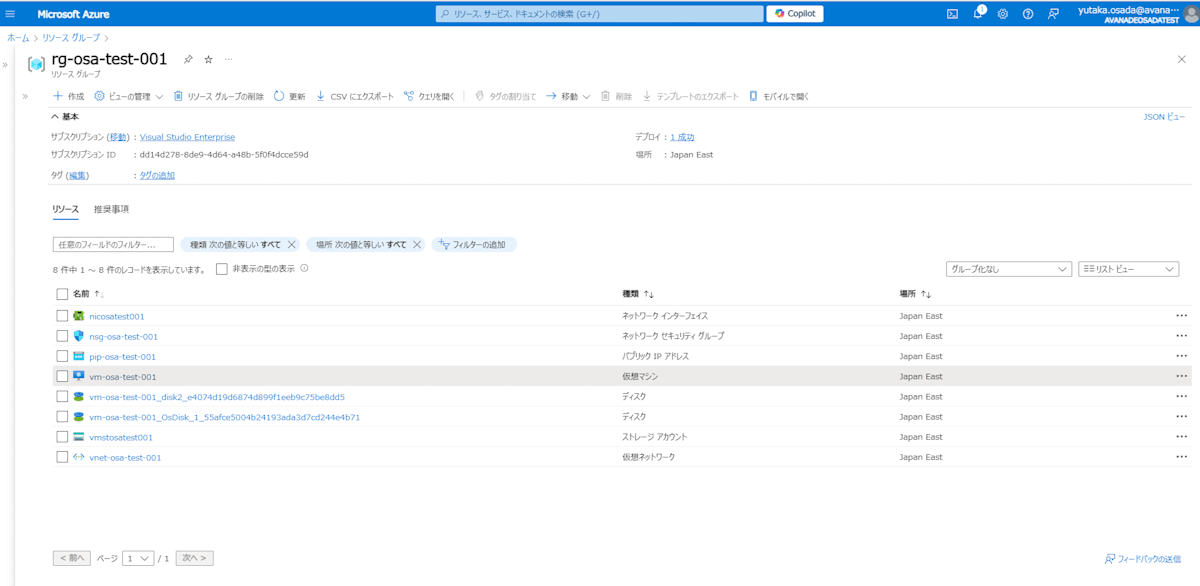
下記のように作成されます。

References
Discussion