ファイルベースルーティングフレームワークを作る!
いわゆるファイルベースルーティングをするJavaScript/TypeScriptのWebのフレームワークを作ってみましょう。
ファイルベースルーティングの例
ここで言うファイルベースルーティングとはファイルを置いたパスに応じてWebのルーティングも決定する、というものです。例はこんな感じです。
$ tree ./app/routes
./app/routes
├── about.tsx // http://localhost:3000/about
├── index.tsx // http://localhost:3000/
└── posts
    └── [id].tsx // http://localhost:3000/posts/123
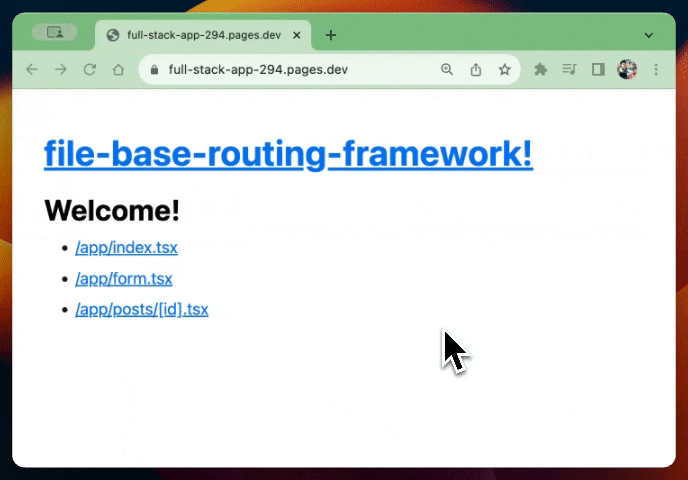
できたアプリ
今回サンプルで作ったアプリはこんなのです。/formではhtmxを使ってフォームの例を実装しています。
ファイルの配置はこちら。
app
├── factory.ts
├── routes
│   ├── _renderer.tsx
│   ├── form.tsx
│   ├── index.tsx
│   └── posts
│       └── [id].tsx
└── server.ts
スクリーンキャストはこちらです。
ViteとHonoを使う
- Vite - ローカルに置いた複数のJavaScript/TypeScriptのファイルをロードしてバンドルします。開発サーバーも備えています。
- Hono - ベースとなるフレームワークです。組み込みのJSXを使ってHTMLを組み立てたり、GET以外にもPOST/PUT/DELETEのメソッドをHonoのシンタックスでサポートします。
各ファイルの例
例えば、GET /へのアクセスに対して簡単なHTMLを返すにはapp/routes/index.tsxをこのように書けばいいことにしましょう。
export default function Home() {
  return <h2>Welcome!</h2>
}
シンプルですね。ただこれだけだとGETしか扱えないので、GETも含み、GET/POST/PUT/DELETEは以下のようなシンタックスで書けるようにしてみます。
const handler: Handler = async (c) => {
  const { name } = await c.req.parseBody<{ name: string }>()
  return c.html(<p>You are name is {name}</p>)
}

export const POST = [handler]
POSTに渡しているのが配列なのはハンドラ一つだけでなくミドルウェアも追加される可能があるからです。
でも、これだと実は型推論がうまくいかなかったり、シンタックスが気に食わないので、最近Honoに新しく入ったhono/factoryのcreateHandlers()を使います。
まずFactoryのインスタンスfactoryは共通で使いまわしたいので、以下に置きます。
import { createFactory } from 'hono/factory'

const factory = createFactory()
export { factory }
このfactoryの関数createHandlersを使えば、正しい型推論をしつつハンドラを定義できます。なので、Zod Validatorも型付きで使えます。
import { factory } from '../factory'
import { z } from 'zod'
import { zValidator } from '@hono/zod-validator'

export const POST = factory.createHandlers(
  zValidator(
    'form',
    z.object({
      name: z.string()
    }),
    (result, c) => {
      if (!result.success) {
        c.status(400)
        return c.html(<p>Invalid!</p>)
      }
    }
  ),
  (c) => {
    const { name } = c.req.valid('form')
    return c.html(<p>You are name is {name}</p>)
  }
)
これはかなりクールですね!
このように各ファイルでは以下の2つの構文でコンテンツを返すことになります。
- JSXの関数を返す(Function Export)。
-
GET/POST/PUT/DELETEにハンドラを渡してexportする。
createApp()
ルートごとにハンドラをファイルとして置くわけですが、エントリとなるファイルを作らなくてはいけません。app/server.tsでcreateApp()を呼ぶようにしましょう。言ってませんでしたが、このフレームワークはsrc/framework.tsで実装することにします。
import { createApp } from '../src/framework'
import { showRoutes } from 'hono/dev'

const app = createApp()

showRoutes(app)

export default app
面白いことに今回、createApp()の返り値はHonoのインスタンスそのものにするので、hono/devのshowRoutes()がそのまま使えます。
@hono/vite-dev-server
このようにapp/server.tsはHonoのアプリです。言うてしまえば、Honoのアプリなので、例のごとくCloudflare、Deno、Bunなどどの環境でも動きます。
さてHonoでは@hono/vite-dev-serverというViteで使えるカスタムサーバーを提供するプラグインがあります。
つまりこれがそのまま使えるわけです。vite.config.tsはこのようになります。
import { defineConfig } from 'vite'
import devServer from '@hono/vite-dev-server'

export default defineConfig({
  plugins: [
    devServer({
      entry: 'app/server.ts'
    })
  ]
})
import.meta.glob()
さて仕様の説明はこれくらいで、実際に作っていきましょう。
ファイルベースルーティングの鍵を握るのはViteが提供するimport.meta.glob()という関数です。これを使うと簡単に希望する場所のファイル一覧を取得し、ロードすることができます。
まず各ルートのファイルの型を定義します。以下のようになるかと思います。
const METHODS = ['GET', 'POST', 'PUT', 'DELETE'] as const

type RouteFile = {
  default?: Function
} & { [M in (typeof METHODS)[number]]?: H[] }
これをジェネリクスで渡しつつ、import.meta.glob()にglob形式でパスを指定するとROUTESがパスをキーとしたexportされたオブジェクトのRecordになります。
const ROUTES = import.meta.glob<RouteFile>('/app/routes/**/[a-z0-9[-][a-z0-9[_-]*.(ts|tsx)', {
  eager: true
})
この状態で以下を実行します。
for (const [key, route] of Object.entries(ROUTES)) {
  console.log(`${key}: ${route}`)
}
するとこのように印字されます。
/app/routes/about.tsx: [object Module]
/app/routes/index.tsx: [object Module]
/app/routes/posts/[id].tsx: [object Module]
これらを以下のようにマッピングしてHonoのインスタンスに登録すればいいのです。例えば全てGETリクエストで受け取る場合はこのようになります。
// /app/routes/about.tsx
app.get('/about', (c) => c.text('about'))

// /app/routes/index.tsx
app.get('/', (c) => c.text('home'))

// /app/routes/posts/[id].tsx
app.get('/posts/:id', (c) => c.text('post permalink'))
一番簡単なフレームワーク
import.meta.glob()を活用して最初のフレームワークをつくりましょう。上記の例から、ファイルパスをWebのルーティングパスに変換すればいいことがわかります。そのためのユーティリティ関数がfilePathToPath()だとします。
また、今回はFunction Exportのパターンを扱います。おさらいすると以下のようなdefault exportの返り値を処理します。
export default function Home() {
  return <h2>Welcome!</h2>
}
ROUTESという変数はRecord<string, RouteFile>となっているのでこれをひとつひとつキーごと回してみましょう。filePathToPath()で変換したパスをapp.get()の第一引数にルートパスとして登録します。そしてハンドラの中では、route.defaultで取得した関数にContextオブジェクトを渡してc.renderすれば希望のHTMLが返せるはずです。
for (const [key, route] of Object.entries(ROUTES)) {
  const path = filePathToPath(key.replace(/^\/app\/routes/, ''))
  app.get(path, (c) => {
    if (route.default) {
      return c.render(route.default(c))
    }
    return c.notFound()
  })
}
ここまでの全てのコードは以下の通りです。たった30行でファイルベースフレームワークができてます!
type RouteFile = {
  default?: Function
}

export const createApp = () => {
  const ROUTES = import.meta.glob<RouteFile>('/app/routes/**/[a-z0-9[-][a-z0-9[_-]*.(ts|tsx)', {
    eager: true
  })

  const app = new Hono()

  for (const [key, route] of Object.entries(ROUTES)) {
    const path = filePathToPath(key.replace(/^\/app\/routes/, ''))
    app.get(path, (c) => {
      if (route.default) {
        return c.render(route.default(c))
      }
      return c.notFound()
    })
  }

  return app
}
GET/POST/PUT/DELETEに対応させる
次に2番目の書き方、GET/POST/PUT/DELETEに対応させます。メソッドを変数で定義します。as constで文字列を型にしています。
const METHODS = ['GET', 'POST', 'PUT', 'DELETE'] as const
RouteFileの型を以下のように変えます。
import type { H } from 'hono/types'

type RouteFile = {
  default?: Function
} & { [M in (typeof METHODS)[number]]?: H[] }
あとはROUTESをキーごとに回す時にroute[methodName]が見つかったらそれをapp.on()で登録していけばいいです。
for (const [key, route] of Object.entries(ROUTES)) {
  // ...
  for (const m of METHODS) {
    const handlers = route[m]
    if (handlers) {
      app.on(m, path, ...handlers)
    }
  }
}
例えば、app/routes/abc.tsxにexpor const POSTがあった場合、
app.on('POST', '/abc', handlers)
が登録されることになります。
_renderer.tsxに対応させる
これで最低限のファイルベースルーティングに対応したWebフレームワークができました。でもやることはまだまだたくさんあります。全部やりきれないので今回はこの_renderer.tsxに対応させる、までやってみましょう。
JSXはこの場合、c.render()で描画されるわけですが、通常だとc.setRenderer()でセットされるようなレイアウトがあった方がいいです。それをユーザーが特別なファイル名_renderer.tsxで書けるようにしましょう。
JSX Rendererをつかう場合は以下のようなものを用意すればいいでしょう。new.cssというCSSフレームワークを挿入しています。
import { jsxRenderer } from 'hono/jsx-renderer'

export default jsxRenderer(({ children }) => {
  return (
    <html>
      <head>
        <meta name="viewport" content="width=device-width, initial-scale=1.0" />
        <link rel="stylesheet" href="https://cdn.jsdelivr.net/npm/@exampledev/new.css/new.min.css" />
      </head>
      <body>
        <h1>Vite+Hono!</h1>
        {children}
      </body>
    </html>
  )
})
これを適応するにはまず_renderer.tsxという名前のついたファイルをさらってきます。これもimport.meta.glob()を使います。
まず型定義をします。_renderer.tsxがdefault exportするのはMiddlwareHandler型なので、以下のようになります。
type RendererFile = {
  default: MiddlewareHandler
}
これを渡して、パスをキーとしたモジュールオブジェクトを取得します。
const RENDERERS = import.meta.glob<RendererFile>('/app/routes/**/_renderer.tsx', {
  eager: true
})
これも回しちゃって、取り出したrenderer.tsxというミドルウェアをapp.get()でマウントすればOKです。
for (const [key, routes] of Object.entries(RENDERERS)) {
  const dirPath = pathTodDirPath(key)
  const path = dirPath.replace(/^\/app\/routes/, '')
  const renderer = routes.default
  app.get(`${path}*`, renderer)
}
こうすれば、app/routes/_renderer.tsxがapp.get('/*', renderer)に登録されるのです。
最終的なコード
これで、Rendererもユーザーが定義できるようになりました。いい感じです!
最終的なコードはこれです。70行未満で収まっています。
import { Hono } from 'hono'
import type { H, MiddlewareHandler } from 'hono/types'

const METHODS = ['GET', 'POST', 'PUT', 'DELETE'] as const

type RouteFile = {
  default?: Function
} & { [M in (typeof METHODS)[number]]?: H[] }

type RendererFile = {
  default: MiddlewareHandler
}

const filePathToPath = (filePath: string) => {
  filePath = filePath
    .replace(/\.tsx?$/g, '')
    .replace(/^\/?index/, '/') // `/index`
    .replace(/\/index/, '') // `/about/index`
    .replace(/\[\.{3}.+\]/, '*')
    .replace(/\[(.+)\]/, ':$1')
  return /^\//.test(filePath) ? filePath : '/' + filePath
}

const pathToDirPath = (path: string) => {
  const dirPath = path.replace(/[^\/]+$/, '')
  return dirPath
}

const RENDERERS = import.meta.glob<RendererFile>('/app/routes/**/_renderer.tsx', {
  eager: true
})

const ROUTES = import.meta.glob<RouteFile>('/app/routes/**/[a-z0-9[-][a-z0-9[_-]*.(ts|tsx)', {
  eager: true
})

export const createApp = () => {
  const app = new Hono()

  for (const [key, routes] of Object.entries(RENDERERS)) {
    const dirPath = pathToDirPath(key)
    const path = dirPath.replace(/^\/app\/routes/, '')
    const renderer = routes.default
    app.get(`${path}*`, renderer)
  }

  for (const [key, route] of Object.entries(ROUTES)) {
    const path = filePathToPath(key.replace(/^\/app\/routes/, ''))

    for (const m of METHODS) {
      const handlers = route[m]
      if (handlers) {
        app.on(m, path, ...handlers)
      }
    }

    app.get(path, (c) => {
      if (route.default) {
        return c.render(route.default(c))
      }
      return c.notFound()
    })
  }

  return app
}
やってることは単純です。Honoのインスタンスを作って、それにファイルパスをWeb用のルートパスに変換したものとそのファイルがexportしたオブジェクトをよしなに登録しているだけです。
デプロイ
最後にデプロイをしてみましょう。やろうと思えばどこでもデプロイできるのですが、今回は@hono/vite-cloudflare-pagesを使ってCloudflare Pagesにデプロイします。
Cloudflare Pagesでは_worker.jsというファイルを参照するので、それに合わせるためにも_worker.tsというエントリポイントを作ります。
import server from './app/server'

export default server
vite.config.tsを対応させましょう。
import { defineConfig } from 'vite'
import devServer from '@hono/vite-dev-server'
import pages from '@hono/vite-cloudflare-pages'

export default defineConfig({
  plugins: [
    pages({
      entry: './_worker.ts',
      outputDir: './dist'
    }),
    devServer({
      entry: 'app/server.ts'
    })
  ]
})
これで準備OKです。ビルド&デプロイをしてみます。ビルドでは、全てのファイルを一つのファイルにバンドルします。wranglerもインストールして、scriptを以下のようにします。
{
  "scripts": {
    "dev": "vite",
    "build": "vite build",
    "deploy": "vite build && wrangler pages deploy dist"
  }
}
ではいざデプロイ!
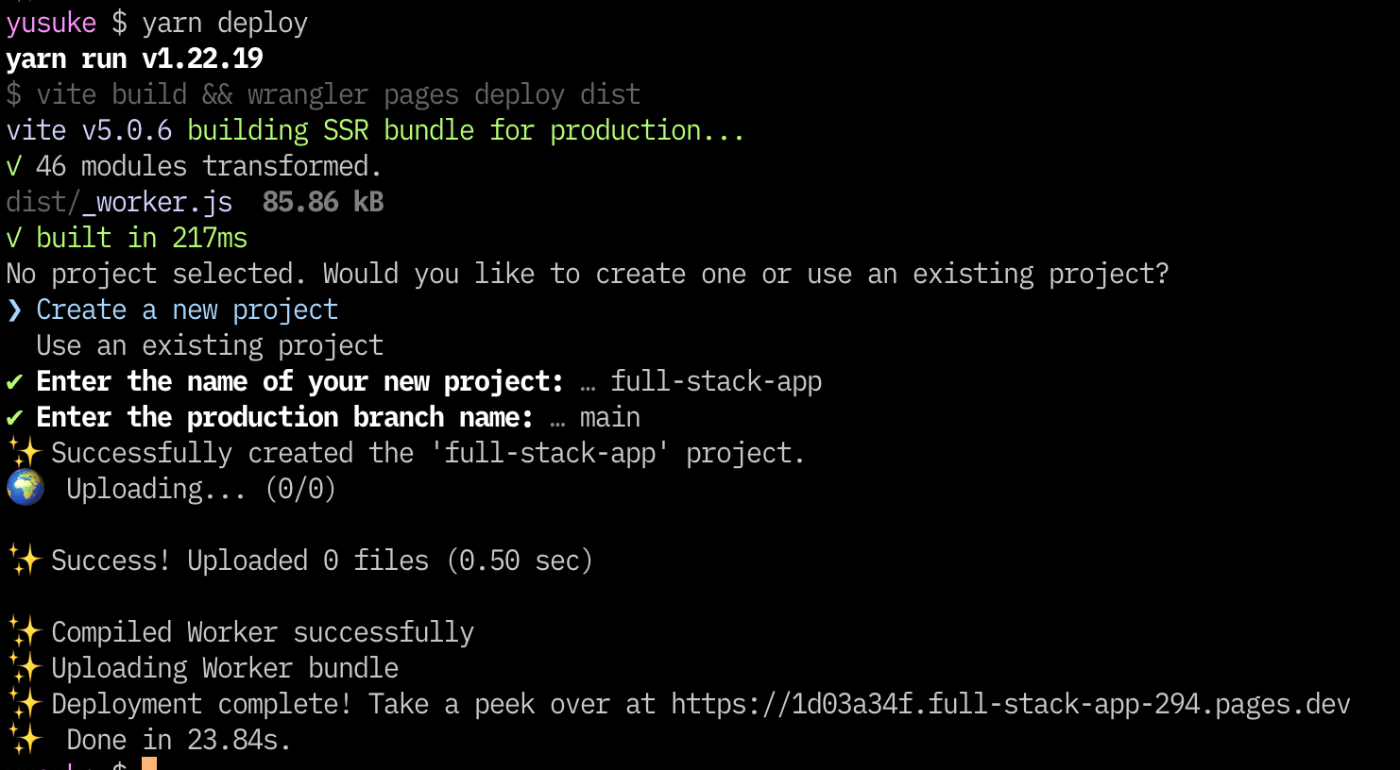
できました!いい感じです。
他にやること
他にやることはたくさんあります。
- 404ページ
- エラーページ
- ネストしたレイアウト
- Streaming対応
- 他のJSX、ReactやPreactへの対応
- その場合のクライアント対応
- 他のプラットフォームへのデプロイ
- などなど
実装していくとコードが膨らみますが、やっていることはシンプルで、ファイルパスをWebのルートパスに変えて、ファイルがexportしているオブジェクトと共にappに登録しているだけです。
まとめ
以上、ViteとHonoを使ってファイルベースルーティングに対応したWebフレームワークを作ってみました。結構簡単です。コードは以下に置きました。
実はこれを応用してSonikというフレームワークを作っています。
まだアルファステータスなので、APIが変わりますが、面白いのはUIライブラリを入れ替えることができて、ReactとPreactのプリセットがあります。そして、クライアントもIslandアーキテクチャで対応させることもできてなかなか使えます。Honoの方のアップデートに手を入れてたのですが、落ち着いてきたらこっちもいじります。
この記事はHono Advent Calenar 2023の12月8日の記事です。まだ空きがあるのでぜひ!
Discussion